Instruction Manual
Page 3
... 67 DVD Setup 67 Language Setup 68 Parental Level Setup 69 DivX Setup 70 Software Information 70 iPod Setup 71 System Setup 71 AV Interface Setup 72 User Interface 73 Entering Background 74 Background Delete 75 Background Select 76 Touch Panel Adjustment 76 Clock Setup 77 Monitor Setup 78 Security Code Setup 79 Deactivating Security Code...
... 67 DVD Setup 67 Language Setup 68 Parental Level Setup 69 DivX Setup 70 Software Information 70 iPod Setup 71 System Setup 71 AV Interface Setup 72 User Interface 73 Entering Background 74 Background Delete 75 Background Select 76 Touch Panel Adjustment 76 Clock Setup 77 Monitor Setup 78 Security Code Setup 79 Deactivating Security Code...
Instruction Manual
Page 7
...unit is stained, wipe it with an optional accessory iPod connection cable (KCA-iP300V), you purchase optional accessories, check with your Kenwood dealer to make sure that they work where the service is not supported by any broadcasting station. • The illustrations of the...conforming to ISO 8859-1 character set supported by this unit is ISO088591. Notes • If you experience problems during installation, consult your Kenwood dealer. • When you can be displayed correctly appear as thinner or alcohol may scratch the surface or erases characters. Characters that ...
...unit is stained, wipe it with an optional accessory iPod connection cable (KCA-iP300V), you purchase optional accessories, check with your Kenwood dealer to make sure that they work where the service is not supported by any broadcasting station. • The illustrations of the...conforming to ISO 8859-1 character set supported by this unit is ISO088591. Notes • If you experience problems during installation, consult your Kenwood dealer. • When you can be displayed correctly appear as thinner or alcohol may scratch the surface or erases characters. Characters that ...
Instruction Manual
Page 79
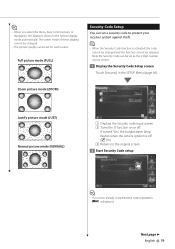
...Next page 3 English 79 The screen mode of your receiver system against theft. ⁄ • When the Security Code function is activated, the code cannot be changed . • The picture qua¡lity can set for each source. Note the Security Code can be set as the 4 digit number of these ...displays cannot be set a security code to the original screen. 2 Start Security Code setup ⁄ • If you select the Menu, Easy Control screen, or Navigation, the display is shown in the SETUP ...
...Next page 3 English 79 The screen mode of your receiver system against theft. ⁄ • When the Security Code function is activated, the code cannot be changed . • The picture qua¡lity can set for each source. Note the Security Code can be set as the 4 digit number of these ...displays cannot be set a security code to the original screen. 2 Start Security Code setup ⁄ • If you select the Menu, Easy Control screen, or Navigation, the display is shown in the SETUP ...

Instruction Manual
Page 80
...in Step 3 for the first code entry). 6 Register the security code again Now, you enter a different security code, the screen returns to enter the registered security code. 80 DNX7100 Now, your Receiver. If you ...press the Reset button or if you disconnect your receiver from battery... 1 Enter the correct security code Input four-digit number. 4 Register your security code You must enter the same security code as that you have entered in Step 3. 2 Enter the security code 5 Reenter the security code Reenter the same security code...
...in Step 3 for the first code entry). 6 Register the security code again Now, you enter a different security code, the screen returns to enter the registered security code. 80 DNX7100 Now, your Receiver. If you ...press the Reset button or if you disconnect your receiver from battery... 1 Enter the correct security code Input four-digit number. 4 Register your security code You must enter the same security code as that you have entered in Step 3. 2 Enter the security code 5 Reenter the security code Reenter the same security code...

Instruction Manual
Page 81
... screen Touch [Touch] in the Set Up Menu (page 66). 2 Start to cancel a registration of the Security Code SAT ESN Watch Setup You can display the SAT ID. (with the optional accessory Satellite Radio connected only) 1 Display ESN Watch SETUP screen Touch [SAT ...ESN Watch] in the SETUP Menu (page 66). 2 Verify ESN 1 3 Enter a security Code 2 1 Displays the Electronic Serial Number. 2 Returns to the original screen. Input by four-digit number. 4 Register your...
... screen Touch [Touch] in the Set Up Menu (page 66). 2 Start to cancel a registration of the Security Code SAT ESN Watch Setup You can display the SAT ID. (with the optional accessory Satellite Radio connected only) 1 Display ESN Watch SETUP screen Touch [SAT ...ESN Watch] in the SETUP Menu (page 66). 2 Verify ESN 1 3 Enter a security Code 2 1 Displays the Electronic Serial Number. 2 Returns to the original screen. Input by four-digit number. 4 Register your...


