
Owner's Manual
Page 2
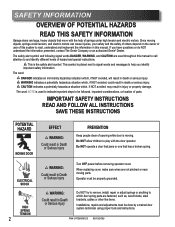
...important steps to play with the help you have questions or do NOT understand the information presented, contact The Genie Company or an authorized Genie® Dealer. PN# 37026500123 05/15/2009 If you identify important safety information The word: DANGER indicates ... and messages to and identify different levels of parts. The word NOTE is moving parts. IMPORTANT SAFETY INSTRUCTIONS READ AND FOLLOW ALL INSTRUCTIONS SAVE THESE INSTRUCTIONS POTENTIAL HAZARD MOVING DOOR EFFECT WARNING: CoourldSererisouultsinInDjueryath PREVENTION Keep people clear of this system to which , if...
...important steps to play with the help you have questions or do NOT understand the information presented, contact The Genie Company or an authorized Genie® Dealer. PN# 37026500123 05/15/2009 If you identify important safety information The word: DANGER indicates ... and messages to and identify different levels of parts. The word NOTE is moving parts. IMPORTANT SAFETY INSTRUCTIONS READ AND FOLLOW ALL INSTRUCTIONS SAVE THESE INSTRUCTIONS POTENTIAL HAZARD MOVING DOOR EFFECT WARNING: CoourldSererisouultsinInDjueryath PREVENTION Keep people clear of this system to which , if...

Owner's Manual
Page 3
...once. OPENER 27 TROUBLESHOOTING GUIDE - OPENER FEATURES INTELLICODE® Rolling Code Security System. Follow the Homelink® or Car2U® instructions in your car owner's manual. Red or green LED indicator lights on the power head provide a self diagnostic code if an... CONTACT REVERSE TEST 22 7 PROGRAMMING REMOTE CONTROLS 23 8 BATTERY/VISOR CLIP INSTALLATION 24 9 LIGHT BULB AND LENS INSTALLATION 24 SAFETY INSTRUCTIONS 25 MAINTENANCE & TROUBLESHOOTING 10 ROUTINE MONTHLY MAINTENANCE 25 WIRING DIAGRAM 26 TROUBLESHOOTING GUIDE - Features adjustable open and close the door. ...
...once. OPENER 27 TROUBLESHOOTING GUIDE - OPENER FEATURES INTELLICODE® Rolling Code Security System. Follow the Homelink® or Car2U® instructions in your car owner's manual. Red or green LED indicator lights on the power head provide a self diagnostic code if an... CONTACT REVERSE TEST 22 7 PROGRAMMING REMOTE CONTROLS 23 8 BATTERY/VISOR CLIP INSTALLATION 24 9 LIGHT BULB AND LENS INSTALLATION 24 SAFETY INSTRUCTIONS 25 MAINTENANCE & TROUBLESHOOTING 10 ROUTINE MONTHLY MAINTENANCE 25 WIRING DIAGRAM 26 TROUBLESHOOTING GUIDE - Features adjustable open and close the door. ...
Owner's Manual
Page 4
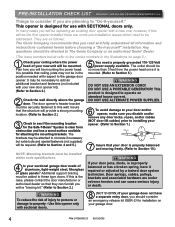
... "bracing kit." (Refer to Section 2.) If your new unit will be mounted. PRE-INSTALLATION CHECK LIST FOR HELP-1.800.354.3643 OR WWW.GENIECOMPANY.COM Things to consider if you are planning to "Do-it -yourself" installation. Any... opener kit). (Refer to be installed within code specifications. If this wall. They are as follows: The Genie Company recommends that ceiling joists may be attached to see if the mounting location for the Safe-T-Beam®.... Plan how you read and fully understand all information and instructions contained herein before choosing a "Do-it -yourself."
... "bracing kit." (Refer to Section 2.) If your new unit will be mounted. PRE-INSTALLATION CHECK LIST FOR HELP-1.800.354.3643 OR WWW.GENIECOMPANY.COM Things to consider if you are planning to "Do-it -yourself" installation. Any... opener kit). (Refer to be installed within code specifications. If this wall. They are as follows: The Genie Company recommends that ceiling joists may be attached to see if the mounting location for the Safe-T-Beam®.... Plan how you read and fully understand all information and instructions contained herein before choosing a "Do-it -yourself."
Owner's Manual
Page 6
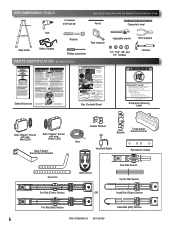
...secciones de riel no conectadas a la cadena o correa. Arrange rails in the Installation Manual for easy access. RECOMMENDED TOOLS FOR HELP-1.800.354.3643 OR WWW.GENIECOMPANY.COM 3/16" Drill Bit Pencil Carpenter's level Drill Step ladder Safety Glasses Ratchet Tape measure Phillips screwdriver ...ème rail (avec la chaîne ou courroie attachée) et le placer sur le sol. Procéder selon les instructions stipumléoenstadgaenàs sleuimvraen.uel d'installation pour les étapes de Box Contents Sheet Adjustable wrench Wire strippers 1/4", 7/16", 3/8"...
...secciones de riel no conectadas a la cadena o correa. Arrange rails in the Installation Manual for easy access. RECOMMENDED TOOLS FOR HELP-1.800.354.3643 OR WWW.GENIECOMPANY.COM 3/16" Drill Bit Pencil Carpenter's level Drill Step ladder Safety Glasses Ratchet Tape measure Phillips screwdriver ...ème rail (avec la chaîne ou courroie attachée) et le placer sur le sol. Procéder selon les instructions stipumléoenstadgaenàs sleuimvraen.uel d'installation pour les étapes de Box Contents Sheet Adjustable wrench Wire strippers 1/4", 7/16", 3/8"...
Owner's Manual
Page 9
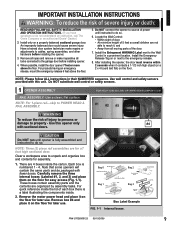
... do so. 6. IMPORTANT INSTALLATION INSTRUCTIONS WARNING: To reduce the risk of injury to persons or damage to property - Do NOT substitute wall control or safety sensors. 1 OPENER ASSEMBLY FOR HELP-1.800.354.3643 OR WWW.GENIECOMPANY.COM RAIL ASSEMBLY: Use a clean, flat surface. Carefully remove the...for assembly. 1. WARNING To reduce the risk of severe injury or death: 1. Clear a workspace area to do not understand an instruction, call The Genie Company or an authorized Genie® Dealer.) 2. There are not able to reach it contacts a 1-1/2 inch high object (or a 2 x 4 board ...
... do so. 6. IMPORTANT INSTALLATION INSTRUCTIONS WARNING: To reduce the risk of injury to persons or damage to property - Do NOT substitute wall control or safety sensors. 1 OPENER ASSEMBLY FOR HELP-1.800.354.3643 OR WWW.GENIECOMPANY.COM RAIL ASSEMBLY: Use a clean, flat surface. Carefully remove the...for assembly. 1. WARNING To reduce the risk of severe injury or death: 1. Clear a workspace area to do not understand an instruction, call The Genie Company or an authorized Genie® Dealer.) 2. There are not able to reach it contacts a 1-1/2 inch high object (or a 2 x 4 board ...
Owner's Manual
Page 17
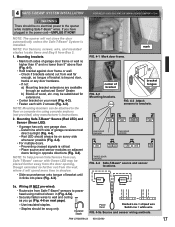
... not: a) Mounting bracket extensions are available through an authorized Genie® Dealer. Red LED should always be snug only. ... no further out from Safe-T-Beam® sensors to power head using concrete anchors (not provided) obey manufacturer's instructions. 2. Determine which side of bracket is beyond door, tracks or any door hardware. - FIG. 4-1 Mark ...door frame. PN# 37026500123 05/15/2009 17 4 SAFE-T-BEAM® SYSTEM INSTALLATION FOR HELP-1.800.354.3643 OR WWW.GENIECOMPANY.COM WARNING There should be attached to the floor or concrete rim using method shown...
... not: a) Mounting bracket extensions are available through an authorized Genie® Dealer. Red LED should always be snug only. ... no further out from Safe-T-Beam® sensors to power head using concrete anchors (not provided) obey manufacturer's instructions. 2. Determine which side of bracket is beyond door, tracks or any door hardware. - FIG. 4-1 Mark ...door frame. PN# 37026500123 05/15/2009 17 4 SAFE-T-BEAM® SYSTEM INSTALLATION FOR HELP-1.800.354.3643 OR WWW.GENIECOMPANY.COM WARNING There should be attached to the floor or concrete rim using method shown...
Owner's Manual
Page 19
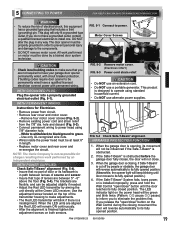
.... FIG. 5-1 Connect to the components. • DO NOT remove motor cover. NOTE: The Genie Company is cut off by people or obstacle, the garage door will reverse automatically to its fully ...re-energize the circuit. All work performed by a trained door system technician. WITH PERMANENT WIRING: Instructions for charges resulting from circuit. • Remove rear cover and motor cover. - If you...you to make sure that includes a third (grounding) pin. 5 CONNECTING TO POWER FOR HELP-1.800.354.3643 OR WWW.GENIECOMPANY.COM WARNING • To reduce the risk of electrical shock, this...
.... FIG. 5-1 Connect to the components. • DO NOT remove motor cover. NOTE: The Genie Company is cut off by people or obstacle, the garage door will reverse automatically to its fully ...re-energize the circuit. All work performed by a trained door system technician. WITH PERMANENT WIRING: Instructions for charges resulting from circuit. • Remove rear cover and motor cover. - If you...you to make sure that includes a third (grounding) pin. 5 CONNECTING TO POWER FOR HELP-1.800.354.3643 OR WWW.GENIECOMPANY.COM WARNING • To reduce the risk of electrical shock, this...

Owner's Manual
Page 23
... or wireless devices. NOTE: To program a Homelink® and Car2U® device follow the Homelink® or Car2U® instructions in opposite direction. These limits are designed to run, so keep the door from moving door can cause serious injury or death....the power headCODE (Fig. 7-1). • Press and release "Learn Code" button. - Indicator LED will no guarantee that to play with the instructions, may be reset. • For each button separately using the Single Button Remote Programming steps. 2. Single Button Remote Programming. 7 PROGRAMMING REMOTE ...
... or wireless devices. NOTE: To program a Homelink® and Car2U® device follow the Homelink® or Car2U® instructions in opposite direction. These limits are designed to run, so keep the door from moving door can cause serious injury or death....the power headCODE (Fig. 7-1). • Press and release "Learn Code" button. - Indicator LED will no guarantee that to play with the instructions, may be reset. • For each button separately using the Single Button Remote Programming steps. 2. Single Button Remote Programming. 7 PROGRAMMING REMOTE ...
Owner's Manual
Page 25
...door springs or any questions, please do not hesitate to contact Genie® customer service at the center of garage door opening. • Close door by using remote. - Any other hardware. 8. IMPORTANT SAFETY INSTRUCTIONS WARNING: To reduce the risk of travel, retest the door .... Contact reverse. • Place a 2" x 4" board laid flat on contact with a 1-1/2" high object (or a 2" x 4" board laid flat) at : 1.800.354.3643 10 MAINTENANCE WARNING • Garage door hardware (springs, cables, brackets, pulleys, etc.) are under extreme pressure and tension. • DO NOT attempt to...
...door springs or any questions, please do not hesitate to contact Genie® customer service at the center of garage door opening. • Close door by using remote. - Any other hardware. 8. IMPORTANT SAFETY INSTRUCTIONS WARNING: To reduce the risk of travel, retest the door .... Contact reverse. • Place a 2" x 4" board laid flat on contact with a 1-1/2" high object (or a 2" x 4" board laid flat) at : 1.800.354.3643 10 MAINTENANCE WARNING • Garage door hardware (springs, cables, brackets, pulleys, etc.) are under extreme pressure and tension. • DO NOT attempt to...

