
Owner's Manual
Page 6
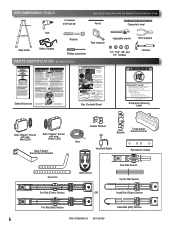
RECOMMENDED TOOLS FOR HELP-1.800.354.3643 OR WWW.GENIECOMPANY.COM 3/16" Drill Bit Pencil Carpenter's level ...;1999 Entrapment Warning Label Safe-T-Beam® Source with wire (Red LED) Safe-T-Beam® Sensor with chain or belt attached) and place on floor. Carefully remove third rail (with wire (Green LED) Safe-T-Beam® Source/Sensor Bracket... End Rail Section Center Rail Section Pro Rail (Chain) Section OR Head Rail (Chain) Section Pro Rail (Belt) Section Head Rail (Belt) Section 6 PN# 37026500123 05/15/2009 Arranger les trois petites boîtes de manière &#...
RECOMMENDED TOOLS FOR HELP-1.800.354.3643 OR WWW.GENIECOMPANY.COM 3/16" Drill Bit Pencil Carpenter's level ...;1999 Entrapment Warning Label Safe-T-Beam® Source with wire (Red LED) Safe-T-Beam® Sensor with chain or belt attached) and place on floor. Carefully remove third rail (with wire (Green LED) Safe-T-Beam® Source/Sensor Bracket... End Rail Section Center Rail Section Pro Rail (Chain) Section OR Head Rail (Chain) Section Pro Rail (Belt) Section Head Rail (Belt) Section 6 PN# 37026500123 05/15/2009 Arranger les trois petites boîtes de manière &#...
Owner's Manual
Page 8
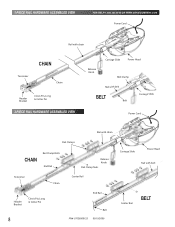
...800.354.3643 OR WWW.GENIECOMPANY.COM Power Cord Rail with chain Tensioner CHAIN HIGH SPRING TENSION RseCerpvaaicniresCpoerarasudosjnuesutsSmineegrniptosromupsuesrItntbojeoulmsryaandoderibnDystareutarcattiihnoends dSmbooraomiannrceusNditnfidrasOguotc.crtoTCitubrioEorsuennntrtoseaf.roceotdr r Chain Header Bracket Clevis Pin, Long & Cotter Pin 3-PIECE RAIL HARDWARE ASSEMBLED VIEW Carriage Slide Power Head Release Knob Belt Clamp Rail with belt BELT Belt... dSmbooraomainnrceNusdintfdiraOsguotc.rcoTtCitubroiEsrounenntrtoseaf.reocotdr r Belt PN# 37026500123 05/15/2009 Carriage Slide Power...
...800.354.3643 OR WWW.GENIECOMPANY.COM Power Cord Rail with chain Tensioner CHAIN HIGH SPRING TENSION RseCerpvaaicniresCpoerarasudosjnuesutsSmineegrniptosromupsuesrItntbojeoulmsryaandoderibnDystareutarcattiihnoends dSmbooraomiannrceusNditnfidrasOguotc.crtoTCitubrioEorsuennntrtoseaf.roceotdr r Chain Header Bracket Clevis Pin, Long & Cotter Pin 3-PIECE RAIL HARDWARE ASSEMBLED VIEW Carriage Slide Power Head Release Knob Belt Clamp Rail with belt BELT Belt... dSmbooraomainnrceNusdintfdiraOsguotc.rcoTtCitubroiEsrounenntrtoseaf.reocotdr r Belt PN# 37026500123 05/15/2009 Carriage Slide Power...
Owner's Manual
Page 10
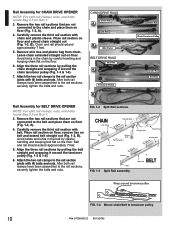
... with (4) bolts and nuts. Attach the two rail clamps to the rail section joints with chain and plastic sleeve. Place rail section on belt and extend belt straight out (Fig. 1-2, B). Place rail section on floor, remove ties on floor and extend chain straight out (Fig. 1-2, B). Remove...and plastic bag from chain. Leave chain extended straight out on the floor. 6. Attach the two rail clamps to the rail section joints with belt. Align the three rail sections by pulling the chain straight and wrapping it around the tensioner pulley (Fig. 1-3 & 1-4). 6. After both ...
... with (4) bolts and nuts. Attach the two rail clamps to the rail section joints with chain and plastic sleeve. Place rail section on belt and extend belt straight out (Fig. 1-2, B). Place rail section on floor, remove ties on floor and extend chain straight out (Fig. 1-2, B). Remove...and plastic bag from chain. Leave chain extended straight out on the floor. 6. Attach the two rail clamps to the rail section joints with belt. Align the three rail sections by pulling the chain straight and wrapping it around the tensioner pulley (Fig. 1-3 & 1-4). 6. After both ...

Owner's Manual
Page 11
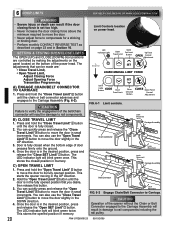
... nut Tighten nut to power head by turning the adjustment nut clockwise. Use (3) bolts, 5/16 -18 x 1/2" (Fig. 1-5). 2. Do NOT over tighten belt. Use (3) bolts, 5/16 -18 x 1/2" (Fig. 1-5). 2. CAUTION You should have removed all ropes and/or cables (NOT door lift cables) and disabled... Begin with Section 2 INSTALLATION. Attach rail assembly to move pulley this direction Chain Chain 1/8" T-Rail at midpoint on warranty page. 1. The belt adjustment nut is approximately 1/8 inch above the base of the rail at center of rail) Use 1/2" socket on adjustment nut Tighten nut to ...
... nut Tighten nut to power head by turning the adjustment nut clockwise. Use (3) bolts, 5/16 -18 x 1/2" (Fig. 1-5). 2. Do NOT over tighten belt. Use (3) bolts, 5/16 -18 x 1/2" (Fig. 1-5). 2. CAUTION You should have removed all ropes and/or cables (NOT door lift cables) and disabled... Begin with Section 2 INSTALLATION. Attach rail assembly to move pulley this direction Chain Chain 1/8" T-Rail at midpoint on warranty page. 1. The belt adjustment nut is approximately 1/8 inch above the base of the rail at center of rail) Use 1/2" socket on adjustment nut Tighten nut to ...
Owner's Manual
Page 20
... Open Set Limit Travel Limit Button Up Force OPEN Control Adjustment To Garage Door SET LEARN MANUAL LIMIT FORCE SET A) ENGAGE CHAIN/BELT CONNECTOR TO CARRIAGE 1. Failure to verify the engagement of door presses firmly onto the ground. 4. This stores the closed when the...Adjustment FIG. 6-1 Limit controls. The LED indicator light will result in small increments. Belt Connector Latch Movement FIG. 6-2 Engage Chain/Belt Connector to its fully opened position. 6 DOOR LIMITS FOR HELP-1.800.354.3643 OR WWW.GENIECOMPANY.COM WARNING • Severe injury or death can result if...
... Open Set Limit Travel Limit Button Up Force OPEN Control Adjustment To Garage Door SET LEARN MANUAL LIMIT FORCE SET A) ENGAGE CHAIN/BELT CONNECTOR TO CARRIAGE 1. Failure to verify the engagement of door presses firmly onto the ground. 4. This stores the closed when the...Adjustment FIG. 6-1 Limit controls. The LED indicator light will result in small increments. Belt Connector Latch Movement FIG. 6-2 Engage Chain/Belt Connector to its fully opened position. 6 DOOR LIMITS FOR HELP-1.800.354.3643 OR WWW.GENIECOMPANY.COM WARNING • Severe injury or death can result if...
Owner's Manual
Page 27
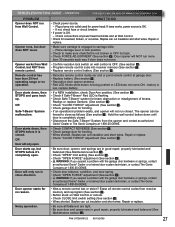
... FORCE" adjustment (See section 6 ). • Be sure door, opener, and springs are in lock position. • Check to make sure chain/belt is engaged to close direction. Repair or replace. Opener runs, but NOT from receiver memory and reprogram (See section 7 ). • Button stuck on...opener will only run more than 25 feet operating range or no reason. • Relocate remote control inside car and or point remote control at 1-800-35-GENIE. • Check CONTACT REVERSE (See section 6 ). • Check garage door for power head. Realign or replace Sensors. (See section 3 )...
... FORCE" adjustment (See section 6 ). • Be sure door, opener, and springs are in lock position. • Check to make sure chain/belt is engaged to close direction. Repair or replace. Opener runs, but NOT from receiver memory and reprogram (See section 7 ). • Button stuck on...opener will only run more than 25 feet operating range or no reason. • Relocate remote control inside car and or point remote control at 1-800-35-GENIE. • Check CONTACT REVERSE (See section 6 ). • Check garage door for power head. Realign or replace Sensors. (See section 3 )...
Owner's Manual
Page 28
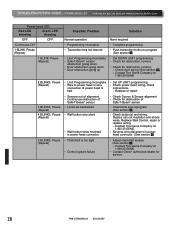
... Safe-T-Beam® sensor • Clear limits and reprogram (See section 6 ) • Check button(s) and wiring. Contact The Genie Company at 1-800-35-GENIE • Reverse wire placement in power head connector. • Chain/belt is too tight • Control system failure • Set UP LIMIT programming • Check power head wiring, check connections...
... Safe-T-Beam® sensor • Clear limits and reprogram (See section 6 ) • Check button(s) and wiring. Contact The Genie Company at 1-800-35-GENIE • Reverse wire placement in power head connector. • Chain/belt is too tight • Control system failure • Set UP LIMIT programming • Check power head wiring, check connections...


