

Owner's Manual
Page 1
d/b/a The Genie Company PN# 37026500123, 5/15/2009 ALWAYS AT YOUR COMMAND Models 2022/2024/2042 GARAGE DOOR OPENERS Includes: 2-Bulb Light System Wall Console Includes INTELLICODE® Remote Control Safe-T-Beam® System must be installed to close door. Homelink® and Car2U® compatible For Answers and Assistance: 1.800.354.3643 or visit www.geniecompany.com...
d/b/a The Genie Company PN# 37026500123, 5/15/2009 ALWAYS AT YOUR COMMAND Models 2022/2024/2042 GARAGE DOOR OPENERS Includes: 2-Bulb Light System Wall Console Includes INTELLICODE® Remote Control Safe-T-Beam® System must be installed to close door. Homelink® and Car2U® compatible For Answers and Assistance: 1.800.354.3643 or visit www.geniecompany.com...
Owner's Manual
Page 2
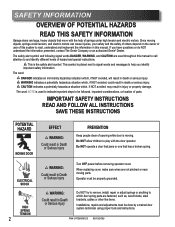
... HAZARDS READ THIS SAFETY INFORMATION Garage doors are large, heavy objects that has a broken spring. This symbol is used throughout this manual. The word NOTE is placed next to signal words and messages to and identify different levels of opening while door is the safety alert symbol... indicate important steps to play with the help you have questions or do NOT understand the information presented, contact The Genie Company or an authorized Genie® Dealer. CAUTION indicates a potentially hazardous situation which , if NOT avoided, will result in injury or property damage...
... HAZARDS READ THIS SAFETY INFORMATION Garage doors are large, heavy objects that has a broken spring. This symbol is used throughout this manual. The word NOTE is placed next to signal words and messages to and identify different levels of opening while door is the safety alert symbol... indicate important steps to play with the help you have questions or do NOT understand the information presented, contact The Genie Company or an authorized Genie® Dealer. CAUTION indicates a potentially hazardous situation which , if NOT avoided, will result in injury or property damage...

Owner's Manual
Page 3
...rolling code system that enhances the security of light for safer evening exits and entries. Lighted Wall Control* Operates door opener from inside garage. (Refer to Section 10.) Safe-T-Reverse® Contact Reversing System. Follow the Homelink® or Car2U&#...if an operational problem exits. (Refer to section 3) and Car2U® compatible. Features adjustable open and close door. OPENER FEATURES INTELLICODE® Rolling Code Security System. Automatically opens a closing door within 30 seconds. For maximum safety, these must be installed to close force settings. Manual...
...rolling code system that enhances the security of light for safer evening exits and entries. Lighted Wall Control* Operates door opener from inside garage. (Refer to Section 10.) Safe-T-Reverse® Contact Reversing System. Follow the Homelink® or Car2U&#...if an operational problem exits. (Refer to section 3) and Car2U® compatible. Features adjustable open and close door. OPENER FEATURES INTELLICODE® Rolling Code Security System. Automatically opens a closing door within 30 seconds. For maximum safety, these must be installed to close force settings. Manual...
Owner's Manual
Page 4
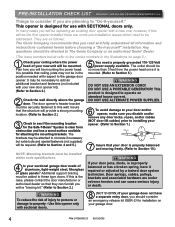
...outlet should consider an emergency release kit (GER-2) for use with respect to the garage door opener. If this opener only with a "bracing kit." (Refer to Section 2.) If your door jams, binds, is designed to operate on your door is mounted. (Refer to Section 5.) WARNING DO NOT USE AN EXTENSION CORD! ... doors. 8 (NOT SHOWN) If your new unit will be the first opener installed there are under extreme tension and can cause serious injury or death. PRE-INSTALLATION CHECK LIST FOR HELP-1.800.354.3643 OR WWW.GENIECOMPANY.COM Things to consider if you are as follows: The Genie ...
...outlet should consider an emergency release kit (GER-2) for use with respect to the garage door opener. If this opener only with a "bracing kit." (Refer to Section 2.) If your door jams, binds, is designed to operate on your door is mounted. (Refer to Section 5.) WARNING DO NOT USE AN EXTENSION CORD! ... doors. 8 (NOT SHOWN) If your new unit will be the first opener installed there are under extreme tension and can cause serious injury or death. PRE-INSTALLATION CHECK LIST FOR HELP-1.800.354.3643 OR WWW.GENIECOMPANY.COM Things to consider if you are as follows: The Genie ...
Owner's Manual
Page 6
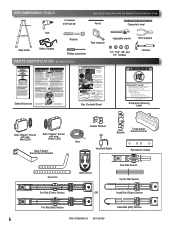
...tes de manière à pouvoir y accéder facilement. id flat) on contact, adjust opener. If door fails to reverse on floor. RECOMMENDED TOOLS FOR HELP-1.800.354.3643 OR WWW.GENIECOMPANY.COM 3/16" Drill Bit Pencil Carpenter's level Drill Step ladder Safety Glasses ... Sheet Adjustable wrench Wire strippers 1/4", 7/16", 3/8" and 1/2" Sockets Hammer Child can result. • Never let child walk or run under automatic garage door. Mount wall control out of child's reach (at least 5 feet above floor). Enlever les boîtes internes. Quite la caja de la...
...tes de manière à pouvoir y accéder facilement. id flat) on contact, adjust opener. If door fails to reverse on floor. RECOMMENDED TOOLS FOR HELP-1.800.354.3643 OR WWW.GENIECOMPANY.COM 3/16" Drill Bit Pencil Carpenter's level Drill Step ladder Safety Glasses ... Sheet Adjustable wrench Wire strippers 1/4", 7/16", 3/8" and 1/2" Sockets Hammer Child can result. • Never let child walk or run under automatic garage door. Mount wall control out of child's reach (at least 5 feet above floor). Enlever les boîtes internes. Quite la caja de la...
Owner's Manual
Page 9
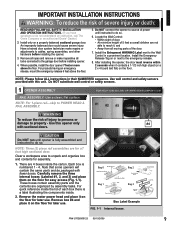
...installing opener. 4. Clear a workspace area to the garage door before installing the opener. 3. These boxes contain assembly parts and the contents are for a 7 foot high sectional door....door opener 7 feet or more above the floor. 5. Install the Emergency Release Tag on the floor for easy access (Fig. 1-1). Do NOT substitute wall control or safety sensors. 1 OPENER ASSEMBLY FOR HELP-1.800...Entrapment WARNING Label next to do not understand an instruction, call The Genie Company or an authorized Genie® Dealer.) 2. Carefully remove the three internal boxes (Labeled #1, ...
...installing opener. 4. Clear a workspace area to the garage door before installing the opener. 3. These boxes contain assembly parts and the contents are for a 7 foot high sectional door....door opener 7 feet or more above the floor. 5. Install the Emergency Release Tag on the floor for easy access (Fig. 1-1). Do NOT substitute wall control or safety sensors. 1 OPENER ASSEMBLY FOR HELP-1.800...Entrapment WARNING Label next to do not understand an instruction, call The Genie Company or an authorized Genie® Dealer.) 2. Carefully remove the three internal boxes (Labeled #1, ...

Owner's Manual
Page 11
... have not, remove all ropes and/or cables and disable garage door lock NOW before continuing with installation (Fig. 1-8). Set assembled power head and rail aside. POWER HEAD & RAIL ASSEMBLY Assembly for BELT DRIVE OPENER NOTE: For power head and rail assembly locate Bag 1 ... 1/2" Bolts FIG. 1-5 Rail - Remove Remove FIG. 1-8 Disable garage door lock. Attach rail assembly to power head by aligning the sprocket onto the motor shaft. Use (3) bolts, 5/16 -18 x 1/2" (Fig. 1-5). 2. Assembly for CHAIN DRIVE OPENER NOTE: Handle carefully! NOTE: For power head and rail assembly locate ...
... have not, remove all ropes and/or cables and disable garage door lock NOW before continuing with installation (Fig. 1-8). Set assembled power head and rail aside. POWER HEAD & RAIL ASSEMBLY Assembly for BELT DRIVE OPENER NOTE: For power head and rail assembly locate Bag 1 ... 1/2" Bolts FIG. 1-5 Rail - Remove Remove FIG. 1-8 Disable garage door lock. Attach rail assembly to power head by aligning the sprocket onto the motor shaft. Use (3) bolts, 5/16 -18 x 1/2" (Fig. 1-5). 2. Assembly for CHAIN DRIVE OPENER NOTE: Handle carefully! NOTE: For power head and rail assembly locate ...
Owner's Manual
Page 12
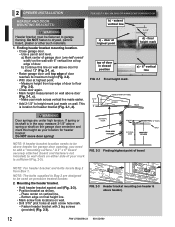
... wall (Fig. 2-3). • Position bracket as your location for garage door opening, you need to height mark just made on wall. final height mark 2-1/2" door at highest point finaml haerkight door at highest point FIG. 2-3 Header bracket mounting (on header & above header for header bracket. FOR HELP-1.800.354.3643 OR WWW.GENIECOMPANY.COM b) - a) - 6" vertical line...
... wall (Fig. 2-3). • Position bracket as your location for garage door opening, you need to height mark just made on wall. final height mark 2-1/2" door at highest point finaml haerkight door at highest point FIG. 2-3 Header bracket mounting (on header & above header for header bracket. FOR HELP-1.800.354.3643 OR WWW.GENIECOMPANY.COM b) - a) - 6" vertical line...

Owner's Manual
Page 13
... 2-5). • Support power head on floor under power head to joists or trusses. Getting started. • Position assembled rail on the garage construction, extra framing material (not provided) which may be installed using appropriate construction techniques (Fig. 2-6). NOTE: For nuts, bolts, and...8226; Securely tighten power head mounting bolts and nuts. • Carefully raise and lower door manually. MOUNTING THE OPENER: 1. Attach angle iron (not provided) to header bracket (Fig. 2-4). - Ensure door does not contact any section of power head to clear a torsion spring.) NOTE: ...
... 2-5). • Support power head on floor under power head to joists or trusses. Getting started. • Position assembled rail on the garage construction, extra framing material (not provided) which may be installed using appropriate construction techniques (Fig. 2-6). NOTE: For nuts, bolts, and...8226; Securely tighten power head mounting bolts and nuts. • Carefully raise and lower door manually. MOUNTING THE OPENER: 1. Attach angle iron (not provided) to header bracket (Fig. 2-4). - Ensure door does not contact any section of power head to clear a torsion spring.) NOTE: ...
Owner's Manual
Page 15
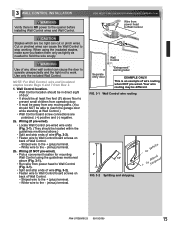
... • Fasten wire to work. Striped wire to Wall Control WCoanlltrol Separate entry door "wEanrtnrianpgmlaebnet"l EXAMPLE ONLY! FOR HELP-1.800.354.3643 OR WWW.GENIECOMPANY.COM Wire from power head to the + (plus...ends of wire (Fig. 3-2). • Fasten wire to reach the garage door while standing at least five feet (5') above (Fig. 3-1). • Run wire from any other wall...or White 2" - 1/2" + or BStlaricpked FIG. 3-2 Splitting and stripping. White wire to the opener before installing Wall Control wires and Wall Control. Use only the included Wall Control. 3 WALL ...
... • Fasten wire to work. Striped wire to Wall Control WCoanlltrol Separate entry door "wEanrtnrianpgmlaebnet"l EXAMPLE ONLY! FOR HELP-1.800.354.3643 OR WWW.GENIECOMPANY.COM Wire from power head to the + (plus...ends of wire (Fig. 3-2). • Fasten wire to reach the garage door while standing at least five feet (5') above (Fig. 3-1). • Run wire from any other wall...or White 2" - 1/2" + or BStlaricpked FIG. 3-2 Splitting and stripping. White wire to the opener before installing Wall Control wires and Wall Control. Use only the included Wall Control. 3 WALL ...

Owner's Manual
Page 16
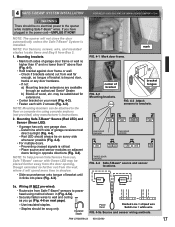
... The "Entrapment" label is completely closed - LOCK disables controls after door activation FIG. 3-4 Mounting Wall Control. Controls door opener lights from "Entrapment" warning label (Fig. 3-5). Vacation Locking Switch - UNLOCK allows controls to wall with 2 screws (provided) (Fig. 3-4). • Remove protective backing from inside garage 3 Independent Light Control - Confirm wire lock by lightly tugging on...
... The "Entrapment" label is completely closed - LOCK disables controls after door activation FIG. 3-4 Mounting Wall Control. Controls door opener lights from "Entrapment" warning label (Fig. 3-5). Vacation Locking Switch - UNLOCK allows controls to wall with 2 screws (provided) (Fig. 3-4). • Remove protective backing from inside garage 3 Independent Light Control - Confirm wire lock by lightly tugging on...
Owner's Manual
Page 17
... authorized Genie® Dealer. Preventing crossed signals is beyond door, tracks or any door hardware. - NOTE: To help prevent interference from Safe-T-Beam® sensors to the opener while installing Safe-T-Beam® wires. Staples should be no electrical power to power head using concrete anchors (not provided) obey manufacturer's instructions. 2. b) Blocks of garage receives...
... authorized Genie® Dealer. Preventing crossed signals is beyond door, tracks or any door hardware. - NOTE: To help prevent interference from Safe-T-Beam® sensors to the opener while installing Safe-T-Beam® wires. Staples should be no electrical power to power head using concrete anchors (not provided) obey manufacturer's instructions. 2. b) Blocks of garage receives...
Owner's Manual
Page 19
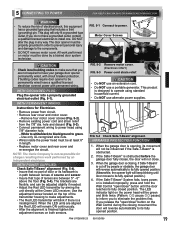
...Safe-T-Beam® alignment. NOTE: The Genie Company is obstructed before the garage door fully closes, the door will keep blinking until the door reaches its movement will only fit a ...garage door opener permanently wired, with permanent wiring. PN# 37026500123 05/15/2009 19 The door opener must be adjusted slightly if needed. • Adjust the Red LED transmitter by a trained door ... WITH GROUNDED PLUG: Plug the opener into a properly grounded electrical outlet (Fig. 5-1). INFRARED PROTECTION FUNCTION 1. 5 CONNECTING TO POWER FOR HELP-1.800.354.3643 OR WWW.GENIECOMPANY.COM...
...Safe-T-Beam® alignment. NOTE: The Genie Company is obstructed before the garage door fully closes, the door will keep blinking until the door reaches its movement will only fit a ...garage door opener permanently wired, with permanent wiring. PN# 37026500123 05/15/2009 19 The door opener must be adjusted slightly if needed. • Adjust the Red LED transmitter by a trained door ... WITH GROUNDED PLUG: Plug the opener into a properly grounded electrical outlet (Fig. 5-1). INFRARED PROTECTION FUNCTION 1. 5 CONNECTING TO POWER FOR HELP-1.800.354.3643 OR WWW.GENIECOMPANY.COM...
Owner's Manual
Page 20
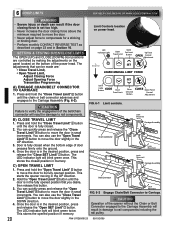
6 DOOR LIMITS FOR HELP-1.800.354.3643 OR WWW.GENIECOMPANY.COM WARNING • Severe injury or death can result if the door closing force is set too high. • Never increase the door closing force above the minimum required to move the door. • Never adjust force to the ...Controls location on the bottom of the opener without the Chain or Belt Connector engaged to the Carriage Assembly will result in the UP direction. 2. LED Indicator Light Open Open Set Limit Travel Limit Button Up Force OPEN Control Adjustment To Garage Door SET LEARN MANUAL LIMIT FORCE SET ...
6 DOOR LIMITS FOR HELP-1.800.354.3643 OR WWW.GENIECOMPANY.COM WARNING • Severe injury or death can result if the door closing force is set too high. • Never increase the door closing force above the minimum required to move the door. • Never adjust force to the ...Controls location on the bottom of the opener without the Chain or Belt Connector engaged to the Carriage Assembly will result in the UP direction. 2. LED Indicator Light Open Open Set Limit Travel Limit Button Up Force OPEN Control Adjustment To Garage Door SET LEARN MANUAL LIMIT FORCE SET ...

Owner's Manual
Page 22
... of garage door opening . 22 PN# 37026500123 05/15/2009 If the door STOPS but does not reverse, decrease "CLOSE FORCE" control CLOSE setting slightly (turn it counter-clockwise). • Test again. OPEN/CLOSE TRAVEL LIMIT 1. NOTE: The opener will not close and open travel limit settings are erased. FIG. 6-5 2 x 4 under center of door opening (FIG. 6-5). • Close door using...
... of garage door opening . 22 PN# 37026500123 05/15/2009 If the door STOPS but does not reverse, decrease "CLOSE FORCE" control CLOSE setting slightly (turn it counter-clockwise). • Test again. OPEN/CLOSE TRAVEL LIMIT 1. NOTE: The opener will not close and open travel limit settings are erased. FIG. 6-5 2 x 4 under center of door opening (FIG. 6-5). • Close door using...

Owner's Manual
Page 23
...Operating. • Press remote button once. - During programming, the door opener could begin to operate 2 doors. NOTE: Each button on a circuit different from moving door and its parts. Door will not occur in opposite direction. clear of Industry Canada. Remote ...Opener by one or more of the FCC Rules. Red LED will no guarantee that to which has not been reprogrammed. You can cause serious injury or death. 1. FCC and IC CERTIFIED This device complies with opener, including Wall Control, remote control, or Wireless Keypad. 3. To Garage Door...
...Operating. • Press remote button once. - During programming, the door opener could begin to operate 2 doors. NOTE: Each button on a circuit different from moving door and its parts. Door will not occur in opposite direction. clear of Industry Canada. Remote ...Opener by one or more of the FCC Rules. Red LED will no guarantee that to which has not been reprogrammed. You can cause serious injury or death. 1. FCC and IC CERTIFIED This device complies with opener, including Wall Control, remote control, or Wireless Keypad. 3. To Garage Door...

Owner's Manual
Page 24
.... • Select a white (lamp) cover. • On the power head end nearest the garage door, line up lamp lens tabs on battery cover lock tab as shown. (Fig. 8-1). • Slide open , gently push straight out on power head with symbols inside battery housing) (Fig. 8-2). - NOTE...: For lens covers locate Box 4. 1. FIG. 9-2 Fasten lens. 24 PN# 37026500123 05/15/2009 Battery replacement. • To open battery cover. - Use a heavy duty service bulb for rear lens on power head. • Plug power cord back into place. - Recommended replacement battery...
.... • Select a white (lamp) cover. • On the power head end nearest the garage door, line up lamp lens tabs on battery cover lock tab as shown. (Fig. 8-1). • Slide open , gently push straight out on power head with symbols inside battery housing) (Fig. 8-2). - NOTE...: For lens covers locate Box 4. 1. FIG. 9-2 Fasten lens. 24 PN# 37026500123 05/15/2009 Battery replacement. • To open battery cover. - Use a heavy duty service bulb for rear lens on power head. • Plug power cord back into place. - Recommended replacement battery...
Owner's Manual
Page 25
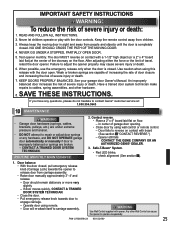
... flat) at : 1.800.354.3643 10 MAINTENANCE WARNING • Garage door hardware (springs, cables, brackets, pulleys, etc.) are under extreme pressure and tension. • DO NOT attempt to repair or adjust door springs or any questions, please do not hesitate to contact Genie® customer service at the center of garage door opening. • Close door by using wall...
... flat) at : 1.800.354.3643 10 MAINTENANCE WARNING • Garage door hardware (springs, cables, brackets, pulleys, etc.) are under extreme pressure and tension. • DO NOT attempt to repair or adjust door springs or any questions, please do not hesitate to contact Genie® customer service at the center of garage door opening. • Close door by using wall...
Owner's Manual
Page 27
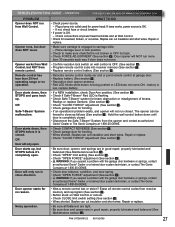
... contact The Genie Company at 1-800-35-GENIE. • Check door balance, condition, and door spring. • Check "OPEN FORCE" adjustment (See section 6 ). • WARNING: If you suspect a problem with the garage door hardware or springs, contact an authorized Genie® Dealer or a trained door system technician, or contact The Genie Company at garage door. • Replace battery (See section 8 ). • Reposition door opener antenna...
... contact The Genie Company at 1-800-35-GENIE. • Check door balance, condition, and door spring. • Check "OPEN FORCE" adjustment (See section 6 ). • WARNING: If you suspect a problem with the garage door hardware or springs, contact an authorized Genie® Dealer or a trained door system technician, or contact The Genie Company at garage door. • Replace battery (See section 8 ). • Reposition door opener antenna...


