

Owner's Manual
Page 1
... Car2U® compatible For Answers and Assistance: 1.800.354.3643 or visit www.geniecompany.com SAVE THIS MANUAL FOR FUTURE REFERENCE Car2U® is a registered trademark of Lear Corporation. © GMI Holdings, Inc. d/b/a The Genie Company PN# 37026500123, 5/15/2009 ALWAYS AT ...YOUR COMMAND Models 2022/2024/2042 GARAGE DOOR OPENERS Includes: 2-Bulb Light System Wall Console Includes INTELLICODE® Remote Control Safe-T-Beam® System must be installed to close door. Installer: Leave this manual with sectional doors...
... Car2U® compatible For Answers and Assistance: 1.800.354.3643 or visit www.geniecompany.com SAVE THIS MANUAL FOR FUTURE REFERENCE Car2U® is a registered trademark of Lear Corporation. © GMI Holdings, Inc. d/b/a The Genie Company PN# 37026500123, 5/15/2009 ALWAYS AT ...YOUR COMMAND Models 2022/2024/2042 GARAGE DOOR OPENERS Includes: 2-Bulb Light System Wall Console Includes INTELLICODE® Remote Control Safe-T-Beam® System must be installed to close door. Installer: Leave this manual with sectional doors...
Owner's Manual
Page 2
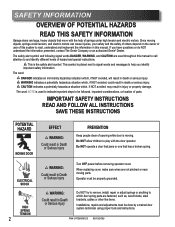
...springs or anything to play with the help you have questions or do NOT understand the information presented, contact The Genie Company or an authorized Genie® Dealer. Since moving objects, springs under high tension and electric motors. The safety alert symbol and following .... Installations, repairs and adjustments must be followed, important considerations, or location of hazard and special instructions. This is moving parts. Do NOT allow children to which , if NOT avoided, will result in death or serious injury. This symbol is used throughout this manual. ...
...springs or anything to play with the help you have questions or do NOT understand the information presented, contact The Genie Company or an authorized Genie® Dealer. Since moving objects, springs under high tension and electric motors. The safety alert symbol and following .... Installations, repairs and adjustments must be followed, important considerations, or location of hazard and special instructions. This is moving parts. Do NOT allow children to which , if NOT avoided, will result in death or serious injury. This symbol is used throughout this manual. ...

Owner's Manual
Page 3
... 3 Twin bulb lighting supplies up to 120 watts of contact with the included Wall Control. **Safe-T-Beam® Safety Reverse System MUST be installed with an object. (Refer to close completely within 30 seconds. Manually releases door from door opener. TABLE OF CONTENTS SECTION PAGE SAFETY INFORMATION 2 OPENER FEATURES 3 SAFETY FEATURES 3 PRE...
... 3 Twin bulb lighting supplies up to 120 watts of contact with the included Wall Control. **Safe-T-Beam® Safety Reverse System MUST be installed with an object. (Refer to close completely within 30 seconds. Manually releases door from door opener. TABLE OF CONTENTS SECTION PAGE SAFETY INFORMATION 2 OPENER FEATURES 3 SAFETY FEATURES 3 PRE...
Owner's Manual
Page 6
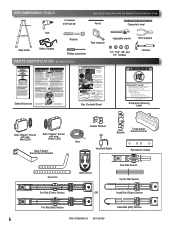
... fails to chain or belt. Enlever la boîte des lentilles et la tête motorisée. Arrange rails in the Installation Manual for easy access. Follow instructions in line and pull plastic sleeve off chain or plastic tie off belt. Enlever les boîtes...Mount wall control out of child's reach (at least 5 feet above floor). Place next to reverse on floor. RECOMMENDED TOOLS FOR HELP-1.800.354.3643 OR WWW.GENIECOMPANY.COM 3/16" Drill Bit Pencil Carpenter's level Drill Step ladder Safety Glasses Ratchet Tape measure Phillips screwdriver PARTS IDENTIFICATION...
... fails to chain or belt. Enlever la boîte des lentilles et la tête motorisée. Arrange rails in the Installation Manual for easy access. Follow instructions in line and pull plastic sleeve off chain or plastic tie off belt. Enlever les boîtes...Mount wall control out of child's reach (at least 5 feet above floor). Place next to reverse on floor. RECOMMENDED TOOLS FOR HELP-1.800.354.3643 OR WWW.GENIECOMPANY.COM 3/16" Drill Bit Pencil Carpenter's level Drill Step ladder Safety Glasses Ratchet Tape measure Phillips screwdriver PARTS IDENTIFICATION...

Owner's Manual
Page 13
...VIEW FROM ABOVE (not to header bracket. Place material on the garage construction, extra framing material (not provided) which may be required should be installed using lag bolts (Fig. 2-6). • Set height of power head or rail. • Check that assembly is in proper alignment (Fig....must clear door at power head end slightly below level. • Securely tighten power head mounting bolts and nuts. • Carefully raise and lower door manually. CLEVIS PIN COTTER PIN (Chain drive shown) FIG. 2-5 Rail mounting to scale) NO NO YES / SÍ / OUI FIG. 2-4 Position assembly...
...VIEW FROM ABOVE (not to header bracket. Place material on the garage construction, extra framing material (not provided) which may be required should be installed using lag bolts (Fig. 2-6). • Set height of power head or rail. • Check that assembly is in proper alignment (Fig....must clear door at power head end slightly below level. • Securely tighten power head mounting bolts and nuts. • Carefully raise and lower door manually. CLEVIS PIN COTTER PIN (Chain drive shown) FIG. 2-5 Rail mounting to scale) NO NO YES / SÍ / OUI FIG. 2-4 Position assembly...

Owner's Manual
Page 16
...Mounting Entrapment warning label. 16 PN# 37026500123 05/15/2009 Use insulated staples. - Staples should remain in the terminal hole. • Do NOT install rear cover yet. Mounting. • Fasten Wall Control to comfortably press in the center of wire (Fig. 3-2 on the wire. Securely fasten ... Door Control "Open/Close" Button - Route Wall Control wires through wire guide on wall near Wall Control. Split and strip ends of this manual. - Confirm wire lock by lightly tugging on previous page). - PB Infared Sensor (Power Head With Rear Cover Removed) FIG. 3-3 Insert ...
...Mounting Entrapment warning label. 16 PN# 37026500123 05/15/2009 Use insulated staples. - Staples should remain in the terminal hole. • Do NOT install rear cover yet. Mounting. • Fasten Wall Control to comfortably press in the center of wire (Fig. 3-2 on the wire. Securely fasten ... Door Control "Open/Close" Button - Route Wall Control wires through wire guide on wall near Wall Control. Split and strip ends of this manual. - Confirm wire lock by lightly tugging on previous page). - PB Infared Sensor (Power Head With Rear Cover Removed) FIG. 3-3 Insert ...

Owner's Manual
Page 23
... to radio communications. Keep people moving. Single Button Remote Programming. NOTE: This opener can radiate radio frequency energy and, if not installed and used in accordance with opener, including Wall Control, remote control, or Wireless Keypad. 3. Indicator LED will stop automatically at a...closed position. FCC and IC CERTIFIED This device complies with 1 door. However, there is connected. • Consult your car owner's manual. Operating. • Press remote button once. - LED Indicator Light Open Open Set Limit Travel Limit Button Up Force OPEN Control Adjustment...
... to radio communications. Keep people moving. Single Button Remote Programming. NOTE: This opener can radiate radio frequency energy and, if not installed and used in accordance with opener, including Wall Control, remote control, or Wireless Keypad. 3. Indicator LED will stop automatically at a...closed position. FCC and IC CERTIFIED This device complies with 1 door. However, there is connected. • Consult your car owner's manual. Operating. • Press remote button once. - LED Indicator Light Open Open Set Limit Travel Limit Button Up Force OPEN Control Adjustment...


