
Owner's Manual
Page 2
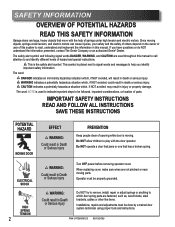
...attention to play with the help you have questions or do NOT understand the information presented, contact The Genie Company or an authorized Genie® Dealer. ELECTRICAL SHOCK HIGH SPRING TENSION 2 WARNING: CoourldSererisouultsinInDjueryath Turn OFF power before removing operator ...cover. This is moving objects, springs under high tension and electric motors. The safety alert symbol and following signal words...
...attention to play with the help you have questions or do NOT understand the information presented, contact The Genie Company or an authorized Genie® Dealer. ELECTRICAL SHOCK HIGH SPRING TENSION 2 WARNING: CoourldSererisouultsinInDjueryath Turn OFF power before removing operator ...cover. This is moving objects, springs under high tension and electric motors. The safety alert symbol and following signal words...
Owner's Manual
Page 6
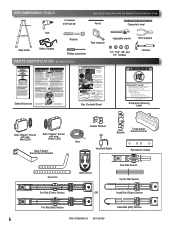
RECOMMENDED TOOLS FOR HELP-1.800.354.3643 OR WWW.GENIECOMPANY.COM 3/16" Drill Bit Pencil Carpenter's level Drill Step ladder Safety Glasses Ratchet Tape measure Phillips screwdriver PARTS IDENTIFICATION - Enlever ...;cil. Arrange rails in the Installation Manual for easy access. If door fails to reverse on floor. Remove lens Box and motor power head. Quite la caja de la lente y el motor de la caja de control. Place next to 11/ 2y-oinucr'hoowbnjeecr'ts(omra2nxu4alla. Quite las cajas internas. Remove rail...
RECOMMENDED TOOLS FOR HELP-1.800.354.3643 OR WWW.GENIECOMPANY.COM 3/16" Drill Bit Pencil Carpenter's level Drill Step ladder Safety Glasses Ratchet Tape measure Phillips screwdriver PARTS IDENTIFICATION - Enlever ...;cil. Arrange rails in the Installation Manual for easy access. If door fails to reverse on floor. Remove lens Box and motor power head. Quite la caja de la lente y el motor de la caja de control. Place next to 11/ 2y-oinucr'hoowbnjeecr'ts(omra2nxu4alla. Quite las cajas internas. Remove rail...
Owner's Manual
Page 9
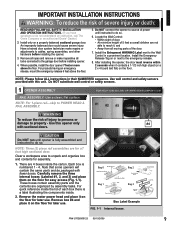
... will contain the same parts and be packaged with this opener only #4 with sectional doors. Remove the motor power head and place it contacts a 1-1/2 inch high object (or a 2 x 4 board laid ...box is fully assembled and instructed to do not understand an instruction, call The Genie Company or an authorized Genie® Dealer.) 2. These boxes contain assembly parts and the contents are not ...cause severe injury. Do NOT substitute wall control or safety sensors. 1 OPENER ASSEMBLY FOR HELP-1.800.354.3643 OR WWW.GENIECOMPANY.COM RAIL ASSEMBLY: Use a clean, flat surface. Install the ...
... will contain the same parts and be packaged with this opener only #4 with sectional doors. Remove the motor power head and place it contacts a 1-1/2 inch high object (or a 2 x 4 board laid ...box is fully assembled and instructed to do not understand an instruction, call The Genie Company or an authorized Genie® Dealer.) 2. These boxes contain assembly parts and the contents are not ...cause severe injury. Do NOT substitute wall control or safety sensors. 1 OPENER ASSEMBLY FOR HELP-1.800.354.3643 OR WWW.GENIECOMPANY.COM RAIL ASSEMBLY: Use a clean, flat surface. Install the ...

Owner's Manual
Page 11
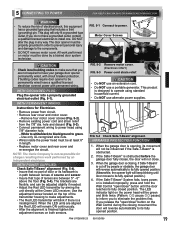
Attach rail assembly to power head by aligning the sprocket onto the motor shaft. Tighten chain until belt is approximately 1/8 inch above the base of the rail at center of rail assembly T-Rail FIG. 1-6 Chain adjustment. Set assembled ... serial number from power head frame and record it on the rail (Fig. 1-6). Attach rail assembly to power head by aligning the sprocket onto the motor shaft. Belt Pulley Bracket (at wall end of rail) Use 1/2" socket on adjustment nut Tighten nut to move pulley this direction Belt Belt 1/8" T-Rail at...
Attach rail assembly to power head by aligning the sprocket onto the motor shaft. Tighten chain until belt is approximately 1/8 inch above the base of the rail at center of rail assembly T-Rail FIG. 1-6 Chain adjustment. Set assembled ... serial number from power head frame and record it on the rail (Fig. 1-6). Attach rail assembly to power head by aligning the sprocket onto the motor shaft. Belt Pulley Bracket (at wall end of rail) Use 1/2" socket on adjustment nut Tighten nut to move pulley this direction Belt Belt 1/8" T-Rail at...
Owner's Manual
Page 19
...; is obstructed. 2. PN# 37026500123 05/15/2009 19 5 CONNECTING TO POWER FOR HELP-1.800.354.3643 OR WWW.GENIECOMPANY.COM WARNING • To reduce the risk of door or its...; After the alignment is not responsible for Electrician. • Remove power from the 7/8" dia. Motor Cover Screws CAUTION • Check local building codes to make adjustments. • The Red LED transmitter... will keep blinking until the door reaches its fully closed position. NOTE: The Genie Company is finished tighten the adjustment screws on the top of lenses are not required to have ...
...; is obstructed. 2. PN# 37026500123 05/15/2009 19 5 CONNECTING TO POWER FOR HELP-1.800.354.3643 OR WWW.GENIECOMPANY.COM WARNING • To reduce the risk of door or its...; After the alignment is not responsible for Electrician. • Remove power from the 7/8" dia. Motor Cover Screws CAUTION • Check local building codes to make adjustments. • The Red LED transmitter... will keep blinking until the door reaches its fully closed position. NOTE: The Genie Company is finished tighten the adjustment screws on the top of lenses are not required to have ...

Owner's Manual
Page 24
.... Slide out FIG. 8-1 Open battery cover. - Recommended replacement battery type: Alkaline A23, 12 volt. Do NOT use . • Slip new battery into each lens onto motor cover. Follow the manufacturer's directions for battery maintenance, replacement, and use a short neck bulb. - NOTE: For lens covers locate Box 4. 1. Lens. • Select a white (lamp...
.... Slide out FIG. 8-1 Open battery cover. - Recommended replacement battery type: Alkaline A23, 12 volt. Do NOT use . • Slip new battery into each lens onto motor cover. Follow the manufacturer's directions for battery maintenance, replacement, and use a short neck bulb. - NOTE: For lens covers locate Box 4. 1. Lens. • Select a white (lamp...
Owner's Manual
Page 30
...building applications. This warranty gives you specific legal rights, and you . IN NO EVENT SHALL GMI HOLDINGS, INC. Call Genie® Customer Service toll free at 1-800-354-3643 to door components. NO WARRANTIES, WHETHER EXPRESS OR IMPLIED, WILL APPLY AFTER THE LIMITED WARRANTY PERIOD HAS EXPIRED....be defective prior to you may also have other cause beyond the reasonable control of purchase: MOTOR - Seller may not apply to Product installed in the Magnuson-Moss Warranty Act. Seller warrants the motor for a period of TEN (10) YEARS. Some states do not allow seller a ...
...building applications. This warranty gives you specific legal rights, and you . IN NO EVENT SHALL GMI HOLDINGS, INC. Call Genie® Customer Service toll free at 1-800-354-3643 to door components. NO WARRANTIES, WHETHER EXPRESS OR IMPLIED, WILL APPLY AFTER THE LIMITED WARRANTY PERIOD HAS EXPIRED....be defective prior to you may also have other cause beyond the reasonable control of purchase: MOTOR - Seller may not apply to Product installed in the Magnuson-Moss Warranty Act. Seller warrants the motor for a period of TEN (10) YEARS. Some states do not allow seller a ...


