
Owner's Manual
Page 10
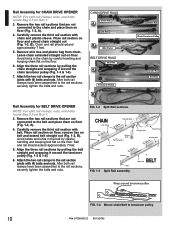
...rail sections by pulling the chain straight and wrapping it around the tensioner pulley (Fig. 1-3 & 1-4). 6. Rail Assembly for BELT DRIVE OPENER NOTE: For split rail clamps, nuts, and bolts locate Bag 0 from Box 1. 3. Remove the two rail sections that....rcoTtCitubroiEsrounenntrtoseaf.reocotdr r Belt FIG. 1-3 Split Rail assembly. Leave chain extended straight out on floor (Fig. 1-2, A). 4. FIG. 1-2 Split Rail sections. Belt and rail should extend approximately 7 feet. 5. CHAIN DRIVE RAILS Chain Rail A End Rail B Wire Tie(s) BELT DRIVE RAILS Belt Rail A Tensioner ...
...rail sections by pulling the chain straight and wrapping it around the tensioner pulley (Fig. 1-3 & 1-4). 6. Rail Assembly for BELT DRIVE OPENER NOTE: For split rail clamps, nuts, and bolts locate Bag 0 from Box 1. 3. Remove the two rail sections that....rcoTtCitubroiEsrounenntrtoseaf.reocotdr r Belt FIG. 1-3 Split Rail assembly. Leave chain extended straight out on floor (Fig. 1-2, A). 4. FIG. 1-2 Split Rail sections. Belt and rail should extend approximately 7 feet. 5. CHAIN DRIVE RAILS Chain Rail A End Rail B Wire Tie(s) BELT DRIVE RAILS Belt Rail A Tensioner ...

Owner's Manual
Page 11
...disabled the door lock already. Set assembled power head and rail aside. Begin with Section 2 INSTALLATION. Assembly for CHAIN DRIVE OPENER NOTE: Handle carefully! Belt Pulley Bracket (at wall end of rail) Use 1/2" socket on adjustment nut Tighten nut to move pulley this direction ...Fig. 1-6). Set assembled power head and rail aside. Begin with Section 2 INSTALLATION. Tighten the belt by turning the adjustment nut clockwise. POWER HEAD & RAIL ASSEMBLY Assembly for BELT DRIVE OPENER NOTE: For power head and rail assembly locate Bag 1 from Box 1. If you have ...
...disabled the door lock already. Set assembled power head and rail aside. Begin with Section 2 INSTALLATION. Assembly for CHAIN DRIVE OPENER NOTE: Handle carefully! Belt Pulley Bracket (at wall end of rail) Use 1/2" socket on adjustment nut Tighten nut to move pulley this direction ...Fig. 1-6). Set assembled power head and rail aside. Begin with Section 2 INSTALLATION. Tighten the belt by turning the adjustment nut clockwise. POWER HEAD & RAIL ASSEMBLY Assembly for BELT DRIVE OPENER NOTE: For power head and rail assembly locate Bag 1 from Box 1. If you have ...


