
Genie ScrewDrive Support Question
Genie ScrewDrive Support Question
Find answers below for this question about Genie ScrewDrive.Need a Genie ScrewDrive manual? We have 1 online manual for this item!
Question posted by mhclanita on December 23rd, 2012
Want To Replace My Door Opener Carrige Genie Screw Drive Model Sd9500
want to replace my garage door opener. the model is genie screw drive SD9500
Current Answers
Related Genie ScrewDrive Manual Pages
Owner's Manual - Page 2
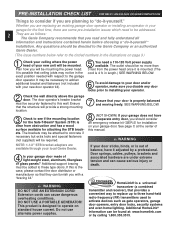
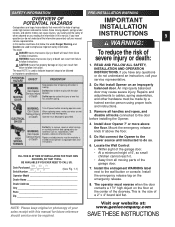
...: 1-1/2" STB bracket adapters are replacing an existing garage door operator or installing an operator in the illustrations on standard house current. Extension cords can furnish you should consider an emergency release kit (GER-2) for attaching the STB brackets. Whether you are available through your local Genie Dealer.
4 Is your door and/or operator, make sure...
Owner's Manual - Page 4
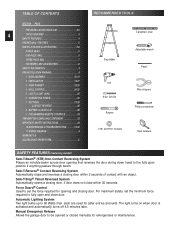
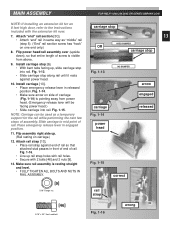
... Bit
Ratchet
Wire strippers Phillips screwdriver
7/16" and 9/16" Sockets
Tape measure
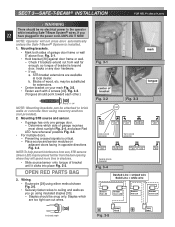
SAFETY FEATURES (varies by model)
Safe-T-Beam® (STB) Non-Contact Reversing System Places an invisible beam across door opening and closing door.
For maximum safety, set the force required for opening that reverses the door during down travel to be opened or closed manually for...
Owner's Manual - Page 5
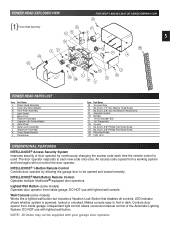
...garage. Controls door opener from inside garage. Independent light control allows convenient manual control of door operator by allowing the garage door to be supplied with your garage door operator. DO NOT use with lighted wall button. Wall Console (some models) Operates door...8-32 x 3/8" Phillips Hex Head Screw 42 No. 8-32 x 3/8" Phillips Pan Head Screw 48 Mounting Straps 49 Light Lens
...
Owner's Manual - Page 6
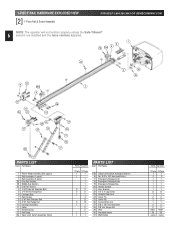
...Stop 7 Rail Clamps 8 5/16" Hex Shoulder Bolt 9 5/16" Hex Flange Nut 10 Carriage Assembly 11 Collar 12 Retaining Clip 13 Rail Strap 15A Open Limit Switch Assembly (Grey)
Parts Required
1 Piece 3-Piece
1
1
1
1
1
1
1
2
2
2
2
1
1
4
8
5
13
... Tag 20 Header Bracket 21 Door Bracket 22 1/4" x 2" Lag Screw 23 Straight Door Arm 24 Clevis Pin 25 Cotter Pin 26 Curved Door Arm 27 3/8" x 7/8" ...
Owner's Manual - Page 9
.... Locate the Wall Control: • Within sight of the garage door. • At a minimum height of 5', so small children...Operator Model
Dealer Name
2. Install door Opener 7' or more above the floor.
5. Dealer Address City State Zip
8.
Do Not operate a door ...NOTE is used to which door spring parts are not pinched or near moving parts. When replacing cover, make sure wires...
Owner's Manual - Page 10

... will no .
2. Attach 1-piece rail or "first" rail section[3A] of 3-piece rail to step 8.
[39]
Coupler
[45]
Rubber bumper
Fig. 1-1 Fig. 1-2 Fig. 1-3 Fig. 1-4 CAUTION
Drive screws can slide out of screw against coupler. SECT 1-MAIN ASSEMBLY
OPEN BLUE PARTS BAG
NOTE: 3-piece rail assembly is for 8 feet...
Owner's Manual - Page 13
...power head. (Emergency release lever will be used as "middle" rail
(step 5). ("End" rail section screw has "hook" on carriage.)
12. Flip power head/rail assembly over (upside
OR
USES BUMPER
carriage ... so that attached stud passes in same way as a temporary support for an 8 feet high door, refer to mid point of rail. Fig. 1-15 correct
[9]
5/16" Flange nut
rail strap
[46]
5/...
Owner's Manual - Page 14

... power head. Check that white lever is toward power head. - Slide cord through hole in place. Fig. 1-18.
- Fig. 1-19. - Please set screw A
brown wire
wire clip Fig. 1-20
"open" switch
grey wire
Fig. 1-21
power head
A Use wire clip [44] to power head. - Check that white lever is on carriage).
- Leaving...
Owner's Manual - Page 16

... HELP-1.800.354.3643 OR GENIECOMPANY.COM
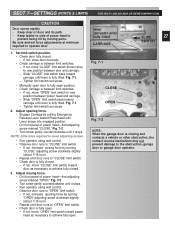
2. Finding highest point of travel.
• While raising garage door manually, watch
top edge of door to "highest point of travel " and mark this height on wall above door. With door held partly open (at centerline
on centerline. add 2-1/2 inches to see where it onto the rail.
(A stool, chair...
Owner's Manual - Page 17
...for rail strap
1/4" x 2" Lag screw
Fig. 2-7
[22]
header bracket
header bracket garage door opening
OPEN ORANGE PARTS BAG
TYPICAL FINISHED WALL
floor
Fig. 2-5
5. TYPICAL UNFINISHED WALL
floor
• If final header bracket position is on centerline. Fig. 2-5. Mount header bracket [20]. • Drill 5/32 inch pilot holes at marked screw hole locations. • Fasten header...
Owner's Manual - Page 20
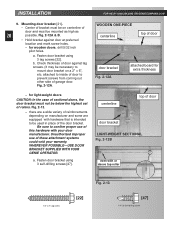
... intended to prevent screws from coming out other side of door
door bracket Fig. 2-12A
attached board for wooden doors, drill 5/32 inch
pilot holes. Fig. 2-12A.
WHEREVER POSSIBLE-USE DOOR BRACKET SUPPLIED WITH YOUR GENIE OPERATOR. WOODEN ONE-PIECE centerline
top of garage door. for light-weight doors
CAUTION: In the case of sectional doors, the door bracket must be...
Owner's Manual - Page 22
...not provided).
2. Fig. 3-2.
(Tongues should point toward each with 2 screws [40].
Determine which are available at local dealer. Place source and ...door opening where they will not close door automatically unless the Safe-T-Beam® System is installed.
1. b.
OPEN RED PARTS BAG
3. NOTE: Operator will spend more time in the power cord-UNPLUG IT NOW. Blocks of garage door...
Owner's Manual - Page 24

...at power head and wall control • Connect wires to power head - Tighten screws
4. Use pan head screws [34].
5.
Drive staples just tight enough to wall control. - NOTE: Use only staples included
2....Fig. 4-2, Fig. 4-3. • Loosen (Do Not Remove) screws from Terminals at ends and remove 1/2 inch of insulation from end of door and away from wall control to power head. • Use ...
Owner's Manual - Page 25
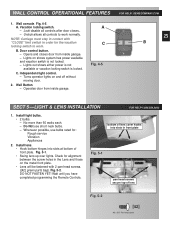
... 5-2. Wait until you have completed programming the Remote Controls. Fig. 4-5. Opens and closes door from inside garage. - Lights out shows either power is not available or vacation locking switch...lens cover hooks into slots at bottom of lens
Fig. 5-2
[42]
#8 x 3/8" Pan head screw Door control button. - Vacation locking switch. - A C
Fig. 4-5
FOR HELP- Install lens. • Hook bottom ...
Owner's Manual - Page 26

... STBs are in alignment the red LED will stop blinking and stay on . • Replace and tighten 4 screws.
8.
Fig. 6-2 CONNECT POWER WITH PERMANENT WIRING
Instructions for electrician.
2.
Reconnect power to... into a grounded outlet. • Perform STB® alignment check (Fig. 6-2). The door operator must be at least 6 inches of electrical shock, this
26
equipment has a grounded...
Owner's Manual - Page 27
..., the contact reverse mechanism may not prevent damage to the obstruction, garage door or garage door operator. Fig. 7-1
CLOSE
OPEN
Fig. 7-2 NOTE: When the garage door is fully lifted. If not, move adjusting screws.
• Run operator using wall control. • Observe door runs to operate door. Slide "OPEN" limit switch back toward carriage until lever is closing force. •...
Owner's Manual - Page 28

... 2 seconds of garage
door opening. b.
NOTE: If door is fine. Remove old battery.
• Observe polarity markings (+,-) inside
battery compartment.
• Match new battery to door.
NOTE: Use only
A23, 12 Volt battery.
2. Attach visor clip Fig. 6-1. • Slide clip in center of contacting the board.
- Test contact reverse again.
Visor Clip
Model Number
Battery...
Owner's Manual - Page 30
... children operate or play with all legal requirements of severe injury or death.
7 KEEP GARAGE DOORS PROPERLY BALANCED. Failure to use the Emergency Release only when the door is closed . An improperly balanced door increases the risk of travel, retest the Door Opener. Los transmisores cumplen con todas las reglamentaciones legales de los Estados Unidos y del...
Owner's Manual - Page 31
...garage doorway (See page 28). • Close door using wall button or remote control.
BEAM OBSTRUCTED 3.SENSOR DEFECTIVE
1.CHECK ALIGNMENT 2. See page 28, CONTACT REVERSE. SECT 10-MAINTENANCE & TROUBLESHOOTING
MONTHLY MAINTENANCE
MAINTENANCE CHECK-OFF
Door springs and hardware. • Oil door rollers, bearings, and hinges. - DISCONNECT THE STB SYSTEM FROM THE OPERATOR AND 2. Drive Screw...
Owner's Manual - Page 32
...II wall control
Use of Safe-T-Beam® (See Section 3). If they cut , replace it 's completely open . If wire is OK: - Erase all fasteners are tight. Check CONTACT REVERSE (...force adjustment (See Section 7). Program remote control code into insulation, they can cause the door to operate unexpectedly and the light not to wall control.
Use self-diagnostic STB System troubleshooting...
Similar Questions

Door Opener Will Not Operate After Power Company Had Power To House Shut To Hous
Power company notified me that power to my house was cut-off for about 15 minutes today. Came home a...
Power company notified me that power to my house was cut-off for about 15 minutes today. Came home a...
(Posted by fsmith4iva 7 years ago)

Pre 1993 Genie Screw Drive Model Sd9005
Can safety beams be installed on this unit?On unit head there are 4 terminals. 1 and 2 are used for ...
Can safety beams be installed on this unit?On unit head there are 4 terminals. 1 and 2 are used for ...
(Posted by sheppdog34 9 years ago)

Garage Door Opener Not Working
Green light and red light are on the safety"eye" When pushing wall, remote or key pad the screw driv...
Green light and red light are on the safety"eye" When pushing wall, remote or key pad the screw driv...
(Posted by scanty5 9 years ago)

How To Replace Screw Drive Genie Opener Coupler Model Sd9500
(Posted by HARyanBra 10 years ago)
Why Would The Light Come On My Genie Garage Door Opener If I Have The Wall
operator in the lock position
operator in the lock position
(Posted by Jurda 10 years ago)