
Genie ScrewDrive Support Question
Genie ScrewDrive Support Question
Find answers below for this question about Genie ScrewDrive.Need a Genie ScrewDrive manual? We have 1 online manual for this item!
Question posted by HARyanBra on February 25th, 2014
How To Replace Screw Drive Genie Opener Coupler Model Sd9500
The person who posted this question about this Genie product did not include a detailed explanation. Please use the "Request More Information" button to the right if more details would help you to answer this question.
Current Answers
Related Genie ScrewDrive Manual Pages
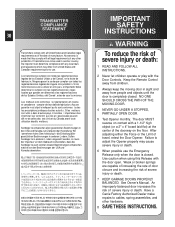
Owner's Manual - Page 2
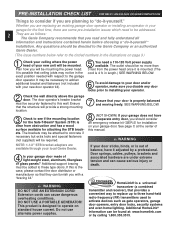
... STB brackets. The outlet should be directed to the Genie Company or an authorized
Genie Dealer.
(The issue numbers below refer to the garage door operator. in the illustrations on standard house current. Door springs, cables, pulleys, brackets and associated hardware are as gate operators, garage door openers, entry door locks, security systems and even home lighting. SEE WARNING...
Owner's Manual - Page 4
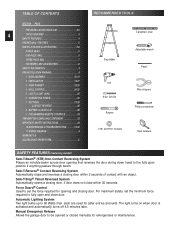
... ladder
Adjustable wrench Pencil
Drill 5/ 32" Drill Bit
Ratchet
Wire strippers Phillips screwdriver
7/16" and 9/16" Sockets
Tape measure
SAFETY FEATURES (varies by model)
Safe-T-Beam® (STB) Non-Contact Reversing System Places an invisible beam across door opening and closing door. For maximum safety, set the force required for safer entries and exits. Safe...
Owner's Manual - Page 5
... the garage door to be supplied with your garage door operator.
Makes console easy to each time the remote control is powered, locked or unlocked.
An access code copied from inside garage. Wall Console (some models) Operates door operator from a working system and tried again will not control the door operator. NOTE: All items may not be opened and...
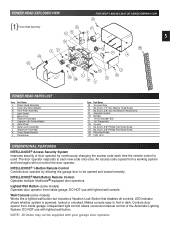
Owner's Manual - Page 6
...Stop 7 Rail Clamps 8 5/16" Hex Shoulder Bolt 9 5/16" Hex Flange Nut 10 Carriage Assembly 11 Collar 12 Retaining Clip 13 Rail Strap 15A Open Limit Switch Assembly (Grey)
Parts Required
1 Piece 3-Piece
1
1
1
1
1
1
1
2
2
2
2
1
1
4
8
5
13
... Tag 20 Header Bracket 21 Door Bracket 22 1/4" x 2" Lag Screw 23 Straight Door Arm 24 Clevis Pin 25 Cotter Pin 26 Curved Door Arm 27 3/8" x 7/8" ...
Owner's Manual - Page 7
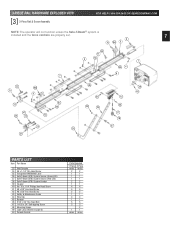
...27
39 45
PARTS LIST
Item Part Name
33 Wall Console 34 #6 x 1-1/4" Pan Head Screw 35 Entrapment WARNING Label 36 Safe-T-Beam (STB) System Sensor (Green LED) 37 Safe-T-...System Source (Red LED) 38 Safe-T-Beam (STB) System Bracket 39 Coupler 40 No. 10 x 1 1/4" Phillips Hex Head Screw 41 #8 x 3/8" Hex Head Screw 42 #8 x 3/8" Pan Head Screw 43 Safety & Maintenance Guide 44 Wire Clip 45 Bumper 46 5/16...
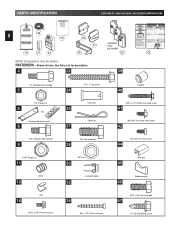
Owner's Manual - Page 8
...
3/8" Hex head bolt
3/8" Nut
30
32
Insulated staple
34
#6 x 1-1/4" Pan head screw
Coupler
40
41
#10 x 1-1/4" Phillips hex head screw
42
#8 x3/8" Hex flange head screw
44
#8 x 3/8" Pan head screw
Wire clip
45
Rubber bumper
46
47
5/16" x 3/4" Hex head bolt
1/4"-20 Self-drilling screw PARTS IDENTIFICATION
FOR HELP-1.800.354.3643 OR GENIECOMPANY.COM
29...
Owner's Manual - Page 9
...Date Purchased WK YY PI
(See Fig. 1-1)
Serial Number
Operator Model
Dealer Name
2. Mount the emergency release knob 6' above the floor....door operator.
When replacing cover, make sure wires are not pinched or near moving .
Do Not connect the Opener to the power source until instructed to follow instruction. Locate the Wall Control: • Within sight of the garage door...
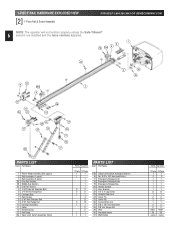
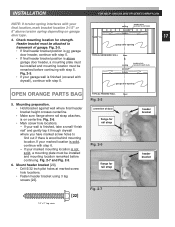
Owner's Manual - Page 10

... rail section with shaft. (It will no .
2. SECT 1-MAIN ASSEMBLY
OPEN BLUE PARTS BAG
NOTE: 3-piece rail assembly is for 8 feet doors is available. 1. Install bumper [45]. • Peel protective paper from glue... so that front panel (with end of screw against coupler. Keep rail sections level until holes in rail match up . Fig. 1-4. CAUTION
Drive screws can slide out of bumper. • ...
Owner's Manual - Page 14

... end of knob [18]. Fig. 1-21. - Fig. 1-21.
• Coil excess wire and tape it around itself.
15. Fig. 1-21. - Insert set screw A
brown wire
wire clip Fig. 1-20
"open" switch
grey wire
Fig. 1-21
power head
A Attach emergency release knob, cord and tag.
• Tie an overhand knot in top of...
Owner's Manual - Page 16

... door.
• Mark "highest point of travel .
• While raising garage door manually, watch
top edge of door to "highest point of travel .
Fig. 2-3. • For ONE-PIECE DOORS...safely support door will also work.)
-
Fig. 2-4. Finding highest point of door.
3. Fig. 2-3. INSTALLATION
FOR HELP-1.800.354.3643 OR GENIECOMPANY.COM
2. With door held partly open (at ...
Owner's Manual - Page 17
... wall studs
remarked before continuing. wall
17
studs
4. Check mounting location for rail strap
1/4" x 2" Lag screw
Fig. 2-7
[22]
header bracket
header bracket
garage door opening
• If final header bracket position is wood behind mounting location. Fig. 2-5.
If your garage wall is finished (covered with
drywall), continue with step 5. Fig. 2-7 and Fig. 2-5.
6. Mount...
Owner's Manual - Page 20
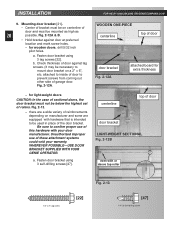
... inch
pilot holes. Fig. 2-12A & B.
• Hold bracket against lag screws. (It may be mounted as high as
20
possible. centerline
top of door
door bracket
LIGHT-WEIGHT SECTIONAL Fig. 2-12B
even with hardware that is intended to confirm proper use of garage door. WOODEN ONE-PIECE centerline
top of this hardware with your warranty...
Owner's Manual - Page 22
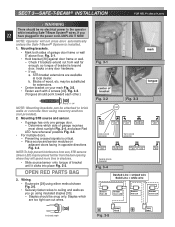
...wires.
[30]
Insulated staple
Fig. 3-1
mark
center of garage door frame or wall 5" above floor.
Staples should point toward each with 2 screws [40]. STB bracket extensions are too tight can be substituted...against door frame or wall. - OPEN RED PARTS BAG
3. Determine which are available at local dealer.
may be placed further from wall far enough, so tongue of garage receives...
Owner's Manual - Page 24

... all your dealer. CAUTION
• Use of door and away from wall control to power head. • Use staples to fasten wire to ceiling and wall. Drive staples just tight enough to terminal # 1 ...wire from your additional controls must be un-lighted. NOTE: Use only staples included
2. Tighten screws
4. More than one lighted wall control per operator will cause a malfunction. Mount wall control...
Owner's Manual - Page 25
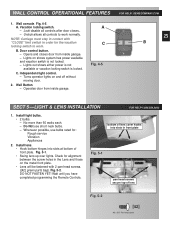
... button. - Opens and closes door from inside garage. - Lights out shows either power is not available or vacation locking switch is not locked. -
Operates door from inside garage. GENIECOMPANY.COM
25
B
SECT 5 -LIGHT & LENS INSTALLATION
FOR HELP-1.800.354.3643
1. Install light bulbs. • 2 bulbs. - Do Not use bulbs rated for alignment between the screw holes...
Owner's Manual - Page 26

...STBs are in proper alignment, the red LED (Source) will blink continuously.
The door operator must be properly
grounded in order to prevent personal injury
and damage to ...CONNECT POWER WITH PLUG
9. This plug will stop blinking and stay on . • Replace and tighten 4 screws.
8.
CONNECT POWER WITH PERMANENT WIRING
Instructions for electrician.
2. SECT 6-CONNECTING POWER
WITH GROUNDED...
Owner's Manual - Page 27
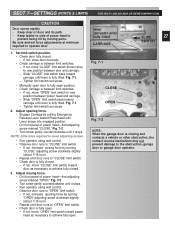
... lifted. If not, increase closing force. • On front panel of power head-find adjusting screw marked "CLOSE." Fig. 7-1
CLOSE
OPEN
Fig. 7-2 NOTE: When the garage door is between door and carriage. - Be sure and set screw.
• Manually open door to fully open position.. • Check carriage is fully closed . -
lever (actuator arm) fully lifted
CARRIAGE
SLIDE
27...
Owner's Manual - Page 28

.... - and b.
until contact reverse works properly. Repeat steps a. Install / replace battery Fig. 8-1.
• Using a pen or similar object, gently push in slot on tab.
• Cover snaps open. If door does not reverse properly: a. NOTE: If door is fine. Door should stop and reverse within 2 seconds of garage
door opening. NOTE: Use only
A23, 12 Volt battery.
2. b.
Fig...
Owner's Manual - Page 30
... using this Release with the door open. Have a Genie Factory Authorized Dealer make repairs to adjust the Opener properly may differ from people and objects until the door is made that they comply with all United States and Canadian legal requirements as of the date of severe injury or death.
7 KEEP GARAGE DOORS PROPERLY BALANCED. TRANSMITTER COMPLIANCE...
Owner's Manual - Page 31
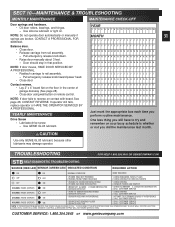
... reverse on your busy schedule is whether or not you perform routine maintenance. NOTE: If door fails to rail assembly. - If operator still fails, replace operator or HAVE THE OPERATOR SERVICED BY A PROFESSIONAL. Drive Screw • Lubricate drive screw. - CAUTION
Use only GENIE GLU3 lubricant, because other lubricants may damage operator. DISCONNECT THE STB SYSTEM FROM THE...
Similar Questions

Pre 1993 Genie Screw Drive Model Sd9005
Can safety beams be installed on this unit?On unit head there are 4 terminals. 1 and 2 are used for ...
Can safety beams be installed on this unit?On unit head there are 4 terminals. 1 and 2 are used for ...
(Posted by sheppdog34 9 years ago)

What Is The Best Screw Drive Carriage For A Standard Garage Opener
(Posted by Starlingdeb 9 years ago)

Genie 1200 Screw Drive Connection Problems When Install Extension Kit
(Posted by andjgr 10 years ago)
Genie Screw Drive G 5000
Where can I find a remote that will open my garge door
Where can I find a remote that will open my garge door
(Posted by lulinghousing 11 years ago)

Want To Replace My Door Opener Carrige Genie Screw Drive Model Sd9500
want to replace my garage door opener. the model is genie screw drive SD9500
want to replace my garage door opener. the model is genie screw drive SD9500
(Posted by mhclanita 11 years ago)