
Genie ScrewDrive Support Question
Genie ScrewDrive Support Question
Find answers below for this question about Genie ScrewDrive.Need a Genie ScrewDrive manual? We have 1 online manual for this item!
Question posted by sheppdog34 on April 19th, 2015
Pre 1993 Genie Screw Drive Model Sd9005
Can safety beams be installed on this unit?On unit head there are 4 terminals. 1 and 2 are used for wall button. 3 and 4 are empty.I purchased new Genie sensors and tried following instructions. They will not function proper. Is this even possible on thee older units?
Current Answers
Answer #1: Posted by sabrie on April 20th, 2015 5:36 AM
sabrie
Member since:
May 23rd, 2013 Points: 3,306,778

Member since:
May 23rd, 2013 Points: 3,306,778
follow the instructions given by the manual on the link below.
http://www.manualslib.com/manual/270869/Genie-Screw-Drive.html
www.techboss.co.za
Related Genie ScrewDrive Manual Pages
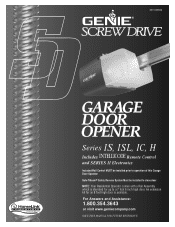
Owner's Manual - Page 1
...;
Series IS, ISL, IC, H
Includes
Remote Control
and SERIES II Electronics
Included Wall Control MUST be installed prior to operation of this Garage Door Operator
Safe-T-Beam® Safety Reverse System Must be installed to a 7 foot 6 inch high door. An extension kit for up to close door
NOTE: Your Residential Operator comes with a Rail Assembly which is standard for...
Owner's Manual - Page 2
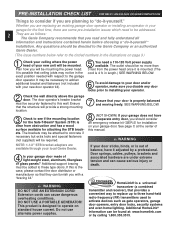
... your ceiling where the power head of your garage door. Any questions should be addressed.
2
They are as gate operators, garage door openers, entry door locks, security systems and even home lighting.
DO NOT USE A PORTABLE GENERATOR! See page C at : www.homelink.com or by a professional. Whether you are replacing an existing garage door operator or installing an operator in the...
Owner's Manual - Page 4
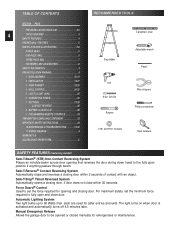
...Drill 5/ 32" Drill Bit
Ratchet
Wire strippers Phillips screwdriver
7/16" and 9/16" Sockets
Tape measure
SAFETY FEATURES (varies by model)
Safe-T-Beam® (STB) Non-Contact Reversing System Places an invisible beam across door opening and closing door. Manual Emergency Release Allows the garage door to 60 Watts max.
each are used for emergencies or maintenance. The light turns on when...
Owner's Manual - Page 5
... new code only once.
Makes console easy to be supplied with your garage door operator. Controls door opener from inside garage. DO NOT use with lighted wall button.
INTELLICODE® Multi-Button Remote Control Operates multiple Intellicode® equipped door operators. DO NOT use with lighted wall console.
Wall Console (some models) Operates door operator from inside garage...
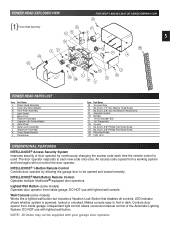
Owner's Manual - Page 6
...Screw Assembly
FOR HELP-1.800.354.3643 OR GENIECOMPANY.COM
NOTE: The operator will not function properly unless the Safe-T-Beam®
6 sensors are installed... Header Bracket 21 Door Bracket 22 1/4" x 2" Lag Screw 23 Straight Door Arm 24 Clevis Pin 25 Cotter Pin 26 Curved Door Arm 27 3/8" x 7/8" Hex Head Bolt 28 3/8" Hex Flange Nut 29 Wire 30 Insulated Staple 31 Wall Button
Parts Required
1 ...
Owner's Manual - Page 8
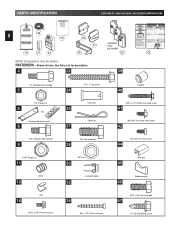
... head screw
Coupler
40
41
#10 x 1-1/4" Phillips hex head screw
42
#8 x3/8" Hex flange head screw
44
#8 x 3/8" Pan head screw
Wire clip
45
Rubber bumper
46
47
5/16" x 3/4" Hex head bolt
1/4"-20 Self-drilling screw
FASTENERS - Shown full size. PARTS IDENTIFICATION
FOR HELP-1.800.354.3643 OR GENIECOMPANY.COM
29
8
35
36
19
31
33
remotes
37
vary
by model
38...
Owner's Manual - Page 9
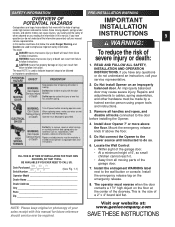
... tag on an improperly balanced door. READ AND FOLLOW ALL SAFETY,
failure to the wall button or console. POTENTIAL HAZARD
EFFECT
PREVENTION
INSTALLATION AND OPERATION INSTRUCTIONS.
Locate the Wall Control: • Within sight of the garage door. • At a minimum height of
to follow , the words Danger, Warning, and Caution are used to indicate important steps to...
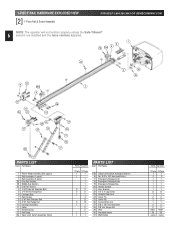
Owner's Manual - Page 14

... to help maintain slack. MAIN ASSEMBLY
OPEN GREEN PARTS BAG
Screws for use later.
14
14. Slip wire of rail back to power head. - Fig. 1-20. • "OPEN" limit switch [15A]. - Check that white lever is on carriage).
- Fig. 1-21. - Attach limit switches. • "CLOSE" limit switch [15B]. (Switches are installed properly.) - Fig. 1-21. - Attach grey...
Owner's Manual - Page 15

.... Measure overall width of residential garage doors. Fig. 2-1. Please note those steps which type of door from side to your particular door.
Continue marking centerline on wall above door from the top of door.
There are two basic types of door. (example: 16 feet) - CENTERLINE
TYPICAL TRACKLESS
garage door
CENTERLINE
floor TYPICAL TRACK GUIDED
garage door
15
1. This is the...
Owner's Manual - Page 16

... height on centerline. NOTE: Following step depends on wall above door. Measure from here to
floor
ONE-PIECE DOORS
Highest point of travel .
• While raising garage door manually, watch
top edge of door to see where it onto the rail.
(A stool, chair, table or any object that can be used to hold the
door in position by clamping...
Owner's Manual - Page 17
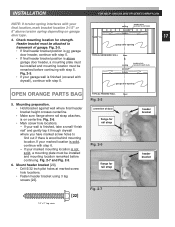
...continue with step 6. - header
• If your garage wall is not solid, a mounting plate must be installed and mounting location remarked before continuing with step 5. Mount header bracket [20]. • Drill 5/32 inch pilot holes at marked screw hole locations. • Fasten header bracket using 3 lag screws [22].
garage door opening
• If final header bracket position is...
Owner's Manual - Page 20
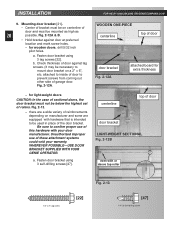
...garage door. Fig. 2-13.
-
Be sure to prevent screws from coming out other side of door
door bracket Fig. 2-12A
attached board for extra thickness
- Unauthorized improper use of this hardware with hardware that is intended to
mount door bracket on a 2" x 6", etc. WHEREVER POSSIBLE-USE DOOR BRACKET SUPPLIED WITH YOUR GENIE OPERATOR. a.
Fasten door bracket using 3 lag screws...
Owner's Manual - Page 22
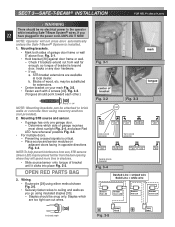
... from the door opening where they will not close door automatically unless the Safe-T-Beam® System is critical. - NOTE:To help prevent interference from wall far enough, so tongue of bracket until it clicks into place Fig. 3-3. If you go using either method shown Fig. 3-5.
• Securely fasten wires to the operator while installing Safe-T-Beam System...
Owner's Manual - Page 23

... no part of door or its hardware is in path between lenses of source and sensor.
• Ensure that tops of lenses are flexible, and can cause the STB System to be performed following connection to electrical power (see page 26). The brackets are between 5" - 6"
above the floor Fig. 3-9. Loosen terminal screws. -
Split and strip...
Owner's Manual - Page 24

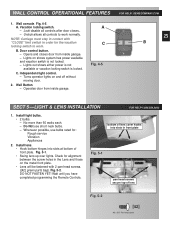
... - Tacks or staples may be required on some rough texture surfaces. Fig. 4-1
1/2" 1-1/4" to hold wire.
1. Drive staples just tight enough to 1-1/2"
Fig. 4-2
button
Fig. 4-3
console
Fig. 4-4
[34]
#6 x 1-1/4" Pan head screw In sight of door and away from Terminals at ends and remove 1/2 inch of insulation from your additional controls must be removed before attaching wires.
24...
Owner's Manual - Page 25
...door.
2. Do Not use bulbs rated for the vacation locking switch to work . DO NOT FASTEN YET! Install lens. • Hook bottom hinges into slots in contact with 2 pan head screws... after door closes.. - Opens and closes door from inside garage. -
Whenever possible, use short neck bulbs. - Wall Button - Install light bulbs. • 2 bulbs. - WALL CONTROL OPERATIONAL...
Owner's Manual - Page 27
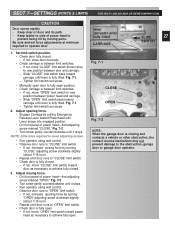
... 7-1.
- NOTE: Little force required to move adjusting screws.
• Run operator using wall control. • Observe door runs to "OPEN" limit switch. - Adjust closing and contacts a vehicle or other obstruction, the contact reverse mechanism may not prevent damage to the obstruction, garage door or garage door operator. If not, increase opening force. • Engage Carriage by moving parts...
Owner's Manual - Page 28

...Test contact reverse again. Install / replace battery Fig. 8-1.
• Using a pen or similar object, gently push in
on floor in place. NOTE: Use only
A23, 12 Volt battery.
2. and b. Repeat steps a. Snap in center of garage
door opening. Test contact reverse.
• Open door using wall control.
-
Fig. 7-3. • Close door using wall control.
• Lay 2" x 4" board...
Owner's Manual - Page 30
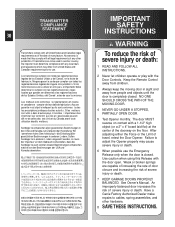
... SAFETY
INSTRUCTIONS
WARNING
To reduce the risk of severe injury or death:
1 READ AND FOLLOW ALL INSTRUCTIONS....door in sight and away from United States and Canadian requirements prior to use the Emergency Release only when the door is made that they comply with the door open. Use caution when using this Release with all United... l importateur d en d terminer leur conformit aux lois et ...
Owner's Manual - Page 31
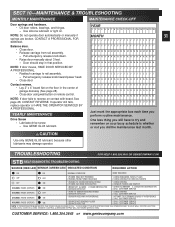
...time you will have to rail assembly. -
BEAM OBSTRUCTED 3.SENSOR DEFECTIVE
1.CHECK ALIGNMENT 2. F F FFF FFFFF F FFFFF FFFF M M MMM MMMMM M MMMMM MMMM A A AAA AAAAA A AAAAA AAAA M M MMM MMMMM M MMMMM MMMM
NOTE: If door moves, HAVE DOOR SERVICED BY A PROFESSIONAL.
• Reattach carriage to try and remember on contact with board.
Use GENIE GLU3 lubricant. One less thing you...
Similar Questions

What Remote Do I Use For Powerlift Garage Door Opener Model Wr77 Serial No.08258
(Posted by tmski87 3 years ago)

Garage Door Opener Not Working
Green light and red light are on the safety"eye" When pushing wall, remote or key pad the screw driv...
Green light and red light are on the safety"eye" When pushing wall, remote or key pad the screw driv...
(Posted by scanty5 9 years ago)

How To Replace Screw Drive Genie Opener Coupler Model Sd9500
(Posted by HARyanBra 10 years ago)
Why Would The Light Come On My Genie Garage Door Opener If I Have The Wall
operator in the lock position
operator in the lock position
(Posted by Jurda 10 years ago)

Want To Replace My Door Opener Carrige Genie Screw Drive Model Sd9500
want to replace my garage door opener. the model is genie screw drive SD9500
want to replace my garage door opener. the model is genie screw drive SD9500
(Posted by mhclanita 11 years ago)