
Genie ScrewDrive Support Question
Genie ScrewDrive Support Question
Find answers below for this question about Genie ScrewDrive.Need a Genie ScrewDrive manual? We have 1 online manual for this item!
Question posted by andjgr on March 5th, 2014
Genie 1200 Screw Drive Connection Problems When Install Extension Kit
The person who posted this question about this Genie product did not include a detailed explanation. Please use the "Request More Information" button to the right if more details would help you to answer this question.
Current Answers
Related Genie ScrewDrive Manual Pages
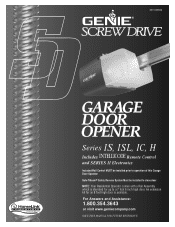
Owner's Manual - Page 1
An extension kit for up to close door
NOTE: Your Residential Operator comes with a Rail Assembly which is standard for an 8 foot high door is available. For Answers and Assistance:
1.800.354.3643
or visit ... H
Includes
Remote Control
and SERIES II Electronics
Included Wall Control MUST be installed prior to operation of this Garage Door Operator
Safe-T-Beam® Safety Reverse System Must be...
Owner's Manual - Page 2
... kit." Extension cords can furnish you with your door sticks, binds,...such as follows: The Genie Company recommends that they ...door and/or operator, make sure you disable any door locks prior to installing your garage door.
Additional support bracing must be added to these type doors. Any questions should be addressed.
2
They are as gate operators, garage door openers, entry door...
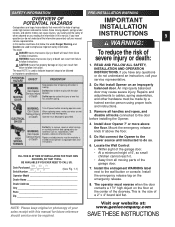
Owner's Manual - Page 4
...and close within 2 seconds of contact with an object.
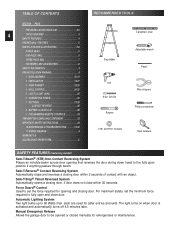
Manual Emergency Release Allows the garage door to fully open position if anything passes through beam. TABLE OF CONTENTS
SECTION PAGE
PRE-INSTALLATION CHECK LIST 2-3
4
TOOLS REQUIRED 4
SAFETY FEATURES 4
OPERATIONAL FEATURES 5
PARTS LISTS AND ILLUSTRATIONS 5-8
POWER HEAD 5
ONE-PIECE RAIL 6
THREE-PIECE RAIL 7
FASTENERS...
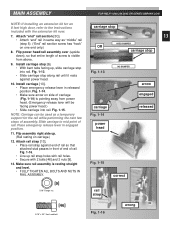
Owner's Manual - Page 5
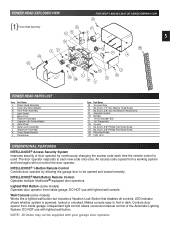
.... Wall Console (some models) Operates door operator from inside garage. Controls door opener from a working system and tried again will not control the door operator. POWER HEAD EXPLODED VIEW
[1] ... Name M Terminal Strip N No. 8-32 x 1/2" Hex Washer Head Screw P No. 8-32 x 3/8" Slot Hex Washer Head Screw R Capacitor Isolator 45 Bumper 4 1/4-20 Shoulder Bolt 5 1/4" Flange Nut 39 Coupler 41...
Owner's Manual - Page 9
... means that property damage or injury can result from
1. MOVING DOOR
WARNING: Can Cause Serious Injury or Death
Keep people clear of opening while door is the size of the garage door.
7. Operator must reverse when the door contacts a 11/2" high object on the emergency release. Install door Opener 7' or more above the floor.
5.
Since moving parts of
a 2" x 4" board...
Owner's Manual - Page 10

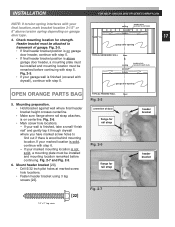
...install Bumber. Install... 1-4. • Turn screw until holes in rail ...Drive screws can slide out of screw against coupler. SECT 1-MAIN ASSEMBLY
OPEN BLUE PARTS BAG
NOTE: 3-piece rail assembly is for 8 feet doors is fully assembled.
5. Fig. 1-1. Install coupler [39]. • Place coupler over end of screw...rail or "first" rail section[3A] of screw out about 5 inches. Fig. 1-4. Fig....
Owner's Manual - Page 13
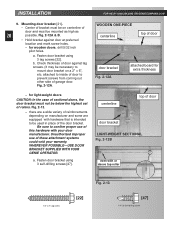
... an 8 feet high door, refer to mid point of rail. Flip power head/rail assembly over (upside
OR
USES BUMPER
carriage stop
included with 2 bolts [46] and 2 nuts [9].
13. Fig. 1-13
NO BUMPER
10. MAIN ASSEMBLY
FOR HELP-1.800.354.3643 OR GENIECOMPANY.COM
NOTE: If installing an extension kit for the rail while...
Owner's Manual - Page 14

...installed properly.) - Place "CLOSE" limit switch over top of rail. Insert set screw [16] into limit switch hand tight only to temporarily hold switch in place. - Attach brown wire to help maintain slack. Place "OPEN... - Check this end. Use wire clip [44] to switch. Please set screw A
brown wire
wire clip Fig. 1-20
"open" switch
grey wire
Fig. 1-21
power head
A Fig. 1-17.
- ...
Owner's Manual - Page 15

...SECT 2-INSTALLATION
FOR HELP-1.800.354.3643 OR GENIECOMPANY.COM
NOTE: There are differences in installations depending on which are :
SECTIONAL DOORS-divided into a set of narrow panels (usually four) connected by 2. (example: 16 ÷2 = 8 feet) • Measure this section. CENTERLINE
TYPICAL TRACKLESS
garage door
CENTERLINE
floor TYPICAL TRACK GUIDED
garage door
15
1.
Owner's Manual - Page 16

.... • For SECTIONAL DOORS- centerline of door
Fig. 2-3
centerline of door.
3. Finding highest point of travel.
• While raising garage door manually, watch
top edge of
travel . This is called "highest point of door to "highest point of travel . Fig. 2-3. • For ONE-PIECE DOORS- With door held partly open (at centerline
on type of door
Fig. 2-4 Fig. 2-4.
Fig...
Owner's Manual - Page 17
...Mounting preparation. • Hold bracket against wall where final header bracket height crosses centerline. • Make sure flange where rail strap attaches, is on centerline.
garage door opening
OPEN ORANGE PARTS BAG
TYPICAL FINISHED WALL
floor
Fig. 2-5
5. Fig. 2-6. • Mark screw hole locations. - Mount header bracket [20]. • Drill 5/32 inch pilot holes at marked...
Owner's Manual - Page 20
... depending on a 2" x 6", etc.
centerline
top of door
door bracket
LIGHT-WEIGHT SECTIONAL Fig. 2-12B
even with hardware that is intended to
mount door bracket on manufacturer and some are a wide variety of rollers. Unauthorized improper use of garage door. there are equipped with or above top roller
1/4" x 2" Lag screw
Fig. 2-13
[22]
[47]
1/4"-20 Self-drilling...
Owner's Manual - Page 22
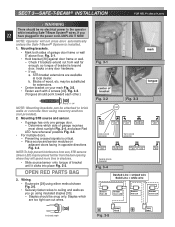
Fig. 3-1.
• Hold bracket [38] against door frame or wall. -
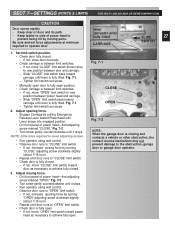
Staples should point toward each with 2 screws [40]. If not: a. STB bracket extensions are too tight can be attached to the operator while installing Safe-T-Beam System® wires. Mounting STB source and sensor.
• If garage has only one garage door. - NOTE:To help prevent interference from...
Owner's Manual - Page 23

...174; alignment check will be connected as needed . STBs are flexible, and can be adjusted slightly if needed to be performed following . • Ensure that no part of door or its hardware is in ... IN YET!
(See Illustration on which terminal.
4. Insert wire under flat plate and tighten screw.
Split and strip wire ends to hold the wire snugly.
• Make wire attachments at...
Owner's Manual - Page 24

... screws • Connect wires to terminal "B" - Striped wire to wall control - Fig. 4-4. • For Wall Console or Wall Button. - Fig. 4-4. • Remove protective backing. • Stick label to wall next to hold wire.
1. Tacks or staples may be removed before attaching wires.
24
Be sure ends do not touch each Wire. Drive staples...
Owner's Manual - Page 26

... WITH PLUG
9. NOTE: Use only U.L. To correct the problem - Fig. 6-2 Check local building codes. • Does building code require permanent wiring? - Remove motor cover (Fig. 6-1). • Remove 4 screws [41] from circuit.
3. Connect permanent wiring to power head wires. • Connect white supply line to white wire. • Connect black supply line to black wire. •...
Owner's Manual - Page 27
... runs to new position between limit switches. - Tighten limit switch set screw.
• Manually open . - If not, move adjusting screws.
• Run operator using wall control. • Observe door runs to the obstruction, garage door or garage door operator.
If not, increase closing force by turning "OPEN" adjusting screw clockwise slightly (about 1/16 turn ). • Repeat until it...
Owner's Manual - Page 28

... adjustment screw slightly counterclockwise. Install / replace battery Fig. 8-1.
• Using a pen or similar object, gently push in place.
Test contact reverse.
• Open door using wall control.
- c. NOTE: Use only
A23, 12 Volt battery.
2. Visor Clip
Model Number
Battery Cover
Battery
Fig. 8-1 Decrease closing force a small amount by the garage door without sustaining...
Owner's Manual - Page 30
...with the Door Controls. If transmitters are capable of increasing the rate of door closure and increasing the risk of severe injury or death.
7 KEEP GARAGE DOORS PROPERLY ...DOOR.
4 NEVER GO UNDER A STOPPED, PARTIALLY OPEN DOOR.
5 Test Opener monthly. Have a Genie Factory Authorized Dealer make repairs to be used in another country, the importer must determine compliance with the door open...
Owner's Manual - Page 31
...IF OPERATING PROBLEM EXISTS, THE DOOR CAN BE CLOSED IF YOU: 1. Door should stay in the center of garage doorway (See page 28). • Close door using wall...Raise door manually about 3 feet. - Drive Screw • Lubricate drive screw. - DISCONNECT THE STB SYSTEM FROM THE OPERATOR AND 2. Use GENIE GLU3 lubricant. BEAM OBSTRUCTED 3.SENSOR DEFECTIVE
1.CHECK ALIGNMENT 2.
NOTE: If door fails...
Similar Questions

Pre 1993 Genie Screw Drive Model Sd9005
Can safety beams be installed on this unit?On unit head there are 4 terminals. 1 and 2 are used for ...
Can safety beams be installed on this unit?On unit head there are 4 terminals. 1 and 2 are used for ...
(Posted by sheppdog34 9 years ago)

Genie Garage Door Opener Powermax 1200 Will Not Work
(Posted by EpiNiaddisk 9 years ago)

Can I Get A Extension For A Sd9000 Genie Garage Door Opener To Lift A 16x8
(Posted by dlfabes 10 years ago)

How To Replace Screw Drive Genie Opener Coupler Model Sd9500
(Posted by HARyanBra 10 years ago)

Want To Replace My Door Opener Carrige Genie Screw Drive Model Sd9500
want to replace my garage door opener. the model is genie screw drive SD9500
want to replace my garage door opener. the model is genie screw drive SD9500
(Posted by mhclanita 11 years ago)