
User Manual
Page 28
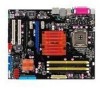
... 2-23 2-24 2-24 Page 2-25 2-25 2-25 2-25 2-25 2-25 2-25 2-25 2-26 2-26 2-26 2-26 2-26 2-26 2-26 2-26 2-4 Chapter 2: Hardware information Clear RTC RAM (3-pin CLRTC) 2. Serial port 14. PS/2 mouse port (green) 2. Rear Speaker Out port (black) 7. Optical S/PDIF Out port 15. 2.2.4 Slots 1. 2. 3. 4.
... 2-23 2-24 2-24 Page 2-25 2-25 2-25 2-25 2-25 2-25 2-25 2-25 2-26 2-26 2-26 2-26 2-26 2-26 2-26 2-26 2-4 Chapter 2: Hardware information Clear RTC RAM (3-pin CLRTC) 2. Serial port 14. PS/2 mouse port (green) 2. Rear Speaker Out port (black) 7. Optical S/PDIF Out port 15. 2.2.4 Slots 1. 2. 3. 4.

User Manual
Page 47
To erase the RTC RAM: 1. Move the jumper cap from pins 1-2 (default) to overclocking, use the C.P.R. (CPU Parameter Recall) feature. Remove the onboard battery. 3. Plug the power cord and turn ON the computer. 6. For system failure due to pins 2-3. ASUS P5N-D 2-23 Keep the cap on pins 2-3 for ...about 5~10 seconds, then move the cap back to default values. Clear RTC RAM (3-pin CLRTC) This jumper allows you clear the CMOS. • You do not...
To erase the RTC RAM: 1. Move the jumper cap from pins 1-2 (default) to overclocking, use the C.P.R. (CPU Parameter Recall) feature. Remove the onboard battery. 3. Plug the power cord and turn ON the computer. 6. For system failure due to pins 2-3. ASUS P5N-D 2-23 Keep the cap on pins 2-3 for ...about 5~10 seconds, then move the cap back to default values. Clear RTC RAM (3-pin CLRTC) This jumper allows you clear the CMOS. • You do not...
User Manual
Page 76
...-Test (POST) to "Run Setup." For example, you can recognize these changes and record them in the CMOS RAM of your screen. • Visit the ASUS website (www.asus.com) to download the latest BIOS file for most conditions to ensure system compatibility and stability. When you start up... any BIOS settings, load the default settings to ensure optimum performance. If you with its test routines. This requires you are installing a motherboard, reconfiguring your system using this last option only if the first two failed. Even if you to reconfigure your system, or prompted to ...
...-Test (POST) to "Run Setup." For example, you can recognize these changes and record them in the CMOS RAM of your screen. • Visit the ASUS website (www.asus.com) to download the latest BIOS file for most conditions to ensure system compatibility and stability. When you start up... any BIOS settings, load the default settings to ensure optimum performance. If you with its test routines. This requires you are installing a motherboard, reconfiguring your system using this last option only if the first two failed. Even if you to reconfigure your system, or prompted to ...

User Manual
Page 89
4.4.3 CPU Configuration Advanced Phoenix-Award BIOS CMOS Setup Utility CPU Configuration CPU Type Genuine Intel(R) CPU CPU Speed 2.80GHz Cache RAM 1024K x2 CPU Internal Thermal Control [Disabled] Limited CPUID MaxVal [Disabled] Execute Disable Bit [Enabled] Virtualization Technology [Enabled] CPU Multiplier [8x] Enhanced Intel Speedstep(tm... [Enabled] Configuration options: [Disabled] [Enabled] CPU Multiplier [8x] Configuration options: [6x] [7x] [8x] [9x] Enhanced Intel Speedstep(tm) Tech. [Disabled] Configuration options: [Disabled] [Enabled] ASUS P5N-D 4-23
4.4.3 CPU Configuration Advanced Phoenix-Award BIOS CMOS Setup Utility CPU Configuration CPU Type Genuine Intel(R) CPU CPU Speed 2.80GHz Cache RAM 1024K x2 CPU Internal Thermal Control [Disabled] Limited CPUID MaxVal [Disabled] Execute Disable Bit [Enabled] Virtualization Technology [Enabled] CPU Multiplier [8x] Enhanced Intel Speedstep(tm... [Enabled] Configuration options: [Disabled] [Enabled] CPU Multiplier [8x] Configuration options: [6x] [7x] [8x] [9x] Enhanced Intel Speedstep(tm) Tech. [Disabled] Configuration options: [Disabled] [Enabled] ASUS P5N-D 4-23

User Manual
Page 104
... by typing the exact characters again, then press . Configuration options: [Non-OS2] [OS2] Full Screen LOGO [Enabled] Allows you want to use the ASUS MyLogo3™ feature. Select an item then press . 2. The password field setting is set to [Enabled] if you to enable or disable the full...) [250] Allows you to set passwords: To set a password: 1. Halt On [All Errors] Allows you are running on an OS/2 operating system with an installed RAM of eight (8) alpha‑numeric characters, then press . 3. Configuration options: [250] [500] [750] [1000] OS Select for DRAM > 64MB [Non-OS2] ...
... by typing the exact characters again, then press . Configuration options: [Non-OS2] [OS2] Full Screen LOGO [Enabled] Allows you want to use the ASUS MyLogo3™ feature. Select an item then press . 2. The password field setting is set to [Enabled] if you to enable or disable the full...) [250] Allows you to set passwords: To set a password: 1. Halt On [All Errors] Allows you are running on an OS/2 operating system with an installed RAM of eight (8) alpha‑numeric characters, then press . 3. Configuration options: [250] [500] [750] [1000] OS Select for DRAM > 64MB [Non-OS2] ...

User Manual
Page 105
...User password is changed to Clear. The RAM data containing the password information is required to require the password before entering the system. Select [Setup] to enter the BIOS Setup program preventing unauthorized access. Configuration options: [Setup] [System] ASUS P5N-D 4-39 Select the password field and ...setting is required to continue... 2. A note about passwords The Supervisor password is powered by erasing the CMOS Real Time Clock (RTC) RAM. To clear the password: 1. Press any key to enter the password before entering the BIOS setup or the system. If you ...
...User password is changed to Clear. The RAM data containing the password information is required to require the password before entering the system. Select [Setup] to enter the BIOS Setup program preventing unauthorized access. Configuration options: [Setup] [System] ASUS P5N-D 4-39 Select the password field and ...setting is required to continue... 2. A note about passwords The Supervisor password is powered by erasing the CMOS Real Time Clock (RTC) RAM. To clear the password: 1. Press any key to enter the password before entering the BIOS setup or the system. If you ...
User Manual
Page 109
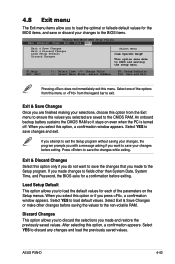
...Discard Changes Select Menu Item Specific Help This option save data to CMOS and exiting the setup menu. An onboard backup battery sustains the CMOS RAM so it stays on the Setup menus. Select YES to load default values. Load Setup Default This option allows you made changes to fields ... Changes Once you are saved to the CMOS RAM. If you attempt to exit the Setup program without saving your changes, the program prompts you with a message asking if you want to save the changes that you made and restore the previously saved values. ASUS P5N-D 4-43 4.8 Exit menu The Exit menu ...
...Discard Changes Select Menu Item Specific Help This option save data to CMOS and exiting the setup menu. An onboard backup battery sustains the CMOS RAM so it stays on the Setup menus. Select YES to load default values. Load Setup Default This option allows you made changes to fields ... Changes Once you are saved to the CMOS RAM. If you attempt to exit the Setup program without saving your changes, the program prompts you with a message asking if you want to save the changes that you made and restore the previously saved values. ASUS P5N-D 4-43 4.8 Exit menu The Exit menu ...


