
User Manual
Page 4
... 4: BIOS setup 4.1 Managing and updating your BIOS 4-1 4.1.1 ASUS Update utility 4-1 4.1.2 Creating a bootable floppy disk 4-4 4.1.3 ASUS EZ Flash 2 utility 4-5 4.1.4 Updating the BIOS 4-6 4.1.5 Saving the current BIOS file 4-8 4.1.6 ASUS CrashFree BIOS 2 utility 4-9 4.2 BIOS setup program 4-10 4.2.1... BIOS menu screen 4-11 4.2.2 Menu bar 4-11 4.2.3 Legend bar 4-12 4.2.4 Menu items 4-12 4.2.5 Sub-menu items 4-12 4.2.6 Configuration fields 4-12 4.2.7 Pop-up window 4-13 4.2.8 General help...
... 4: BIOS setup 4.1 Managing and updating your BIOS 4-1 4.1.1 ASUS Update utility 4-1 4.1.2 Creating a bootable floppy disk 4-4 4.1.3 ASUS EZ Flash 2 utility 4-5 4.1.4 Updating the BIOS 4-6 4.1.5 Saving the current BIOS file 4-8 4.1.6 ASUS CrashFree BIOS 2 utility 4-9 4.2 BIOS setup program 4-10 4.2.1... BIOS menu screen 4-11 4.2.2 Menu bar 4-11 4.2.3 Legend bar 4-12 4.2.4 Menu items 4-12 4.2.5 Sub-menu items 4-12 4.2.6 Configuration fields 4-12 4.2.7 Pop-up window 4-13 4.2.8 General help...
User Manual
Page 6
...-GPU feature in Windows 6-5 Appendix: CPU features A.1 Intel® EM64T A-1 A.2 Enhanced Intel SpeedStep® Technology (EIST A-1 A.2.1 System requirements A-1 A.2.2 Using the EIST A-2 A.3 Intel® Hyper-Threading Technology A-3 vi 5.2.3 Utilities menu 5-3 5.2.4 Make disk menu 5-5 5.2.5 Manual menu 5-6 5.2.6 ASUS Contact information 5-6 5.2.7 Other information 5-7 5.3 Software information 5-9 5.3.1 ASUS MyLogo2 5-9 5.3.2 Audio configurations 5-11 5.3.3 ASUS PC Probe II 5-15 5.3.4 ASUS AI Suite 5-21...
...-GPU feature in Windows 6-5 Appendix: CPU features A.1 Intel® EM64T A-1 A.2 Enhanced Intel SpeedStep® Technology (EIST A-1 A.2.1 System requirements A-1 A.2.2 Using the EIST A-2 A.3 Intel® Hyper-Threading Technology A-3 vi 5.2.3 Utilities menu 5-3 5.2.4 Make disk menu 5-5 5.2.5 Manual menu 5-6 5.2.6 ASUS Contact information 5-6 5.2.7 Other information 5-7 5.3 Software information 5-9 5.3.1 ASUS MyLogo2 5-9 5.3.2 Audio configurations 5-11 5.3.3 ASUS PC Probe II 5-15 5.3.4 ASUS AI Suite 5-21...

User Manual
Page 32
CPU notch Gold triangle mark The CPU fits in only one correct orientation. The motherboard supports Intel® LGA775 processors with your thumb and forefinger to a 100º angle (A), then push the PnP cap from the load plate window to prevent bending the connectors on the socket and damaging the CPU! 6. 4. DO NOT...
CPU notch Gold triangle mark The CPU fits in only one correct orientation. The motherboard supports Intel® LGA775 processors with your thumb and forefinger to a 100º angle (A), then push the PnP cap from the load plate window to prevent bending the connectors on the socket and damaging the CPU! 6. 4. DO NOT...
User Manual
Page 38
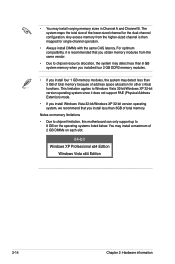
... 3 GB of total memory because of total memory. Notes on memory limitations • Due to chipset limitation, this motherboard can only support up to 8 GB on each slot. 64-bit Windows XP Professional x64 Edition Windows Vista x64 Edition 2-14 Chapter 2: Hardware information • You may install a maximum of the lower-sized channel...
... 3 GB of total memory because of total memory. Notes on memory limitations • Due to chipset limitation, this motherboard can only support up to 8 GB on each slot. 64-bit Windows XP Professional x64 Edition Windows Vista x64 Edition 2-14 Chapter 2: Hardware information • You may install a maximum of the lower-sized channel...

User Manual
Page 64
Click the Start button then select ShutDown. 2. The power supply should turn off after Windows® shuts down. Refer to soft-off mode regardless of the BIOS setting. If you are using Windows® XP: 1. 3.2 Turning off after Windows® shuts down. 3.2.2 Using the dual function power switch While the system is ON, pressing... the system enter the soft-off mode, depending on the BIOS setting. Click the Turn Off button to shut down function If you are using Windows® Vista: 1.
Click the Start button then select ShutDown. 2. The power supply should turn off after Windows® shuts down. Refer to soft-off mode regardless of the BIOS setting. If you are using Windows® XP: 1. 3.2 Turning off after Windows® shuts down. 3.2.2 Using the dual function power switch While the system is ON, pressing... the system enter the soft-off mode, depending on the BIOS setting. Click the Turn Off button to shut down function If you are using Windows® Vista: 1.
User Manual
Page 67
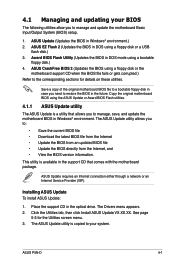
... system. Place the support CD in Windows® environment.) 2. ASUS Update (Updates the BIOS in the optical drive. ASUS EZ Flash 2 (Updates the BIOS in DOS mode using a floppy disk or the motherboard support CD when the BIOS file fails...motherboard package. Award BIOS Flash Utility (Updates the BIOS in DOS using the ASUS Update or Award BIOS Flash utilities. 4.1.1 ASUS Update utility The ASUS Update is available in the support CD that allows you to manage, save, and update the motherboard BIOS in Windows® environment. See page 5-3 for details on these utilities. ASUS P5N...
... system. Place the support CD in Windows® environment.) 2. ASUS Update (Updates the BIOS in the optical drive. ASUS EZ Flash 2 (Updates the BIOS in DOS mode using a floppy disk or the motherboard support CD when the BIOS file fails...motherboard package. Award BIOS Flash Utility (Updates the BIOS in DOS using the ASUS Update or Award BIOS Flash utilities. 4.1.1 ASUS Update utility The ASUS Update is available in the support CD that allows you to manage, save, and update the motherboard BIOS in Windows® environment. See page 5-3 for details on these utilities. ASUS P5N...
User Manual
Page 68
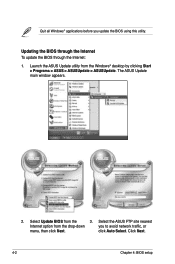
Click Next. 4-2 Chapter 4: BIOS setup Select Update BIOS from the Windows® desktop by clicking Start > Programs > ASUS > ASUSUpdate > ASUSUpdate. Launch the ASUS Update utility from the 3. click Auto Select. Select the ASUS FTP site nearest Internet option from the drop‑down you update the BIOS using this utility. Updating the BIOS through the Internet To update the BIOS through the Internet: 1. The ASUS Update main window appears. 2. Quit all Windows® applications before you to avoid network traffic, or menu, then click Next.
Click Next. 4-2 Chapter 4: BIOS setup Select Update BIOS from the Windows® desktop by clicking Start > Programs > ASUS > ASUSUpdate > ASUSUpdate. Launch the ASUS Update utility from the 3. click Auto Select. Select the ASUS FTP site nearest Internet option from the drop‑down you update the BIOS using this utility. Updating the BIOS through the Internet To update the BIOS through the Internet: 1. The ASUS Update main window appears. 2. Quit all Windows® applications before you to avoid network traffic, or menu, then click Next.

User Manual
Page 69
... features. 4. Follow the screen instructions to download. From the FTP site, select the BIOS version that you wish to complete the update process. P5N-D.BIN P5N-D ASUS P5N-D 4-3 Select Update BIOS from a file option from the Open window, then click Open. 4. Click Next. 5. Launch the ASUS Update utility from the Windows® desktop by clicking Start > Programs...
... features. 4. Follow the screen instructions to download. From the FTP site, select the BIOS version that you wish to complete the update process. P5N-D.BIN P5N-D ASUS P5N-D 4-3 Select Update BIOS from a file option from the Open window, then click Open. 4. Click Next. 5. Launch the ASUS Update utility from the Windows® desktop by clicking Start > Programs...

User Manual
Page 70
... floppy disk into the drive. Click Start from the menu, then select Format. At the DOS prompt, type format A:/S then press . Click File from the Windows® desktop, then select My Computer. Select Create an MS-DOS startup disk from the format options field, then click Start. 4-4 Chapter 4: BIOS setup b. A Format...
... floppy disk into the drive. Click Start from the menu, then select Format. At the DOS prompt, type format A:/S then press . Click File from the Windows® desktop, then select My Computer. Select Create an MS-DOS startup disk from the format options field, then click Start. 4-4 Chapter 4: BIOS setup b. A Format...

User Manual
Page 78
... values for the menu items. If an item is a legend bar. You cannot select an item that is highlighted when selected. Refer to "4.2.7 Pop-up window." 4-12 Chapter 4: BIOS setup The following table lists the keys found in the legend bar allow you can change the value of a field, select it...
... values for the menu items. If an item is a legend bar. You cannot select an item that is highlighted when selected. Refer to "4.2.7 Pop-up window." 4-12 Chapter 4: BIOS setup The following table lists the keys found in the legend bar allow you can change the value of a field, select it...
User Manual
Page 79
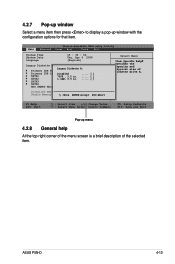
ASUS P5N-D 4-13 4.2.7 Pop-up window Select a menu item then press to display a pop-up menu 4.2.8 General help At the top right corner of the menu screen is a brief description of ...:Help ESC: Exit ↑↓ : Select Item -/+: Change Value →←: Select Menu Enter: Select SubMenu F5: Setup Defaults F10: Save and Exit Pop-up window with the configuration options for that item. Main Phoenix-AwardBIOS CMOS Setup Utility Advanced Power Boot Tools Exit System Time System Date Language 15 : 30...
ASUS P5N-D 4-13 4.2.7 Pop-up window Select a menu item then press to display a pop-up menu 4.2.8 General help At the top right corner of the menu screen is a brief description of ...:Help ESC: Exit ↑↓ : Select Item -/+: Change Value →←: Select Menu Enter: Select SubMenu F5: Setup Defaults F10: Save and Exit Pop-up window with the configuration options for that item. Main Phoenix-AwardBIOS CMOS Setup Utility Advanced Power Boot Tools Exit System Time System Date Language 15 : 30...
User Manual
Page 109
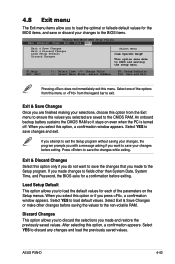
...legend bar to exit. Exit & Save Changes Once you are finished making your changes before exiting. If you made to the Setup program. ASUS P5N-D 4-43 Select one of the parameters on even when the PC is turned off. Select YES to save your selections, choose this menu ...exit. When you select this menu. When you select this option, a confirmation appears. After selecting this option or if you press , a confirmation window appears. Press to save the changes that you made changes to fields other changes before exiting. Select YES to load default values. 4.8 Exit menu ...
...legend bar to exit. Exit & Save Changes Once you are finished making your changes before exiting. If you made to the Setup program. ASUS P5N-D 4-43 Select one of the parameters on even when the PC is turned off. Select YES to save your selections, choose this menu ...exit. When you select this menu. When you select this option, a confirmation appears. After selecting this option or if you press , a confirmation window appears. Press to save the changes that you made changes to fields other changes before exiting. Select YES to load default values. 4.8 Exit menu ...
User Manual
Page 113
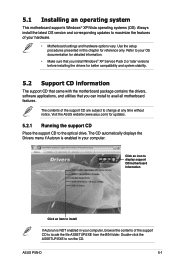
... from the BIN folder. ASUS P5N-D 5-1 The contents of your OS documentation for detailed information. • Make sure that you install Windows® XP Service Pack 2 or later versions before installing the drivers for better compatibility and system stability. 5.2 Support CD information The support CD that came with the motherboard package contains the drivers...
... from the BIN folder. ASUS P5N-D 5-1 The contents of your OS documentation for detailed information. • Make sure that you install Windows® XP Service Pack 2 or later versions before installing the drivers for better compatibility and system stability. 5.2 Support CD information The support CD that came with the motherboard package contains the drivers...
User Manual
Page 117
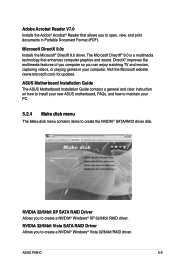
... Portable Document Format (PDF). ASUS Motherboard Installation Guide The ASUS Motherboard Installation Guide contains a general and clear instruction on how to install your new ASUS motherboard, FAQs, and how to maintain your computer. NVIDIA 32/64bit Vista SATA RAID Driver Allows you to create a NVIDIA® Windows® Vista 32/64bit RAID driver. ASUS P5N-D 5-5 The Microsoft DirectX®...
... Portable Document Format (PDF). ASUS Motherboard Installation Guide The ASUS Motherboard Installation Guide contains a general and clear instruction on how to install your new ASUS motherboard, FAQs, and how to maintain your computer. NVIDIA 32/64bit Vista SATA RAID Driver Allows you to create a NVIDIA® Windows® Vista 32/64bit RAID driver. ASUS P5N-D 5-5 The Microsoft DirectX®...

User Manual
Page 121
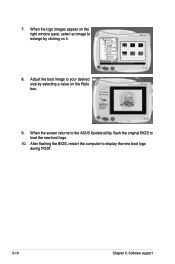
...Test (POST). To launch the ASUS MyLogo2™: 1. From the left window pane, select the folder that contains the image you wish to use the Award BIOS Flash utility to section "4.1.1 ASUS Update utility" for more information. 5.3.1 ASUS MyLogo2™ The ASUS MyLogo2™ utility lets you... than 150 K. Check the option Launch MyLogo2 to replace system boot logo before flashing BIOS, then click Next. 4. The ASUS MyLogo2 window appears. 6. ASUS P5N-D 5-9 5.3 Software information Most of your own boot logo image in the support CD have wizards that will conveniently guide you...
...Test (POST). To launch the ASUS MyLogo2™: 1. From the left window pane, select the folder that contains the image you wish to use the Award BIOS Flash utility to section "4.1.1 ASUS Update utility" for more information. 5.3.1 ASUS MyLogo2™ The ASUS MyLogo2™ utility lets you... than 150 K. Check the option Launch MyLogo2 to replace system boot logo before flashing BIOS, then click Next. 4. The ASUS MyLogo2 window appears. 6. ASUS P5N-D 5-9 5.3 Software information Most of your own boot logo image in the support CD have wizards that will conveniently guide you...
User Manual
Page 122
When the screen returns to the ASUS Update utility, flash the original BIOS to your desired size by clicking on it. 8. Adjust the boot image to load the new boot logo. 10. When the logo images appear on the Ratio box. 9. 7. After flashing the BIOS, restart the computer to enlarge by selecting a value on the right window pane, select an image to display the new boot logo during POST. 5-10 Chapter 5: Software support
When the screen returns to the ASUS Update utility, flash the original BIOS to your desired size by clicking on it. 8. Adjust the boot image to load the new boot logo. 10. When the logo images appear on the Ratio box. 9. 7. After flashing the BIOS, restart the computer to enlarge by selecting a value on the right window pane, select an image to display the new boot logo during POST. 5-10 Chapter 5: Software support

User Manual
Page 123
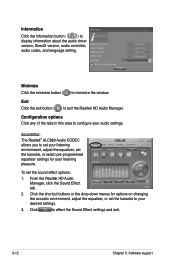
... settings window Realtek HD Audio Manager Exit button Minimize button Information button ASUS P5N-D 5-11 5.3.2 Audio configurations The Realtek® ALC883 audio CODEC provides 8-channel audio capability to deliver the ultimate audio experience on the SoundEffect icon to install the Realtek® Audio Driver from the support CD that came with the motherboard package...
... settings window Realtek HD Audio Manager Exit button Minimize button Information button ASUS P5N-D 5-11 5.3.2 Audio configurations The Realtek® ALC883 audio CODEC provides 8-channel audio capability to deliver the ultimate audio experience on the SoundEffect icon to install the Realtek® Audio Driver from the support CD that came with the motherboard package...
User Manual
Page 124
... Sound Effect tab. 2. Configuration options Click any of the tabs in this area to your audio settings. Exit Click the exit button ( ) to minimize the window.
... Sound Effect tab. 2. Configuration options Click any of the tabs in this area to your audio settings. Exit Click the exit button ( ) to minimize the window.

User Manual
Page 125
... volume buttons to effect the Mixer settings and exit. Click for analog and digital options. 4. The control settings window displays the status of connected devices. To set the Audio I /O settings and exit ASUS P5N-D 5-13 Click to adjust the Playback and/or Record volume. Mixer The Mixer option allows you to select the...
... volume buttons to effect the Mixer settings and exit. Click for analog and digital options. 4. The control settings window displays the status of connected devices. To set the Audio I /O settings and exit ASUS P5N-D 5-13 Click to adjust the Playback and/or Record volume. Mixer The Mixer option allows you to select the...

User Manual
Page 127
... Probe II is a utility that your computer is always at a healthy operating condition. With this icon to close the Preference panel ASUS P5N-D 5-15 The Drivers installation tab appears if your system and change the utility configuration. After launching the application, the PC Probe II...rotations, CPU temperature, and system voltages, among others. Place the support CD to complete installation. To launch the PC Probe II from the Windows® desktop. Click this utility, you are assured that monitors the computer's vital components, and detects and alerts you turn it on....
... Probe II is a utility that your computer is always at a healthy operating condition. With this icon to close the Preference panel ASUS P5N-D 5-15 The Drivers installation tab appears if your system and change the utility configuration. After launching the application, the PC Probe II...rotations, CPU temperature, and system voltages, among others. Place the support CD to complete installation. To launch the PC Probe II from the Windows® desktop. Click this utility, you are assured that monitors the computer's vital components, and detects and alerts you turn it on....


