
User Manual
Page 2
... OF THE POSSIBILITY OF SUCH DAMAGES ARISING FROM ANY DEFECT OR ERROR IN THIS MANUAL OR PRODUCT. ASUS ASSUMES NO RESPONSIBILITY OR LIABILITY FOR ANY ERRORS OR INACCURACIES THAT MAY APPEAR IN THIS MANUAL, INCLUDING THE PRODUCTS AND SOFTWARE DESCRIBED IN IT. or (2) the serial number ...infringe. E3894 Second Edition V2 May 2008 Copyright © 2008 ASUSTeK COMPUTER INC. No part of ASUSTeK COMPUTER INC. ("ASUS"). ii All Rights Reserved. ASUS PROVIDES THIS MANUAL "AS IS" WITHOUT WARRANTY OF ANY KIND, EITHER EXPRESS OR IMPLIED, INCLUDING BUT NOT LIMITED TO THE IMPLIED WARRANTIES OR...
... OF THE POSSIBILITY OF SUCH DAMAGES ARISING FROM ANY DEFECT OR ERROR IN THIS MANUAL OR PRODUCT. ASUS ASSUMES NO RESPONSIBILITY OR LIABILITY FOR ANY ERRORS OR INACCURACIES THAT MAY APPEAR IN THIS MANUAL, INCLUDING THE PRODUCTS AND SOFTWARE DESCRIBED IN IT. or (2) the serial number ...infringe. E3894 Second Edition V2 May 2008 Copyright © 2008 ASUSTeK COMPUTER INC. No part of ASUSTeK COMPUTER INC. ("ASUS"). ii All Rights Reserved. ASUS PROVIDES THIS MANUAL "AS IS" WITHOUT WARRANTY OF ANY KIND, EITHER EXPRESS OR IMPLIED, INCLUDING BUT NOT LIMITED TO THE IMPLIED WARRANTIES OR...
User Manual
Page 6
AI Gear 3 5-23 5.3.6 ASUS AI Nap 5-24 5.3.7 ASUS Q-Fan 2 5-25 5.3.8 ASUS AI Booster 5-26 5.3.9 ASUS AI Direct Link 5-27 5.4 RAID configurations 5-29 5.4.1 RAID definitions 5-29 5.4.2 NVIDIA® RAID... A-1 A.2.2 Using the EIST A-2 A.3 Intel® Hyper-Threading Technology A-3 vi 5.2.3 Utilities menu 5-3 5.2.4 Make disk menu 5-5 5.2.5 Manual menu 5-6 5.2.6 ASUS Contact information 5-6 5.2.7 Other information 5-7 5.3 Software information 5-9 5.3.1 ASUS MyLogo2 5-9 5.3.2 Audio configurations 5-11 5.3.3 ASUS PC Probe II 5-15 5.3.4 ASUS AI Suite 5-21 5.3.5 ASUS EPU Utility --
AI Gear 3 5-23 5.3.6 ASUS AI Nap 5-24 5.3.7 ASUS Q-Fan 2 5-25 5.3.8 ASUS AI Booster 5-26 5.3.9 ASUS AI Direct Link 5-27 5.4 RAID configurations 5-29 5.4.1 RAID definitions 5-29 5.4.2 NVIDIA® RAID... A-1 A.2.2 Using the EIST A-2 A.3 Intel® Hyper-Threading Technology A-3 vi 5.2.3 Utilities menu 5-3 5.2.4 Make disk menu 5-5 5.2.5 Manual menu 5-6 5.2.6 ASUS Contact information 5-6 5.2.7 Other information 5-7 5.3 Software information 5-9 5.3.1 ASUS MyLogo2 5-9 5.3.2 Audio configurations 5-11 5.3.3 ASUS PC Probe II 5-15 5.3.4 ASUS AI Suite 5-21 5.3.5 ASUS EPU Utility --

User Manual
Page 8
... cables are using an adapter or extension cord. If you add a device. • Before connecting or removing signal cables from the motherboard, ensure that all cables are correctly connected and the power cables are not sure about the voltage of the crossed out wheeled bin indicates...interrupt the grounding circuit. • Make sure that your power supply is broken, do not try to fix it , carefully read all the manuals that came with the product, contact a qualified service technician or your retailer. Safety information Electrical safety • To prevent electrical shock hazard, ...
... cables are using an adapter or extension cord. If you add a device. • Before connecting or removing signal cables from the motherboard, ensure that all cables are correctly connected and the power cables are not sure about the voltage of the crossed out wheeled bin indicates...interrupt the grounding circuit. • Make sure that your power supply is broken, do not try to fix it , carefully read all the manuals that came with the product, contact a qualified service technician or your retailer. Safety information Electrical safety • To prevent electrical shock hazard, ...

User Manual
Page 10
... you must press the Enter or Return key. Example: means that you must press the enclosed key. Used to complete a task. Keys enclosed in this manual. NOTE: Tips and additional information to complete a task. Conventions used throughout this guide To make sure that you perform certain tasks properly, take note of...
... you must press the Enter or Return key. Example: means that you must press the enclosed key. Used to complete a task. Keys enclosed in this manual. NOTE: Tips and additional information to complete a task. Conventions used throughout this guide To make sure that you perform certain tasks properly, take note of...

User Manual
Page 81
...sub-menu for the remaining fields on a previous system, the setup BIOS may detect incorrect parameters. Select a device item then press to manually enter the IDE hard disk drive parameters. Cylinder Head Sector Transfer Mode 39420 16 255 UDMA 5 F1:Help ESC: Exit ↑↓... options: [Disable] [Auto] Primary IDE Master/Slave [Auto] Select [Auto] to automatically detect an IDE hard disk drive. Configuration options: [None] [Auto] [Manual] ASUS P5N-D 4-15 Configuration options: [Auto] [Mode 0] [Mode 1] [Mode 2] [Mode 3] [Mode 4] UDMA Mode [Auto] Disables or sets the UDMA mode. Main...
...sub-menu for the remaining fields on a previous system, the setup BIOS may detect incorrect parameters. Select a device item then press to manually enter the IDE hard disk drive parameters. Cylinder Head Sector Transfer Mode 39420 16 255 UDMA 5 F1:Help ESC: Exit ↑↓... options: [Disable] [Auto] Primary IDE Master/Slave [Auto] Select [Auto] to automatically detect an IDE hard disk drive. Configuration options: [None] [Auto] [Manual] ASUS P5N-D 4-15 Configuration options: [Auto] [Mode 0] [Mode 1] [Mode 2] [Mode 3] [Mode 4] UDMA Mode [Auto] Disables or sets the UDMA mode. Main...

User Manual
Page 82
... disk drives to recognize the installed hard disk. After entering the IDE hard disk drive information into BIOS, use a disk utility, such as FDISK, to [Manual]. Select [CHS] for this item if you set the partition of sectors per track. Configuration options: [CHS] [LBA] [Large] [Auto] Before attempting to configure a hard...
... disk drives to recognize the installed hard disk. After entering the IDE hard disk drive information into BIOS, use a disk utility, such as FDISK, to [Manual]. Select [CHS] for this item if you set the partition of sectors per track. Configuration options: [CHS] [LBA] [Large] [Auto] Before attempting to configure a hard...

User Manual
Page 85
... menu The Advanced menu items allow you to individually set overclocking parameters. Selct either one of the preset overclocking configuration options: Manual Allows you to change the settings for the system. ASUS P5N-D 4-19 F1:Help Select Item ESC: Exit →←: Select Menu -/+: Change Value Enter: Select SubMenu F5: Setup Defaults F10...
... menu The Advanced menu items allow you to individually set overclocking parameters. Selct either one of the preset overclocking configuration options: Manual Allows you to change the settings for the system. ASUS P5N-D 4-19 F1:Help Select Item ESC: Exit →←: Select Menu -/+: Change Value Enter: Select SubMenu F5: Setup Defaults F10...
User Manual
Page 86
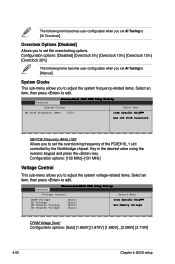
... options: [100 MHz]~[131 MHz] Voltage Control This sub-menu allows you to adjust the system voltage-related items. Select an item, then press to [Manual]. The following items become user-configurable when you set AI Tuning to edit. System Clocks This sub-menu allows you to adjust the system frequency...
... options: [100 MHz]~[131 MHz] Voltage Control This sub-menu allows you to adjust the system voltage-related items. Select an item, then press to [Manual]. The following items become user-configurable when you set AI Tuning to edit. System Clocks This sub-menu allows you to adjust the system frequency...

User Manual
Page 87
... MHz 800.0 Select Menu Item Specific Help System clock mode [Auto] Set FSB and memory speed automatically. [Linked] Enter FSB speed manually. Memory Clock Mode [Auto] Allows you to adjust the system frequency-related items. Select an item, then press to edit. Adjust ...;←: Select Menu [Unlinked] Enter FSB and memory speed manually. -/+: Change Value F5: Setup Defaults Enter: Select SubMenu F10: Save and Exit FSB - FSB - The following items become user-configurable when you set the CPU FSB frequency. ASUS P5N-D 4-21 Configuration options: [Auto] [Linked] [Unlinked]...
... MHz 800.0 Select Menu Item Specific Help System clock mode [Auto] Set FSB and memory speed automatically. [Linked] Enter FSB speed manually. Memory Clock Mode [Auto] Allows you to adjust the system frequency-related items. Select an item, then press to edit. Adjust ...;←: Select Menu [Unlinked] Enter FSB and memory speed manually. -/+: Change Value F5: Setup Defaults Enter: Select SubMenu F10: Save and Exit FSB - FSB - The following items become user-configurable when you set the CPU FSB frequency. ASUS P5N-D 4-21 Configuration options: [Auto] [Linked] [Unlinked]...

User Manual
Page 118
Click an item to display the ASUS contact information. 5.2.5 Manual menu The Manual menu contains a list of the user manual. You can also find this information on the inside front cover of this user guide. 5-6 Chapter 5: Software support Most user manual files are in Portable Document Format (PDF). Install the Adobe® Acrobat® Reader from the ASUS Superb Software Library CD before opening a user manual file. 5.2.6 ASUS Contact information Click the Contact tab to open the folder of supplementary user manuals.
Click an item to display the ASUS contact information. 5.2.5 Manual menu The Manual menu contains a list of the user manual. You can also find this information on the inside front cover of this user guide. 5-6 Chapter 5: Software support Most user manual files are in Portable Document Format (PDF). Install the Adobe® Acrobat® Reader from the ASUS Superb Software Library CD before opening a user manual file. 5.2.6 ASUS Contact information Click the Contact tab to open the folder of supplementary user manuals.
User Manual
Page 138
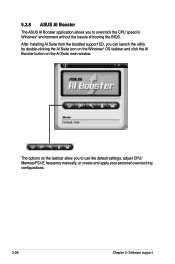
5.3.8 ASUS AI Booster The ASUS AI Booster application allows you to overclock the CPU speed in WIndows® environment without the hassle of booting the BIOS. The options on the AI Suite main window. After installing AI Suite from the bundled support CD, you can launch the utility by double-clicking the AI Suite icon on the Windows® OS taskbar and click the AI Booster button on the taskbar allow you to use the default settings, adjust CPU/ Memory/PCI-E frequency manually, or create and apply your personal overclocking configurations. 5-26 Chapter 5: Software support
5.3.8 ASUS AI Booster The ASUS AI Booster application allows you to overclock the CPU speed in WIndows® environment without the hassle of booting the BIOS. The options on the AI Suite main window. After installing AI Suite from the bundled support CD, you can launch the utility by double-clicking the AI Suite icon on the Windows® OS taskbar and click the AI Booster button on the taskbar allow you to use the default settings, adjust CPU/ Memory/PCI-E frequency manually, or create and apply your personal overclocking configurations. 5-26 Chapter 5: Software support

User Manual
Page 142
...item in the BIOS before you want to configure as RAID. Save your RAID configuration. Installing Serial ATA (SATA) hard disks The motherboard supports Ultra DMA 133/100/66 and Serial ATA hard disk drives. See section "4.4.6 Onboard Device Configuration > NVRAID Configuration" for ... RAID 1, RAID 0+1, RAID 5 and JBOD for details. 3. If you install an operating system to a selected hard disk drive. See section "5.2.5 Manuals menu." Connect a SATA power cable to enter the BIOS Setup Utility. 2. Refer to section "5.5 Creating a RAID driver disk" for details. 5.4.2 NVIDIA...
...item in the BIOS before you want to configure as RAID. Save your RAID configuration. Installing Serial ATA (SATA) hard disks The motherboard supports Ultra DMA 133/100/66 and Serial ATA hard disk drives. See section "4.4.6 Onboard Device Configuration > NVRAID Configuration" for ... RAID 1, RAID 0+1, RAID 5 and JBOD for details. 3. If you install an operating system to a selected hard disk drive. See section "5.2.5 Manuals menu." Connect a SATA power cable to enter the BIOS Setup Utility. 2. Refer to section "5.5 Creating a RAID driver disk" for details. 5.4.2 NVIDIA...


