
User Manual
Page 4
... Flash 2 utility 4-5 4.1.4 Updating the BIOS 4-6 4.1.5 Saving the current BIOS file 4-8 4.1.6 ASUS CrashFree BIOS 2 utility 4-9 4.2 BIOS setup program 4-10 4.2.1 BIOS menu screen 4-11 4.2.2 Menu bar 4-11 4.2.3 Legend bar 4-12 4.2.4 Menu items 4-12 4.2.5 Sub-menu items 4-12 4.2.6 Configuration fields 4-12 4.2.7 Pop-up window 4-13 4.2.8 General help 4-13 4.3 Main menu 4-14 4.3.1 System Time [xx:xx:xx...
... Flash 2 utility 4-5 4.1.4 Updating the BIOS 4-6 4.1.5 Saving the current BIOS file 4-8 4.1.6 ASUS CrashFree BIOS 2 utility 4-9 4.2 BIOS setup program 4-10 4.2.1 BIOS menu screen 4-11 4.2.2 Menu bar 4-11 4.2.3 Legend bar 4-12 4.2.4 Menu items 4-12 4.2.5 Sub-menu items 4-12 4.2.6 Configuration fields 4-12 4.2.7 Pop-up window 4-13 4.2.8 General help 4-13 4.3 Main menu 4-14 4.3.1 System Time [xx:xx:xx...
User Manual
Page 122
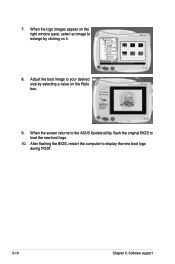
When the screen returns to the ASUS Update utility, flash the original BIOS to display the new boot logo during POST. 5-10 Chapter 5: Software support After flashing the BIOS, restart the computer to load the new boot logo. 10. Adjust the boot image to enlarge by selecting a value on it. 8. When the logo images appear on the right window pane, select an image to your desired size by clicking on the Ratio box. 9. 7.
When the screen returns to the ASUS Update utility, flash the original BIOS to display the new boot logo during POST. 5-10 Chapter 5: Software support After flashing the BIOS, restart the computer to load the new boot logo. 10. Adjust the boot image to enlarge by selecting a value on it. 8. When the logo images appear on the right window pane, select an image to your desired size by clicking on the Ratio box. 9. 7.

User Manual
Page 139
... and select Incoming folder > Enable incoming folder. For Windows XP Home edition users, click Steps of them is ASUS product) using a network cable, and then install the utility to both computers to enable the incoming folder. 2. ASUS P5N-D 5-27 Otherwise, select Use public account. Click OK... and the "Ready for incoming" message appears. Using AI Direct Link To enable the incoming folder: 1. For security's sake, it is limited if you use a 10/100 LAN card. From the Windows® taskbar, ...
... and select Incoming folder > Enable incoming folder. For Windows XP Home edition users, click Steps of them is ASUS product) using a network cable, and then install the utility to both computers to enable the incoming folder. 2. ASUS P5N-D 5-27 Otherwise, select Use public account. Click OK... and the "Ready for incoming" message appears. Using AI Direct Link To enable the incoming folder: 1. For security's sake, it is limited if you use a 10/100 LAN card. From the Windows® taskbar, ...

User Manual
Page 162
..., right click on a blank space on the operating system. Click Apply, then click OK. 10. A-2 Appendix: CPU features Go to save your changes and exit the BIOS setup. 5. Close the Display Properties window. Set the Intel(R) SpeedStep (TM) Tech. The screen displays and procedures may vary depending on... Properties from the pop-up menu. 6. A.2.2 Using the EIST To use the EIST feature: 1. item to open the Power Options Properties window. 8. Click the Power button on the computer, then enter the BIOS Setup. 2. Turn on the Monitor power section to [Automatic], then press .
..., right click on a blank space on the operating system. Click Apply, then click OK. 10. A-2 Appendix: CPU features Go to save your changes and exit the BIOS setup. 5. Close the Display Properties window. Set the Intel(R) SpeedStep (TM) Tech. The screen displays and procedures may vary depending on... Properties from the pop-up menu. 6. A.2.2 Using the EIST To use the EIST feature: 1. item to open the Power Options Properties window. 8. Click the Power button on the computer, then enter the BIOS Setup. 2. Turn on the Monitor power section to [Automatic], then press .

