
User Manual
Page 1
Motherboard
Motherboard

User Manual
Page 1
P5N-D Motherboard
P5N-D Motherboard
User Manual
Page 3
... Notices...vii Safety information viii About this guide ix P5N-D specifications summary xi Chapter 1: Product introduction 1.1 Welcome 1-1 1.2 Package contents 1-1 1.3 Special features 1-2 1.3.1 Product highlights 1-2 1.3.2 ASUS AI Lifestyle unique features 1-4 1.3.3 ASUS Intelligent Performance and Overclocking features 1-6 Chapter 2: Hardware information 2.1 Before you proceed 2-1 2.2 Motherboard overview 2-2 2.2.1 Placement direction 2-2 2.2.2 Screw holes 2-2 2.2.3 Motherboard layout 2-3 2.2.4 Layout contents 2-4 2.3 Central Processing Unit (CPU 2-6 2.3.1 Installing...
... Notices...vii Safety information viii About this guide ix P5N-D specifications summary xi Chapter 1: Product introduction 1.1 Welcome 1-1 1.2 Package contents 1-1 1.3 Special features 1-2 1.3.1 Product highlights 1-2 1.3.2 ASUS AI Lifestyle unique features 1-4 1.3.3 ASUS Intelligent Performance and Overclocking features 1-6 Chapter 2: Hardware information 2.1 Before you proceed 2-1 2.2 Motherboard overview 2-2 2.2.1 Placement direction 2-2 2.2.2 Screw holes 2-2 2.2.3 Motherboard layout 2-3 2.2.4 Layout contents 2-4 2.3 Central Processing Unit (CPU 2-6 2.3.1 Installing...

User Manual
Page 8
...devices are unplugged before the signal cables are connected. If you add a device. • Before connecting or removing signal cables from the motherboard, ensure that all cables are correctly connected and the power cables are unplugged. • Seek professional assistance before using , contact your retailer...any area where it may become wet. • Place the product on it by yourself. Operation safety • Before installing the motherboard and adding devices on a stable surface. • If you are not sure about the voltage of the electrical outlet you encounter technical...
...devices are unplugged before the signal cables are connected. If you add a device. • Before connecting or removing signal cables from the motherboard, ensure that all cables are correctly connected and the power cables are unplugged. • Seek professional assistance before using , contact your retailer...any area where it may become wet. • Place the product on it by yourself. Operation safety • Before installing the motherboard and adding devices on a stable surface. • If you are not sure about the voltage of the electrical outlet you encounter technical...
User Manual
Page 9
... documentation, such as warranty flyers, that may have to change system settings through the BIOS Setup menus. Where to find more information Refer to the ASUS contact information. 2. ASUS websites The ASUS website provides updated information on the motherboard. • Chapter 3: Powering up This chapter describes the power up sequence and ways of the...
... documentation, such as warranty flyers, that may have to change system settings through the BIOS Setup menus. Where to find more information Refer to the ASUS contact information. 2. ASUS websites The ASUS website provides updated information on the motherboard. • Chapter 3: Powering up This chapter describes the power up sequence and ways of the...

User Manual
Page 15
This chapter describes the motherboard features and the new technologies it supports. Chapter 1: 1Product introduction
This chapter describes the motherboard features and the new technologies it supports. Chapter 1: 1Product introduction
User Manual
Page 17
...the above items is damaged or missing, contact your motherboard package for the following items. Motherboard I/O modules Cables Accessories Application CD Documentation ASUS P5N-D �m�o�t�h�e�r�b�...ASUS Optional Fans for buying an ASUS® P5N-D motherboard! Before you for Water-Cooling or Passive-Cooling only 1 x 3-in your package with the list below. 1.2 Package contents Check your retailer. Retail version only) 1 x ASUS SLI Bridges ASUS motherboard support CD User guide If any of ASUS quality motherboards! ASUS P5N...
...the above items is damaged or missing, contact your motherboard package for the following items. Motherboard I/O modules Cables Accessories Application CD Documentation ASUS P5N-D �m�o�t�h�e�r�b�...ASUS Optional Fans for buying an ASUS® P5N-D motherboard! Before you for Water-Cooling or Passive-Cooling only 1 x 3-in your package with the list below. 1.2 Package contents Check your retailer. Retail version only) 1 x ASUS SLI Bridges ASUS motherboard support CD User guide If any of ASUS quality motherboards! ASUS P5N...
User Manual
Page 18
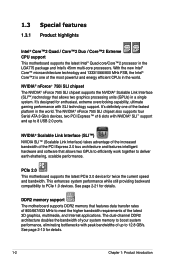
... 1.3 Special features 1.3.1 Product highlights Intel® Core™2 Quad / Core™2 Duo / Core™2 Extreme CPU support This motherboard supports the latest Intel® Quad-core/Core™2 processor in the world. It's definitely one of the latest 3D graphics, multimedia..., and Internet applications. PCIe 2.0 This motherboard supports the latest PCIe 2.0 device for details. See page 2‑13 for enthusiast, extreme overclocking capability, ultimate gaming performance...
... 1.3 Special features 1.3.1 Product highlights Intel® Core™2 Quad / Core™2 Duo / Core™2 Extreme CPU support This motherboard supports the latest Intel® Quad-core/Core™2 processor in the world. It's definitely one of the latest 3D graphics, multimedia..., and Internet applications. PCIe 2.0 This motherboard supports the latest PCIe 2.0 device for details. See page 2‑13 for enthusiast, extreme overclocking capability, ultimate gaming performance...
User Manual
Page 19
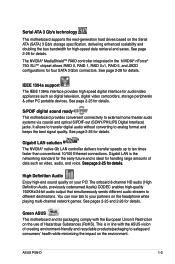
... to ten times faster than conventional 10/100 Ethernet connections. Green ASUS This motherboard and its packaging comply with the ASUS vision of creating environment-friendly and recyclable products/packaging to your PC! ASUS P5N-D 1-3 Serial ATA 3 Gb/s technology This motherboard supports the next-generation hard drives based on the Serial ATA (SATA...65533;5��f�o�r��d�e��ta��il�s�. S/PDIF digital sound ready This motherboard provides convenient connectivity to different destinations.
... to ten times faster than conventional 10/100 Ethernet connections. Green ASUS This motherboard and its packaging comply with the ASUS vision of creating environment-friendly and recyclable products/packaging to your PC! ASUS P5N-D 1-3 Serial ATA 3 Gb/s technology This motherboard supports the next-generation hard drives based on the Serial ATA (SATA...65533;5��f�o�r��d�e��ta��il�s�. S/PDIF digital sound ready This motherboard provides convenient connectivity to different destinations.
User Manual
Page 20
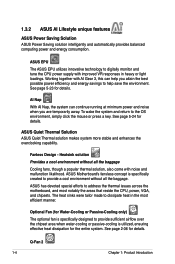
... the overclocking capability. Heatsink solution Provides a cool environment without all the baggage Cooling fans, though a popular thermal solution, also come with noise and malfunction likelihood. ASUS Motherboard's fansless concept is utilized, ensuring effective heat dissipation for the entire system. Optional Fan (for details. To wake the system and return to help save...
... the overclocking capability. Heatsink solution Provides a cool environment without all the baggage Cooling fans, though a popular thermal solution, also come with noise and malfunction likelihood. ASUS Motherboard's fansless concept is utilized, ensuring effective heat dissipation for the entire system. Optional Fan (for details. To wake the system and return to help save...
User Manual
Page 21
... easy ways to share and distribute their favorite settings. See page 4-40 for details. saving up your motherboard against Electronic Magnetic Interference (EMI). ASUS P5N-D 1-5 Profile that allows users to ensure quiet, cool and efficient operation. ASUS Q-Fan2 technology intelligently adjusts both CPU fan and chassis fan speeds according to system loading to conveniently...
... easy ways to share and distribute their favorite settings. See page 4-40 for details. saving up your motherboard against Electronic Magnetic Interference (EMI). ASUS P5N-D 1-5 Profile that allows users to ensure quiet, cool and efficient operation. ASUS Q-Fan2 technology intelligently adjusts both CPU fan and chassis fan speeds according to system loading to conveniently...
User Manual
Page 22
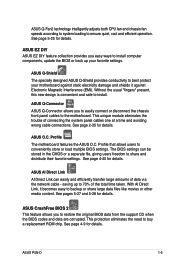
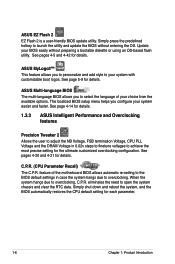
... the system hangs due to open the system chassis and clear the RTC data. ASUS EZ Flash 2 EZ Flash 2 is a user-friendly BIOS update utility. The localized BIOS setup menu helps you to select the language of the motherboard BIOS allows automatic re-setting to the BIOS default settings in 0.02v steps...
... the system hangs due to open the system chassis and clear the RTC data. ASUS EZ Flash 2 EZ Flash 2 is a user-friendly BIOS update utility. The localized BIOS setup menu helps you to select the language of the motherboard BIOS allows automatic re-setting to the BIOS default settings in 0.02v steps...

User Manual
Page 23
It includes description of the jumpers and connectors on the motherboard. This chapter lists the hardware setup procedures that you have to perform when installing system components. Chapter 2: 2 Hardware information
It includes description of the jumpers and connectors on the motherboard. This chapter lists the hardware setup procedures that you have to perform when installing system components. Chapter 2: 2 Hardware information
User Manual
Page 24
Chapter summary 2 2.1 Before you proceed 2-1 2.2 Motherboard overview 2-2 2.3 Central Processing Unit (CPU 2-6 2.4 System memory 2-13 2.5 Expansion slots 2-19 2.6 Jumpers 2-23 2.7 Connectors 2-25 ASUS P5N-D
Chapter summary 2 2.1 Before you proceed 2-1 2.2 Motherboard overview 2-2 2.3 Central Processing Unit (CPU 2-6 2.4 System memory 2-13 2.5 Expansion slots 2-19 2.6 Jumpers 2-23 2.7 Connectors 2-25 ASUS P5N-D
User Manual
Page 25
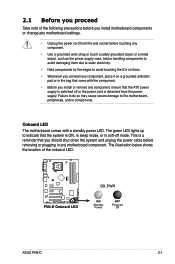
...the system and unplug the power cable before removing or plugging in any motherboard component. Onboard LED The motherboard comes with the component. • Before you install or remove any component, ensure that the ATX power supply is switched off or the power cord is ON, in ...before handling components to avoid damaging them due to static electricity. • Hold components by the edges to the motherboard, peripherals, and/or components. 2.1 Before you proceed Take note of the onboard LED. ® P5N-D P5N-D Onboard LED SB_PWR ON Standby Power OFF Powered Off ASUS P5N-D 2-1
...the system and unplug the power cable before removing or plugging in any motherboard component. Onboard LED The motherboard comes with the component. • Before you install or remove any component, ensure that the ATX power supply is switched off or the power cord is ON, in ...before handling components to avoid damaging them due to static electricity. • Hold components by the edges to the motherboard, peripherals, and/or components. 2.1 Before you proceed Take note of the onboard LED. ® P5N-D P5N-D Onboard LED SB_PWR ON Standby Power OFF Powered Off ASUS P5N-D 2-1

User Manual
Page 26
...motherboard components. 2.2.1 Placement direction When installing the motherboard, make sure that you install the motherboard, study the configuration of your chassis to ensure that the motherboard... fits into it into the chassis in the image below. 2.2.2 Screw holes Place nine (9) screws into the holes indicated by circles to secure the motherboard... to do so can damage the motherboard. Place this side towards the rear...
...motherboard components. 2.2.1 Placement direction When installing the motherboard, make sure that you install the motherboard, study the configuration of your chassis to ensure that the motherboard... fits into it into the chassis in the image below. 2.2.2 Screw holes Place nine (9) screws into the holes indicated by circles to secure the motherboard... to do so can damage the motherboard. Place this side towards the rear...
User Manual
Page 27
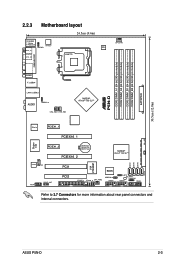
® P5N-D DDR2 DIMM_A1 (64 bit,240-pin module) DDR2 DIMM_A2 (64 bit,240-pin module) DDR2 DIMM_B1 (64 bit,240-pin module) DDR2 DIMM_B2 (64 bit,240-pin module) EATXPWR 30.5cm (12.0in) 2.2.3 Motherboard layout 24.5cm (9.6in) PS/2KBMS T: Mouse B: Keyboard SPDIF_O1 ATX12V KBPWR SPDIF_O2 LGA775 EPU CPU_FAN PARALLEL PORT...-8 USB56 CLRTC SB_PWR CHASSIS USB78 PANEL VIA VT6308P SATA1 SATA2 SATA3 SATA4 Refer to 2.7 Connectors for more information about rear panel connectors and internal connectors. ASUS P5N-D 2-3
® P5N-D DDR2 DIMM_A1 (64 bit,240-pin module) DDR2 DIMM_A2 (64 bit,240-pin module) DDR2 DIMM_B1 (64 bit,240-pin module) DDR2 DIMM_B2 (64 bit,240-pin module) EATXPWR 30.5cm (12.0in) 2.2.3 Motherboard layout 24.5cm (9.6in) PS/2KBMS T: Mouse B: Keyboard SPDIF_O1 ATX12V KBPWR SPDIF_O2 LGA775 EPU CPU_FAN PARALLEL PORT...-8 USB56 CLRTC SB_PWR CHASSIS USB78 PANEL VIA VT6308P SATA1 SATA2 SATA3 SATA4 Refer to 2.7 Connectors for more information about rear panel connectors and internal connectors. ASUS P5N-D 2-3
User Manual
Page 30
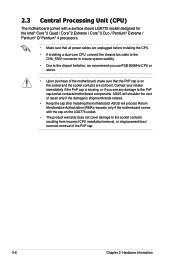
...Make sure that the PnP cap is on the LGA775 socket. • The product warranty does not cover damage to the PnP cap/socket contacts/motherboard components. ASUS will shoulder the cost of repair only if the damage is shipment/transit-related. • Keep the cap after installing the... motherboard. Contact your retailer immediately if the PnP cap is missing, or if you use FSB 800MHz CPU or above. • Upon purchase of the motherboard, make sure that ...
...Make sure that the PnP cap is on the LGA775 socket. • The product warranty does not cover damage to the PnP cap/socket contacts/motherboard components. ASUS will shoulder the cost of repair only if the damage is shipment/transit-related. • Keep the cap after installing the... motherboard. Contact your retailer immediately if the PnP cap is missing, or if you use FSB 800MHz CPU or above. • Upon purchase of the motherboard, make sure that ...
User Manual
Page 31
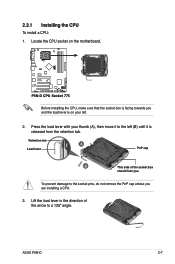
Locate the CPU socket on the motherboard. ® P5N-D P5N-D CPU Socket 775 Before installing the CPU, make sure that the socket box is facing towards you and the load lever is released from the retention tab. ASUS P5N-D 2-7 To prevent damage to a 135º angle. Lift the load lever in the direction of the socket...
Locate the CPU socket on the motherboard. ® P5N-D P5N-D CPU Socket 775 Before installing the CPU, make sure that the socket box is facing towards you and the load lever is released from the retention tab. ASUS P5N-D 2-7 To prevent damage to a 135º angle. Lift the load lever in the direction of the socket...

User Manual
Page 32
... information on the bottom‑left corner of the socket then fit the socket alignment key into the CPU notch. B A Load plate Alignment key 5. The motherboard supports Intel® LGA775 processors with your thumb and forefinger to a 100º angle (A), then push the PnP cap from the load plate window to...
... information on the bottom‑left corner of the socket then fit the socket alignment key into the CPU notch. B A Load plate Alignment key 5. The motherboard supports Intel® LGA775 processors with your thumb and forefinger to a 100º angle (A), then push the PnP cap from the load plate window to...


