
English Manual
Page 2
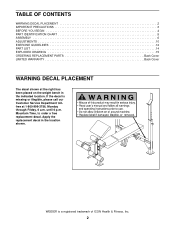
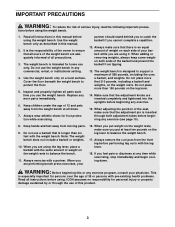
..., to order a free replacement decal. Apply the replacement decal in the indicated location. until 6 p.m. If the decal is a registered trademark of ICON Health & Fitness, Inc. 2 WEIDER is missing or illegible, please call our Customer Service Department tollfree at the right has been placed on the weight...
..., to order a free replacement decal. Apply the replacement decal in the indicated location. until 6 p.m. If the decal is a registered trademark of ICON Health & Fitness, Inc. 2 WEIDER is missing or illegible, please call our Customer Service Department tollfree at the right has been placed on the weight...
English Manual
Page 3
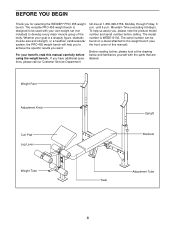
... on both adjustment tubes before using it. It is an equal amount of serious injury, read the following important precau- The weight bench is inserted through the use only. WARNING: Before beginning this manual before beginning any time while exercising, stop immediately and begin cooling down...exercise program, consult your 16. Read all parts each side of 560 pounds, including the user, a barbell, and weights. Use the weight bench only as described in any worn parts immediately. 6. Keep children under the age of this manual. 2. Always wear athletic shoes for home use...
... on both adjustment tubes before using it. It is an equal amount of serious injury, read the following important precau- The weight bench is inserted through the use only. WARNING: Before beginning this manual before beginning any time while exercising, stop immediately and begin cooling down...exercise program, consult your 16. Read all parts each side of 560 pounds, including the user, a barbell, and weights. Use the weight bench only as described in any worn parts immediately. 6. Keep children under the age of this manual. 2. Always wear athletic shoes for home use...
English Manual
Page 4
...your goal is a shapely figure, dramatic muscle size and strength, or a healthier cardiovascular system, the PRO 455 weight bench will help us assist you for selecting the WEIDER® PRO 455 weight bench. Mountain Time (excluding holidays). The model number is designed to be found on a decal attached ...this manual). BEFORE YOU BEGIN Thank you , please note the product model number and serial number before using the weight bench. The versatile PRO 455 weight bench is WEBE13102. until 6 p.m. To help you to achieve the specific results you have additional questions, please call our ...
...your goal is a shapely figure, dramatic muscle size and strength, or a healthier cardiovascular system, the PRO 455 weight bench will help us assist you for selecting the WEIDER® PRO 455 weight bench. Mountain Time (excluding holidays). The model number is designed to be found on a decal attached ...this manual). BEFORE YOU BEGIN Thank you , please note the product model number and serial number before using the weight bench. The versatile PRO 455 weight bench is WEBE13102. until 6 p.m. To help you to achieve the specific results you have additional questions, please call our ...
English Manual
Page 6
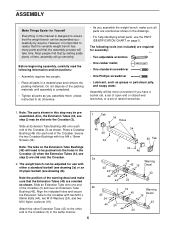
...information and instructions: • Assembly requires two people. • Place all parts as you assemble them, unless instructed to ensure that the weight bench can be pushed into each end of the Crossbar (3) as shown in the drawings. • For help identifying small parts, use with either ... read the following tools (not included) are oriented as grease or petroleum jelly, and soapy water. Assembly will be preassembled. The weight bench can be slid onto the Crossbar (3). 1 Tab 34 Holes Slide an Extension Tube Bushing (45) onto each end of the Crossbar. Slide...
...information and instructions: • Assembly requires two people. • Place all parts as you assemble them, unless instructed to ensure that the weight bench can be pushed into each end of the Crossbar (3) as shown in the drawings. • For help identifying small parts, use with either ... read the following tools (not included) are oriented as grease or petroleum jelly, and soapy water. Assembly will be preassembled. The weight bench can be slid onto the Crossbar (3). 1 Tab 34 Holes Slide an Extension Tube Bushing (45) onto each end of the Crossbar. Slide...
English Manual
Page 9
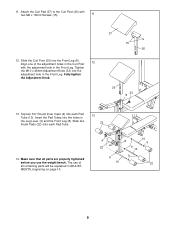
Slide the Curl Post (26) into each Pad Tube. 13 22 14. Align one of all parts are properly tightened before you use the weight bench. Slide two Foam Pads (22) onto each Pad Tube (10). Insert the Pad Tubes into the adjustment hole in the Leg Lever (4) and the Front ...
Slide the Curl Post (26) into each Pad Tube. 13 22 14. Align one of all parts are properly tightened before you use the weight bench. Slide two Foam Pads (22) onto each Pad Tube (10). Insert the Pad Tubes into the adjustment hole in the Leg Lever (4) and the Front ...
English Manual
Page 10
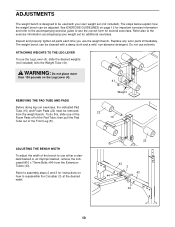
... Pads off of the Front Leg (8). Refer also to the exercise information accompanying your own weight set for additional exercises. ADJUSTMENTS The weight bench is designed to be used with a damp cloth and a mild, non-abrasive detergent. Replace any worn parts immediately. ATTACHING WEIGHTS TO... 4 To use either a standard barbell or an Olympic barbell, remove the indicated M10 x 73mm Bolts (44) from the weight bench. See EXERCISE GUIDELINES on page 12 for important exercise information and refer to the accompanying exercise guide to see the correct form for instructions...
... Pads off of the Front Leg (8). Refer also to the exercise information accompanying your own weight set for additional exercises. ADJUSTMENTS The weight bench is designed to be used with a damp cloth and a mild, non-abrasive detergent. Replace any worn parts immediately. ATTACHING WEIGHTS TO... 4 To use either a standard barbell or an Olympic barbell, remove the indicated M10 x 73mm Bolts (44) from the weight bench. See EXERCISE GUIDELINES on page 12 for important exercise information and refer to the accompanying exercise guide to see the correct form for instructions...
English Manual
Page 11
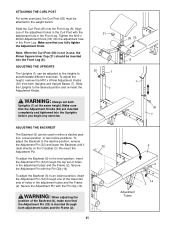
... the Backrest (6), make sure that the Adjustment Knobs (30) are inserted completely and tightened into the Front Leg (8). To adjust the Backrest (6) to the weight bench. Re-insert the Adjustment Pin. tion, a level position, or two incline positions. ATTACHING THE CURL POST For some exercises, the Curl Post (26) must be...
... the Backrest (6), make sure that the Adjustment Knobs (30) are inserted completely and tightened into the Front Leg (8). To adjust the Backrest (6) to the weight bench. Re-insert the Adjustment Pin. tion, a level position, or two incline positions. ATTACHING THE CURL POST For some exercises, the Curl Post (26) must be...
English Manual
Page 16
... vary from state to give the following information when calling: • The MODEL NUMBER of the product (WEBE13102) • The NAME of the product (WEIDER® PRO 455 weight bench) • The SERIAL NUMBER of the product (see the front cover of this manual) • The KEY NUMBER and DESCRIPTION of removal or installation...
... vary from state to give the following information when calling: • The MODEL NUMBER of the product (WEBE13102) • The NAME of the product (WEIDER® PRO 455 weight bench) • The SERIAL NUMBER of the product (see the front cover of this manual) • The KEY NUMBER and DESCRIPTION of removal or installation...


