
User Manual
Page 1
... this product, or if you need to give the following information: • the MODEL NUMBER of the product (WEEVBE7035.0) • the NAME of the product (WEIDER PRO 130 weight bench) • the SERIAL NUMBER of the product (see the front cover of this manual) • the KEY NUMBER and DESCRIPTION of the part(s) (see the...
... this product, or if you need to give the following information: • the MODEL NUMBER of the product (WEEVBE7035.0) • the NAME of the product (WEIDER PRO 130 weight bench) • the SERIAL NUMBER of the product (see the front cover of this manual) • the KEY NUMBER and DESCRIPTION of the part(s) (see the...
User Manual
Page 2
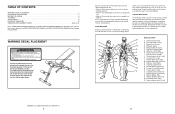
...) Q. Spinae Erectors (lower back) U. WARNING DECAL PLACEMENT The decal shown here has been placed on the weight bench in the location shown. Include stretches for a weight loss workout. Pectoralis Major (chest) C. Soleus (front of thigh) J. Apply the replacement decal in the ...indicated location. Hip Flexors (upper thigh) G. Anterior Deltoid (shoulder) M. Gastrocnemius (back of calf) WEIDER is a registered trademark of...
...) Q. Spinae Erectors (lower back) U. WARNING DECAL PLACEMENT The decal shown here has been placed on the weight bench in the location shown. Include stretches for a weight loss workout. Pectoralis Major (chest) C. Soleus (front of thigh) J. Apply the replacement decal in the ...indicated location. Hip Flexors (upper thigh) G. Anterior Deltoid (shoulder) M. Gastrocnemius (back of calf) WEIDER is a registered trademark of...
User Manual
Page 3
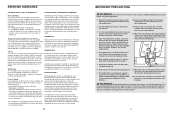
... set . Keep children under the age of 12 and pets away from session to session. The weight bench is important. Weight Loss To lose weight, use a low amount of weight and increase the number of repetitions in an uncontrolled manner will reshape and strengthen your body, plus...increase the size and strength of your muscles, push them to a moderate percentage of their maximum capacity. Place the weight bench on the weight bench before using the weight bench. 10. Exhale during the return stroke. If you want to 10 different exercises. Always make sure that you ...
... set . Keep children under the age of 12 and pets away from session to session. The weight bench is important. Weight Loss To lose weight, use a low amount of weight and increase the number of repetitions in an uncontrolled manner will reshape and strengthen your body, plus...increase the size and strength of your muscles, push them to a moderate percentage of their maximum capacity. Place the weight bench on the weight bench before using the weight bench. 10. Exhale during the return stroke. If you want to 10 different exercises. Always make sure that you ...

User Manual
Page 4
... groups of the upper body. Fully tighten the Knob. Adjust the height of the weight bench, remove the Adjustment Knob (23) and raise or lower the Bench Frame (1) to the weight bench (see the correct form for selecting the versatile WEIDER® PRO 130 weight bench. Seat Seat Frame Adjustment Leg Backrest Backrest Bracket Short Pin ASSEMBLED DIMENSIONS: Height: 39...
... groups of the upper body. Fully tighten the Knob. Adjust the height of the weight bench, remove the Adjustment Knob (23) and raise or lower the Bench Frame (1) to the weight bench (see the correct form for selecting the versatile WEIDER® PRO 130 weight bench. Seat Seat Frame Adjustment Leg Backrest Backrest Bracket Short Pin ASSEMBLED DIMENSIONS: Height: 39...

User Manual
Page 5
... M8 x 67mm Bolts (34), an M8 Washer (32), and three M8 Nylon Locknuts (35). Before beginning assembly, make sure you assemble the weight bench, make sure all parts in this step with two M8 x 72mm Carriage Bolts (21) and two M8 Nylon Locknuts (35). Make sure that the... mallet • One standard screwdriver • One Phillips screwdriver • Clear tape or masking tape, and soapy water. Most people find that the weight bench can be more convenient if you have been properly tightened. Orient the Stabiliser (2) as shown in the drawings. • For help identifying small parts...
... M8 x 67mm Bolts (34), an M8 Washer (32), and three M8 Nylon Locknuts (35). Before beginning assembly, make sure you assemble the weight bench, make sure all parts in this step with two M8 x 72mm Carriage Bolts (21) and two M8 Nylon Locknuts (35). Make sure that the... mallet • One standard screwdriver • One Phillips screwdriver • Clear tape or masking tape, and soapy water. Most people find that the weight bench can be more convenient if you have been properly tightened. Orient the Stabiliser (2) as shown in the drawings. • For help identifying small parts...


