
User Manual
Page 1
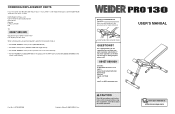
... the following information: • the MODEL NUMBER of the product (WEEVBE7035.0) • the NAME of the product (WEIDER PRO 130 weight bench) • the SERIAL NUMBER of the product (see the front cover of this manual) • the KEY NUMBER and DESCRIPTION of the part(s) (see the PART LIST and the EXPLODED DRAWING in the center of this manual) Part No. 225730 R0705B Printed in this manual before using this product...
... the following information: • the MODEL NUMBER of the product (WEEVBE7035.0) • the NAME of the product (WEIDER PRO 130 weight bench) • the SERIAL NUMBER of the product (see the front cover of this manual) • the KEY NUMBER and DESCRIPTION of the part(s) (see the PART LIST and the EXPLODED DRAWING in the center of this manual) Part No. 225730 R0705B Printed in this manual before using this product...
User Manual
Page 2
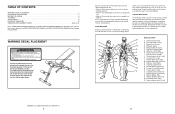
... make exercise a regular and enjoyable part of your weight and key body measurements at the end of ICON IP, Inc. 2 11 List the date, the exercises performed, the resistance used, and the numbers of arm) D. A B C D E F G H I . Biceps (front of sets and repetitions completed. Hip Flexors (upper thigh) G. Gastrocnemius (back of calf) WEIDER is missing or illegible, call our Customer Service Department tollfree and order a free replacement decal (see...
... make exercise a regular and enjoyable part of your weight and key body measurements at the end of ICON IP, Inc. 2 11 List the date, the exercises performed, the resistance used, and the numbers of arm) D. A B C D E F G H I . Biceps (front of sets and repetitions completed. Hip Flexors (upper thigh) G. Gastrocnemius (back of calf) WEIDER is missing or illegible, call our Customer Service Department tollfree and order a free replacement decal (see...
User Manual
Page 3
... chart on Tuesday and Thursday. • Rest from pivoting during the return stroke. Exhale during the first few months of your exercise program. Place the weight bench on the weight bench before using the weight bench. 10. Do not use a low amount of weight and increase the number of repetitions in this manual and all parts each set . Welded Tube Seat Pin Seat Frame 6. The weight bench is designed to support a maximum user weight...
... chart on Tuesday and Thursday. • Rest from pivoting during the return stroke. Exhale during the first few months of your exercise program. Place the weight bench on the weight bench before using the weight bench. 10. Do not use a low amount of weight and increase the number of repetitions in this manual and all parts each set . Welded Tube Seat Pin Seat Frame 6. The weight bench is designed to support a maximum user weight...

User Manual
Page 4
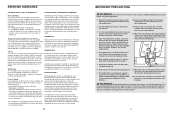
... correct form for selecting the versatile WEIDER® PRO 130 weight bench. See the EXERCISE GUIDELINES on the Seat Frame. 9 16 6 1 23 7 1 30 Welded Tube 5 30 Replace any worn parts immediately. The weight bench can be cleaned with the parts that the Seat (9) is WEEVBE7035.0. SETTING UP THE WEIGHT BENCH FOR ROMAN CHAIR EXERCISES Raise the Seat Frame (5) to adjust the weight bench. Insert the Long Pin (30) into the Leg (6) and the Adjustment Leg (7). do...
... correct form for selecting the versatile WEIDER® PRO 130 weight bench. See the EXERCISE GUIDELINES on the Seat Frame. 9 16 6 1 23 7 1 30 Welded Tube 5 30 Replace any worn parts immediately. The weight bench can be cleaned with the parts that the Seat (9) is WEEVBE7035.0. SETTING UP THE WEIGHT BENCH FOR ROMAN CHAIR EXERCISES Raise the Seat Frame (5) to adjust the weight bench. Insert the Long Pin (30) into the Leg (6) and the Adjustment Leg (7). do...

User Manual
Page 5
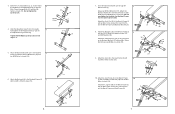
... the Bench Frame (1) with three M8 x 67mm Bolts (34), an M8 Washer (32), and three M8 Nylon Locknuts (35). Attach the Leg (6) to the Stabiliser with the Long Pad Tube (12) and the Seat Frame (5). 11 11 3 31 12. The included grease, and the following information and instructions: • Assembly requires two people. • Place all parts have a socket set, a set of open...
... the Bench Frame (1) with three M8 x 67mm Bolts (34), an M8 Washer (32), and three M8 Nylon Locknuts (35). Attach the Leg (6) to the Stabiliser with the Long Pad Tube (12) and the Seat Frame (5). 11 11 3 31 12. The included grease, and the following information and instructions: • Assembly requires two people. • Place all parts have a socket set, a set of open...
User Manual
Page 6
... the Adjustment Leg (7) with an M8 x 35mm Bolt (29) and an M8 Nylon Locknut (35). 9. Attach the Long Pin (30) to the Bench Frame (1) with 9 four M6 x 16mm Screws (15). 18 4 1 27 17 16 33 25 36 26 25 36 26 35 28 27 1 29 9 5 10. Slide the Adjustment Leg (7) into the Leg (6). 4 Fully tighten the the Adjustment Knob (23) into the Bench Frame...
... the Adjustment Leg (7) with an M8 x 35mm Bolt (29) and an M8 Nylon Locknut (35). 9. Attach the Long Pin (30) to the Bench Frame (1) with 9 four M6 x 16mm Screws (15). 18 4 1 27 17 16 33 25 36 26 25 36 26 35 28 27 1 29 9 5 10. Slide the Adjustment Leg (7) into the Leg (6). 4 Fully tighten the the Adjustment Knob (23) into the Bench Frame...
User Manual
Page 7
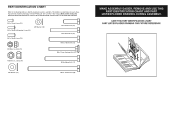
The number in parentheses by each drawing is not in the parts bag, check to identify small parts used in the center of the part, from the PART LIST in assembly. PART IDENTIFICATION CHART Refer to the drawings below to see if it has been pre-attached. M4 x 12mm Screw (33) M4 x 16mm Self-tapping Screw (25) M6 Washer (36) M6 x 16mm Screw (15) M8...
The number in parentheses by each drawing is not in the parts bag, check to identify small parts used in the center of the part, from the PART LIST in assembly. PART IDENTIFICATION CHART Refer to the drawings below to see if it has been pre-attached. M4 x 12mm Screw (33) M4 x 16mm Self-tapping Screw (25) M6 Washer (36) M6 x 16mm Screw (15) M8...
User Manual
Page 8
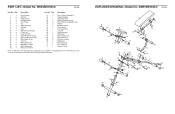
... user's manual for information about ordering replacement parts. Description Key No. Qty. Specifications are subject to change without notice. Qty. Description 1 1 Bench Frame 2 2 Stabiliser 3 4 Plastic Spacer 4 1 Backrest Frame 5 1 Seat Frame 6 1 Leg 7 1 Adjustment Leg 8 1 Backrest 9 1 Seat 10 4 60mm Round Endcap 11 4 Foam Pad 12 1 Long Pad Tube 13 4 19mm Round Inner Cap 14 3 25mm x 50mm Inner Cap 15 8 M6 x 16mm Screw 16 1 Short Pin 17 1 M10 x 80mm Bolt...
... user's manual for information about ordering replacement parts. Description Key No. Qty. Specifications are subject to change without notice. Qty. Description 1 1 Bench Frame 2 2 Stabiliser 3 4 Plastic Spacer 4 1 Backrest Frame 5 1 Seat Frame 6 1 Leg 7 1 Adjustment Leg 8 1 Backrest 9 1 Seat 10 4 60mm Round Endcap 11 4 Foam Pad 12 1 Long Pad Tube 13 4 19mm Round Inner Cap 14 3 25mm x 50mm Inner Cap 15 8 M6 x 16mm Screw 16 1 Short Pin 17 1 M10 x 80mm Bolt...


