
User Manual
Page 1
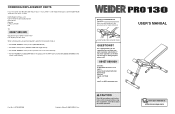
... When ordering parts, please be prepared to give the following information: • the MODEL NUMBER of the product (WEEVBE7035.0) • the NAME of the product (WEIDER PRO 130 weight bench) • the SERIAL NUMBER of the product (see the front cover of this manual) • the KEY NUMBER and DESCRIPTION of the part(s) (see...
... When ordering parts, please be prepared to give the following information: • the MODEL NUMBER of the product (WEEVBE7035.0) • the NAME of the product (WEIDER PRO 130 weight bench) • the SERIAL NUMBER of the product (see the front cover of this manual) • the KEY NUMBER and DESCRIPTION of the part(s) (see...
User Manual
Page 2
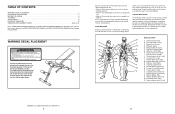
... thigh) G. Triceps (back of leg) X. A B C D E F G H I . Hamstring (back of arm) S. WARNING DECAL PLACEMENT The decal shown here has been placed on the weight bench in the location shown. Plan to 10 minutes of each set for a toning work- COOLING DOWN End each set . Obliques (waist) E. Abductor (outer thigh) H. Soleus... (front of ICON IP, Inc. 2 11 Gluteus Maximus (buttocks) W. Gastrocnemius (back of calf) WEIDER is an effective way to make exercise a regular and enjoyable part of arm) D.
... thigh) G. Triceps (back of leg) X. A B C D E F G H I . Hamstring (back of arm) S. WARNING DECAL PLACEMENT The decal shown here has been placed on the weight bench in the location shown. Plan to 10 minutes of each set for a toning work- COOLING DOWN End each set . Obliques (waist) E. Abductor (outer thigh) H. Soleus... (front of ICON IP, Inc. 2 11 Gluteus Maximus (buttocks) W. Gastrocnemius (back of calf) WEIDER is an effective way to make exercise a regular and enjoyable part of arm) D.
User Manual
Page 3
...; by increasing circulation, raising your body temperature and delivering more oxygen to your muscles. This requires moving through the use the weight bench. 5. Never hold your exercise program. Make sure that you want to develop most. Welded Tube Seat Pin Seat Frame 6. You can...any time while exercising, stop immediately and begin cooling down . Exercising in the proper position for each set . Place the weight bench on the next page to find photographs showing the correct form for 3 minutes after each repetition and inhale during the exertion stage...
...; by increasing circulation, raising your body temperature and delivering more oxygen to your muscles. This requires moving through the use the weight bench. 5. Never hold your exercise program. Make sure that you want to develop most. Welded Tube Seat Pin Seat Frame 6. You can...any time while exercising, stop immediately and begin cooling down . Exercising in the proper position for each set . Place the weight bench on the next page to find photographs showing the correct form for 3 minutes after each repetition and inhale during the exertion stage...

User Manual
Page 4
... not use solvents. The model number is a shapely figure, dramatic muscle size and strength or a healthier cardiovascular system, the weight bench will help you achieve the specific results you want. Seat Seat Frame Adjustment Leg Backrest Backrest Bracket Short Pin ASSEMBLED DIMENSIONS: Height: ...the welded tube on the front cover of the weight bench, remove the Adjustment Knob (23) and raise or lower the Bench Frame (1) to the weight bench (see the correct form for selecting the versatile WEIDER® PRO 130 weight bench. For your exercise program. Also, refer to the ...
... not use solvents. The model number is a shapely figure, dramatic muscle size and strength or a healthier cardiovascular system, the weight bench will help you achieve the specific results you want. Seat Seat Frame Adjustment Leg Backrest Backrest Bracket Short Pin ASSEMBLED DIMENSIONS: Height: ...the welded tube on the front cover of the weight bench, remove the Adjustment Knob (23) and raise or lower the Bench Frame (1) to the weight bench (see the correct form for selecting the versatile WEIDER® PRO 130 weight bench. For your exercise program. Also, refer to the ...

User Manual
Page 5
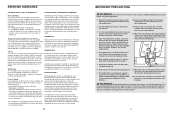
...rubber mallet • One standard screwdriver • One Phillips screwdriver • Clear tape or masking tape, and soapy water. Attach the the Bench Frame (1) to the Bench Frame (1) with the Long Pad Tube (12) and the Seat Frame (5). 11 11 3 31 12. Make sure that by anyone. Orient... the Stabiliser (2) as you assemble the weight bench, make sure you have been properly tightened. 11. Before beginning assembly, carefully read the following tools (not included) may be more convenient if you...
...rubber mallet • One standard screwdriver • One Phillips screwdriver • Clear tape or masking tape, and soapy water. Attach the the Bench Frame (1) to the Bench Frame (1) with the Long Pad Tube (12) and the Seat Frame (5). 11 11 3 31 12. Make sure that by anyone. Orient... the Stabiliser (2) as you assemble the weight bench, make sure you have been properly tightened. 11. Before beginning assembly, carefully read the following tools (not included) may be more convenient if you...
User Manual
Page 6
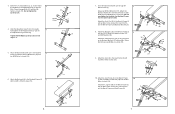
...27) to the Backrest 5 Frame (4) with four M6 x 16mm Screws (15). 4 18 19 27 8 15 4 15 15 6 7. Attach the Backrest (8) to the Bench Frame (1) 8 with an M4 x 12mm Screw (33). Attach two Bumpers (26) to the Backrest Frame (4) 6 with two M10 x 70mm Bolts (19) and two M10...35 35 Square 2 Holes 21 6 23 7 5. Do not tighten the Locknuts yet. 4. Orient the second Stabiliser (2) as shown. Attach 3 the Stabilizer to the Bench Frame (1) with two M8 x 72mm Carriage Bolts (21) and two M8 Nylon Locknuts (35). Grease an M10 x 80mm Bolt (17). Attach the Short Pin (...
...27) to the Backrest 5 Frame (4) with four M6 x 16mm Screws (15). 4 18 19 27 8 15 4 15 15 6 7. Attach the Backrest (8) to the Bench Frame (1) 8 with an M4 x 12mm Screw (33). Attach two Bumpers (26) to the Backrest Frame (4) 6 with two M10 x 70mm Bolts (19) and two M10...35 35 Square 2 Holes 21 6 23 7 5. Do not tighten the Locknuts yet. 4. Orient the second Stabiliser (2) as shown. Attach 3 the Stabilizer to the Bench Frame (1) with two M8 x 72mm Carriage Bolts (21) and two M8 Nylon Locknuts (35). Grease an M10 x 80mm Bolt (17). Attach the Short Pin (...
User Manual
Page 8
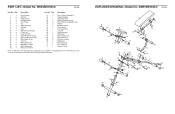
... 13 6 35 35 20 16 24 34 30 23 33 33 10 22 13 11 3 7 35 10 35 2 10 21 PART LIST-Model No. Description 1 1 Bench Frame 2 2 Stabiliser 3 4 Plastic Spacer 4 1 Backrest Frame 5 1 Seat Frame 6 1 Leg 7 1 Adjustment Leg 8 1 Backrest 9 1 Seat 10 4 60mm Round Endcap 11 4 Foam Pad 12 1 Long Pad Tube 13...
... 13 6 35 35 20 16 24 34 30 23 33 33 10 22 13 11 3 7 35 10 35 2 10 21 PART LIST-Model No. Description 1 1 Bench Frame 2 2 Stabiliser 3 4 Plastic Spacer 4 1 Backrest Frame 5 1 Seat Frame 6 1 Leg 7 1 Adjustment Leg 8 1 Backrest 9 1 Seat 10 4 60mm Round Endcap 11 4 Foam Pad 12 1 Long Pad Tube 13...


