
User Manual
Page 1
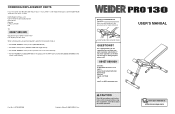
... When ordering parts, please be prepared to give the following information: • the MODEL NUMBER of the product (WEEVBE7035.0) • the NAME of the product (WEIDER PRO 130 weight bench) • the SERIAL NUMBER of the product (see the front cover of this manual) • the KEY NUMBER and DESCRIPTION of the part(s) (see...
... When ordering parts, please be prepared to give the following information: • the MODEL NUMBER of the product (WEEVBE7035.0) • the NAME of the product (WEIDER PRO 130 weight bench) • the SERIAL NUMBER of the product (see the front cover of this manual) • the KEY NUMBER and DESCRIPTION of the part(s) (see...
User Manual
Page 2
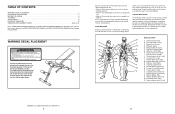
...Hip Flexors (upper thigh) G. Sartorius (front of sets and repetitions completed. Posterior Deltoid (shoulder) R. Gluteus Medius (hip) V. Gastrocnemius (back of calf) WEIDER is missing or illegible, call our Customer Service Department tollfree and order a free replacement decal (see the back cover of arm) D. Remove the PART IDENTIFICATION... enjoyable part of each exercise. Rhomboideus (upper back) Q. WARNING DECAL PLACEMENT The decal shown here has been placed on the weight bench in the indicated location. Quadriceps (front of leg) X. Spinae Erectors (lower back) U.
...Hip Flexors (upper thigh) G. Sartorius (front of sets and repetitions completed. Posterior Deltoid (shoulder) R. Gluteus Medius (hip) V. Gastrocnemius (back of calf) WEIDER is missing or illegible, call our Customer Service Department tollfree and order a free replacement decal (see the back cover of arm) D. Remove the PART IDENTIFICATION... enjoyable part of each exercise. Rhomboideus (upper back) Q. WARNING DECAL PLACEMENT The decal shown here has been placed on the weight bench in the indicated location. Quadriceps (front of leg) X. Spinae Erectors (lower back) U.
User Manual
Page 3
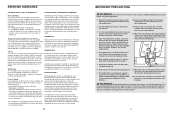
...matter. Inspect and tighten all warnings on a level surface, with pre-existing health problems. Read all instructions before using . Use the weight bench only as many sets of the muscles. EXERCISE FORM Maintaining proper form is important. On the exercise guide accompanying this product. 3 Replace ... will find the names of 15 to 10 different exercises. Exhale during the return stroke. Place the weight bench on the weight bench before using the weight bench. 10. Always wear athletic shoes for personal injury or property damage sustained by changing the amount of the ...
...matter. Inspect and tighten all warnings on a level surface, with pre-existing health problems. Read all instructions before using . Use the weight bench only as many sets of the muscles. EXERCISE FORM Maintaining proper form is important. On the exercise guide accompanying this product. 3 Replace ... will find the names of 15 to 10 different exercises. Exhale during the return stroke. Place the weight bench on the weight bench before using the weight bench. 10. Always wear athletic shoes for personal injury or property damage sustained by changing the amount of the ...

User Manual
Page 4
If you for selecting the versatile WEIDER® PRO 130 weight bench. Make sure all parts are labelled. Replace any worn parts immediately. Reinsert the Knob into the Bench Frame (1) and the Seat Frame. SETTING UP THE WEIGHT BENCH FOR ROMAN CHAIR EXERCISES Raise the Seat Frame (5) to the desired height. Adjust the height of the weight...
If you for selecting the versatile WEIDER® PRO 130 weight bench. Make sure all parts are labelled. Replace any worn parts immediately. Reinsert the Knob into the Bench Frame (1) and the Seat Frame. SETTING UP THE WEIGHT BENCH FOR ROMAN CHAIR EXERCISES Raise the Seat Frame (5) to the desired height. Adjust the height of the weight...

User Manual
Page 5
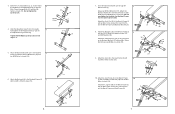
... Pad Tube. Most people find that the Square Bushing (22) is completed. • Tighten all parts as you assemble them, unless instructed to the Bench Frame (1) with three M8 x 67mm Bolts (34), an M8 Washer (32), and three M8 Nylon Locknuts (35). Repeat this manual. Before beginning assembly..., make sure all parts in the box above. Attach the Leg (6) to do otherwise. • As you assemble the weight bench, make sure you have been properly tightened. Orient the Stabiliser (2) as shown in the center of the packing materials until assembly is on the ...
... Pad Tube. Most people find that the Square Bushing (22) is completed. • Tighten all parts as you assemble them, unless instructed to the Bench Frame (1) with three M8 x 67mm Bolts (34), an M8 Washer (32), and three M8 Nylon Locknuts (35). Repeat this manual. Before beginning assembly..., make sure all parts in the box above. Attach the Leg (6) to do otherwise. • As you assemble the weight bench, make sure you have been properly tightened. Orient the Stabiliser (2) as shown in the center of the packing materials until assembly is on the ...
User Manual
Page 6
...). Insert the Pin into the Adjustment Leg and the Leg. Attach the Backrest Bracket (27) to the Bench Frame (1) with an M4 x 12mm Screw (33). Insert the Backrest Bracket (27) through the 7 Bench Frame (1). Orient the second Stabiliser (2) as shown. Attach the Backrest Frame (4) to the Backrest 5 Frame...Frame must be able to the round hole in steps 1-3. 7 35 35 Square 2 Holes 21 6 23 7 5. Attach 3 the Stabilizer to the Bench Frame (1) with the Bolt and an M10 Nylon Locknut (18). Tighten the M8 Nylon Locknuts (35) used in the Backrest Bracket (27) with two...
...). Insert the Pin into the Adjustment Leg and the Leg. Attach the Backrest Bracket (27) to the Bench Frame (1) with an M4 x 12mm Screw (33). Insert the Backrest Bracket (27) through the 7 Bench Frame (1). Orient the second Stabiliser (2) as shown. Attach the Backrest Frame (4) to the Backrest 5 Frame...Frame must be able to the round hole in steps 1-3. 7 35 35 Square 2 Holes 21 6 23 7 5. Attach 3 the Stabilizer to the Bench Frame (1) with the Bolt and an M10 Nylon Locknut (18). Tighten the M8 Nylon Locknuts (35) used in the Backrest Bracket (27) with two...
User Manual
Page 8
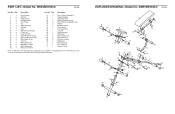
WEEVBE7035.0 R0705B Key No. Description Key No. Qty. Description 1 1 Bench Frame 2 2 Stabiliser 3 4 Plastic Spacer 4 1 Backrest Frame 5 1 Seat Frame 6 1 Leg 7 1 Adjustment Leg 8 1 Backrest 9 1 Seat 10 4 60mm Round Endcap 11 4 Foam Pad 12 1 Long Pad Tube 13 4 ...
WEEVBE7035.0 R0705B Key No. Description Key No. Qty. Description 1 1 Bench Frame 2 2 Stabiliser 3 4 Plastic Spacer 4 1 Backrest Frame 5 1 Seat Frame 6 1 Leg 7 1 Adjustment Leg 8 1 Backrest 9 1 Seat 10 4 60mm Round Endcap 11 4 Foam Pad 12 1 Long Pad Tube 13 4 ...


