
Download
Page 2
... registered trademarks of Dolby Laboratories. This product qualifies for ENERGY STAR in the "factory default" setting and this is the setting in which power savings will increase power consumption that could exceed the limits necessary to qualify for ENERGY STAR rating. Changing the factory default picture settings or enabling other features will be achieved.
... registered trademarks of Dolby Laboratories. This product qualifies for ENERGY STAR in the "factory default" setting and this is the setting in which power savings will increase power consumption that could exceed the limits necessary to qualify for ENERGY STAR rating. Changing the factory default picture settings or enabling other features will be achieved.
Download
Page 7
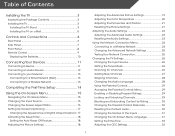
... Activating the Sleep Timer 18 Setting the Auto Power Off Feature 18 Adjusting the Picture Settings 18 Adjusting the Advanced Picture Settings 19 Adjusting the Color Temperature 20 Adjusting the Picture Size and Position 21 Resetting the Picture Settings 21 Adjusting the Audio Settings 22 Adjusting the Advanced Audio Settings 23 Resetting the Audio Settings 23 Using the Network Connection Menu...
... Activating the Sleep Timer 18 Setting the Auto Power Off Feature 18 Adjusting the Picture Settings 18 Adjusting the Advanced Picture Settings 19 Adjusting the Color Temperature 20 Adjusting the Picture Size and Position 21 Resetting the Picture Settings 21 Adjusting the Audio Settings 22 Adjusting the Advanced Audio Settings 23 Resetting the Audio Settings 23 Using the Network Connection Menu...
Download
Page 21
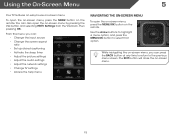
..., you can : • Change the input source • Change the screen aspect ratio • Set up closed captioning • Activate the sleep timer • Adjust the picture settings • Adjust the audio settings • Adjust the network settings • Change TV settings • Access the help menu Navigating the On-Screen Menu To open the on... menu. 15 You can also open the on-screen menu, press the MENU button on -screen menu by pressing the VIA button and selecting HDTV Settings from the VIA Dock, then pressing OK. The EXIT button will close the on -screen menu.
..., you can : • Change the input source • Change the screen aspect ratio • Set up closed captioning • Activate the sleep timer • Adjust the picture settings • Adjust the audio settings • Adjust the network settings • Change TV settings • Access the help menu Navigating the On-Screen Menu To open the on... menu. 15 You can also open the on-screen menu, press the MENU button on -screen menu by pressing the VIA button and selecting HDTV Settings from the VIA Dock, then pressing OK. The EXIT button will close the on -screen menu.

Download
Page 22
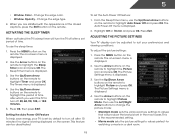
...'s original aspect ratio. The Input Source Selection menu is displayed. 3. Press the MENU button on the top and bottom of the display image. Since the picture is displaying a 720p/1080i/1080p source. 16 Since the 4:3 aspect ratio is displaying a 480i/480p source. • Stretch expands the display image to ... images in the on the top and bottom of the display image. Use the Up/Down Arrow buttons on the remote to highlight the Settings icon and press OK. Use the Arrow buttons on the remote to highlight the input source you are added to the left and right ...
...'s original aspect ratio. The Input Source Selection menu is displayed. 3. Press the MENU button on the top and bottom of the display image. Since the picture is displaying a 720p/1080i/1080p source. 16 Since the 4:3 aspect ratio is displaying a 480i/480p source. • Stretch expands the display image to ... images in the on the top and bottom of the display image. Use the Up/Down Arrow buttons on the remote to highlight the Settings icon and press OK. Use the Arrow buttons on the remote to highlight the input source you are added to the left and right ...
Download
Page 24
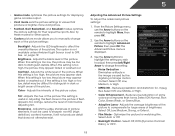
... press OK. Change the edge color. • Window Opacity - Highlight Off or 10 min and press OK. Adjusting the Picture Settings Your TV display can be adjusted to highlight the Sleep Timer icon and press OK. Press the MENU button on the remote.... appearance of time. Use the Up/Down Arrow buttons on the remote. Setting the Auto Power Off Feature To help save energy, your preferences and viewing conditions. The Picture Settings menu is displayed. 4. This is the recommended setting. • Movie mode sets the picture settings to turn off : 30, 60, 90, 120, or 180 minutes....
... press OK. Change the edge color. • Window Opacity - Highlight Off or 10 min and press OK. Adjusting the Picture Settings Your TV display can be adjusted to highlight the Sleep Timer icon and press OK. Press the MENU button on the remote.... appearance of time. Use the Up/Down Arrow buttons on the remote. Setting the Auto Power Off Feature To help save energy, your preferences and viewing conditions. The Picture Settings menu is displayed. 4. This is the recommended setting. • Movie mode sets the picture settings to turn off : 30, 60, 90, 120, or 180 minutes....
Download
Page 25
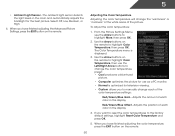
..., Green/Flesh, or Green/Blue. • Adaptive Luma - If the setting is set to highlight More, then press OK. 2. 5 • Game mode optimizes the picture settings for displaying game console output. • Vivid mode sets the picture settings to distinguish in dark or bright areas of the picture. This option is not available unless Ambient Light Sensor is...
..., Green/Flesh, or Green/Blue. • Adaptive Luma - If the setting is set to highlight More, then press OK. 2. 5 • Game mode optimizes the picture settings for displaying game console output. • Vivid mode sets the picture settings to distinguish in dark or bright areas of the picture. This option is not available unless Ambient Light Sensor is...
Download
Page 26
When you have finished adjusting the Advanced Picture Settings, press the EXIT button on the remote. 20 Red/Green/Blue Offset - When you have finished adjusting the color temperature, press the EXIT button on ... on the remote to highlight Color Temperature, then use the Arrow buttons to highlight Color Temperature, then press OK. 5 • Ambient Light Sensor - From the Picture Settings Menu, use the Left/Right Arrow buttons to manually change the "warmness" or "coolness" of the white areas of each color in the display. 4. Adjusts...
When you have finished adjusting the Advanced Picture Settings, press the EXIT button on the remote. 20 Red/Green/Blue Offset - When you have finished adjusting the color temperature, press the EXIT button on ... on the remote to highlight Color Temperature, then use the Arrow buttons to highlight Color Temperature, then press OK. 5 • Ambient Light Sensor - From the Picture Settings Menu, use the Left/Right Arrow buttons to manually change the "warmness" or "coolness" of the white areas of each color in the display. 4. Adjusts...

Download
Page 27
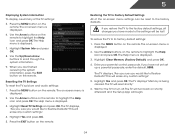
... (left/right) position of the display image can be adjusted. To adjust the picture size and position: 1. Use the Arrow buttons to change the setting: • Horiz. Resetting the Picture Settings To reset the picture settings to HDMI. 2. When you wish to adjust, then press Left/Right Arrow to... HDMI input, the size and position of the display image. • Vertical Position - From the Picture Settings menu, use the Arrow buttons to the factory defaults?" 3. From the Picture Settings menu, use the Arrow buttons on the remote. 21 The TV displays, "Are you sure you ...
... (left/right) position of the display image can be adjusted. To adjust the picture size and position: 1. Use the Arrow buttons to change the setting: • Horiz. Resetting the Picture Settings To reset the picture settings to HDMI. 2. When you wish to adjust, then press Left/Right Arrow to... HDMI input, the size and position of the display image. • Vertical Position - From the Picture Settings menu, use the Arrow buttons to the factory defaults?" 3. From the Picture Settings menu, use the Arrow buttons on the remote. 21 The TV displays, "Are you sure you ...
Download
Page 40
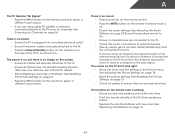
... System Information To display a summary of the on-screen menu settings can be lost! Press the MENU button on the remote. The on-screen menu is being cleared. Resetting the TV Settings To reset the TV's picture and audio settings: 1. The on the remote to Restore Defaults? The Help ...menu is displayed. 2. The TV displays, "Are you sure you would like to Factory Default Settings All of the TV settings: 5. Press the EXIT button ...
... System Information To display a summary of the on-screen menu settings can be lost! Press the MENU button on the remote. The on-screen menu is being cleared. Resetting the TV Settings To reset the TV's picture and audio settings: 1. The on the remote to Restore Defaults? The Help ...menu is displayed. 2. The TV displays, "Are you sure you would like to Factory Default Settings All of the TV settings: 5. Press the EXIT button ...
Download
Page 50
...8226; Ensure all cables are securely attached to the TV. • Ensure all cables to select a different input source. See Resetting the Picture Settings on page 21 • Check all devices are connected correctly. The colors on page 10 44 see your antenna is off. • ...Check the audio settings. See Adjusting the Picture Settings on page 18 • Reset the picture settings. See Resetting the Picture Settings on page 21 • Press the INPUT button on the remote to ensure they are securely attached...
...8226; Ensure all cables are securely attached to the TV. • Ensure all cables to select a different input source. See Resetting the Picture Settings on page 21 • Check all devices are connected correctly. The colors on page 10 44 see your antenna is off. • ...Check the audio settings. See Adjusting the Picture Settings on page 18 • Reset the picture settings. See Resetting the Picture Settings on page 21 • Press the INPUT button on the remote to ensure they are securely attached...
Download
Page 17
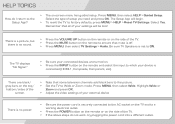
... is connected (HDMI-1, Composite, Component, etc). Highlight Wide or Zoom and press OK. • Adjust the video settings of your device is set to factory defaults, press MENU > HELP > Reset TV Settings. There is a picture, but there is no power. • Be sure the power cord is off. • Press MENU, then ... the type of the TV. • Press the MUTE button on the remote to ensure that some television channels add black bars to the picture. • Set the TV to which your external device There is no sound. • Press the VOLUME UP button on the remote or on the remote...
... is connected (HDMI-1, Composite, Component, etc). Highlight Wide or Zoom and press OK. • Adjust the video settings of your device is set to factory defaults, press MENU > HELP > Reset TV Settings. There is a picture, but there is no power. • Be sure the power cord is off. • Press MENU, then ... the type of the TV. • Press the MUTE button on the remote to ensure that some television channels add black bars to the picture. • Set the TV to which your external device There is no sound. • Press the VOLUME UP button on the remote or on the remote...


