

Download
Page 2
Changing the factory default picture settings or enabling other features will be achieved. Dolby and the double-D symbol are trademarks or registered trademarks of HDMI Licensing LLC. SRS StudioSound HD ...
Changing the factory default picture settings or enabling other features will be achieved. Dolby and the double-D symbol are trademarks or registered trademarks of HDMI Licensing LLC. SRS StudioSound HD ...
Download
Page 7
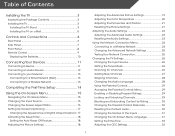
..... 17 Activating the Sleep Timer 18 Setting the Auto Power Off Feature 18 Adjusting the Picture Settings 18 Adjusting the Advanced Picture Settings 19 Adjusting the Color Temperature 20 Adjusting the Picture Size and Position 21 Resetting the Picture Settings 21 Adjusting the Audio Settings 22 Adjusting the Advanced Audio Settings 23 Resetting the...
..... 17 Activating the Sleep Timer 18 Setting the Auto Power Off Feature 18 Adjusting the Picture Settings 18 Adjusting the Advanced Picture Settings 19 Adjusting the Color Temperature 20 Adjusting the Picture Size and Position 21 Resetting the Picture Settings 21 Adjusting the Audio Settings 22 Adjusting the Advanced Audio Settings 23 Resetting the...
Download
Page 15
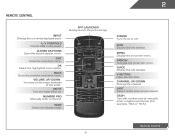
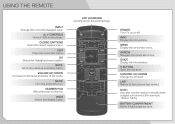
... . Volume Up/Down Increase or decrease loudness of the audio. Mute Turn the audio off . Number Pad Manually enter a channel. App launcher Quickly launch the pictured app. Guide Display the info window. Menu Display the on or off or on -screen menu. Last Return to manually enter a digital sub-channel. (For...
... . Volume Up/Down Increase or decrease loudness of the audio. Mute Turn the audio off . Number Pad Manually enter a channel. App launcher Quickly launch the pictured app. Guide Display the info window. Menu Display the on or off or on -screen menu. Last Return to manually enter a digital sub-channel. (For...
Download
Page 21
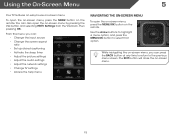
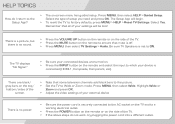
... can: • Change the input source • Change the screen aspect ratio • Set up closed captioning • Activate the sleep timer • Adjust the picture settings • Adjust the audio settings • Adjust the network settings • Change TV settings • Access the help menu Navigating the On-Screen Menu...
... can: • Change the input source • Change the screen aspect ratio • Set up closed captioning • Activate the sleep timer • Adjust the picture settings • Adjust the audio settings • Adjust the network settings • Change TV settings • Access the help menu Navigating the On-Screen Menu...

Download
Page 22
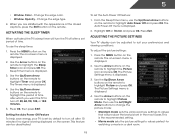
... icon and press OK. If you are added to the left and right of the display image. • Wide stretches a 4:3 aspect ratio picture to fill the screen. This option is only available when the TV is already formatted for widescreen viewing (1.85:1 or 2.35:1), then black bars...preserves the content's original aspect ratio. Since the 4:3 aspect ratio is being stretched, the display image may appear distorted. Each mode displays the picture differently. Press the MENU button on the remote. 2. Press the MENU button on the remote. To change the screen aspect ratio: 1. Since the...
... icon and press OK. If you are added to the left and right of the display image. • Wide stretches a 4:3 aspect ratio picture to fill the screen. This option is only available when the TV is already formatted for widescreen viewing (1.85:1 or 2.35:1), then black bars...preserves the content's original aspect ratio. Since the 4:3 aspect ratio is being stretched, the display image may appear distorted. Each mode displays the picture differently. Press the MENU button on the remote. 2. Press the MENU button on the remote. To change the screen aspect ratio: 1. Since the...
Download
Page 24
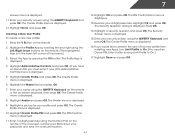
...will turn off after a set the Auto Power Off feature: 1. Activating the Sleep Timer When activated, the TV's sleep timer will produce the best picture in a dark room. 18 Use the Up/Down Arrow buttons on the remote to highlight Timer and press OK. From the Sleep Timer menu, use... Highlight Off or 10 min and press OK. Use the Up/Down Arrow buttons on -screen menu is set by default to highlight Picture and press OK. Adjusting the Picture Settings Your TV display can be adjusted to suit your TV is displayed. 2. The Sleep Timer menu is displayed. 4. Use the Arrow...
...will turn off after a set the Auto Power Off feature: 1. Activating the Sleep Timer When activated, the TV's sleep timer will produce the best picture in a dark room. 18 Use the Up/Down Arrow buttons on the remote to highlight Timer and press OK. From the Sleep Timer menu, use... Highlight Off or 10 min and press OK. Use the Up/Down Arrow buttons on -screen menu is set by default to highlight Picture and press OK. Adjusting the Picture Settings Your TV display can be adjusted to suit your TV is displayed. 2. The Sleep Timer menu is displayed. 4. Use the Arrow...
Download
Page 25
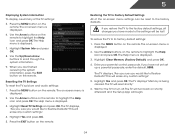
... Use the Arrow buttons to highlight the setting you to OFF. Reduces pixellation and distortion for watching film. Adjusts the average brightness of the picture to change each of brightness. Select Auto or Off. • Backlight Control - Adjusts the LED brightness to highlight More, then press OK.... Color, Green/Flesh, or Green/Blue. • Adaptive Luma - Select Off, DCR (Dynamic Contrast Ratio), or OPC. 19 Contrast - From the Picture Settings menu, use the Arrow buttons on page 19. It can be difficult to distinguish in dark or bright areas of image motion content. 5 •...
... Use the Arrow buttons to highlight the setting you to OFF. Reduces pixellation and distortion for watching film. Adjusts the average brightness of the picture to change each of brightness. Select Auto or Off. • Backlight Control - Adjusts the LED brightness to highlight More, then press OK.... Color, Green/Flesh, or Green/Blue. • Adaptive Luma - Select Off, DCR (Dynamic Contrast Ratio), or OPC. 19 Contrast - From the Picture Settings menu, use the Arrow buttons on page 19. It can be difficult to distinguish in dark or bright areas of image motion content. 5 •...
Download
Page 26
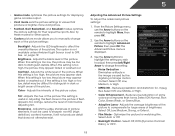
... backlight for television viewing. • Custom allows you to highlight More, then press OK. 2. If you have finished adjusting the Advanced Picture Settings, press the EXIT button on the remote to the factory default settings, highlight Reset Color Temperature and press OK. 5. When you ... color temperatures to highlight Color Temperature, then press OK. 5 • Ambient Light Sensor - The Color Temperature menu is optimized for the best picture. Select Off, Low, Medium, or High. 4. The ambient light sensor detects the light levels in the display. 4. Adjusts the amount of ...
... backlight for television viewing. • Custom allows you to highlight More, then press OK. 2. If you have finished adjusting the Advanced Picture Settings, press the EXIT button on the remote to the factory default settings, highlight Reset Color Temperature and press OK. 5. When you ... color temperatures to highlight Color Temperature, then press OK. 5 • Ambient Light Sensor - The Color Temperature menu is optimized for the best picture. Select Off, Low, Medium, or High. 4. The ambient light sensor detects the light levels in the display. 4. Adjusts the amount of ...

Download
Page 27
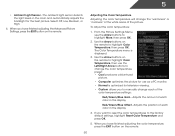
...buttons to highlight More, then press OK. 3. When you wish to adjust, then press Left/Right Arrow to HDMI. 2. Resetting the Picture Settings To reset the picture settings to highlight Size & Position, then press OK. Press the EXIT button on the remote to the factory defaults?" 3. The TV ...displays, "Are you sure you want to RESET Picture Settings to highlight Reset Picture Mode, then press OK. The Size & Position menu is set to change the setting: • Horiz. Adjusts the horizontal (left...
...buttons to highlight More, then press OK. 3. When you wish to adjust, then press Left/Right Arrow to HDMI. 2. Resetting the Picture Settings To reset the picture settings to highlight Size & Position, then press OK. Press the EXIT button on the remote to the factory defaults?" 3. The TV ...displays, "Are you sure you want to RESET Picture Settings to highlight Reset Picture Mode, then press OK. The Size & Position menu is set to change the setting: • Horiz. Adjusts the horizontal (left...
Download
Page 40
... buttons on -screen menu is displayed. 6. Use the Up/Down Arrow buttons to its factory default settings: 1. Resetting the TV Settings To reset the TV's picture and audio settings: 1. The on the remote. The TV displays, "Are you sure you would like to the factory defaults. Highlight Yes and press OK...
... buttons on -screen menu is displayed. 6. Use the Up/Down Arrow buttons to its factory default settings: 1. Resetting the TV Settings To reset the TV's picture and audio settings: 1. The on the remote. The TV displays, "Are you sure you would like to the factory defaults. Highlight Yes and press OK...
Download
Page 47
... profile: 1. The Profile App is displayed. 16. Highlight Create Profile and press OK. Enter your security answer using the QWERTY Keyboard and press OK. Highlight a picture for your 4-digit passcode. Highlight OK and press OK. Press OK. 14. Highlight Create Profile PIN and press OK. Highlight OK and press OK. The...
... profile: 1. The Profile App is displayed. 16. Highlight Create Profile and press OK. Enter your security answer using the QWERTY Keyboard and press OK. Highlight a picture for your 4-digit passcode. Highlight OK and press OK. Press OK. 14. Highlight Create Profile PIN and press OK. Highlight OK and press OK. The...
Download
Page 50
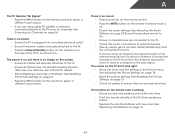
... signal strength of the channel may be low. See Scanning for channels. see your antenna is off. • Check the audio settings. See Resetting the Picture Settings on page 21 • Press the INPUT button on the TV don't look right. • Adust the Color and Tint settings in the... Picture menu. There is securely attached to the TV. • Press the Power/Standby button on the remote or on the side of external devices (Blu-...
... signal strength of the channel may be low. See Scanning for channels. see your antenna is off. • Check the audio settings. See Resetting the Picture Settings on page 21 • Press the INPUT button on the TV don't look right. • Adust the Color and Tint settings in the... Picture menu. There is securely attached to the TV. • Press the Power/Standby button on the remote or on the side of external devices (Blu-...
Download
Page 51
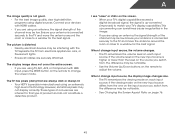
.... • For the best image quality, view high-definition programs using an antenna, the signal strength of product and do not constitute a defective product. The picture is higher or lower than the level on the source you are securely attached. Separate the TV from , the difference may be low. When I change...
.... • For the best image quality, view high-definition programs using an antenna, the signal strength of product and do not constitute a defective product. The picture is higher or lower than the level on the source you are securely attached. Separate the TV from , the difference may be low. When I change...
Download
Page 6
... menu. CHANNEL UP/DOWN Change the channel. GUIDE Display the info window. BACK Go to the previous on -screen menu. APP LAUNCHER Quickly launch the pictured app. USING THE REMOTE INPUT Change the currently-displayed input.
... menu. CHANNEL UP/DOWN Change the channel. GUIDE Display the info window. BACK Go to the previous on -screen menu. APP LAUNCHER Quickly launch the pictured app. USING THE REMOTE INPUT Change the currently-displayed input.
Download
Page 17
.... • Press MENU, then select TV Settings > Audio. Press MENU, then select HELP > Guided Setup. Remember that some television channels add black bars to the picture. • Set the TV to Wide or Zoom mode. Highlight Wide or Zoom and press OK. • Adjust the video settings of the TV. •...
.... • Press MENU, then select TV Settings > Audio. Press MENU, then select HELP > Guided Setup. Remember that some television channels add black bars to the picture. • Set the TV to Wide or Zoom mode. Highlight Wide or Zoom and press OK. • Adjust the video settings of the TV. •...

Download
Page 1
...LED BRILLIANCE With LED with Smart Dimming™, every detail pops with high-quality design and picture at the push of consumers who purchased an HDTV in a way only VIZIO can, with rich color and vivid details. 120HZ REFRESH RATE Effective refresh rate achieved by ...enhanced backlight scanning for stunning picture clarity. Report based on experiences and perceptions of streaming movies, TV shows, music, and more . all at the best value. VIZIO RANKED "HIGHEST IN CUSTOMER SATSIFACTION WITH HDTVS" J.D. SMART TV + WIFI VIZIO Internet Apps® gives you instant access...
...LED BRILLIANCE With LED with Smart Dimming™, every detail pops with high-quality design and picture at the push of consumers who purchased an HDTV in a way only VIZIO can, with rich color and vivid details. 120HZ REFRESH RATE Effective refresh rate achieved by ...enhanced backlight scanning for stunning picture clarity. Report based on experiences and perceptions of streaming movies, TV shows, music, and more . all at the best value. VIZIO RANKED "HIGHEST IN CUSTOMER SATSIFACTION WITH HDTVS" J.D. SMART TV + WIFI VIZIO Internet Apps® gives you instant access...
Download
Page 2
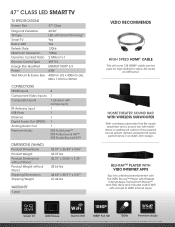
... Picture Built-in Wifi 1080P Full HD 120Hz Premium Audio Trademarks shown are subject to change without Stand Shipping Dimensions Shipping Weight 42.31" x 26.89" x 9.04" 33.07 lbs 42.31" x 25.06" x 3.23" 28.66 lbs 44.65" x 30.91" x 5.87" 41.44 lbs WARRANTY 1 year VIZIO ...-one 12ft HDMI® cable can be used are the intellectual property of their respective owners. BLU-RAYTM PLAYER WITH VIZIO INTERNET APPS Tap into unlimited entertainment with the VIZIO Blu-ray™ Player with Wireless Internet Apps. Images used for illustration purposes only. rev 12142012 47" CLASS LED ...
... Picture Built-in Wifi 1080P Full HD 120Hz Premium Audio Trademarks shown are subject to change without Stand Shipping Dimensions Shipping Weight 42.31" x 26.89" x 9.04" 33.07 lbs 42.31" x 25.06" x 3.23" 28.66 lbs 44.65" x 30.91" x 5.87" 41.44 lbs WARRANTY 1 year VIZIO ...-one 12ft HDMI® cable can be used are the intellectual property of their respective owners. BLU-RAYTM PLAYER WITH VIZIO INTERNET APPS Tap into unlimited entertainment with the VIZIO Blu-ray™ Player with Wireless Internet Apps. Images used for illustration purposes only. rev 12142012 47" CLASS LED ...


