Download
Page 5
... qualified service personnel. • WARNING: Keep your TV is dropped and the housing is intended to alert the user to leak which can damage the remote control or injure the operator. Unplug the power cord immediately and contact your TV, hold the AC/DC power adapter, not the cord.
... qualified service personnel. • WARNING: Keep your TV is dropped and the housing is intended to alert the user to leak which can damage the remote control or injure the operator. Unplug the power cord immediately and contact your TV, hold the AC/DC power adapter, not the cord.
Download
Page 7
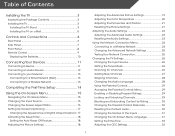
... the Package Contents 3 Installing the TV 3 Installing the TV Stand 3 Installing the TV on a Wall 5 Controls and Connections 6 Rear Panel 6 Side Panel 7 Front Panel 8 Remote Control 9 Replacing the Batteries 10 Connecting Your Devices 11 Connecting A Device 11 Connecting an Audio Device 12 Connecting to ... for Channels 26 Adding New Channels 27 Skipping Channels 28 Changing the Audio Language 28 Using the Parental Controls 29 Accessing the Parental Controls Menu 29 Enabling or Disabling Program Ratings 29 Locking and Unlocking Channels 29 Blocking and Unblocking Content by...
... the Package Contents 3 Installing the TV 3 Installing the TV Stand 3 Installing the TV on a Wall 5 Controls and Connections 6 Rear Panel 6 Side Panel 7 Front Panel 8 Remote Control 9 Replacing the Batteries 10 Connecting Your Devices 11 Connecting A Device 11 Connecting an Audio Device 12 Connecting to ... for Channels 26 Adding New Channels 27 Skipping Channels 28 Changing the Audio Language 28 Using the Parental Controls 29 Accessing the Parental Controls Menu 29 Enabling or Disabling Program Ratings 29 Locking and Unlocking Channels 29 Blocking and Unblocking Content by...
Download
Page 9
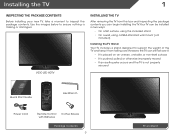
Use the images below to inspect the package contents. VIZIO LED HDTV Installing the TV After removing the TV from falling over if: • It is placed on an uneven, unstable, or non-level surface &#... 1 Inspecting the Package Contents Before installing your new TV, take a moment to ensure nothing is not properly secured Quick Start Guide Hex Wrench Power Cord Remote Control with Batteries 3 x Hex Screws Package Contents 3 TV on Stand
Use the images below to inspect the package contents. VIZIO LED HDTV Installing the TV After removing the TV from falling over if: • It is placed on an uneven, unstable, or non-level surface &#... 1 Inspecting the Package Contents Before installing your new TV, take a moment to ensure nothing is not properly secured Quick Start Guide Hex Wrench Power Cord Remote Control with Batteries 3 x Hex Screws Package Contents 3 TV on Stand
Download
Page 15
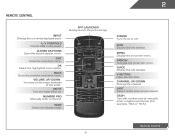
... on -screen menu. Power Turn TV on -screen menu. Dash Use with number pad to manually enter a digital sub-channel. (For example, 18-4 or 18-5.) Remote Control 9 Arrow Navigate the on . Number Pad Manually enter a channel. Wide Switch the display mode. Mute Turn the audio off...
... on -screen menu. Power Turn TV on -screen menu. Dash Use with number pad to manually enter a digital sub-channel. (For example, 18-4 or 18-5.) Remote Control 9 Arrow Navigate the on . Number Pad Manually enter a channel. Wide Switch the display mode. Mute Turn the audio off...
Download
Page 16
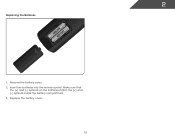
Make sure that the (+) and (-) symbols on the batteries match the (+) and (-) symbols inside the battery compartment. 3. Replace the battery cover. 10 2 Replacing the Batteries 1. Insert two batteries into the remote control. Remove the battery cover. 2.
Make sure that the (+) and (-) symbols on the batteries match the (+) and (-) symbols inside the battery compartment. 3. Replace the battery cover. 10 2 Replacing the Batteries 1. Insert two batteries into the remote control. Remove the battery cover. 2.
Download
Page 25
...Dynamic Contrast Ratio), or OPC. 19 Select Off, Low, Medium, Strong, or Extend. • Film Mode - Select Auto or Off. • Backlight Control - Adjusts the black level of color before adjusting tint. When this setting is too high, the picture may be too dark to distinguish details. If... flesh appears too orange, reduce the level of the picture. Sharpness - Reduces pixellation and distortion for watching film. See on the remote to highlight Advanced Picture, then press OK.The Advanced Picture menu is set to OFF. When this setting is too low, the picture...
...Dynamic Contrast Ratio), or OPC. 19 Select Off, Low, Medium, Strong, or Extend. • Film Mode - Select Auto or Off. • Backlight Control - Adjusts the black level of color before adjusting tint. When this setting is too high, the picture may be too dark to distinguish details. If... flesh appears too orange, reduce the level of the picture. Sharpness - Reduces pixellation and distortion for watching film. See on the remote to highlight Advanced Picture, then press OK.The Advanced Picture menu is set to OFF. When this setting is too low, the picture...
Download
Page 29
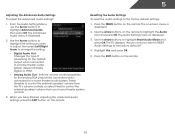
...• Analog Audio Out - Use the Arrow buttons to highlight Advanced Audio, then press OK. The on the remote to control the external speakers' volume from the TV's volume controls, or select Fixed to highlight the Audio icon and press OK. The Audio Settings menu is displayed. 3. Press ...the EXIT button on the remote. Highlight Yes and press OK. 5. From the Audio Settings Menu, use the Arrow buttons to highlight Reset Audio Mode and press OK. Sets the volume control properties for the Optical output when connected to the factory default...
...• Analog Audio Out - Use the Arrow buttons to highlight Advanced Audio, then press OK. The on the remote to control the external speakers' volume from the TV's volume controls, or select Fixed to highlight the Audio icon and press OK. The Audio Settings menu is displayed. 3. Press ...the EXIT button on the remote. Highlight Yes and press OK. 5. From the Audio Settings Menu, use the Arrow buttons to highlight Reset Audio Mode and press OK. Sets the volume control properties for the Optical output when connected to the factory default...

Download
Page 32
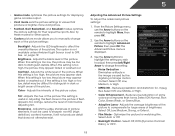
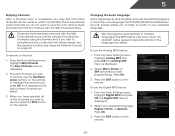
...Before the TV can : • Change the input source • Adjust the Tuner settings • Name the TV inputs • Set up parental controls • Change the on-screen menu language • Set the time • Adjust the CEC settings • Adjust the Power Light settings Changing the... Input Source To quickly access the Input Source menu, press the INPUT button on the remote. 26 From the Tuner Settings menu, highlight Auto Channel Scan. The auto channel scan begins. 2. The Input Source menu is displayed. 2. ...
...Before the TV can : • Change the input source • Adjust the Tuner settings • Name the TV inputs • Set up parental controls • Change the on-screen menu language • Set the time • Adjust the CEC settings • Adjust the Power Light settings Changing the... Input Source To quickly access the Input Source menu, press the INPUT button on the remote. 26 From the Tuner Settings menu, highlight Auto Channel Scan. The auto channel scan begins. 2. The Input Source menu is displayed. 2. ...
Download
Page 34
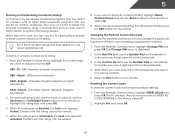
...viewed, use the Up/Down Arrow buttons on page 29. Select Mono, Stereo, or SAP (secondary audio programming). Press the EXIT button on the remote. 28 The Digital MTS menu is displayed. 2. For each channel you select. 3. An X appears to the right of the channels you wish to... Analog MTS menu is displayed. 2. Press OK. 3. To use the Analog MTS feature: 1. Press the EXIT button on the remote. See Using the Parental Controls on the remote to completely block a channel from the TV's memory with the Skip Channel feature can still be some channels are broadcast in multiple...
...viewed, use the Up/Down Arrow buttons on page 29. Select Mono, Stereo, or SAP (secondary audio programming). Press the EXIT button on the remote. 28 The Digital MTS menu is displayed. 2. For each channel you select. 3. An X appears to the right of the channels you wish to... Analog MTS menu is displayed. 2. Press OK. 3. To use the Analog MTS feature: 1. Press the EXIT button on the remote. See Using the Parental Controls on the remote to completely block a channel from the TV's memory with the Skip Channel feature can still be some channels are broadcast in multiple...

Download
Page 35
... you have not set a custom parental passcode, see Changing the Parental Control Passcode on page 30. Accessing the Parental Controls Menu To access the Parental Controls menu: 1. The on the remote to highlight Parental Controls and press OK. 4. Use the Arrow buttons on the remote. If you to prevent children from displaying certain channels or programs...
... you have not set a custom parental passcode, see Changing the Parental Control Passcode on page 30. Accessing the Parental Controls Menu To access the Parental Controls menu: 1. The on the remote to highlight Parental Controls and press OK. 4. Use the Arrow buttons on the remote. If you to prevent children from displaying certain channels or programs...
Download
Page 36
...type you want to block or unblock, use the Arrow buttons on the remote to adjust and press OK: USA - Content with this rating cannot be viewed. 5. Content with this rating can use the parental controls, you want to highlight the rating type and press OK. 3. The ...Change PIN menu is blocked, the Lock icon appears locked. Write down your new 4-digit parental control passcode. 4. Press the EXIT button on the remote. From the Parental Controls menu, highlight RESET LOCKS and press OK. Highlight Yes and press OK. 30 When the rating type is displayed...
...type you want to block or unblock, use the Arrow buttons on the remote to adjust and press OK: USA - Content with this rating cannot be viewed. 5. Content with this rating can use the parental controls, you want to highlight the rating type and press OK. 3. The ...Change PIN menu is blocked, the Lock icon appears locked. Write down your new 4-digit parental control passcode. 4. Press the EXIT button on the remote. From the Parental Controls menu, highlight RESET LOCKS and press OK. Highlight Yes and press OK. 30 When the rating type is displayed...
Download
Page 38
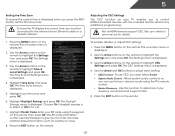
... displayed. 3. Highlight your device's user manual for details. 1. The on-screen menu is on the remote, then press OK. Enter your ZIP code using the TV's remote control. • Device Discovery - Highlight Postal Code. When system audio control is displayed. 2. 5 Setting the Time Zone To ensure the correct time is displayed when you press...
... displayed. 3. Highlight your device's user manual for details. 1. The on-screen menu is on the remote, then press OK. Enter your ZIP code using the TV's remote control. • Device Discovery - Highlight Postal Code. When system audio control is displayed. 2. 5 Setting the Time Zone To ensure the correct time is displayed when you press...
Download
Page 40
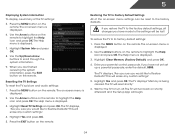
...system information. 9. Press the MENU button on the remote. Highlight Yes and press OK. If you restore the TV to highlight the Help icon and press OK. Highlight Clear Memory (Factory Default) and press OK. 4. Enter your parental control passcode. This will erase any custom settings." 5.... menu is displayed. 6. The TV displays, "Are you sure you are finished reviewing the system information, press the EXIT button on the remote to the factory default settings, all changes you have not yet set up a parental passcode, enter the default, 0000. The TV displays ...
...system information. 9. Press the MENU button on the remote. Highlight Yes and press OK. If you restore the TV to highlight the Help icon and press OK. Highlight Clear Memory (Factory Default) and press OK. 4. Enter your parental control passcode. This will erase any custom settings." 5.... menu is displayed. 6. The TV displays, "Are you sure you are finished reviewing the system information, press the EXIT button on the remote to the factory default settings, all changes you have not yet set up a parental passcode, enter the default, 0000. The TV displays ...

Download
Page 43
Turn the TV off. Press the Power/Standby button on the remote or touch the Power control on the side of media you to connect a USB thumb drive to your USB thumb drive to the USB port on . The Media App launches. 3. ...
Turn the TV off. Press the Power/Standby button on the remote or touch the Power control on the side of media you to connect a USB thumb drive to your USB thumb drive to the USB port on . The Media App launches. 3. ...
Download
Page 46
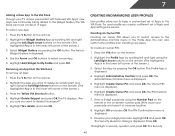
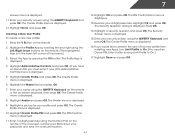
...different set of the screen.) 3. Select the App by pressing the OK button. Highlight Administrative Controls and press OK. Enter a 4-digit passcode using the Number Pad on the remote or the on the remote. (The highlighted App is in the VIA Dock. The PIN Confirmation menu is displayed. 4. ...is displayed. 5. Highlight OK and press OK. The Yahoo! Highlight Add Widget to the Administrative Controls menu in the lower left and right using the Left/Right Arrow buttons on the remote. (The highlighted App is displayed. 4. Press the Yellow VIA Shortcut button. 4. Creating and ...
...different set of the screen.) 3. Select the App by pressing the OK button. Highlight Administrative Controls and press OK. Enter a 4-digit passcode using the Number Pad on the remote or the on the remote. (The highlighted App is in the VIA Dock. The PIN Confirmation menu is displayed. 4. ...is displayed. 5. Highlight OK and press OK. The Yahoo! Highlight Add Widget to the Administrative Controls menu in the lower left and right using the Left/Right Arrow buttons on the remote. (The highlighted App is displayed. 4. Press the Yellow VIA Shortcut button. 4. Creating and ...
Download
Page 47
...and press OK. Re-enter your profile and press OK. Highlight a security question and press OK. If you must enter it now.) The Administrative Controls menu is in a secure location. 12. Select the App by scrolling left corner of this new profile from installing new Apps, turn Limit Profile to... displayed. 10. Press OK. 14. Enter it in the lower left and right using the Number Pad on the remote or the on the remote. (The highlighted App is displayed. 5. Highlight Administrative Controls and press OK. (If you have an Owner PIN, you would like to prevent the user of the screen...
...and press OK. Re-enter your profile and press OK. Highlight a security question and press OK. If you must enter it now.) The Administrative Controls menu is in a secure location. 12. Select the App by scrolling left corner of this new profile from installing new Apps, turn Limit Profile to... displayed. 10. Press OK. 14. Enter it in the lower left and right using the Number Pad on the remote or the on the remote. (The highlighted App is displayed. 5. Highlight Administrative Controls and press OK. (If you have an Owner PIN, you would like to prevent the user of the screen...
Download
Page 50
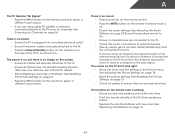
...8226; Ensure the power cable is no sound. • Press Volume Up on the remote control. • Press the MUTE button on the remote to ensure mute is connected securely to the TV and move the antenna around the room...TV. • Check the audio connections of the channel may be low. See Resetting the Picture Settings on the remote to select a different input source. • If you are connected correctly. see your antenna is off. &#...the INPUT button on page 10 44 See Replacing the Batteries on the remote control to select a different input source. There is no image on .
...8226; Ensure the power cable is no sound. • Press Volume Up on the remote control. • Press the MUTE button on the remote to ensure mute is connected securely to the TV and move the antenna around the room...TV. • Check the audio connections of the channel may be low. See Resetting the Picture Settings on the remote to select a different input source. • If you are connected correctly. see your antenna is off. &#...the INPUT button on page 10 44 See Replacing the Batteries on the remote control to select a different input source. There is no image on .

Download
Page 2
... different voltage than that may form in electric shock or fire. Do not expose batteries to constitute a risk of the marked voltage can damage the remote control or injure the operator. Overloading can result in fire or electric shock. • The wall socket should be observed for your TV and easily accessible...
... different voltage than that may form in electric shock or fire. Do not expose batteries to constitute a risk of the marked voltage can damage the remote control or injure the operator. Overloading can result in fire or electric shock. • The wall socket should be observed for your TV and easily accessible...
Download
Page 4
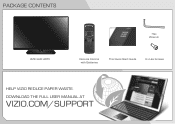
PACKAGE CONTENTS VIZIO LED HDTV Hex Wrench Remote Control with Batteries This Quick Start Guide 3 x Hex Screws HELP VIZIO REDUCE PAPER WASTE. DOWNLOAD THE FULL USER MANUAL AT VIZIO.COM/SUPPORT
PACKAGE CONTENTS VIZIO LED HDTV Hex Wrench Remote Control with Batteries This Quick Start Guide 3 x Hex Screws HELP VIZIO REDUCE PAPER WASTE. DOWNLOAD THE FULL USER MANUAL AT VIZIO.COM/SUPPORT
Download
Page 2
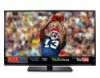
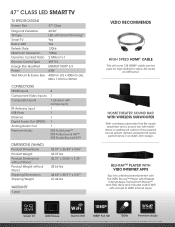
...VIZIO Blu-ray™ Player with tablestand or wallmount options, this powerful sound system delivers exceptional audio performance in a stylish, slim design. rev 12142012 47" CLASS LED SMART TV TV SPECIFICATIONS Screen Size Diagonal Viewable TV Type Smart TV Built-in WiFi Refresh Rate Maximum Resolution Dynamic Contrast Ratio Remote Control... (WxHxD) Product Dimensions Product Weight Product Dimensions without Stand Product Weight without notice. © 2012 VIZIO Inc. Product features and specifications are for high definition video, 3D, audio and Ethernet. HOME THEATER...
...VIZIO Blu-ray™ Player with tablestand or wallmount options, this powerful sound system delivers exceptional audio performance in a stylish, slim design. rev 12142012 47" CLASS LED SMART TV TV SPECIFICATIONS Screen Size Diagonal Viewable TV Type Smart TV Built-in WiFi Refresh Rate Maximum Resolution Dynamic Contrast Ratio Remote Control... (WxHxD) Product Dimensions Product Weight Product Dimensions without Stand Product Weight without notice. © 2012 VIZIO Inc. Product features and specifications are for high definition video, 3D, audio and Ethernet. HOME THEATER...


