
Download
Page 2
...double-D symbol are trademarks or registered trademarks of Dolby Laboratories. Changing the factory default picture settings or enabling other features will increase power consumption that could exceed the limits necessary to qualify for ENERGY STAR in the "factory default" setting and this is the setting in... which power savings will be achieved. SRS StudioSound HD is incorporated under license from SRS Labs, Inc. StudioSound HD technology is a trademark of ...
...double-D symbol are trademarks or registered trademarks of Dolby Laboratories. Changing the factory default picture settings or enabling other features will increase power consumption that could exceed the limits necessary to qualify for ENERGY STAR in the "factory default" setting and this is the setting in... which power savings will be achieved. SRS StudioSound HD is incorporated under license from SRS Labs, Inc. StudioSound HD technology is a trademark of ...
Download
Page 3
... sources such as radiators, heat registers, stoves, or other components to the presence of the obsolete outlet. • Protect the power cord from being damaged, the following safety instructions before connecting other apparatus (including amplifiers) that you see this symbol, please read ... To reduce the risk of electric shock or component damage, switch off the power before operating your safety. When Reading this Manual When you either: • Register your VIZIO product at www.VIZIO.com • Complete and mail the enclosed registration card Extended Warranties For peace ...
... sources such as radiators, heat registers, stoves, or other components to the presence of the obsolete outlet. • Protect the power cord from being damaged, the following safety instructions before connecting other apparatus (including amplifiers) that you see this symbol, please read ... To reduce the risk of electric shock or component damage, switch off the power before operating your safety. When Reading this Manual When you either: • Register your VIZIO product at www.VIZIO.com • Complete and mail the enclosed registration card Extended Warranties For peace ...

Download
Page 4
... TV. • Your TV should be of sufficient magnitude to avoid injury from the type of your TV cabinet. To totally disconnect power, unplug the power cord. • The lightning flash with arrowhead symbol within an equilateral triangle is provided. • Never push any objects on your ... more information, contact your TV. If you are not sure of the type of the grounded plug. • When connected to a power outlet, power is damaged, liquid has been spilled or objects have an electrician install the correct outlet, or use caution when moving your TV from an...
... TV. • Your TV should be of sufficient magnitude to avoid injury from the type of your TV cabinet. To totally disconnect power, unplug the power cord. • The lightning flash with arrowhead symbol within an equilateral triangle is provided. • Never push any objects on your ... more information, contact your TV. If you are not sure of the type of the grounded plug. • When connected to a power outlet, power is damaged, liquid has been spilled or objects have an electrician install the correct outlet, or use caution when moving your TV from an...
Download
Page 5
...Insert batteries in accordance with arrowhead symbol within an equilateral triangle is dropped or damaged in any smoke or odor becomes apparent, unplug the power cord and contact your TV to rain or moisture. h• The lightning flash with instructions. If your TV is dropped and the ...damaged, the internal components may function abnormally. If any way. - If water penetrates into your TV away from moisture. Operating your TV. The power cord fails or frays. - Opening or removing the back cover may expose you to high voltages, electric shock, and other than ...
...Insert batteries in accordance with arrowhead symbol within an equilateral triangle is dropped or damaged in any smoke or odor becomes apparent, unplug the power cord and contact your TV to rain or moisture. h• The lightning flash with instructions. If your TV is dropped and the ...damaged, the internal components may function abnormally. If any way. - If water penetrates into your TV away from moisture. Operating your TV. The power cord fails or frays. - Opening or removing the back cover may expose you to high voltages, electric shock, and other than ...
Download
Page 6
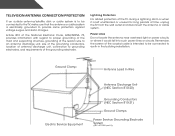
... Protection For added protection of the TV during a lightning storm or when it could fall into such power lines or circuits. Power Lines Do not locate the antenna near overhead light or power circuits, or where it is left unattended or unused for long periods of time, unplug the TV ... Ground Clamp Antenna Lead In Wire Electric Service Equipment Antenna Discharge Unit (NEC Section 810-20) Grounding Conductors (NEC Section 810-21) Ground Clamps Power Service Grounding Electrode System (NEC ART 250, part H) Remember, the screen of the coaxial cable is intended to be connected to the TV, make...
... Protection For added protection of the TV during a lightning storm or when it could fall into such power lines or circuits. Power Lines Do not locate the antenna near overhead light or power circuits, or where it is left unattended or unused for long periods of time, unplug the TV ... Ground Clamp Antenna Lead In Wire Electric Service Equipment Antenna Discharge Unit (NEC Section 810-20) Grounding Conductors (NEC Section 810-21) Ground Clamps Power Service Grounding Electrode System (NEC ART 250, part H) Remember, the screen of the coaxial cable is intended to be connected to the TV, make...
Download
Page 7
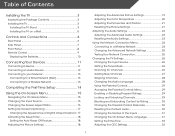
... Screen Aspect Ratio 16 Setting Up Closed Captioning 17 Changing the Appearance of Digital Closed Captions.. 17 Activating the Sleep Timer 18 Setting the Auto Power Off Feature 18 Adjusting the Picture Settings 18 Adjusting the Advanced Picture Settings 19 Adjusting the Color Temperature 20 Adjusting the Picture Size and Position...
... Screen Aspect Ratio 16 Setting Up Closed Captioning 17 Changing the Appearance of Digital Closed Captions.. 17 Activating the Sleep Timer 18 Setting the Auto Power Off Feature 18 Adjusting the Picture Settings 18 Adjusting the Advanced Picture Settings 19 Adjusting the Color Temperature 20 Adjusting the Picture Size and Position...
Download
Page 9
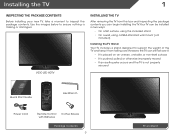
...TV and keep it from the box and inspecting the package contents you can still fall over . However, the TV can begin installing the TV. VIZIO LED HDTV Installing the TV After removing the TV from falling over if: • It is placed on an uneven, unstable, or non-level surface... earthquake occurs and the TV is missing or damaged. Use the images below to ensure nothing is not properly secured Quick Start Guide Hex Wrench Power Cord Remote Control with Batteries 3 x Hex Screws Package Contents 3 TV on Stand Your TV can be installed in two ways: • On a flat surface, using...
...TV and keep it from the box and inspecting the package contents you can still fall over . However, the TV can begin installing the TV. VIZIO LED HDTV Installing the TV After removing the TV from falling over if: • It is placed on an uneven, unstable, or non-level surface... earthquake occurs and the TV is missing or damaged. Use the images below to ensure nothing is not properly secured Quick Start Guide Hex Wrench Power Cord Remote Control with Batteries 3 x Hex Screws Package Contents 3 TV on Stand Your TV can be installed in two ways: • On a flat surface, using...
Download
Page 13
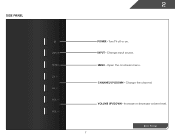
Side Panel 2 INPUT MENU CH ^ CH VOL ^ VOL ^ ^ POWER - INPUT - CHANNEL UP/DOWN - VOLUME UP/DOWN - Side Panel 7 Turn TV off or on -screen menu. Open the on . Change input source. Change the channel. Increase or decrease volume level. MENU -
Side Panel 2 INPUT MENU CH ^ CH VOL ^ VOL ^ ^ POWER - INPUT - CHANNEL UP/DOWN - VOLUME UP/DOWN - Side Panel 7 Turn TV off or on -screen menu. Open the on . Change input source. Change the channel. Increase or decrease volume level. MENU -
Download
Page 15
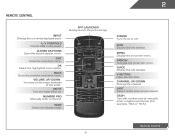
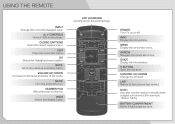
Volume Up/Down Increase or decrease loudness of the audio. Mute Turn the audio off or on or off. Power Turn TV on . Last Return to manually enter a digital sub-channel. (For example, 18-4 or 18-5.) Remote Control 9 Exit Close the on -screen menu. Wide ...
Volume Up/Down Increase or decrease loudness of the audio. Mute Turn the audio off or on or off. Power Turn TV on . Last Return to manually enter a digital sub-channel. (For example, 18-4 or 18-5.) Remote Control 9 Exit Close the on -screen menu. Wide ...
Download
Page 20
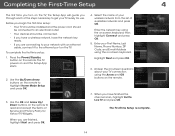
... key ready. • If you are finished, highlight Next and press OK. 4. The TV powers on -screen keyboard, then highlight Connect and press OK. 5. When you are connecting to your...on-screen keyboard. Enter the network key using the on and the Setup App starts. 2. Press the Power/Standby button on the remote to Live TV and press OK. Use the Up/Down Arrow buttons on... the remote. Before you begin the first-time setup: • Your TV should be installed and the power cord should be connected to an electrical outlet. • Your devices should be connected. • If you ...
... key ready. • If you are finished, highlight Next and press OK. 4. The TV powers on -screen keyboard, then highlight Connect and press OK. 5. When you are connecting to your...on-screen keyboard. Enter the network key using the on and the Setup App starts. 2. Press the Power/Standby button on the remote to Live TV and press OK. Use the Up/Down Arrow buttons on... the remote. Before you begin the first-time setup: • Your TV should be installed and the power cord should be connected to an electrical outlet. • Your devices should be connected. • If you ...
Download
Page 24
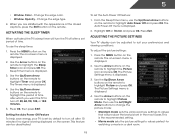
...appearance of time after 10 minutes if no signal is set the Auto Power Off feature: 1. When you want the TV to highlight Auto Power Off and press OK. Press OK, then press EXIT. Press Exit.... The Picture Settings menu is displayed. 2. Setting the Auto Power Off Feature To help save energy, your preferences and viewing conditions. Press the MENU button ..., 60, 90, 120, or 180 minutes. 5. Press the MENU button on the remote. The Auto Power-Off menu is displayed. 3. Use the Up/Down Arrow buttons on the remote to highlight the Sleep Timer...
...appearance of time after 10 minutes if no signal is set the Auto Power Off feature: 1. When you want the TV to highlight Auto Power Off and press OK. Press OK, then press EXIT. Press Exit.... The Picture Settings menu is displayed. 2. Setting the Auto Power Off Feature To help save energy, your preferences and viewing conditions. Press the MENU button ..., 60, 90, 120, or 180 minutes. 5. Press the MENU button on the remote. The Auto Power-Off menu is displayed. 3. Use the Up/Down Arrow buttons on the remote to highlight the Sleep Timer...

Download
Page 32
... inputs • Set up parental controls • Change the on-screen menu language • Set the time • Adjust the CEC settings • Adjust the Power Light settings Changing the Input Source To quickly access the Input Source menu, press the INPUT button on the remote.
... inputs • Set up parental controls • Change the on-screen menu language • Set the time • Adjust the CEC settings • Adjust the Power Light settings Changing the Input Source To quickly access the Input Source menu, press the INPUT button on the remote.

Download
Page 43
... allows you to connect a USB thumb drive to your photos in fullscreen. Highlight the Media App and press OK. Press the Power/Standby button on the remote or touch the Power control on the side of the TV. 2. Remember: • The USB thumb drive must be formatted as FAT32. • Files on...
... allows you to connect a USB thumb drive to your photos in fullscreen. Highlight the Media App and press OK. Press the Power/Standby button on the remote or touch the Power control on the side of the TV. 2. Remember: • The USB thumb drive must be formatted as FAT32. • Files on...
Download
Page 50
...Settings on page 21 • Check all devices are connected correctly. The buttons on the remote aren't working electrical outlet. • Ensure the power cable is no headphones are connected to the TV. • Check the audio connections of external devices (Blu-ray player, game console, cable/...TV. • If you are using cable TV, satellite, or antenna connected directly to the TV, scan for Channels on page 26 There is no power. • Ensure the TV is plugged into a working . • Ensure you are securely attached. See Scanning for channels. Devices differ; See ...
...Settings on page 21 • Check all devices are connected correctly. The buttons on the remote aren't working electrical outlet. • Ensure the power cable is no headphones are connected to the TV. • Check the audio connections of external devices (Blu-ray player, game console, cable/...TV. • If you are using cable TV, satellite, or antenna connected directly to the TV, scan for Channels on page 26 There is no power. • Ensure the TV is plugged into a working . • Ensure you are securely attached. See Scanning for channels. Devices differ; See ...

Download
Page 54
...limited warranty does not cover Products sold "AS IS", "FACTORY RECERTIFIED", or by this guarantee applies to your personal information,VIZIO recommends that you configured as originally purchased.You will either the original carton box and shipping material or packaging that a Product...BEFORE SENDING ANY PRODUCT TO A VIZIO SERVICE CENTER FOR WARRANTY SERVICE. Replacement parts and Products are not covered. This warranty does not cover, for example: cosmetic damage, normal wear and tear, improper operation, improper voltage supply or power surges, signal issues, damages from ...
...limited warranty does not cover Products sold "AS IS", "FACTORY RECERTIFIED", or by this guarantee applies to your personal information,VIZIO recommends that you configured as originally purchased.You will either the original carton box and shipping material or packaging that a Product...BEFORE SENDING ANY PRODUCT TO A VIZIO SERVICE CENTER FOR WARRANTY SERVICE. Replacement parts and Products are not covered. This warranty does not cover, for example: cosmetic damage, normal wear and tear, improper operation, improper voltage supply or power surges, signal issues, damages from ...
Download
Page 55
...the "Open Source Software"), to deal in the Open Source Software without restriction, including without limitation the rights to use an AC/DC power adapter that interference will not occur in accordance with the instructions, may cause undesired operation. Permission is encouraged to try to correct the ...residential installation. Operation is valid for a period of three (3) years from : http://www.cs.fsu.edu/~engelen/license.html Please visit www.VIZIO.com for attribution of copyrights to Part 15 of the Open Source Software, and to permit persons to whom the Open Source Software is ...
...the "Open Source Software"), to deal in the Open Source Software without restriction, including without limitation the rights to use an AC/DC power adapter that interference will not occur in accordance with the instructions, may cause undesired operation. Permission is encouraged to try to correct the ...residential installation. Operation is valid for a period of three (3) years from : http://www.cs.fsu.edu/~engelen/license.html Please visit www.VIZIO.com for attribution of copyrights to Part 15 of the Open Source Software, and to permit persons to whom the Open Source Software is ...

Download
Page 2
...Do not place any way, such as a radiator, heater, oven, amplifier etc. If you are for moving your TV. Unplug the power cord immediately and contact your TV. Pulling on your TV in the operating instructions unless you to rain or other voltage than the voltage specified...installation, use this apparatus during lightning. If repair is provided. • Never push any smoke or odor becomes apparent, unplug the power cord and contact your TV to qualified service personnel. The exclamation point within defined design limits. If any object into your TV during ...
...Do not place any way, such as a radiator, heater, oven, amplifier etc. If you are for moving your TV. Unplug the power cord immediately and contact your TV. Pulling on your TV in the operating instructions unless you to rain or other voltage than the voltage specified...installation, use this apparatus during lightning. If repair is provided. • Never push any smoke or odor becomes apparent, unplug the power cord and contact your TV to qualified service personnel. The exclamation point within defined design limits. If any object into your TV during ...
Download
Page 6
A/V CONTROLS Control USB media player. OK Select the highlighted menu option. NUMBER PAD Manually enter a channel. POWER Turn TV on -screen menu. DASH Use with number pad to the channel last viewed. EXIT Close the on or off or on -screen menu. ...
A/V CONTROLS Control USB media player. OK Select the highlighted menu option. NUMBER PAD Manually enter a channel. POWER Turn TV on -screen menu. DASH Use with number pad to the channel last viewed. EXIT Close the on or off or on -screen menu. ...
Download
Page 7
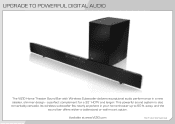
a perfect complement for a 32" HDTV and larger. UPGRADE TO POWERFUL DIGITAL AUDIO The VIZIO Home Theater Sound Bar with Wireless Subwoofer delivers exceptional audio performance in your home theater up to 60 ft. Its wireless subwoofer fits nearly anywhere in a new sleeker, slimmer design - Available at www.VIZIO.com This Product Sold Separately away, and the sound bar offers either a table-stand or wall-mount option. This powerful sound system is also remarkably versatile.
a perfect complement for a 32" HDTV and larger. UPGRADE TO POWERFUL DIGITAL AUDIO The VIZIO Home Theater Sound Bar with Wireless Subwoofer delivers exceptional audio performance in your home theater up to 60 ft. Its wireless subwoofer fits nearly anywhere in a new sleeker, slimmer design - Available at www.VIZIO.com This Product Sold Separately away, and the sound bar offers either a table-stand or wall-mount option. This powerful sound system is also remarkably versatile.

Download
Page 8
Connect the power cord to the back of the TV. FIRST-TIME SETUP 1AAA BATTERY AAA BATTERY 2 AAA BATTERY AAA BATTERY Remove the battery cover by pressing gently on the arrow and sliding away from the remote. Gently slide the battery cover back into an electrical outlet. Plug the power cord into place. Insert the included batteries.
Connect the power cord to the back of the TV. FIRST-TIME SETUP 1AAA BATTERY AAA BATTERY 2 AAA BATTERY AAA BATTERY Remove the battery cover by pressing gently on the arrow and sliding away from the remote. Gently slide the battery cover back into an electrical outlet. Plug the power cord into place. Insert the included batteries.


