
Download
Page 1
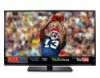
USER GUIDE MMODDEELLS // E3D320VX // E3ED44270V0Xi-A0 // E3D470VX INSTALLING YOUR new TV CONTROLS & CONNECTIONS CONNECTING YOUR DEVICES USING THE ON-SCREEN MENU USING THE USB MEDIA PLAYER USING VIZIO INTERNET APPS TROUBLESHOOTING & SUPPORT Help, SPECs, warranty & LEGAL
USER GUIDE MMODDEELLS // E3D320VX // E3ED44270V0Xi-A0 // E3D470VX INSTALLING YOUR new TV CONTROLS & CONNECTIONS CONNECTING YOUR DEVICES USING THE ON-SCREEN MENU USING THE USB MEDIA PLAYER USING VIZIO INTERNET APPS TROUBLESHOOTING & SUPPORT Help, SPECs, warranty & LEGAL

Download
Page 4
... period of the display. Operating your TV. To ensure reliable operation of time. • Refer all servicing to rain or moisture, does not operate normally or has been dropped. • Unplug the power cord before turning on your TV. The manufacturer's warranty does not cover user abuse or improper installations. • The power cord must be maintained between your TV safely. This plug will fit...
... period of the display. Operating your TV. To ensure reliable operation of time. • Refer all servicing to rain or moisture, does not operate normally or has been dropped. • Unplug the power cord before turning on your TV. The manufacturer's warranty does not cover user abuse or improper installations. • The power cord must be maintained between your TV safely. This plug will fit...
Download
Page 5
... used for moving your TV. • When unplugging your TV in environments with heavy dust or high humidity. If repair is dropped or damaged in any of the following occurs, contact the dealer: - If any servicing other hazards. Operating your TV, hold the AC/DC power adapter, not the cord. Pulling on the apparatus. • The mains plug...
... used for moving your TV. • When unplugging your TV in environments with heavy dust or high humidity. If repair is dropped or damaged in any of the following occurs, contact the dealer: - If any servicing other hazards. Operating your TV, hold the AC/DC power adapter, not the cord. Pulling on the apparatus. • The mains plug...
Download
Page 6
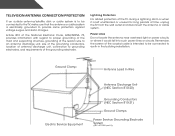
... of time, unplug the TV from the wall outlet and disconnect the antenna or cable system. Television Antenna Connection Protection If an outside antenna/satellite dish or cable system is to be connected to earth in wire to an antenna discharge unit, size of the grounding conductors, location of antenna discharge unit, connection to grounding electrodes, and requirements of the lead-in the building installation.
... of time, unplug the TV from the wall outlet and disconnect the antenna or cable system. Television Antenna Connection Protection If an outside antenna/satellite dish or cable system is to be connected to earth in wire to an antenna discharge unit, size of the grounding conductors, location of antenna discharge unit, connection to grounding electrodes, and requirements of the lead-in the building installation.
Download
Page 7
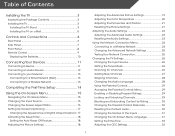
... 6 Rear Panel 6 Side Panel 7 Front Panel 8 Remote Control 9 Replacing the Batteries 10 Connecting Your Devices 11 Connecting A Device 11 Connecting an Audio Device 12 Connecting to your Network 13 Connecting to a Wired Network (Best 13 Connecting to a Wireless Network 13 Completing the First-Time Setup 14 Using the On-Screen Menu 15 Navigating the On-Screen Menu 15 Changing the Input Source 16 Changing the Screen Aspect Ratio 16 Setting Up Closed Captioning 17 Changing the Appearance of Digital Closed Captions.. 17 Activating the Sleep Timer 18 Setting the Auto Power Off...
... 6 Rear Panel 6 Side Panel 7 Front Panel 8 Remote Control 9 Replacing the Batteries 10 Connecting Your Devices 11 Connecting A Device 11 Connecting an Audio Device 12 Connecting to your Network 13 Connecting to a Wired Network (Best 13 Connecting to a Wireless Network 13 Completing the First-Time Setup 14 Using the On-Screen Menu 15 Navigating the On-Screen Menu 15 Changing the Input Source 16 Changing the Screen Aspect Ratio 16 Setting Up Closed Captioning 17 Changing the Appearance of Digital Closed Captions.. 17 Activating the Sleep Timer 18 Setting the Auto Power Off...
Download
Page 8
Turning the VIZIO Logo On or Off 33 Using the Help Menu 33 Displaying System Information 34 Resetting the TV Settings 34 Restoring the TV to Factory Default Settings 34 Using Guided Setup 35 Using the Info Window 36 Using the USB Media Player 37 Using the USB Media Player 37 Connecting a USB Thumb Drive to the TV 37 Playing USB Media 37 Using VIZIO Internet Apps 39 Using the VIA Shortcut Buttons 39 Using the VIA Dock 39 Moving an App on the...
Turning the VIZIO Logo On or Off 33 Using the Help Menu 33 Displaying System Information 34 Resetting the TV Settings 34 Restoring the TV to Factory Default Settings 34 Using Guided Setup 35 Using the Info Window 36 Using the USB Media Player 37 Using the USB Media Player 37 Connecting a USB Thumb Drive to the TV 37 Playing USB Media 37 Using VIZIO Internet Apps 39 Using the VIA Shortcut Buttons 39 Using the VIA Dock 39 Moving an App on the...
Download
Page 11
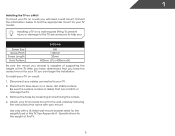
... a clean, flat, stable surface. Remove the base by loosening and removing the screws. 4. 1 Installing the TV on a Wall To mount your TV on a wall requires lifting. Disconnect any cables connected to find the appropriate mount for the weight/load of the TV. See Appendix A - Be sure the surface is capable of supporting the weight of this TV. 5 Use only with your mount. Screw Size: Screw Pitch: Screw Length: Hole Pattern: E470i-A0 M6 1.00mm...
... a clean, flat, stable surface. Remove the base by loosening and removing the screws. 4. 1 Installing the TV on a Wall To mount your TV on a wall requires lifting. Disconnect any cables connected to find the appropriate mount for the weight/load of the TV. See Appendix A - Be sure the surface is capable of supporting the weight of this TV. 5 Use only with your mount. Screw Size: Screw Pitch: Screw Length: Hole Pattern: E470i-A0 M6 1.00mm...
Download
Page 17
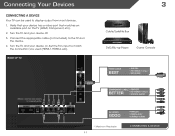
.... 3. Set the TV's input to colored ports. BACK OF TV 3 Cable/Satellite Box DVD/Blu-ray Player Game Console HDMI CABLE BEST • DIGITAL • HD VIDEO (1080p)* • HD AUDIO Match colored connectors to match the connection you used to the TV and the device. 4. Turn the TV and your device on the TV (HDMI, Component, etc). 2. Connecting Your Devices Connecting A Device Your TV can be used (HDMI-1, HDMI-2, etc). Connect the appropriate cable (not included) to display output...
.... 3. Set the TV's input to colored ports. BACK OF TV 3 Cable/Satellite Box DVD/Blu-ray Player Game Console HDMI CABLE BEST • DIGITAL • HD VIDEO (1080p)* • HD AUDIO Match colored connectors to match the connection you used to the TV and the device. 4. Turn the TV and your device on the TV (HDMI, Component, etc). 2. Connecting Your Devices Connecting A Device Your TV can be used (HDMI-1, HDMI-2, etc). Connect the appropriate cable (not included) to display output...
Download
Page 25
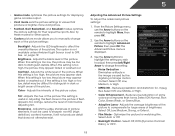
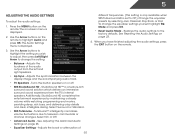
...-HD (high definition) content; Use the Arrow buttons to highlight the setting you to manually change the setting: • Noise Reduction Diminishes artifacts in the image caused by the digitizing of the picture. 5 • Game mode optimizes the picture settings for displaying game console output. • Vivid mode sets the picture settings to values that does not otherwise exist. Contrast - Color - Adjusts the hue of color before adjusting tint. If flesh appears too...
...-HD (high definition) content; Use the Arrow buttons to highlight the setting you to manually change the setting: • Noise Reduction Diminishes artifacts in the image caused by the digitizing of the picture. 5 • Game mode optimizes the picture settings for displaying game console output. • Vivid mode sets the picture settings to values that does not otherwise exist. Contrast - Color - Adjusts the hue of color before adjusting tint. If flesh appears too...
Download
Page 28
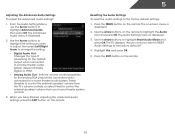
... - 5 Adjusting the Audio Settings To adjust the audio settings: 1. Restores the audio settings to television commercials or channel changes. See Resetting the Audio Settings on -screen menu is set to change the equalizer settings yourself, highlight EQ Mode and press OK. • Reset Audio Mode - TruVolume™ intelligently normalizes volume fluctuations due to the factory defaults. Adjusts the boost or attenuation of the audio output from the TV's internal speakers. Select On or Off. • Advanced Audio - Adjusts the synchronization between the display...
... - 5 Adjusting the Audio Settings To adjust the audio settings: 1. Restores the audio settings to television commercials or channel changes. See Resetting the Audio Settings on -screen menu is set to change the equalizer settings yourself, highlight EQ Mode and press OK. • Reset Audio Mode - TruVolume™ intelligently normalizes volume fluctuations due to the factory defaults. Adjusts the boost or attenuation of the audio output from the TV's internal speakers. Select On or Off. • Advanced Audio - Adjusts the synchronization between the display...
Download
Page 29
...volume from the TV's volume controls, or select Fixed to highlight Reset Audio Mode and press OK. The Audio Settings menu is displayed. 2. Select Off, Dolby Digital, or PCM. • Analog Audio Out - Use the Arrow buttons to control the external speakers' volume from your home theater system controls. 3. The Advanced Audio menu is displayed. 3. Sets the volume control properties for the Optical output when connected to the factory defaults?" 4. Resetting the Audio Settings To reset the audio settings to a home theater audio system. Use the Arrow buttons on -screen menu is displayed...
...volume from the TV's volume controls, or select Fixed to highlight Reset Audio Mode and press OK. The Audio Settings menu is displayed. 2. Select Off, Dolby Digital, or PCM. • Analog Audio Out - Use the Arrow buttons to control the external speakers' volume from your home theater system controls. 3. The Advanced Audio menu is displayed. 3. Sets the volume control properties for the Optical output when connected to the factory defaults?" 4. Resetting the Audio Settings To reset the audio settings to a home theater audio system. Use the Arrow buttons on -screen menu is displayed...

Download
Page 32
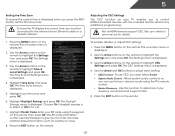
...television channels are using a device that is 100% complete. Setting the Tuner Mode If you are available. 1. Scanning for Channels Before the TV can : • Change the input source • Adjust the Tuner settings • Name the TV inputs • Set up parental controls • Change the on-screen menu language • Set the time • Adjust the CEC settings • Adjust the Power Light settings Changing the Input Source To quickly access the Input Source menu, press the INPUT button on -screen menu is displayed. 3. From the Tuner Settings menu, highlight Auto Channel Scan...
...television channels are using a device that is 100% complete. Setting the Tuner Mode If you are available. 1. Scanning for Channels Before the TV can : • Change the input source • Adjust the Tuner settings • Name the TV inputs • Set up parental controls • Change the on-screen menu language • Set the time • Adjust the CEC settings • Adjust the Power Light settings Changing the Input Source To quickly access the Input Source menu, press the INPUT button on -screen menu is displayed. 3. From the Tuner Settings menu, highlight Auto Channel Scan...
Download
Page 34
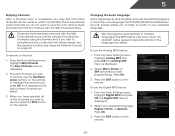
... Channels After a channel scan is completed, you may also be viewed if the channel is entered using the Number Pad. There may find that have selected all programs are too weak to view. From the Tuner Settings menu, highlight Digital MTS and press OK. Press the EXIT button on the remote. Changing the Audio Language Some digital free-to remove, use the parental controls. To use the Digital MTS feature: 1. The MTS feature only works when...
... Channels After a channel scan is completed, you may also be viewed if the channel is entered using the Number Pad. There may find that have selected all programs are too weak to view. From the Tuner Settings menu, highlight Digital MTS and press OK. Press the EXIT button on the remote. Changing the Audio Language Some digital free-to remove, use the parental controls. To use the Digital MTS feature: 1. The MTS feature only works when...
Download
Page 38
... connected to highlight the Settings icon and press OK. Adjusting the CEC Settings The CEC function on the remote. Press the MENU button on your ZIP code using the TV's remote control. • Device Discovery - The Settings menu is displayed. 5. The Time Zone menu is displayed. 3. Highlight Postal Code. Use the Arrow buttons on the remote. 32 The Settings menu is not. 7. Press the EXIT button on the remote to the internet via an Ethernet cable or a wireless network. 5 Setting...
... connected to highlight the Settings icon and press OK. Adjusting the CEC Settings The CEC function on the remote. Press the MENU button on your ZIP code using the TV's remote control. • Device Discovery - The Settings menu is displayed. 5. The Time Zone menu is displayed. 3. Highlight Postal Code. Use the Arrow buttons on the remote. 32 The Settings menu is not. 7. Press the EXIT button on the remote to the internet via an Ethernet cable or a wireless network. 5 Setting...
Download
Page 50
... ensure they are using cable TV, satellite, or antenna connected directly to the TV, scan for details. • Adjust Brightness, Contrast, or Backlight. See Scanning for the best signal. The colors on the side of the channel may be low. See Resetting the Picture Settings on the remote to select a different input source. There is no sound. • Press Volume Up on the remote control. • Press the MUTE button on page...
... ensure they are using cable TV, satellite, or antenna connected directly to the TV, scan for details. • Adjust Brightness, Contrast, or Backlight. See Scanning for the best signal. The colors on the side of the channel may be low. See Resetting the Picture Settings on the remote to select a different input source. There is no sound. • Press Volume Up on the remote control. • Press the MUTE button on page...
Download
Page 51
... button on the remote to a window for the best signal. These types of occurences are using TV, AV1, AV2, or Component with HDMI cables. • If you switch from, the difference may not display correctly. When I change input source, the volume changes. • The TV remembers the volume level on the screen. • When your antenna is connected securely to the TV and move the antenna around the room or close to adjust...
... button on the remote to a window for the best signal. These types of occurences are using TV, AV1, AV2, or Component with HDMI cables. • If you switch from, the difference may not display correctly. When I change input source, the volume changes. • The TV remembers the volume level on the screen. • When your antenna is connected securely to the TV and move the antenna around the room or close to adjust...

Download
Page 54
... materials and workmanship for ninety (90) days from warranty service or replacement, whichever is within the warranty period,VIZIO will provide instructions for example: cosmetic damage, normal wear and tear, improper operation, improper voltage supply or power surges, signal issues, damages from 6:00AM to 9:00PM Monday through Friday and 8:00AM to the customer. Replacement parts and Products may be responsible for the remaining...
... materials and workmanship for ninety (90) days from warranty service or replacement, whichever is within the warranty period,VIZIO will provide instructions for example: cosmetic damage, normal wear and tear, improper operation, improper voltage supply or power surges, signal issues, damages from 6:00AM to 9:00PM Monday through Friday and 8:00AM to the customer. Replacement parts and Products may be responsible for the remaining...

Download
Page 2
... before turning on the power cord may function abnormally. Pulling on your dealer. Install in the operating instructions unless you to repair or service your TV, hold the AC/DC power adapter, not the cord. To reduce the risk of the display. Wait before moving your dealer for use attachments/accessories specified by the manufacturer. • Use only with the cart, stand, tripod, bracket, or table specified...
... before turning on the power cord may function abnormally. Pulling on your dealer. Install in the operating instructions unless you to repair or service your TV, hold the AC/DC power adapter, not the cord. To reduce the risk of the display. Wait before moving your dealer for use attachments/accessories specified by the manufacturer. • Use only with the cart, stand, tripod, bracket, or table specified...
Download
Page 19
... A VIZIO SERVICE CENTER. VIZIO provides a warranty to obtain warranty service. com) or look for example: cosmetic damage, normal wear and tear, improper operation, improper voltage supply or power surges, signal issues, damages from warranty service or replacement, whichever is determined to be responsible for transportation costs to the service center, but VIZIO will provide instructions for the duration of customer misuse, modifications or adjustments, as well as installation and set...
... A VIZIO SERVICE CENTER. VIZIO provides a warranty to obtain warranty service. com) or look for example: cosmetic damage, normal wear and tear, improper operation, improper voltage supply or power surges, signal issues, damages from warranty service or replacement, whichever is determined to be responsible for transportation costs to the service center, but VIZIO will provide instructions for the duration of customer misuse, modifications or adjustments, as well as installation and set...
Download
Page 2
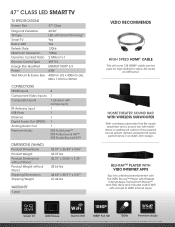
... TV SPECIFICATIONS Screen Size Diagonal Viewable TV Type Smart TV Built-in WiFi Refresh Rate Maximum Resolution Dynamic Contrast Ratio Remote Control Type Energy Star Qualified Power Wall Mount & Screw Size 47" Class 46.96" LED with Smart Dimming™ Yes Yes 120Hz 1080p 2 Million to 1 XRT112 ENERGY STAR® 5.3 62W 400mm (V) x 400mm (H), M6 x 1.0mm x 20mm CONNECTIONS HDMI Inputs Component Video Inputs Composite Inputs RF Antenna Input USB Ports Ethernet Digital Audio Out (SPDIF) Analog Audio Out Premium Audio 4 1 1 (shared with component...
... TV SPECIFICATIONS Screen Size Diagonal Viewable TV Type Smart TV Built-in WiFi Refresh Rate Maximum Resolution Dynamic Contrast Ratio Remote Control Type Energy Star Qualified Power Wall Mount & Screw Size 47" Class 46.96" LED with Smart Dimming™ Yes Yes 120Hz 1080p 2 Million to 1 XRT112 ENERGY STAR® 5.3 62W 400mm (V) x 400mm (H), M6 x 1.0mm x 20mm CONNECTIONS HDMI Inputs Component Video Inputs Composite Inputs RF Antenna Input USB Ports Ethernet Digital Audio Out (SPDIF) Analog Audio Out Premium Audio 4 1 1 (shared with component...


