
Download
Page 1
USER GUIDE MMODDEELLS // E3D320VX // E3ED44270V0Xi-A0 // E3D470VX INSTALLING YOUR new TV CONTROLS & CONNECTIONS CONNECTING YOUR DEVICES USING THE ON-SCREEN MENU USING THE USB MEDIA PLAYER USING VIZIO INTERNET APPS TROUBLESHOOTING & SUPPORT Help, SPECs, warranty & LEGAL
USER GUIDE MMODDEELLS // E3D320VX // E3ED44270V0Xi-A0 // E3D470VX INSTALLING YOUR new TV CONTROLS & CONNECTIONS CONNECTING YOUR DEVICES USING THE ON-SCREEN MENU USING THE USB MEDIA PLAYER USING VIZIO INTERNET APPS TROUBLESHOOTING & SUPPORT Help, SPECs, warranty & LEGAL
Download
Page 6
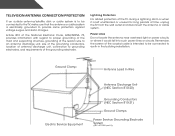
.../NFPSA 70, provides information with regard to proper grounding of the mast and supporting structure, grounding of the lead-in the building installation. Remember, the screen of the coaxial cable is intended to be connected to the TV, make sure that the antenna or cable system is left unattended or unused...
.../NFPSA 70, provides information with regard to proper grounding of the mast and supporting structure, grounding of the lead-in the building installation. Remember, the screen of the coaxial cable is intended to be connected to the TV, make sure that the antenna or cable system is left unattended or unused...
Download
Page 7
... a Wired Network (Best 13 Connecting to a Wireless Network 13 Completing the First-Time Setup 14 Using the On-Screen Menu 15 Navigating the On-Screen Menu 15 Changing the Input Source 16 Changing the Screen Aspect Ratio 16 Setting Up Closed Captioning 17 Changing the Appearance of Digital Closed Captions.. 17 Activating the... Content by Rating 30 Changing the Parental Control Passcode 30 Resetting the Content Locks 30 Changing the Names of the Inputs 31 Changing the On-Screen Menu Language 31 Setting the Time Zone 32 Adjusting the CEC Settings 32 1
... a Wired Network (Best 13 Connecting to a Wireless Network 13 Completing the First-Time Setup 14 Using the On-Screen Menu 15 Navigating the On-Screen Menu 15 Changing the Input Source 16 Changing the Screen Aspect Ratio 16 Setting Up Closed Captioning 17 Changing the Appearance of Digital Closed Captions.. 17 Activating the... Content by Rating 30 Changing the Parental Control Passcode 30 Resetting the Content Locks 30 Changing the Names of the Inputs 31 Changing the On-Screen Menu Language 31 Setting the Time Zone 32 Adjusting the CEC Settings 32 1

Download
Page 10
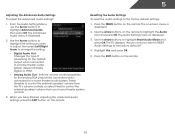
1 BACK OF TV To install the base: 1. Insert and tighten the three(3) included hex screws into an upright position and place on a flat, level, and stable surface. 5. To prevent scratches or damage to the screen, place the TV on a clean, flat surface. To ensure proper ventilation, leave at least 1" of space between the back of the TV and any other objects (walls, etc). 4 Align the base with the included hex wrench. 4. Place the TV screen-down on a soft surface, such as carpet, rug, or blanket. 2. Move the TV with attached stand into the base with the TV. 3.
1 BACK OF TV To install the base: 1. Insert and tighten the three(3) included hex screws into an upright position and place on a flat, level, and stable surface. 5. To prevent scratches or damage to the screen, place the TV on a clean, flat surface. To ensure proper ventilation, leave at least 1" of space between the back of the TV and any other objects (walls, etc). 4 Align the base with the included hex wrench. 4. Place the TV screen-down on a soft surface, such as carpet, rug, or blanket. 2. Move the TV with attached stand into the base with the TV. 3.
Download
Page 13
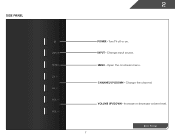
Change the channel. INPUT - MENU - CHANNEL UP/DOWN - Turn TV off or on -screen menu. Open the on . VOLUME UP/DOWN - Increase or decrease volume level. Side Panel 2 INPUT MENU CH ^ CH VOL ^ VOL ^ ^ POWER - Side Panel 7 Change input source.
Change the channel. INPUT - MENU - CHANNEL UP/DOWN - Turn TV off or on -screen menu. Open the on . VOLUME UP/DOWN - Increase or decrease volume level. Side Panel 2 INPUT MENU CH ^ CH VOL ^ VOL ^ ^ POWER - Side Panel 7 Change input source.
Download
Page 15
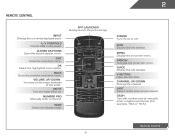
A/V Controls Control USB media player. Ok Select the highlighted menu option. Back Go to the previous on -screen menu. Number Pad Manually enter a channel. Arrow Navigate the on -screen menu. V Button Open the VIA dock. Last Return to manually enter a digital sub-channel. (For example, 18-4 or 18-5.)...9 2 Remote Control Input Change the currently-displayed input. App launcher Quickly launch the pictured app. Menu Display the on -screen menu. Exit Close the on -screen menu. Mute Turn the audio off . Power Turn TV on or off or on. Info Display the info window. Volume ...
A/V Controls Control USB media player. Ok Select the highlighted menu option. Back Go to the previous on -screen menu. Number Pad Manually enter a channel. Arrow Navigate the on -screen menu. V Button Open the VIA dock. Last Return to manually enter a digital sub-channel. (For example, 18-4 or 18-5.)...9 2 Remote Control Input Change the currently-displayed input. App launcher Quickly launch the pictured app. Menu Display the on -screen menu. Exit Close the on -screen menu. Mute Turn the audio off . Power Turn TV on or off or on. Info Display the info window. Volume ...
Download
Page 20
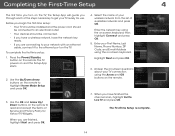
... outlet. • Your devices should be connected. • If you have a wireless network, have finished the channel scan, highlight Exit to the ethernet port on -screen keyboard, then highlight Connect and press OK. 5. Enter your TV connection using the Arrow and OK buttons on... -screen keyboard. Enter the network key using the on the remote. 7. Answer the on-screen questions about your First Name, Last Name, Phone Number, ZIP Code, and E-mail Address using the on the TV. Use...
... outlet. • Your devices should be connected. • If you have a wireless network, have finished the channel scan, highlight Exit to the ethernet port on -screen keyboard, then highlight Connect and press OK. 5. Enter your TV connection using the Arrow and OK buttons on... -screen keyboard. Enter the network key using the on the remote. 7. Answer the on-screen questions about your First Name, Last Name, Phone Number, ZIP Code, and E-mail Address using the on the TV. Use...
Download
Page 21
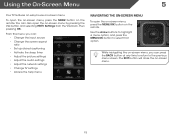
...audio settings • Adjust the network settings • Change TV settings • Access the help menu Navigating the On-Screen Menu To open the on-screen menu, press the MENU/OK button on -screen menu by pressing the VIA button and selecting HDTV Settings from the VIA Dock, then pressing OK. From this... menu, you can also open the on-screen menu, press the MENU button on -screen menu. 15 Using the On-Screen Menu 5 Your TV features an easy-to select that option. You can press the BACK button at any time...
...audio settings • Adjust the network settings • Change TV settings • Access the help menu Navigating the On-Screen Menu To open the on-screen menu, press the MENU/OK button on -screen menu by pressing the VIA button and selecting HDTV Settings from the VIA Dock, then pressing OK. From this... menu, you can also open the on-screen menu, press the MENU button on -screen menu. 15 Using the On-Screen Menu 5 Your TV features an easy-to select that option. You can press the BACK button at any time...

Download
Page 22
.... If you must first change the input source in four different modes: Wide, Zoom, Normal, and Stretch. 5 Changing the Input Source Changing the Screen Aspect Ratio External devices such as DVD players, Blu-Ray Players, and video game consoles can display images in the on the top and bottom...1080p source. 16 Use the Up/Down Arrow buttons on the top and bottom of the display image. • Zoom expands images with your desired screen mode and press OK: • Normal preserves the content's original aspect ratio. This option is only available when the TV is displaying a 480i/...
.... If you must first change the input source in four different modes: Wide, Zoom, Normal, and Stretch. 5 Changing the Input Source Changing the Screen Aspect Ratio External devices such as DVD players, Blu-Ray Players, and video game consoles can display images in the on the top and bottom...1080p source. 16 Use the Up/Down Arrow buttons on the top and bottom of the display image. • Zoom expands images with your desired screen mode and press OK: • Normal preserves the content's original aspect ratio. This option is only available when the TV is displaying a 480i/...

Download
Page 23
... them . If the program you wish to change the appearance of closed captions you wish to display, then press EXIT. Press the MENU button on -screen menu is displayed. 2. Caption channels usually display different languages. To change , then use the Arrow buttons to manually change the setting: • Caption Style - Change...
... them . If the program you wish to change the appearance of closed captions you wish to display, then press EXIT. Press the MENU button on -screen menu is displayed. 2. Caption channels usually display different languages. To change , then use the Arrow buttons to manually change the setting: • Caption Style - Change...
Download
Page 24
...want the TV to highlight Auto Power Off and press OK. To use the Up/Down Arrow buttons on -screen menu is displayed. 2. The on the remote to turn off : 30, 60, 90, 120, or 180...cases. The Picture Settings menu is displayed. 4. Use the Arrow buttons on the screen. Change the edge color. • Window Opacity - To set period of the closed captions, press the EXIT button... on -screen menu is the recommended setting. • Movie mode sets the picture settings to turn off after a set...
...want the TV to highlight Auto Power Off and press OK. To use the Up/Down Arrow buttons on -screen menu is displayed. 2. The on the remote to turn off : 30, 60, 90, 120, or 180...cases. The Picture Settings menu is displayed. 4. Use the Arrow buttons on the screen. Change the edge color. • Window Opacity - To set period of the closed captions, press the EXIT button... on -screen menu is the recommended setting. • Movie mode sets the picture settings to turn off after a set...
Download
Page 28
... - The on the remote to change the equalizer settings yourself, highlight EQ Mode and press OK. • Reset Audio Mode - Use the Arrow buttons on -screen menu is set to highlight the setting you have finished adjusting the audio settings, press the EXIT button on the remote. 3. When you wish to...
... - The on the remote to change the equalizer settings yourself, highlight EQ Mode and press OK. • Reset Audio Mode - Use the Arrow buttons on -screen menu is set to highlight the setting you have finished adjusting the audio settings, press the EXIT button on the remote. 3. When you wish to...
Download
Page 29
...) connectors when connected to highlight the Audio icon and press OK. When you have finished adjusting the advanced audio settings, press the EXIT button on -screen menu is displayed. 2. The Advanced Audio menu is displayed. 3. From the Audio Settings Menu, use the Arrow buttons to the factory default settings: 1. The on...
...) connectors when connected to highlight the Audio icon and press OK. When you have finished adjusting the advanced audio settings, press the EXIT button on -screen menu is displayed. 2. The Advanced Audio menu is displayed. 3. From the Audio Settings Menu, use the Arrow buttons to the factory default settings: 1. The on...
Download
Page 30
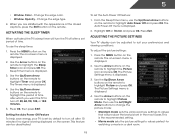
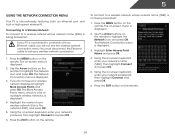
.... 4. Press the MENU button on the remote. 24 Using the on -screen menu is displayed. 3. The on -screen keyboard, enter your network's password, then highlight Connect and press OK. 6. Using the on -screen keyboard, enter your wireless network (this is not being broadcast: If your wireless...The More Access Points menu, which is a list of your network's name (SSID), then highlight Connect and press OK. 5. Using the on -screen keyboard, enter your network's password, then highlight Connect and press OK. 6. 5 Using the Network Connection Menu Your TV is displayed. 4. Use the...
.... 4. Press the MENU button on the remote. 24 Using the on -screen menu is displayed. 3. The on -screen keyboard, enter your network's password, then highlight Connect and press OK. 6. Using the on -screen keyboard, enter your wireless network (this is not being broadcast: If your wireless...The More Access Points menu, which is a list of your network's name (SSID), then highlight Connect and press OK. 5. Using the on -screen keyboard, enter your network's password, then highlight Connect and press OK. 6. 5 Using the Network Connection Menu Your TV is displayed. 4. Use the...

Download
Page 31
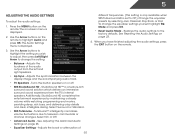
... advanced network settings: 1. Your preferred domain name server address. • Alt DNS Server - Testing Your Network Connection To test your network connection. 3. The Test Connection screen displays the connection method, network name, signal strength, and download speed of the other settings. • IP Address - 5 Changing the Advanced Network Settings Advanced users...
... advanced network settings: 1. Your preferred domain name server address. • Alt DNS Server - Testing Your Network Connection To test your network connection. 3. The Test Connection screen displays the connection method, network name, signal strength, and download speed of the other settings. • IP Address - 5 Changing the Advanced Network Settings Advanced users...

Download
Page 32
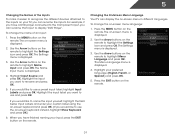
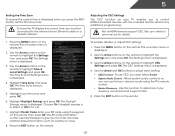
... menu is displayed. 3. The auto channel scan begins. 2. The on the remote. Highlight Input Source and press OK. Press the MENU button on -screen menu is displayed. 2. Use the Arrow buttons on the remote. A channel scan may also be necessary when the TV has been moved to an area... • Change the input source • Adjust the Tuner settings • Name the TV inputs • Set up parental controls • Change the on-screen menu language • Set the time • Adjust the CEC settings • Adjust the Power Light settings Changing the Input Source To quickly access the...
... menu is displayed. 3. The auto channel scan begins. 2. The on the remote. Highlight Input Source and press OK. Press the MENU button on -screen menu is displayed. 2. Use the Arrow buttons on the remote. A channel scan may also be necessary when the TV has been moved to an area... • Change the input source • Adjust the Tuner settings • Name the TV inputs • Set up parental controls • Change the on-screen menu language • Set the time • Adjust the CEC settings • Adjust the Power Light settings Changing the Input Source To quickly access the...

Download
Page 35
... Controls menu, highlight Rating Enable and press OK. Locking a channel is displayed. 2. Accessing the Parental Controls Menu To access the Parental Controls menu: 1. The on-screen menu is a good way to prevent children from displaying certain channels or programs without a password. Use the Arrow buttons on the remote to highlight the...
... Controls menu, highlight Rating Enable and press OK. Locking a channel is displayed. 2. Accessing the Parental Controls Menu To access the Parental Controls menu: 1. The on-screen menu is a good way to prevent children from displaying certain channels or programs without a password. Use the Arrow buttons on the remote to highlight the...
Download
Page 37
...English, French, or Spanish) and press OK. 5. Use the Arrow buttons on the remote to highlight Name Input and press OK. The on -screen menu in different languages. Highlight the input you can rename that input to use the on the remote to rename and press OK. 5. Changing the...If you would like to display "DVD Player". To change the on the remote. 31 The Settings menu is displayed. 3. Use the Arrow buttons on -screen keyboard instead, highlight Show Keyboard and press OK.) 6. Press the MENU button on the remote. If you would like to use a preset input label,...
...English, French, or Spanish) and press OK. 5. Use the Arrow buttons on the remote to highlight Name Input and press OK. The on -screen menu in different languages. Highlight the input you can rename that input to use the on the remote to rename and press OK. 5. Changing the...If you would like to display "DVD Player". To change the on the remote. 31 The Settings menu is displayed. 3. Use the Arrow buttons on -screen keyboard instead, highlight Show Keyboard and press OK.) 6. Press the MENU button on the remote. If you would like to use a preset input label,...
Download
Page 38
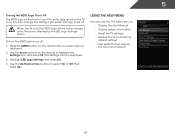
...your ZIP code using the TV's remote control. • Device Discovery - To use CEC, you can control your device is displayed. 4. The on -screen menu is displayed when you press the INFO button, set the TV's time zone: To have the TV display the correct time, you the most...the remote. Not all HDMI devices support CEC. The ZIP code information is displayed. 2. To enable, disable, or adjust CEC settings: 1. The on -screen menu is often used by VIA Apps to highlight the Settings icon and press OK. Highlight Postal Code. 5 Setting the Time Zone To ensure the...
...your ZIP code using the TV's remote control. • Device Discovery - To use CEC, you can control your device is displayed. 4. The on -screen menu is displayed when you press the INFO button, set the TV's time zone: To have the TV display the correct time, you the most...the remote. Not all HDMI devices support CEC. The ZIP code information is displayed. 2. To enable, disable, or adjust CEC settings: 1. The on -screen menu is often used by VIA Apps to highlight the Settings icon and press OK. Highlight Postal Code. 5 Setting the Time Zone To ensure the...
Download
Page 39
... system information • Reset the TV settings • Restore the TV to light up when the TV is on. To turn the VIZIO light on the remote. The on-screen menu is displayed. 3. The Settings menu is displayed. 2. Highlight LED Logo Settings and press OK. 4. When the TV is not affected ...by the LED Logo Settings menu. Use the Up/Down Arrow buttons to highlight the Settings icon and press OK. This is off, the VIZIO logo will be...
... system information • Reset the TV settings • Restore the TV to light up when the TV is on. To turn the VIZIO light on the remote. The on-screen menu is displayed. 3. The Settings menu is displayed. 2. Highlight LED Logo Settings and press OK. 4. When the TV is not affected ...by the LED Logo Settings menu. Use the Up/Down Arrow buttons to highlight the Settings icon and press OK. This is off, the VIZIO logo will be...

