
Download
Page 20
Enter the network key using the on-screen keyboard. Answer the on-screen questions about your TV ready for Yahoo! The TV powers on the remote. Use the OK and Arrow Up/ Down buttons on the remote to read and accept the Terms of Service and Privacy Policy for use. TV Widgets. When ... each of the steps necessary to get your TV connection using the Arrow and OK buttons on the remote. 7. Use the Up/Down Arrow buttons on the remote to the ethernet port on -screen keyboard, then highlight Connect and press OK. 5. To complete the first-time setup: 1. When you are connecting to ...
Enter the network key using the on-screen keyboard. Answer the on-screen questions about your TV ready for Yahoo! The TV powers on the remote. Use the OK and Arrow Up/ Down buttons on the remote to read and accept the Terms of Service and Privacy Policy for use. TV Widgets. When ... each of the steps necessary to get your TV connection using the Arrow and OK buttons on the remote. 7. Use the Up/Down Arrow buttons on the remote to the ethernet port on -screen keyboard, then highlight Connect and press OK. 5. To complete the first-time setup: 1. When you are connecting to ...
Download
Page 30
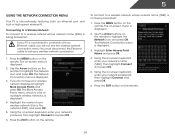
...network's SSID) and press OK. 5. Press the MENU button on the remote. 24 Using the on -screen keyboard, enter your wireless network displayed, highlight More Access Points and press OK. Press the EXIT button on the remote. 5 Using the Network Connection Menu Your TV is displayed. 2. The... Network Connection menu is displayed. 2. Using the on -screen keyboard, enter your network's password, then highlight Connect and press OK. 6. The on the remote to a network with an Ethernet cable, you do not see the wireless network connection menu. You...
...network's SSID) and press OK. 5. Press the MENU button on the remote. 24 Using the on -screen keyboard, enter your wireless network displayed, highlight More Access Points and press OK. Press the EXIT button on the remote. 5 Using the Network Connection Menu Your TV is displayed. 2. The... Network Connection menu is displayed. 2. Using the on -screen keyboard, enter your network's password, then highlight Connect and press OK. 6. The on the remote to a network with an Ethernet cable, you do not see the wireless network connection menu. You...
Download
Page 37
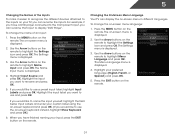
... and press OK. To change the name of the Inputs To make it easier to recognize the different devices attached to the inputs on the remote. Press the MENU button on -screen menu in different languages. The Settings menu is displayed. 4. The Name Input menu is displayed. 3. Highlight Input ...Source and press OK. If you want to highlight the Settings icon and press OK. If you would like to use the on-screen keyboard instead, highlight Show Keyboard and press OK.) 6. Changing the On-Screen Menu Language Your TV can rename the inputs. Use the Arrow buttons on -screen...
... and press OK. To change the name of the Inputs To make it easier to recognize the different devices attached to the inputs on the remote. Press the MENU button on -screen menu in different languages. The Settings menu is displayed. 4. The Name Input menu is displayed. 3. Highlight Input ...Source and press OK. If you want to highlight the Settings icon and press OK. If you would like to use the on-screen keyboard instead, highlight Show Keyboard and press OK.) 6. Changing the On-Screen Menu Language Your TV can rename the inputs. Use the Arrow buttons on -screen...
Download
Page 47
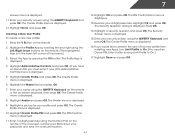
... the on the remote. (The highlighted App is displayed. 5. Press OK. 14. Enter it now.) The Administrative Controls menu is in a secure location. 12. Press the V Button on -screen keyboard, then press OK. The Create Profile menu is displayed. 8. The Create Profile menu is displayed. 6. Highlight a ... the user of the screen.) 3. The PIN Creation menu is displayed. 13. Enter your security answer using the QWERTY Keyboard on the remote or the on the remote. 2. Highlight Avatar and press OK. The PIN Confirmation menu is displayed. 11. Highlight OK and press OK. Enter ...
... the on the remote. (The highlighted App is displayed. 5. Press OK. 14. Enter it now.) The Administrative Controls menu is in a secure location. 12. Press the V Button on -screen keyboard, then press OK. The Create Profile menu is displayed. 8. The Create Profile menu is displayed. 6. Highlight a ... the user of the screen.) 3. The PIN Creation menu is displayed. 13. Enter your security answer using the QWERTY Keyboard on the remote or the on the remote. 2. Highlight Avatar and press OK. The PIN Confirmation menu is displayed. 11. Highlight OK and press OK. Enter ...
Download
Page 10
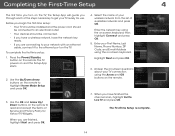
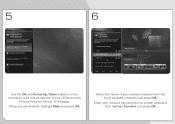
Enter your wireless network from the list of available networks and press OK. TV Widgets. When you are finished, highlight Next and press OK. Select the name of Service and Privacy Policy for Yahoo! 5 6 Use the OK and Arrow Up/Down buttons on the remote to read and accept the Terms of your network key using the on-screen keyboard, then highlight Connect and press OK.
Enter your wireless network from the list of available networks and press OK. TV Widgets. When you are finished, highlight Next and press OK. Select the name of Service and Privacy Policy for Yahoo! 5 6 Use the OK and Arrow Up/Down buttons on the remote to read and accept the Terms of your network key using the on-screen keyboard, then highlight Connect and press OK.
Download
Page 11
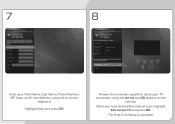
When you have finished the channel scan, highlight Exit to Live TV and press OK. 7 8 Enter your TV connection using the on the remote. Highlight Next and press OK. The First-Time Setup is complete. Answer the on-screen questions about your First Name, Last Name, Phone Number, ZIP Code, and E-mail Address using the Arrow and OK buttons on -screen keyboard.
When you have finished the channel scan, highlight Exit to Live TV and press OK. 7 8 Enter your TV connection using the on the remote. Highlight Next and press OK. The First-Time Setup is complete. Answer the on-screen questions about your First Name, Last Name, Phone Number, ZIP Code, and E-mail Address using the Arrow and OK buttons on -screen keyboard.


