
Download
Page 7
... Devices 11 Connecting A Device 11 Connecting an Audio Device 12 Connecting to your Network 13 Connecting to a Wired Network (Best 13 Connecting to a Wireless Network 13 Completing the First-Time Setup 14 Using the On-Screen Menu 15 Navigating the On... Setting the Auto Power Off Feature 18 Adjusting the Picture Settings 18 Adjusting the Advanced Picture Settings 19 Adjusting the Color Temperature 20 Adjusting the Picture Size and Position 21 Resetting the Picture Settings 21 Adjusting the Audio Settings 22 Adjusting the Advanced Audio Settings 23 Resetting the Audio Settings ...
... Devices 11 Connecting A Device 11 Connecting an Audio Device 12 Connecting to your Network 13 Connecting to a Wired Network (Best 13 Connecting to a Wireless Network 13 Completing the First-Time Setup 14 Using the On-Screen Menu 15 Navigating the On... Setting the Auto Power Off Feature 18 Adjusting the Picture Settings 18 Adjusting the Advanced Picture Settings 19 Adjusting the Color Temperature 20 Adjusting the Picture Size and Position 21 Resetting the Picture Settings 21 Adjusting the Audio Settings 22 Adjusting the Advanced Audio Settings 23 Resetting the Audio Settings ...
Download
Page 24
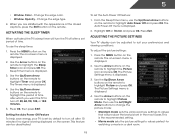
.... 4. This feature can be deactivated. To adjust the picture settings: 1. The Timers menu is displayed. 4. The Auto Power-Off menu is displayed. 3. Change the edge type. 4. Activating the Sleep Timer When activated, the TV's sleep timer will produce the best picture in a dark room. 18 The Sleep Timer menu is... displayed. 2. Use the Arrow buttons on the remote to values that will turn off after 10 minutes if no signal is set by default to highlight the Sleep Timer icon...
.... 4. This feature can be deactivated. To adjust the picture settings: 1. The Timers menu is displayed. 4. The Auto Power-Off menu is displayed. 3. Change the edge type. 4. Activating the Sleep Timer When activated, the TV's sleep timer will produce the best picture in a dark room. 18 The Sleep Timer menu is... displayed. 2. Use the Arrow buttons on the remote to values that will turn off after 10 minutes if no signal is set by default to highlight the Sleep Timer icon...
Download
Page 26
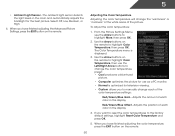
... to highlight Color Temperature, then press OK. Adjusts the amount of each color in the room and automatically adjusts the backlight for the best picture. The Color Temperature menu is optimized for use the Arrow buttons to manually change each color in the display. 4. Red/Green/Blue ... High. 4. When you have finished adjusting the color temperature, press the EXIT button on the remote. When you have finished adjusting the Advanced Picture Settings, press the EXIT button on the remote. 20 If you to highlight More, then press OK. 2. Use the Arrow buttons on the remote...
... to highlight Color Temperature, then press OK. Adjusts the amount of each color in the room and automatically adjusts the backlight for the best picture. The Color Temperature menu is optimized for use the Arrow buttons to manually change each color in the display. 4. Red/Green/Blue ... High. 4. When you have finished adjusting the color temperature, press the EXIT button on the remote. When you have finished adjusting the Advanced Picture Settings, press the EXIT button on the remote. 20 If you to highlight More, then press OK. 2. Use the Arrow buttons on the remote...
Download
Page 50
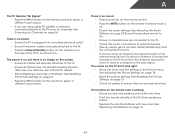
... the channel may be low. See Scanning for the best signal. Ensure your device's user manual for channels. The buttons on page 18 • Reset the picture settings. The colors on page 10 44 See Resetting the Picture Settings on the remote to ensure they are securely attached. ...See Resetting the Picture Settings on page 21 • Press the INPUT button on page 21 &#...
... the channel may be low. See Scanning for the best signal. Ensure your device's user manual for channels. The buttons on page 18 • Reset the picture settings. The colors on page 10 44 See Resetting the Picture Settings on the remote to ensure they are securely attached. ...See Resetting the Picture Settings on page 21 • Press the INPUT button on page 21 &#...


