Operating Instructions
Page 1
... below. Owner's Record The model and serial numbers are located on your Sony dealer regarding this manual thoroughly, and retain it for future reference. MVC-CD500 © 2003 Sony Corporation 3-081-837-11(1) Getting started Shooting still images Viewing still images Deleting still images Before advanced operations Advanced still image shooting _________ Advanced still image viewing __________ Still image editing Enjoying...
... below. Owner's Record The model and serial numbers are located on your Sony dealer regarding this manual thoroughly, and retain it for future reference. MVC-CD500 © 2003 Sony Corporation 3-081-837-11(1) Getting started Shooting still images Viewing still images Deleting still images Before advanced operations Advanced still image shooting _________ Advanced still image viewing __________ Still image editing Enjoying...
Operating Instructions
Page 3
...picture and sound of this product. For more information regarding recycling of the battery used to BS 1362, (i.e., marked with your nearest Sony service station. Attention The electromagnetic field at the specific frequencies may regulate disposal of rechargeable batteries, call toll free 1-800-822-8837...RECYCLING LITHIUM-ION BATTERIES Lithium-Ion batteries are recyclable. You can help preserve our environment by ASTA or BSI to power this camera. If the plug supplied with BS 1363 is indicated under the lens. Notice If static electricity or electromagnetism causes data transfer to...
...picture and sound of this product. For more information regarding recycling of the battery used to BS 1362, (i.e., marked with your nearest Sony service station. Attention The electromagnetic field at the specific frequencies may regulate disposal of rechargeable batteries, call toll free 1-800-822-8837...RECYCLING LITHIUM-ION BATTERIES Lithium-Ion batteries are recyclable. You can help preserve our environment by ASTA or BSI to power this camera. If the plug supplied with BS 1363 is indicated under the lens. Notice If static electricity or electromagnetism causes data transfer to...
Operating Instructions
Page 4
... in color) that the camera is working correctly. 4 No compensation for contents of the recording Contents of the recording cannot be careful not to remove it before use . "CD-R" or "CD-RW" mentioned above is not a malfunction. Before using your camera This digital still camera uses 8 cm CD-Rs/CDRWs as "disc"...surface, resulting in the manufacturing process and do not shake or strike the camera. ∗ The Mavica disc is indicated as "CD-R" or "CD-RW." However, there may want to make a trial recording to make sure that constantly appear on the flash surface to become discolored...
... in color) that the camera is working correctly. 4 No compensation for contents of the recording Contents of the recording cannot be careful not to remove it before use . "CD-R" or "CD-RW" mentioned above is not a malfunction. Before using your camera This digital still camera uses 8 cm CD-Rs/CDRWs as "disc"...surface, resulting in the manufacturing process and do not shake or strike the camera. ∗ The Mavica disc is indicated as "CD-R" or "CD-RW." However, there may want to make a trial recording to make sure that constantly appear on the flash surface to become discolored...
Operating Instructions
Page 5
... careful not to strike or apply excessive force to sand or dust Using the camera in sandy or dusty locations may cause irrecoverable damage to record or play back properly. • Do not use the camera near a TV, radio, tuner. Microsoft Corporation in the United States and other ...Or it may not be caused on the camera locations • Do not use the camera near a location that generates strong radio wave or emits radiation. About the Carl Zeiss lens This camera is equipped with a Carl Zeiss lens which is a trademark of Sony Corporation. • Microsoft and Windows are ...
... careful not to strike or apply excessive force to sand or dust Using the camera in sandy or dusty locations may cause irrecoverable damage to record or play back properly. • Do not use the camera near a TV, radio, tuner. Microsoft Corporation in the United States and other ...Or it may not be caused on the camera locations • Do not use the camera near a location that generates strong radio wave or emits radiation. About the Carl Zeiss lens This camera is equipped with a Carl Zeiss lens which is a trademark of Sony Corporation. • Microsoft and Windows are ...
Operating Instructions
Page 6
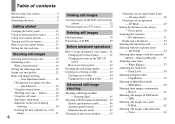
... screen 34 Deleting still images Deleting images 36 Formatting a CD-RW 39 Before advanced operations How to setup and operate your camera 15 How to use the jog dial 42 Deciding the still image quality 43 Creating or selecting a folder 43 Creating a new folder 44 Changing the recording folder 44 Advanced still image shooting Shooting with...
... screen 34 Deleting still images Deleting images 36 Formatting a CD-RW 39 Before advanced operations How to setup and operate your camera 15 How to use the jog dial 42 Deciding the still image quality 43 Creating or selecting a folder 43 Creating a new folder 44 Changing the recording folder 44 Advanced still image shooting Shooting with...
Operating Instructions
Page 7
... Connecting the camera to print - Playback zoom 70 Recording an enlarged image - Trimming 71 Playing back successive images - Shooting according to record images - Confirm before write 66 Using an external flash 67 Using the Sony HVL-F32X Flash ......67 Using the Sony HVL-F1000 Flash .....68 Using a commercially available external flash 68 Advanced still image viewing...
... Connecting the camera to print - Playback zoom 70 Recording an enlarged image - Trimming 71 Playing back successive images - Shooting according to record images - Confirm before write 66 Using an external flash 67 Using the Sony HVL-F32X Flash ......67 Using the Sony HVL-F1000 Flash .....68 Using a commercially available external flash 68 Advanced still image viewing...
Operating Instructions
Page 8
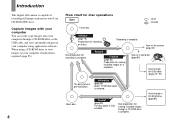
Introduction This digital still camera is restored. Capture images with your computer You can easily copy images onto your computer through a CD-ROM drive (page 85) View on a computer. Finalize (page 85) Preparation for viewing recorded images on the camera (page 32) Record Disc preparation for recording is complete. Disc preparation for recording on a computer (page 84) View through a CD-ROM...
Introduction This digital still camera is restored. Capture images with your computer You can easily copy images onto your computer through a CD-ROM drive (page 85) View on a computer. Finalize (page 85) Preparation for viewing recorded images on the camera (page 32) Record Disc preparation for recording is complete. Disc preparation for recording on a computer (page 84) View through a CD-ROM...
Operating Instructions
Page 9
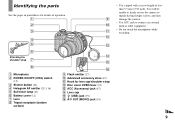
You will be unable to firmly secure the camera to tripods having longer screws, and may damage the camera. • Use ACC jack to connect an external flash or other equipment. • Do not touch the microphone while recording. 9 Identifying the parts See the pages in parentheses for details of operation. 1 9 2 0 3 qa qs 4 5 qd...
You will be unable to firmly secure the camera to tripods having longer screws, and may damage the camera. • Use ACC jack to connect an external flash or other equipment. • Do not touch the microphone while recording. 9 Identifying the parts See the pages in parentheses for details of operation. 1 9 2 0 3 qa qs 4 5 qd...
Operating Instructions
Page 11
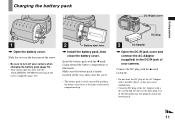
... pack with the v mark facing up . 3 AC Adaptor , Open the DC IN jack cover and connect the AC Adaptor (supplied) to turn off your camera. Connect the DC plug with the b mark facing toward the battery compartment as this may not properly charge the battery pack. 11 Use of the... dirty plug. Slide the cover in the direction of the arrow. • Be sure to the DC IN jack of your camera when charging the battery pack (page 15). • Your camera operates only with the "InfoLITHIUM" NP-FM50 battery pack (M series) (supplied) (page 121). 2 Battery eject lever , Install the battery...
... pack with the v mark facing up . 3 AC Adaptor , Open the DC IN jack cover and connect the AC Adaptor (supplied) to turn off your camera. Connect the DC plug with the b mark facing toward the battery compartment as this may not properly charge the battery pack. 11 Use of the... dirty plug. Slide the cover in the direction of the arrow. • Be sure to the DC IN jack of your camera when charging the battery pack (page 15). • Your camera operates only with the "InfoLITHIUM" NP-FM50 battery pack (M series) (supplied) (page 121). 2 Battery eject lever , Install the battery...
Operating Instructions
Page 12
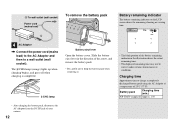
... the arrow, and remove the battery pack. • Be careful not to charge a completely discharged battery pack using the AC Adaptor at a temperature of your camera. 12 Slide the battery eject lever in the illustration shows the actual remaining time. • The displayed remaining time may not be correct under certain...
... the arrow, and remove the battery pack. • Be careful not to charge a completely discharged battery pack using the AC Adaptor at a temperature of your camera. 12 Slide the battery eject lever in the illustration shows the actual remaining time. • The displayed remaining time may not be correct under certain...
Operating Instructions
Page 13
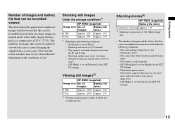
... The tables show the approximate number of images and the battery life that can be recorded/viewed when you use . Shooting one time every 30 seconds - The camera has been turned on and off once every ten times - [AF Mode] is set to [Monitor] in the SET UP settings...(page 122). - [AF Mode] is set to [Cont] in the SET UP settings Viewing still images2) NP-FM50 (supplied) Image size No. Quality] is set to [Bright] in the following conditions: - Shooting still images Under the average conditions1) NP-FM50 (supplied) Image size No. The flash strobes once every...
... The tables show the approximate number of images and the battery life that can be recorded/viewed when you use . Shooting one time every 30 seconds - The camera has been turned on and off once every ten times - [AF Mode] is set to [Monitor] in the SET UP settings...(page 122). - [AF Mode] is set to [Cont] in the SET UP settings Viewing still images2) NP-FM50 (supplied) Image size No. Quality] is set to [Bright] in the following conditions: - Shooting still images Under the average conditions1) NP-FM50 (supplied) Image size No. The flash strobes once every...
Operating Instructions
Page 14
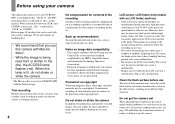
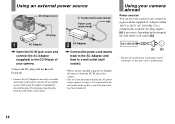
AC-L15A/L15B • Do not use your camera. Using your camera abroad Power sources You can use an electronic transformer (travel converter), as ...V AC, 50/60 Hz. Use a commercially available AC plug adaptor [a], if necessary, depending on the design of the camera. • The set is connected to the wall outlet (wall socket), even if the unit itself has been turned off... Open the DC IN jack cover and connect the AC Adaptor (supplied) to the DC IN jack of your camera in any trouble occurs while using the AC Adaptor, disconnect it is not disconnected from the AC power source (...
AC-L15A/L15B • Do not use your camera. Using your camera abroad Power sources You can use an electronic transformer (travel converter), as ...V AC, 50/60 Hz. Use a commercially available AC plug adaptor [a], if necessary, depending on the design of the camera. • The set is connected to the wall outlet (wall socket), even if the unit itself has been turned off... Open the DC IN jack cover and connect the AC Adaptor (supplied) to the DC IN jack of your camera in any trouble occurs while using the AC Adaptor, disconnect it is not disconnected from the AC power source (...
Operating Instructions
Page 15
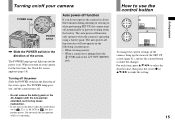
... the control button Spot Center Multi Metering Mode WB ISO Mode 400 200 100 Auto WB ISO Mode To change the current settings of the camera, bring up and the power is operating using a battery pack. How to , P, S, A, M, SCN or , the lens portion moves. Auto power-off function If you do... off automatically to make the changes. Do not touch the lens portion while it is operating. When you turn on your camera POWER lamp POWER switch , Slide the POWER switch in the following circumstances. • When viewing movies • When a connector is set to use the control ...
... the control button Spot Center Multi Metering Mode WB ISO Mode 400 200 100 Auto WB ISO Mode To change the current settings of the camera, bring up and the power is operating using a battery pack. How to , P, S, A, M, SCN or , the lens portion moves. Auto power-off function If you do... off automatically to make the changes. Do not touch the lens portion while it is operating. When you turn on your camera POWER lamp POWER switch , Slide the POWER switch in the following circumstances. • When viewing movies • When a connector is set to use the control ...
Operating Instructions
Page 18
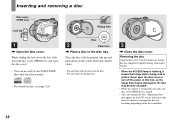
...8226; You can use only 8 cm CD-R/CD-RW discs that image data is being read or written. Disc 2 Push here , Place a disc in the disc tray. Shooting still images Inserting and removing a disc Disc cover... OPEN lever Lock tab Pickup lens 1 , Open the disc cover. Check to prepare the disc for recording depending on the disc condition.... as the image data may be damaged or the disc may become unusable. • While the camera is writing data on a disc, the disc cover OPEN lever is flashing, it means that have...
...8226; You can use only 8 cm CD-R/CD-RW discs that image data is being read or written. Disc 2 Push here , Place a disc in the disc tray. Shooting still images Inserting and removing a disc Disc cover... OPEN lever Lock tab Pickup lens 1 , Open the disc cover. Check to prepare the disc for recording depending on the disc condition.... as the image data may be damaged or the disc may become unusable. • While the camera is writing data on a disc, the disc cover OPEN lever is flashing, it means that have...

Operating Instructions
Page 19
... P, S, A, M, SCN or . • You can also perform initialization using your camera to view images through a CD-ROM drive, initialization is also automatically performed, and you can continue to record images. To cancel initialization Select [Cancel] with v on the control button, then press...UP settings (page 117). Initialization starts. Shooting still images Initializing a disc What is required to record images on a disc. Images recorded before finalization remain on the power. Do not shake or strike the camera during initialization. 19 When you perform finalization (...
... P, S, A, M, SCN or . • You can also perform initialization using your camera to view images through a CD-ROM drive, initialization is also automatically performed, and you can continue to record images. To cancel initialization Select [Cancel] with v on the control button, then press...UP settings (page 117). Initialization starts. Shooting still images Initializing a disc What is required to record images on a disc. Images recorded before finalization remain on the power. Do not shake or strike the camera during initialization. 19 When you perform finalization (...
Operating Instructions
Page 21
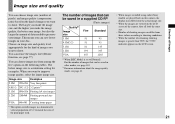
...Resize function, see page 43. • When images recorded using earlier Sony models are played back on this camera, the display may differ from these values according to shooting... conditions. • When the number of remaining shooting images is set to [Normal] For the number of images that can be saved in a supplied CD...print paper used. When you want to shoot. Image size and quality Shooting still images You can choose image size (number of pixels) and image quality (...
...Resize function, see page 43. • When images recorded using earlier Sony models are played back on this camera, the display may differ from these values according to shooting... conditions. • When the number of remaining shooting images is set to [Normal] For the number of images that can be saved in a supplied CD...print paper used. When you want to shoot. Image size and quality Shooting still images You can choose image size (number of pixels) and image quality (...
Operating Instructions
Page 22
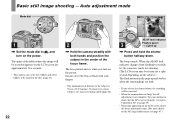
...is not complete. You can create new folders and select folders to be stored in the center of the folder where the image will be recorded appears on the LCD screen for a split second depending on the AF range finder frame, see page 49). • The frame appearing on... be frozen for approximately five seconds. • This camera can continue to , and turn on the power. Basic still image shooting - The beep sounds. The lens portion moves when you release the shutter button, the recording will be canceled. • When the camera does not beep, the AF adjustment is not set...
...is not complete. You can create new folders and select folders to be stored in the center of the folder where the image will be recorded appears on the LCD screen for a split second depending on the AF range finder frame, see page 49). • The frame appearing on... be frozen for approximately five seconds. • This camera can continue to , and turn on the power. Basic still image shooting - The beep sounds. The lens portion moves when you release the shutter button, the recording will be canceled. • When the camera does not beep, the AF adjustment is not set...

Operating Instructions
Page 23
...exposure and white balance are automatically adjusted to allow easy shooting. The shutter sounds. Also do not operate the camera for still image shooting When shooting still images with your camera, you can select the aperture value (page 47). In addition, you can set the desired shooting functions using...pages 41 and 112). Shooting still images 60min 5.0M 101 95 M AF 4 , Press the shutter button fully down the battery (page 15). • While the image is set to [Fine] (page 43). Mode dial for about three minutes during recording, the camera turns off the power, remove ...
...exposure and white balance are automatically adjusted to allow easy shooting. The shutter sounds. Also do not operate the camera for still image shooting When shooting still images with your camera, you can select the aperture value (page 47). In addition, you can set the desired shooting functions using...pages 41 and 112). Shooting still images 60min 5.0M 101 95 M AF 4 , Press the shutter button fully down the battery (page 15). • While the image is set to [Fine] (page 43). Mode dial for about three minutes during recording, the camera turns off the power, remove ...
Operating Instructions
Page 24
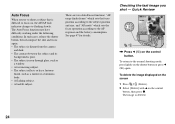
... changes to flashing slowly. In such cases, release the shutter button, then recompose the shot and focus again. • The subject is distant from the camera and dark. • The contrast between the subject and its background is poor. • The subject is deleted. 24 See page 47 for details. The...
... changes to flashing slowly. In such cases, release the shutter button, then recompose the shot and focus again. • The subject is distant from the camera and dark. • The contrast between the subject and its background is poor. • The subject is deleted. 24 See page 47 for details. The...
Operating Instructions
Page 27
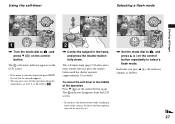
... is set . , Set the mode dial to , and press v ( ) on the control button repeatedly to P, S, A, M, SCN or . 2 , Center the subject in the middle of the camera, the focus and the exposure may not be correctly set to select a flash mode. The indicator disappears from the LCD screen. • If you press... self-timer 60min 5.0M 101 96 M AF 60min 5.0M FINE 101 96 M AF 0EV F2.8 30 Selecting a flash mode 60min 5.0M 101 96 M AF Shooting still images 1 , Turn the mode dial to , and press V ( ) on the control button again.
... is set . , Set the mode dial to , and press v ( ) on the control button repeatedly to P, S, A, M, SCN or . 2 , Center the subject in the middle of the camera, the focus and the exposure may not be correctly set to select a flash mode. The indicator disappears from the LCD screen. • If you press... self-timer 60min 5.0M 101 96 M AF 60min 5.0M FINE 101 96 M AF 0EV F2.8 30 Selecting a flash mode 60min 5.0M 101 96 M AF Shooting still images 1 , Turn the mode dial to , and press V ( ) on the control button again.


