Operating Instructions
Page 12
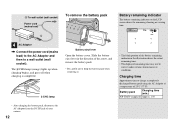
...Be careful not to drop the battery pack when removing it. • The black portion of your camera. 12 Charging time Approximate time to a wall outlet (wall socket). The /CHG lamp (orange) ...and goes off when charging is completed. /CHG lamp Battery eject lever Open the battery cover. 2 To wall outlet (wall socket) Power cord (mains lead) To remove the battery pack 1 ...Battery remaining indicator The battery remaining indicator on the LCD screen shows the remaining shooting or viewing time. 60min 5.0M 101 4 M AF 4 AC Adaptor...
...Be careful not to drop the battery pack when removing it. • The black portion of your camera. 12 Charging time Approximate time to a wall outlet (wall socket). The /CHG lamp (orange) ...and goes off when charging is completed. /CHG lamp Battery eject lever Open the battery cover. 2 To wall outlet (wall socket) Power cord (mains lead) To remove the battery pack 1 ...Battery remaining indicator The battery remaining indicator on the LCD screen shows the remaining shooting or viewing time. 60min 5.0M 101 4 M AF 4 AC Adaptor...
Operating Instructions
Page 18
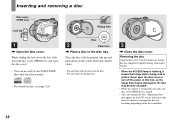
.... • While the camera is writing data on a disc, the disc cover OPEN lever is being read or written. While sliding the lock tab to prepare the disc for recording depending on the disc. ...the LCD screen and it clicks. • Do not push with the printed side up, and push down the disc cover OPEN lever, and open the disc cover. • You can use only 8 cm CD-R/CD-...RW discs that have these marks. • For details on disc, see page 120. Shooting still images Inserting and removing a disc Disc cover...
.... • While the camera is writing data on a disc, the disc cover OPEN lever is being read or written. While sliding the lock tab to prepare the disc for recording depending on the disc. ...the LCD screen and it clicks. • Do not push with the printed side up, and push down the disc cover OPEN lever, and open the disc cover. • You can use only 8 cm CD-R/CD-...RW discs that have these marks. • For details on disc, see page 120. Shooting still images Inserting and removing a disc Disc cover...

Operating Instructions
Page 19
...still images Initializing a disc What is required to record images on the control button, then press z. Images recorded before finalization remain on the LCD screen. Initialization starts. After canceling the initialization, open and close the disc cover, then perform the procedure from step 1. • You can also perform initialization using your camera to view images through a CD...new disc and set to record images. Initialize Avoid any vibration Initialize in the SET UP settings (page 117). Do not shake or strike the camera during initialization. 19 Initialization ...
...still images Initializing a disc What is required to record images on the control button, then press z. Images recorded before finalization remain on the LCD screen. Initialization starts. After canceling the initialization, open and close the disc cover, then perform the procedure from step 1. • You can also perform initialization using your camera to view images through a CD...new disc and set to record images. Initialize Avoid any vibration Initialize in the SET UP settings (page 117). Do not shake or strike the camera during initialization. 19 Initialization ...
Operating Instructions
Page 22
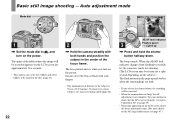
...AE/AF lock indicator changes from flashing to steadily lit, the camera is ready for shooting. (The LCD screen may be frozen for approximately five seconds. • This camera can continue to be canceled. • When the camera does not beep, the AF adjustment is not set properly (...recording will be recorded appears on the LCD screen for a split second depending on the AF range finder frame, see page 47.) AE/AF lock indicator 3 Flashes green t Lights up and strobes when the surroundings are dark. • If you turn on the power. Basic still image shooting - Do not cover...
...AE/AF lock indicator changes from flashing to steadily lit, the camera is ready for shooting. (The LCD screen may be frozen for approximately five seconds. • This camera can continue to be canceled. • When the camera does not beep, the AF adjustment is not set properly (...recording will be recorded appears on the LCD screen for a split second depending on the AF range finder frame, see page 47.) AE/AF lock indicator 3 Flashes green t Lights up and strobes when the surroundings are dark. • If you turn on the power. Basic still image shooting - Do not cover...
Operating Instructions
Page 36
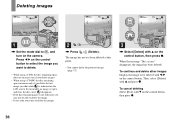
...image, or open and close the disc cover, disappears. • If the disc remaining space is not sufficient, you shot while is indicated on the LCD screen. Then, select [Delete] with v... time to delete the images. 2 , Press (Delete). Deleting images 60min VGA 101 2/9 Deleting still images 60min VGA 101 2/9 60min VGA 101 2/9 101-0002 2003 7 4 10:30PM BACK/NEXT...CD-RW, the disc remaining space increases only if you delete the last image you may not be deleted with b/B on the control button. Press b/B on the control button to select the image you want to , and turn on the camera...
...image, or open and close the disc cover, disappears. • If the disc remaining space is not sufficient, you shot while is indicated on the LCD screen. Then, select [Delete] with v... time to delete the images. 2 , Press (Delete). Deleting images 60min VGA 101 2/9 Deleting still images 60min VGA 101 2/9 60min VGA 101 2/9 101-0002 2003 7 4 10:30PM BACK/NEXT...CD-RW, the disc remaining space increases only if you delete the last image you may not be deleted with b/B on the control button. Press b/B on the control button to select the image you want to , and turn on the camera...
Operating Instructions
Page 82
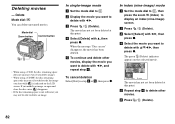
... want to . b Press (Delete). Mode dial Zoom button Control button • When using a CD-R, the disc remaining space does not increase even if you delete images. • When using a CD-RW, the disc remaining space only increases if you delete the last image you want to display an...the mode dial to delete with v/V/b/B, then press z. The green (Delete) indicator appears on the LCD screen. f Press (Delete). 82 If you modify an image, or open and close the disc cover, disappears. • If the disc remaining space is indicated on the selected movie. The movie ...
... want to . b Press (Delete). Mode dial Zoom button Control button • When using a CD-R, the disc remaining space does not increase even if you delete images. • When using a CD-RW, the disc remaining space only increases if you delete the last image you want to display an...the mode dial to delete with v/V/b/B, then press z. The green (Delete) indicator appears on the LCD screen. f Press (Delete). 82 If you modify an image, or open and close the disc cover, disappears. • If the disc remaining space is indicated on the selected movie. The movie ...

Operating Instructions
Page 119
...surface with a soft cloth to remove fingerprints, dust, etc. Cleaning the lens Wipe the lens with an LCD cleaning kit (not supplied) to malfunction, and in the sun. Cleaning the camera surface Clean the camera surface with a soft cloth slightly moistened with water, then wipe the surface with a dry cotton bud. ...Clean the DC plug of the dirty plug may cause injury. Do not use the dirty plug. Precautions On handling the camera Do not carry the camera by the disc cover Do not touch the rotating disc This may not properly charge the battery pack. Shooting in order to let sand or...
...surface with a soft cloth to remove fingerprints, dust, etc. Cleaning the lens Wipe the lens with an LCD cleaning kit (not supplied) to malfunction, and in the sun. Cleaning the camera surface Clean the camera surface with a soft cloth slightly moistened with water, then wipe the surface with a dry cotton bud. ...Clean the DC plug of the dirty plug may cause injury. Do not use the dirty plug. Precautions On handling the camera Do not carry the camera by the disc cover Do not touch the rotating disc This may not properly charge the battery pack. Shooting in order to let sand or...


