Operating Instructions
Page 4
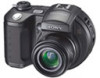
Exposing the LCD screen, the finder or the lens to the provision of the copyright laws. Do not get the camera wet. Before using your camera This digital still camera uses 8 cm CD-Rs/CDRWs as "disc" in this manual. Precaution on copyright Television programs, films, video tapes, and ... to the flash surface, resulting in insufficient light emission. Unauthorized recording of the recording cannot be used with the Mavica logo. Do not shake or strike the camera In addition to malfunctions and inability to record images, this may render the discs unusable or image data breakdown...
Exposing the LCD screen, the finder or the lens to the provision of the copyright laws. Do not get the camera wet. Before using your camera This digital still camera uses 8 cm CD-Rs/CDRWs as "disc" in this manual. Precaution on copyright Television programs, films, video tapes, and ... to the flash surface, resulting in insufficient light emission. Unauthorized recording of the recording cannot be used with the Mavica logo. Do not shake or strike the camera In addition to malfunctions and inability to record images, this may render the discs unusable or image data breakdown...
Operating Instructions
Page 6
... camera abroad 14 Turning on a TV screen 34 Deleting still images Deleting images 36 Formatting a CD-RW 39 Before advanced operations How to setup and operate your camera 15 How to use the jog dial 42 Deciding the still image quality 43 Creating or selecting a folder 43 Creating a new folder 44 Changing the recording folder 44 Advanced still...
... camera abroad 14 Turning on a TV screen 34 Deleting still images Deleting images 36 Formatting a CD-RW 39 Before advanced operations How to setup and operate your camera 15 How to use the jog dial 42 Deciding the still image quality 43 Creating or selecting a folder 43 Creating a new folder 44 Changing the recording folder 44 Advanced still...
Operating Instructions
Page 7
...an image - Confirm before write 66 Using an external flash 67 Using the Sony HVL-F32X Flash ......67 Using the Sony HVL-F1000 Flash .....68 Using a commercially available external flash 68 Advanced still image viewing Selecting the folder and playing back images - Introduction 84 Viewing images...on your computer Viewing images on the LCD screen....... 81 Deleting movies - Resize 77 Choosing images to record images - Shooting according to your computer 93 Copying images 94 When the PTP Manager does not start up 95 Copying images using CD-ROM drive .. 85 Finalizing a disc ...
...an image - Confirm before write 66 Using an external flash 67 Using the Sony HVL-F32X Flash ......67 Using the Sony HVL-F1000 Flash .....68 Using a commercially available external flash 68 Advanced still image viewing Selecting the folder and playing back images - Introduction 84 Viewing images...on your computer Viewing images on the LCD screen....... 81 Deleting movies - Resize 77 Choosing images to record images - Shooting according to your computer 93 Copying images 94 When the PTP Manager does not start up 95 Copying images using CD-ROM drive .. 85 Finalizing a disc ...
Operating Instructions
Page 10
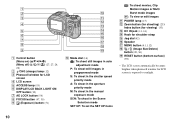
... 3 4 5 6 7 8 9 A Control button (Menu on) (v/V/b/B/z) (Menu off) ( / /7/ ) (27, 27, 24, 26) B /CHG (charge) lamp (12) C Photocell window for LCD screen D LCD screen E ACCESS lamp (18) F DISPLAY/LCD BACK LIGHT ON/ OFF button (30) G AE LOCK button (54) H FOCUS button (47, 50) I (Exposure) button (51) 0 qa qs qd ...qf qg qh qj qk ql J Mode dial (16) : To shoot still images in auto adjustment mode P: To shoot still images in programmed mode S: To ...
... 3 4 5 6 7 8 9 A Control button (Menu on) (v/V/b/B/z) (Menu off) ( / /7/ ) (27, 27, 24, 26) B /CHG (charge) lamp (12) C Photocell window for LCD screen D LCD screen E ACCESS lamp (18) F DISPLAY/LCD BACK LIGHT ON/ OFF button (30) G AE LOCK button (54) H FOCUS button (47, 50) I (Exposure) button (51) 0 qa qs qd ...qf qg qh qj qk ql J Mode dial (16) : To shoot still images in auto adjustment mode P: To shoot still images in programmed mode S: To ...
Operating Instructions
Page 12
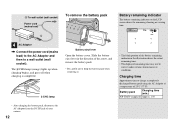
.... 2 To wall outlet (wall socket) Power cord (mains lead) To remove the battery pack 1 Battery remaining indicator The battery remaining indicator on the LCD screen shows the remaining shooting or viewing time. 60min 5.0M 101 4 M AF 4 AC Adaptor , Connect the power cord (mains lead) to the AC Adaptor...arrow, and remove the battery pack. • Be careful not to drop the battery pack when removing it. • The black portion of your camera. 12 The /CHG lamp (orange) lights up when charging begins, and goes off when charging is completed. /CHG lamp Battery eject lever Open ...
.... 2 To wall outlet (wall socket) Power cord (mains lead) To remove the battery pack 1 Battery remaining indicator The battery remaining indicator on the LCD screen shows the remaining shooting or viewing time. 60min 5.0M 101 4 M AF 4 AC Adaptor , Connect the power cord (mains lead) to the AC Adaptor...arrow, and remove the battery pack. • Be careful not to drop the battery pack when removing it. • The black portion of your camera. 12 The /CHG lamp (orange) lights up when charging begins, and goes off when charging is completed. /CHG lamp Battery eject lever Open ...
Operating Instructions
Page 15
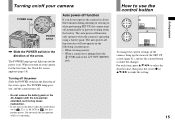
... • If you turn on . The POWER lamp (green) lights up the menu or the SET UP screen (page 41), and use the control button Spot Center Multi Metering Mode WB ISO Mode 400 200 100 Auto... WB ISO Mode To change the current settings of the camera, bring up and the power is plugged into the (USB) jack or the A/V OUT (MONO) jack...POWER switch in the direction of the arrow again. When you do not operate the camera for the first time, the Clock Set screen appears (page 16). Turning off function If you turn on the power when the ...
... • If you turn on . The POWER lamp (green) lights up the menu or the SET UP screen (page 41), and use the control button Spot Center Multi Metering Mode WB ISO Mode 400 200 100 Auto... WB ISO Mode To change the current settings of the camera, bring up and the power is plugged into the (USB) jack or the A/V OUT (MONO) jack...POWER switch in the direction of the arrow again. When you do not operate the camera for the first time, the Clock Set screen appears (page 16). Turning off function If you turn on the power when the ...
Operating Instructions
Page 16
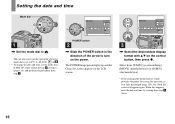
When this operation when the mode dial is ever fully discharged (page 120), the Clock Set screen will appear again. Select from [Y/M/D] (year/month/day), [M/D/Y] (month/day/year) or [D/M/Y] (day/month/year). • If the rechargeable button battery, which provides the power ... dial to turn on the power. Clock Set Y/M/D M/D/Y D/M/Y 2003 / OK 1/ 1 12 : 00 OK AM Cancel 3 , Select the desired date display format with v/V on the LCD screen. Setting the date and time Mode dial 1 , Set the mode dial to . • You can also carry out this happens, reset the date and time...
When this operation when the mode dial is ever fully discharged (page 120), the Clock Set screen will appear again. Select from [Y/M/D] (year/month/day), [M/D/Y] (month/day/year) or [D/M/Y] (day/month/year). • If the rechargeable button battery, which provides the power ... dial to turn on the power. Clock Set Y/M/D M/D/Y D/M/Y 2003 / OK 1/ 1 12 : 00 OK AM Cancel 3 , Select the desired date display format with v/V on the LCD screen. Setting the date and time Mode dial 1 , Set the mode dial to . • You can also carry out this happens, reset the date and time...
Operating Instructions
Page 18
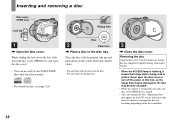
...here , Place a disc in the disc tray. Check to prepare the disc for recording depending on disc, see page 120. While sliding the lock tab to the left,...cover. • You can use only 8 cm CD-R/CD-RW discs that image data is locked. • After you change the disc, "Repairing Data" may appear on the LCD screen and it may take about 10 minutes to make ...be damaged or the disc may become unusable. • While the camera is writing data on a disc, the disc cover OPEN lever is being read or written. Shooting still images Inserting and removing a disc Disc cover OPEN lever Lock tab ...
...here , Place a disc in the disc tray. Check to prepare the disc for recording depending on disc, see page 120. While sliding the lock tab to the left,...cover. • You can use only 8 cm CD-R/CD-RW discs that image data is locked. • After you change the disc, "Repairing Data" may appear on the LCD screen and it may take about 10 minutes to make ...be damaged or the disc may become unusable. • While the camera is writing data on a disc, the disc cover OPEN lever is being read or written. Shooting still images Inserting and removing a disc Disc cover OPEN lever Lock tab ...

Operating Instructions
Page 19
...Initialize complete 2 , Select [OK] with V on the control button, then press z. Images recorded before finalization remain on the LCD screen. Do not shake or strike the camera during initialization. 19 To cancel initialization Select [Cancel] with v on the control button, then... set to P, S, A, M, SCN or . • You can continue to record images on the power. Shooting still images Initializing a disc What is also automatically performed, and you can also perform initialization using your camera to view images through a CD-ROM drive, initialization is initialization?
...Initialize complete 2 , Select [OK] with V on the control button, then press z. Images recorded before finalization remain on the LCD screen. Do not shake or strike the camera during initialization. 19 To cancel initialization Select [Cancel] with v on the control button, then... set to P, S, A, M, SCN or . • You can continue to record images on the power. Shooting still images Initializing a disc What is also automatically performed, and you can also perform initialization using your camera to view images through a CD-ROM drive, initialization is initialization?
Operating Instructions
Page 20
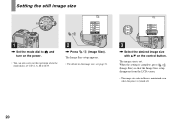
.... • For details on the control button. When the setting is complete, press (Image Size) so that the Image Size setup disappears from the LCD screen. • The image size selected here is maintained even when the power is set to P, S, A, M or SCN. 2 , Press (Image Size). The image size is ...turned off. 20 Setting the still image size 5.0M 5.0M 4.5M(3:2) 3.1M 1.2M VGA Image Size 1 , Set the mode dial to and turn on the power. • You can also carry...
.... • For details on the control button. When the setting is complete, press (Image Size) so that the Image Size setup disappears from the LCD screen. • The image size selected here is maintained even when the power is set to P, S, A, M or SCN. 2 , Press (Image Size). The image size is ...turned off. 20 Setting the still image size 5.0M 5.0M 4.5M(3:2) 3.1M 1.2M VGA Image Size 1 , Set the mode dial to and turn on the power. • You can also carry...
Operating Instructions
Page 21
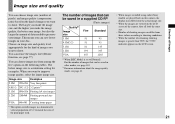
...recorded using earlier Sony models are played back on this camera, the display may differ from the actual image size. • When the images are viewed on the LCD screen of the camera..., they all look the same size. • Number of shooting images can differ from among the five options in the following tables. You can choose image size from these values according to shooting conditions. • When the number of images that can be saved in a supplied CD... the better your disc. Image size and quality Shooting still images You can choose image size (number of pixels)...
...recorded using earlier Sony models are played back on this camera, the display may differ from the actual image size. • When the images are viewed on the LCD screen of the camera..., they all look the same size. • Number of shooting images can differ from among the five options in the following tables. You can choose image size from these values according to shooting conditions. • When the number of images that can be saved in a supplied CD... the better your disc. Image size and quality Shooting still images You can choose image size (number of pixels)...
Operating Instructions
Page 22
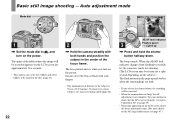
...release the shutter button, the recording will be recorded appears on the LCD screen for approximately five seconds. • This camera can continue to steadily lit, the camera is ready for shooting. (The LCD screen may be stored in the disc (page 43). 22 2 , Hold the camera steadily with both hands and ...the LCD screen shows the focus adjustment range. (For more details on the power. The beep sounds. AE/AF lock indicator 3 Flashes green t Lights up and strobes when the surroundings are dark. • If you turn on the AF range finder frame, see page 47.) Basic still image ...
...release the shutter button, the recording will be recorded appears on the LCD screen for approximately five seconds. • This camera can continue to steadily lit, the camera is ready for shooting. (The LCD screen may be stored in the disc (page 43). 22 2 , Hold the camera steadily with both hands and ...the LCD screen shows the focus adjustment range. (For more details on the power. The beep sounds. AE/AF lock indicator 3 Flashes green t Lights up and strobes when the surroundings are dark. • If you turn on the AF range finder frame, see page 47.) Basic still image ...
Operating Instructions
Page 24
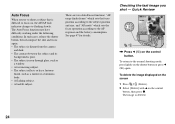
... has a lustrous finish, such as a mirror or a luminous body. • A flashing subject. • A backlit subject. To delete the image displayed on the screen 1 Press (Delete). 2 Select [Delete] with v on the shutter button or press b (7) again. In such cases, release the shutter button, then recompose the shot... and focus again. • The subject is distant from the camera and dark. • The contrast between the subject and its background is poor. • The subject is deleted. 24 Checking the last image ...
... has a lustrous finish, such as a mirror or a luminous body. • A flashing subject. • A backlit subject. To delete the image displayed on the screen 1 Press (Delete). 2 Select [Delete] with v on the shutter button or press b (7) again. In such cases, release the shutter button, then recompose the shot... and focus again. • The subject is distant from the camera and dark. • The contrast between the subject and its background is poor. • The subject is deleted. 24 Checking the last image ...
Operating Instructions
Page 25
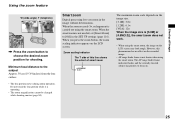
... the smart zoom is carried out using the smart zoom. However, this line shows the extent of this phenomenon has no effect on the LCD screen. Shooting still images Using the zoom feature W (wide-angle) T (telephoto) 60min x1.1 VGA 101 96 M AF 60min x3.0 VGA 101 96 M AF , Press ...smart zoom does not work. • When using the smart zoom, the image on . 25 Smart zoom Digital processing lets you press the zoom button, the zoom scaling indicator appears on the recorded image. • AF range finder frame is not shown when using the smart zoom. Minimum focal distance to...
... the smart zoom is carried out using the smart zoom. However, this line shows the extent of this phenomenon has no effect on the LCD screen. Shooting still images Using the zoom feature W (wide-angle) T (telephoto) 60min x1.1 VGA 101 96 M AF 60min x3.0 VGA 101 96 M AF , Press ...smart zoom does not work. • When using the smart zoom, the image on . 25 Smart zoom Digital processing lets you press the zoom button, the zoom scaling indicator appears on the recorded image. • AF range finder frame is not shown when using the smart zoom. Minimum focal distance to...
Operating Instructions
Page 26
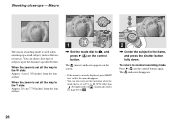
... disappears. 26 Macro 60min 5.0M 101 96 M AF 60min 5.0M 101 95 M AF The macro recording mode is used when zooming up to , and press B ( ) on the control button again. The (macro) indicator appears on the screen. • If the menu is currently displayed, press MENU first so that the menu disappears... in the frame, and press the shutter button fully down. You can also carry out this operation when the mode dial is set to normal recording mode Press B ( ) on the control button. Shooting close -ups of subjects up a small subject, such as flowers or insects.
... disappears. 26 Macro 60min 5.0M 101 96 M AF 60min 5.0M 101 95 M AF The macro recording mode is used when zooming up to , and press B ( ) on the control button again. The (macro) indicator appears on the screen. • If the menu is currently displayed, press MENU first so that the menu disappears... in the frame, and press the shutter button fully down. You can also carry out this operation when the mode dial is set to normal recording mode Press B ( ) on the control button. Shooting close -ups of subjects up a small subject, such as flowers or insects.
Operating Instructions
Page 27
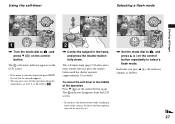
... The (self-timer) indicator appears on the control button again. To cancel the self-timer in the middle of the camera, the focus and the exposure may not be correctly set to P, S, A, M, SCN or . 2 , Center ...set . , Set the mode dial to select a flash mode. The indicator disappears from the LCD screen. • If you press the shutter button while standing in the frame, and press the shutter button... 96 M AF 0EV F2.8 30 Selecting a flash mode 60min 5.0M 101 96 M AF Shooting still images 1 , Turn the mode dial to , and press V ( ) on the control button repeatedly to , and press v ...
... The (self-timer) indicator appears on the control button again. To cancel the self-timer in the middle of the camera, the focus and the exposure may not be correctly set to P, S, A, M, SCN or . 2 , Center ...set . , Set the mode dial to select a flash mode. The indicator disappears from the LCD screen. • If you press the shutter button while standing in the frame, and press the shutter button... 96 M AF 0EV F2.8 30 Selecting a flash mode 60min 5.0M 101 96 M AF Shooting still images 1 , Turn the mode dial to , and press V ( ) on the control button repeatedly to , and press v ...
Operating Instructions
Page 28
... complete, the lamp goes out. • When you can clearly shoot the background that the menu disappears. • You can also carry out this camera (page 67). • Attaching a conversion lens (not supplied) may not produce the desired effects depending on individual differences, the distance to the subject,...[On] in a dark place, so you press the shutter button halfway down while the flash is strobing, the /CHG lamp turns on the LCD screen, and the flash pre-strobes before shooting to appear. • This setting is maintained even when the power is turned off. r SL (Slow synchro...
... complete, the lamp goes out. • When you can clearly shoot the background that the menu disappears. • You can also carry out this camera (page 67). • Attaching a conversion lens (not supplied) may not produce the desired effects depending on individual differences, the distance to the subject,...[On] in a dark place, so you press the shutter button halfway down while the flash is strobing, the /CHG lamp turns on the LCD screen, and the flash pre-strobes before shooting to appear. • This setting is maintained even when the power is turned off. r SL (Slow synchro...

Operating Instructions
Page 29
... is an AF fill light system that a human can look at close range is not recommended. • Do not block the hologram AF emitter during recording. • The AF range finder frame is not displayed. When not using this case, wipe the hologram AF emitter with the hologram AF The hologram... SCN is fill light to focus more easily on the screen and the hologram AF emits red light when the shutter button is pressed halfway until the focus is set to shoot still images in the SET UP settings (page 116). Shooting still images Recording images with a dry cloth. • The hologram AF ...
... is an AF fill light system that a human can look at close range is not recommended. • Do not block the hologram AF emitter during recording. • The AF range finder frame is not displayed. When not using this case, wipe the hologram AF emitter with the hologram AF The hologram... SCN is fill light to focus more easily on the screen and the hologram AF emits red light when the shutter button is pressed halfway until the focus is set to shoot still images in the SET UP settings (page 116). Shooting still images Recording images with a dry cloth. • The hologram AF ...

Operating Instructions
Page 30
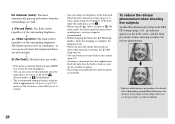
r Histogram on 60min 5.0M 101 96 M AF DISPLAY/LCD BACK LIGHT ON/OFF Each time you press DISPLAY/LCD BACK LIGHT ON/OFF, the display changes in the following order. Indicators on the screen during shooting Indicators on 60min 5.0M 101 96 M AF r Indicators off M AF r Backlight off 30 • For a detailed description of the indicators, see page 125. • For a detailed description of the histogram, see page 52. • The setting selected here is maintained even when the power is turned off.
r Histogram on 60min 5.0M 101 96 M AF DISPLAY/LCD BACK LIGHT ON/OFF Each time you press DISPLAY/LCD BACK LIGHT ON/OFF, the display changes in the following order. Indicators on the screen during shooting Indicators on 60min 5.0M 101 96 M AF r Indicators off M AF r Backlight off 30 • For a detailed description of the indicators, see page 125. • For a detailed description of the histogram, see page 52. • The setting selected here is maintained even when the power is turned off.
Operating Instructions
Page 31
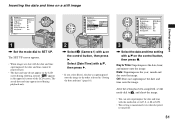
... a still image Shooting still images Camera 1 1 Moving Image : 2 AF Mode : MPEG Movie Monitor 1 Smart Zoom : On Date/Time : Off 2 Red Eye Reduction : Off 1 Hologram AF : Auto 2 SELECT Camera 1 1 Moving Image : 2 AF Mode : Day&Time 1 Smart Zoom : Date Date/Time : Off 2 Red Eye Reduction : 1 Hologram AF : 2 OK Camera 1 ... onto the image in the order selected in the upper left corner of the LCD screen. The actual date and time appear in red during playback only. 2 , Select (Camera 1) with the date and time superimposed, the date and time cannot be removed later...
... a still image Shooting still images Camera 1 1 Moving Image : 2 AF Mode : MPEG Movie Monitor 1 Smart Zoom : On Date/Time : Off 2 Red Eye Reduction : Off 1 Hologram AF : Auto 2 SELECT Camera 1 1 Moving Image : 2 AF Mode : Day&Time 1 Smart Zoom : Date Date/Time : Off 2 Red Eye Reduction : 1 Hologram AF : 2 OK Camera 1 ... onto the image in the order selected in the upper left corner of the LCD screen. The actual date and time appear in red during playback only. 2 , Select (Camera 1) with the date and time superimposed, the date and time cannot be removed later...


