Operating Instructions
Page 3
...leaking Lithium-Ion batteries. For more information regarding recycling of the battery used rechargeable batteries to power this camera. If the plug supplied with your nearest Sony service station. If you . and Canada RECYCLING LITHIUM-ION BATTERIES Lithium-Ion batteries are recyclable. Notice ...on the supplied AC Adaptor for using connection cables shorter than 3 meters (9.8 feet). You can help preserve our environment by...
...leaking Lithium-Ion batteries. For more information regarding recycling of the battery used rechargeable batteries to power this camera. If the plug supplied with your nearest Sony service station. If you . and Canada RECYCLING LITHIUM-ION BATTERIES Lithium-Ion batteries are recyclable. Notice ...on the supplied AC Adaptor for using connection cables shorter than 3 meters (9.8 feet). You can help preserve our environment by...
Operating Instructions
Page 11
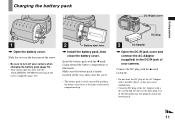
...properly charge the battery pack. 11 Insert the battery pack with the v mark facing up . 3 AC Adaptor , Open the DC IN jack cover and connect the AC Adaptor (supplied) to turn off your camera. Slide the cover in the direction of the dirty plug may cause malfunction. • Clean the DC ...plug of your camera when charging the battery pack (page 15). • Your camera operates only with the "InfoLITHIUM" NP-...
...properly charge the battery pack. 11 Insert the battery pack with the v mark facing up . 3 AC Adaptor , Open the DC IN jack cover and connect the AC Adaptor (supplied) to turn off your camera. Slide the cover in the direction of the dirty plug may cause malfunction. • Clean the DC ...plug of your camera when charging the battery pack (page 15). • Your camera operates only with the "InfoLITHIUM" NP-...
Operating Instructions
Page 12
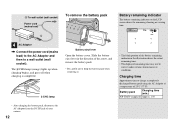
... the direction of the arrow, and remove the battery pack. • Be careful not to charge a completely discharged battery pack using the AC Adaptor at a temperature of 25°C (77°F). Charging time Approximate time to drop the battery pack when removing it. • The black ...portion of your camera. 12 2 To wall outlet (wall socket) Power cord (mains lead) To remove the battery pack 1 Battery remaining indicator The battery remaining indicator ...
... the direction of the arrow, and remove the battery pack. • Be careful not to charge a completely discharged battery pack using the AC Adaptor at a temperature of 25°C (77°F). Charging time Approximate time to drop the battery pack when removing it. • The black ...portion of your camera. 12 2 To wall outlet (wall socket) Power cord (mains lead) To remove the battery pack 1 Battery remaining indicator The battery remaining indicator ...
Operating Instructions
Page 14
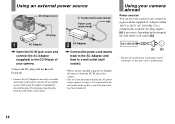
... transformer (travel converter), as it is not disconnected from the DC IN jack of the camera. • The set is connected to 240 V AC, 50/60 Hz. If any country or region with the supplied AC Adaptor within 100 V to the wall outlet (wall socket), even if the unit itself has been... off the power by . Connect the DC plug with the v mark facing up. • Connect the AC Adaptor to the DC IN jack of your camera in any trouble occurs while using the AC Adaptor, disconnect it from the AC power source (mains) as long as this may cause a malfunction. 14 Using an...
... transformer (travel converter), as it is not disconnected from the DC IN jack of the camera. • The set is connected to 240 V AC, 50/60 Hz. If any country or region with the supplied AC Adaptor within 100 V to the wall outlet (wall socket), even if the unit itself has been... off the power by . Connect the DC plug with the v mark facing up. • Connect the AC Adaptor to the DC IN jack of your camera in any trouble occurs while using the AC Adaptor, disconnect it from the AC power source (mains) as long as this may cause a malfunction. 14 Using an...
Operating Instructions
Page 15
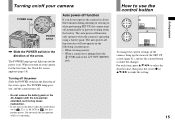
... off. • Do not remove the battery pack or the AC Adaptor with the lens portion extended, as this may cause malfunction. • If you do not operate the camera for the first time, the Clock Set screen appears (page 16). For each item, press v/V/b/B to select the desired value, then ...press the center z or v/V/b/B to make the changes. Auto power-off function If you turn on your camera POWER lamp POWER switch , Slide the POWER switch in the direction of the arrow. The auto power-off function also will not operate in the...
... off. • Do not remove the battery pack or the AC Adaptor with the lens portion extended, as this may cause malfunction. • If you do not operate the camera for the first time, the Clock Set screen appears (page 16). For each item, press v/V/b/B to select the desired value, then ...press the center z or v/V/b/B to make the changes. Auto power-off function If you turn on your camera POWER lamp POWER switch , Slide the POWER switch in the direction of the arrow. The auto power-off function also will not operate in the...

Operating Instructions
Page 34
... the desired image. • When using the AC Adaptor (supplied) to prevent the power from turning off both your camera and the TV before connecting the camera and the TV with the A/V connecting cable. • We recommend using your camera abroad, it may differ depending on a TV screen ...2/9 A/V connecting cable (supplied) 1 A/V OUT (MONO) jack , Connect the supplied A/V connecting cable to match that of the TV. Press b/B on the camera. If your TV has stereo input jacks, connect the audio plug (black) of the A/V connecting cable to the Lch jack. • Turn off partway. 2...
... the desired image. • When using the AC Adaptor (supplied) to prevent the power from turning off both your camera and the TV before connecting the camera and the TV with the A/V connecting cable. • We recommend using your camera abroad, it may differ depending on a TV screen ...2/9 A/V connecting cable (supplied) 1 A/V OUT (MONO) jack , Connect the supplied A/V connecting cable to match that of the TV. Press b/B on the camera. If your TV has stereo input jacks, connect the audio plug (black) of the A/V connecting cable to the Lch jack. • Turn off partway. 2...
Operating Instructions
Page 39
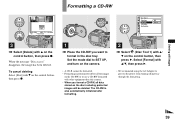
... [Format] with v/V, then press B. • We recommend using the AC Adaptor to use a CD-RW formatted with other equipment than this camera. • When you want to format in the disc tray. The CD-RW is performed to delete all data stored on the disc including protected images will... camera. • A CD-R cannot be deleted. To cancel deleting Select [Exit] with V on the control button, then press z. 1 , Place the CD-RW you format a CD-RW, all the images on the CD-RW or to prevent the power from turning off partway through the formatting. 39 Deleting still images Formatting a CD-...
... [Format] with v/V, then press B. • We recommend using the AC Adaptor to use a CD-RW formatted with other equipment than this camera. • When you want to format in the disc tray. The CD-RW is performed to delete all data stored on the disc including protected images will... camera. • A CD-R cannot be deleted. To cancel deleting Select [Exit] with V on the control button, then press z. 1 , Place the CD-RW you format a CD-RW, all the images on the CD-RW or to prevent the power from turning off partway through the formatting. 39 Deleting still images Formatting a CD-...
Operating Instructions
Page 85
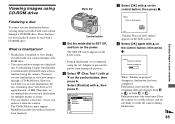
...to read discs that have been finalized. RW RW Finalization may take some time. You must execute finalization before viewing images recorded with your camera through a CDROM drive. • You can finalize a disc later, even if you execute finalization, the disc remaining ...space will decrease by initializing it from the camera. • The CD-ROM drive must support MultiRead in progress" disappears, finalization has been completed. Therefore, we recommend using the AC Adaptor to prevent the power from to . Select [Finalize] with v/ 1 ...
...to read discs that have been finalized. RW RW Finalization may take some time. You must execute finalization before viewing images recorded with your camera through a CDROM drive. • You can finalize a disc later, even if you execute finalization, the disc remaining ...space will decrease by initializing it from the camera. • The CD-ROM drive must support MultiRead in progress" disappears, finalization has been completed. Therefore, we recommend using the AC Adaptor to prevent the power from to . Select [Finalize] with v/ 1 ...
Operating Instructions
Page 87
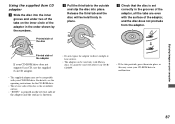
...of the disc is the recordable surface. • "SONY" is printed on the inner circle of the adaptor in the order shown by the numbers. 1 Printed side of the adaptor If your CD-ROM drive does not support 8 cm CD, use the supplied 8 cm CD adaptor. • The supplied adaptor may cause your CD-ROM drive to malfunction....grooves of the adaptor, all the tabs are even with the surface of the adaptor, and the disc does not protrude from the adaptor. 2 Printed side of the disc b Pull the third tab to the outside and slip the disc into place, as this may not be used only with Mavica discs.
...of the disc is the recordable surface. • "SONY" is printed on the inner circle of the adaptor in the order shown by the numbers. 1 Printed side of the adaptor If your CD-ROM drive does not support 8 cm CD, use the supplied 8 cm CD adaptor. • The supplied adaptor may cause your CD-ROM drive to malfunction....grooves of the adaptor, all the tabs are even with the surface of the adaptor, and the disc does not protrude from the adaptor. 2 Printed side of the disc b Pull the third tab to the outside and slip the disc into place, as this may not be used only with Mavica discs.
Operating Instructions
Page 93
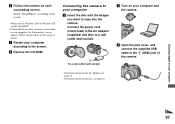
... page 18. c Restart your computer and the camera. Connect the power cord (mains lead) to the AC Adaptor (supplied) and then to install. SONY • For further details on the screen to a wall outlet (wall socket). Follow the procedure on the disc, see page 14. To a wall outlet (wall ... you use Windows 2000 or Windows XP, install "WinASPI". • If DirectX8.0a or a later version is not installed in your computer 93 d Remove the CD-ROM.
... page 18. c Restart your computer and the camera. Connect the power cord (mains lead) to the AC Adaptor (supplied) and then to install. SONY • For further details on the screen to a wall outlet (wall socket). Follow the procedure on the disc, see page 14. To a wall outlet (wall ... you use Windows 2000 or Windows XP, install "WinASPI". • If DirectX8.0a or a later version is not installed in your computer 93 d Remove the CD-ROM.
Operating Instructions
Page 98
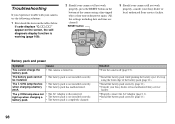
... pack cannot be installed. p Properly connect the AC Adaptor (page 11). Solution p Turn the camera off (page 15). Cause • The camera is working (page 109). 2 Should your camera still not work properly, consult your Sony dealer or local authorized Sony service facility. p Consult your Sony dealer or local authorized Sony service facility. p Install the battery pack correctly (page...
... pack cannot be installed. p Properly connect the AC Adaptor (page 11). Solution p Turn the camera off (page 15). Cause • The camera is working (page 109). 2 Should your camera still not work properly, consult your Sony dealer or local authorized Sony service facility. p Consult your Sony dealer or local authorized Sony service facility. p Install the battery pack correctly (page...

Operating Instructions
Page 99
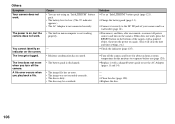
.... • The battery pack is not installed correctly. • The AC Adaptor is disconnected. • The battery pack is discharged. • The battery pack is displayed but the power runs out soon. You cannot turn on the camera again (page 15) or use the AC Adapter (page 14). p Charge... the battery pack (page 11). p Install a charged battery pack (page 11). p Properly connect the AC Adaptor (page 14). The power turns off automatically to prevent wearing ...
.... • The battery pack is not installed correctly. • The AC Adaptor is disconnected. • The battery pack is discharged. • The battery pack is displayed but the power runs out soon. You cannot turn on the camera again (page 15) or use the AC Adapter (page 14). p Charge... the battery pack (page 11). p Install a charged battery pack (page 11). p Properly connect the AC Adaptor (page 14). The power turns off automatically to prevent wearing ...

Operating Instructions
Page 104
...on HELP. - p Disconnect the USB cables except for Sony" application software, click on the camera (page 15). p Connect the camera and your camera. p If you connect the camera to the keyboard, the mouse, and your computer correctly ... 85). • Vibration caused an error during recording. write system. • The CD-ROM drive does not support the p Consult the computer or the CD-ROM drive manufacturer. When the disc is not... recognized, then install PTP Manager (pages 95 and 91). p Use the AC Adaptor (page 14). p ...
...on HELP. - p Disconnect the USB cables except for Sony" application software, click on the camera (page 15). p Connect the camera and your camera. p If you connect the camera to the keyboard, the mouse, and your computer correctly ... 85). • Vibration caused an error during recording. write system. • The CD-ROM drive does not support the p Consult the computer or the CD-ROM drive manufacturer. When the disc is not... recognized, then install PTP Manager (pages 95 and 91). p Use the AC Adaptor (page 14). p ...
Operating Instructions
Page 106
...Cause • You are not using an "InfoLITHIUM" battery pack. • The battery level is low. (The E indicator appears.) • The AC Adaptor is not connected securely. • The built-in microcomputer is not working properly. - • Moisture condensation has occurred. • The battery pack is ...discharged. • The image file has an error. • The image was not recorded correctly. • The disc is on the camera. p Connect it with a pointed object, then turn on , but the camera does not work . p Disconnect, and then, after one minute, reconnect all power sources ...
...Cause • You are not using an "InfoLITHIUM" battery pack. • The battery level is low. (The E indicator appears.) • The AC Adaptor is not connected securely. • The built-in microcomputer is not working properly. - • Moisture condensation has occurred. • The battery pack is ...discharged. • The image file has an error. • The image was not recorded correctly. • The disc is on the camera. p Connect it with a pointed object, then turn on , but the camera does not work . p Disconnect, and then, after one minute, reconnect all power sources ...

Operating Instructions
Page 117
... the last executed finalization (page 86) (CD-RW only). Additional information 117 (Camera 2) 2 Item Bracket Step Conversion Lens Setting ±1.0EV / x±0.7EV / ±0.3EV On / xOff Hot Shoe On / xOff Description Sets the exposure compensation value when recording three images with each exposure value shifted (page...to [On] when using the VCL-MHG07 conversion lens (not supplied). Also, note that the VAD-S70 adaptor ring needed to mount the conversion lens to allow viewing through a CD-ROM drive (page 85). When [Conversion Lens] is set to [On]: • When the mode ...
... the last executed finalization (page 86) (CD-RW only). Additional information 117 (Camera 2) 2 Item Bracket Step Conversion Lens Setting ±1.0EV / x±0.7EV / ±0.3EV On / xOff Hot Shoe On / xOff Description Sets the exposure compensation value when recording three images with each exposure value shifted (page...to [On] when using the VCL-MHG07 conversion lens (not supplied). Also, note that the VAD-S70 adaptor ring needed to mount the conversion lens to allow viewing through a CD-ROM drive (page 85). When [Conversion Lens] is set to [On]: • When the mode ...

Operating Instructions
Page 119
...8226; Alcohol • Diposable cloth • Volatile insecticide • Contact with rubber or vinyl for a long time Note on operating temperature Your camera is not recommended. On cleaning Cleaning the LCD screen Wipe the screen surface with a soft cloth to remove fingerprints, dust, etc. Cleaning the lens...176;C and 40°C (32°F and 104°F). Cleaning the DC plug Clean the DC plug of the AC Adaptor with a dry cloth. Cleaning the camera surface Clean the camera surface with a soft cloth slightly moistened with water, then wipe the surface with a dry cotton bud.
...8226; Alcohol • Diposable cloth • Volatile insecticide • Contact with rubber or vinyl for a long time Note on operating temperature Your camera is not recommended. On cleaning Cleaning the LCD screen Wipe the screen surface with a soft cloth to remove fingerprints, dust, etc. Cleaning the lens...176;C and 40°C (32°F and 104°F). Cleaning the DC plug Clean the DC plug of the AC Adaptor with a dry cloth. Cleaning the camera surface Clean the camera surface with a soft cloth slightly moistened with water, then wipe the surface with a dry cotton bud.
Operating Instructions
Page 120
... as you are using the AC Adaptor, or install a charged battery pack, and leave the camera for maintaining the date and time and other mild detergent. You can still use a commercially available CD cleaner. Charging method Connect the camera to record clear images. 120 On internal rechargeable button battery This camera has an internal rechargeable button battery...
... as you are using the AC Adaptor, or install a charged battery pack, and leave the camera for maintaining the date and time and other mild detergent. You can still use a commercially available CD cleaner. Charging method Connect the camera to record clear images. 120 On internal rechargeable button battery This camera has an internal rechargeable button battery...

Operating Instructions
Page 121
... not strike, bend, drop or rub the edge of a disc. 121 Write using a CD-ROM drive, the CD-ROM drive may malfunction or the disc may cause the camera to play back a disc on which no images have been recorded using only an oil-based felt-tip marker and do not touch the ink... until dry. Do not touch the recordable side (the reverse of the printed side) of a disc. • Do not store a disc in an ambient temperature of between your camera and the AC Adaptor. In damp places • If you carry or store a disc, put it in...
... not strike, bend, drop or rub the edge of a disc. 121 Write using a CD-ROM drive, the CD-ROM drive may malfunction or the disc may cause the camera to play back a disc on which no images have been recorded using only an oil-based felt-tip marker and do not touch the ink... until dry. Do not touch the recordable side (the reverse of the printed side) of a disc. • Do not store a disc in an ambient temperature of between your camera and the AC Adaptor. In damp places • If you carry or store a disc, put it in...
Operating Instructions
Page 124
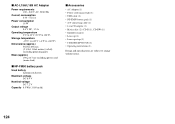
x AC-L15A/L15B AC Adaptor Power requirements 100 - 240 V AC, 50/60 Hz Current consumption 0.35 - 0.18 A Power consumption 18 W Output voltage 8.4 V DC, 1.5 A Operating temperature 0°C to ...ion battery Maximum voltage DC 8.4 V Nominal voltage DC 7.2 V Capacity 8.5 Wh (1 180 mAh) x Accessories • AC Adaptor (1) • Power cord (mains lead) (1) • USB cable (1) • NP-FM50 battery pack (1) • A/V connecting cable (1) • 8 cm CD adaptor (1) • Mavica disc (2) (CD-R (1), CD-RW (1)) • Shoulder strap (1) • Lens cap (1) • Lens cap strap (1) •...
x AC-L15A/L15B AC Adaptor Power requirements 100 - 240 V AC, 50/60 Hz Current consumption 0.35 - 0.18 A Power consumption 18 W Output voltage 8.4 V DC, 1.5 A Operating temperature 0°C to ...ion battery Maximum voltage DC 8.4 V Nominal voltage DC 7.2 V Capacity 8.5 Wh (1 180 mAh) x Accessories • AC Adaptor (1) • Power cord (mains lead) (1) • USB cable (1) • NP-FM50 battery pack (1) • A/V connecting cable (1) • 8 cm CD adaptor (1) • Mavica disc (2) (CD-R (1), CD-RW (1)) • Shoulder strap (1) • Lens cap (1) • Lens cap strap (1) •...

Operating Instructions
Page 129
Index Index A AC Adaptor 11, 14 Access lamp 18 Advanced accessory shoe 9, 67 AE/AF lock 50 AE/...indicator 12, 122 Beep/shutter sound 118 Bracket 55 Brightness image 51, 55 LCD screen 118 Burst 61 C Changing the recording folder 44 Charging battery pack 11, 121 charging time 12 Cleaning 119, 120 Clip Motion 59 Clock set 16 Computer ...initializing 19 inserting 18 number of images that can be saved or shooting time 110 unfinalizing 86 DPOF 77 E Editing still images Print (DPOF) mark 77 Protect 75 Resize 77 E-mail 62 Enlarging an image 70 EV adjustment 51 Exposure ...
Index Index A AC Adaptor 11, 14 Access lamp 18 Advanced accessory shoe 9, 67 AE/AF lock 50 AE/...indicator 12, 122 Beep/shutter sound 118 Bracket 55 Brightness image 51, 55 LCD screen 118 Burst 61 C Changing the recording folder 44 Charging battery pack 11, 121 charging time 12 Cleaning 119, 120 Clip Motion 59 Clock set 16 Computer ...initializing 19 inserting 18 number of images that can be saved or shooting time 110 unfinalizing 86 DPOF 77 E Editing still images Print (DPOF) mark 77 Protect 75 Resize 77 E-mail 62 Enlarging an image 70 EV adjustment 51 Exposure ...
