Operating Instructions
Page 3
... in the plug supplied need to be used rechargeable batteries to attach the fuse cover after you should lose the fuse cover, please contact your local authority. 3 You can help preserve our environment by ASTA or BSI to power this camera. For more information regarding recycling of this product. ... the limits sets out in the EMC Directive for the customers in Europe This product has been tested and found compliant with your nearest Sony service station. CAUTION TO PREVENT ELECTRIC SHOCK, DO NOT USE THIS POLARIZED AC PLUG WITH AN EXTENSION CORD, RECEPTACLE OR OTHER OUTLET UNLESS...
... in the plug supplied need to be used rechargeable batteries to attach the fuse cover after you should lose the fuse cover, please contact your local authority. 3 You can help preserve our environment by ASTA or BSI to power this camera. For more information regarding recycling of this product. ... the limits sets out in the EMC Directive for the customers in Europe This product has been tested and found compliant with your nearest Sony service station. CAUTION TO PREVENT ELECTRIC SHOCK, DO NOT USE THIS POLARIZED AC PLUG WITH AN EXTENSION CORD, RECEPTACLE OR OTHER OUTLET UNLESS...
Operating Instructions
Page 6
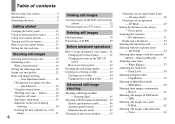
... contents Before using your camera 4 Introduction 8 Identifying the parts 9 Getting started Charging the battery pack 11 Using an external power source 14 Using your camera abroad 14 Turning on a TV screen 34 Deleting still images Deleting images 36 Formatting a CD-RW 39 Before advanced ...operations How to setup and operate your camera 15 How to use the jog dial 42 Deciding the still image quality 43 Creating or selecting a folder 43 Creating a new folder 44 Changing the recording folder 44 Advanced still...
... contents Before using your camera 4 Introduction 8 Identifying the parts 9 Getting started Charging the battery pack 11 Using an external power source 14 Using your camera abroad 14 Turning on a TV screen 34 Deleting still images Deleting images 36 Formatting a CD-RW 39 Before advanced ...operations How to setup and operate your camera 15 How to use the jog dial 42 Deciding the still image quality 43 Creating or selecting a folder 43 Creating a new folder 44 Changing the recording folder 44 Advanced still...
Operating Instructions
Page 7
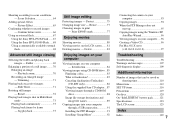
...Sony HVL-F32X Flash ......67 Using the Sony HVL-F1000 Flash .....68 Using a commercially available external flash 68 Advanced still image viewing Selecting the folder and playing back images - Playback zoom 70 Recording...Manager 91 Installing "ImageMixer 92 Connecting the camera to print - Shooting according to record images - Slide Show 71 Rotating still images - Introduction 84 Viewing images using...CD-ROM drive .. 85 Finalizing a disc 85 What is finalization 85 Canceling finalization (Unfinalize) (CD-RW only 86 Using the supplied 8cm CD adapter... 87 Viewing images through a CD...
...Sony HVL-F32X Flash ......67 Using the Sony HVL-F1000 Flash .....68 Using a commercially available external flash 68 Advanced still image viewing Selecting the folder and playing back images - Playback zoom 70 Recording...Manager 91 Installing "ImageMixer 92 Connecting the camera to print - Shooting according to record images - Slide Show 71 Rotating still images - Introduction 84 Viewing images using...CD-ROM drive .. 85 Finalizing a disc 85 What is finalization 85 Canceling finalization (Unfinalize) (CD-RW only 86 Using the supplied 8cm CD adapter... 87 Viewing images through a CD...
Operating Instructions
Page 9
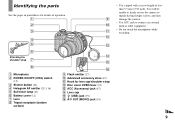
... shoulder strap 7 8 A Microphone B POWER ON/OFF (CHG) switch (15) C Shutter button (22) D Hologram AF emitter (29, 116) E Self-timer lamp (27) F Battery cover (11) G Lens H Tripod receptacle (bottom surface) qf qg qh I Flash emitter (27) J Advanced accessory shoe (67) K Hook for lens cap/shoulder strap L Disc cover...a tripod with a screw length of less than 5.5 mm (7/32 inch). You will be unable to firmly secure the camera to tripods having longer screws, and may damage the camera. • Use ACC jack to connect an external flash or other equipment. • Do not touch the microphone while...
... shoulder strap 7 8 A Microphone B POWER ON/OFF (CHG) switch (15) C Shutter button (22) D Hologram AF emitter (29, 116) E Self-timer lamp (27) F Battery cover (11) G Lens H Tripod receptacle (bottom surface) qf qg qh I Flash emitter (27) J Advanced accessory shoe (67) K Hook for lens cap/shoulder strap L Disc cover...a tripod with a screw length of less than 5.5 mm (7/32 inch). You will be unable to firmly secure the camera to tripods having longer screws, and may damage the camera. • Use ACC jack to connect an external flash or other equipment. • Do not touch the microphone while...
Operating Instructions
Page 11
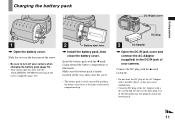
... Getting started Getting started Charging the battery pack DC IN jack cover DC plug 1 , Open the battery cover. Slide the cover in the direction of the dirty plug may cause malfunction. • Clean the DC plug of your camera when charging the battery pack (page 15). • Your camera operates only with a metallic object, as...
... Getting started Getting started Charging the battery pack DC IN jack cover DC plug 1 , Open the battery cover. Slide the cover in the direction of the dirty plug may cause malfunction. • Clean the DC plug of your camera when charging the battery pack (page 15). • Your camera operates only with a metallic object, as...
Operating Instructions
Page 12
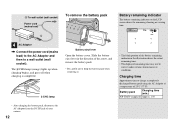
... the AC Adaptor from the DC IN jack of the battery remaining indicator in the direction of the arrow, and remove the battery pack. • Be careful not to drop the battery pack when removing it. • The black portion of your camera. 12 The /CHG lamp (orange) lights up when ...charging begins, and goes off when charging is completed. /CHG lamp Battery eject lever Open the battery cover. Charging time Approximate time to a wall ...
... the AC Adaptor from the DC IN jack of the battery remaining indicator in the direction of the arrow, and remove the battery pack. • Be careful not to drop the battery pack when removing it. • The black portion of your camera. 12 The /CHG lamp (orange) lights up when ...charging begins, and goes off when charging is completed. /CHG lamp Battery eject lever Open the battery cover. Charging time Approximate time to a wall ...
Operating Instructions
Page 13
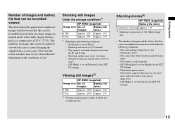
...in the SET UP settings Viewing still images2) NP-FM50 (supplied) Image size No. The battery capacity decreases as you shoot images in the following conditions: - of images Battery life (min.) 5.0M Approx... in normal mode with a fully charged battery pack at 160 (Mail) image size • The number of images and the battery life that can be recorded or viewed take into account changing the... The battery power is low - of Battery life images (min.) 5.0M Approx. 1900 Approx. 160 VGA Approx. 2000 Approx. 170 2) Viewing single images in the SET UP settings - The camera has been...
...in the SET UP settings Viewing still images2) NP-FM50 (supplied) Image size No. The battery capacity decreases as you shoot images in the following conditions: - of images Battery life (min.) 5.0M Approx... in normal mode with a fully charged battery pack at 160 (Mail) image size • The number of images and the battery life that can be recorded or viewed take into account changing the... The battery power is low - of Battery life images (min.) 5.0M Approx. 1900 Approx. 160 VGA Approx. 2000 Approx. 170 2) Viewing single images in the SET UP settings - The camera has been...
Operating Instructions
Page 15
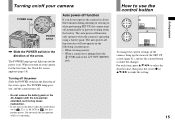
... about three minutes during shooting or viewing or when performing SET UP, the camera turns off automatically to prevent wearing down the battery. Do not touch the lens portion while it is set to , P, S, A, M, SCN or , the lens portion moves. When you turn on the power when the ... direction of the arrow again. The auto power-off . • Do not remove the battery pack or the AC Adaptor with the lens portion extended, as this may cause malfunction. • If you do not operate the camera for the first time, the Clock Set screen appears (page 16). Auto power-off...
... about three minutes during shooting or viewing or when performing SET UP, the camera turns off automatically to prevent wearing down the battery. Do not touch the lens portion while it is set to , P, S, A, M, SCN or , the lens portion moves. When you turn on the power when the ... direction of the arrow again. The auto power-off . • Do not remove the battery pack or the AC Adaptor with the lens portion extended, as this may cause malfunction. • If you do not operate the camera for the first time, the Clock Set screen appears (page 16). Auto power-off...
Operating Instructions
Page 16
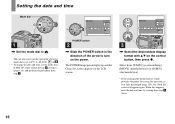
... mode dial to turn on the LCD screen. Select from [Y/M/D] (year/month/day), [M/D/Y] (month/day/year) or [D/M/Y] (day/month/year). • If the rechargeable button battery, which provides the power for saving the time data, is set to P, S, A, M, SCN, or . • To change the date and time, set the mode dial...
... mode dial to turn on the LCD screen. Select from [Y/M/D] (year/month/day), [M/D/Y] (month/day/year) or [D/M/Y] (day/month/year). • If the rechargeable button battery, which provides the power for saving the time data, is set to P, S, A, M, SCN, or . • To change the date and time, set the mode dial...

Operating Instructions
Page 23
...can select the shutter speed (page 46). Mode dial for about three minutes during recording, the camera turns off the power, remove the battery pack, or open the disc cover at this lamp is being recorded on the disc, the ACCESS lamp flashes. In addition, you can choose from... (Manual) You can set the desired shooting functions using menus (pages 41 and 112). Also do not operate the camera for still image shooting When shooting still images with your camera, you do not turn off automatically to allow easy shooting. P (Program auto shooting) You can set the desired ...
...can select the shutter speed (page 46). Mode dial for about three minutes during recording, the camera turns off the power, remove the battery pack, or open the disc cover at this lamp is being recorded on the disc, the ACCESS lamp flashes. In addition, you can choose from... (Manual) You can set the desired shooting functions using menus (pages 41 and 112). Also do not operate the camera for still image shooting When shooting still images with your camera, you do not turn off automatically to allow easy shooting. P (Program auto shooting) You can set the desired ...
Operating Instructions
Page 24
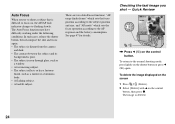
... on the control button. In such cases, release the shutter button, then recompose the shot and focus again. • The subject is distant from the camera and dark. • The contrast between the subject and its background is poor. • The subject is difficult to the AF response and the...
... on the control button. In such cases, release the shutter button, then recompose the shot and focus again. • The subject is distant from the camera and dark. • The contrast between the subject and its background is poor. • The subject is difficult to the AF response and the...
Operating Instructions
Page 47
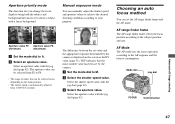
... AF range finder frame The AF range finder frame selects the focus position according to the AF response and the battery consumption. Mode dial Jog dial FOCUS Control button Advanced still image shooting 47 b Select an aperture value. Select an aperture value with the jog dial (page 42). ... focus operation according to the subject position and size. Manual exposure mode You can set value and the appropriate exposure determined by the camera. b Select the shutter speed value. Aperture priority mode This function lets you change the focus depth to bring both the subject and...
... AF range finder frame The AF range finder frame selects the focus position according to the AF response and the battery consumption. Mode dial Jog dial FOCUS Control button Advanced still image shooting 47 b Select an aperture value. Select an aperture value with the jog dial (page 42). ... focus operation according to the subject position and size. Manual exposure mode You can set value and the appropriate exposure determined by the camera. b Select the shutter speed value. Aperture priority mode This function lets you change the focus depth to bring both the subject and...

Operating Instructions
Page 49
...locked when you compose images with B/v/V. Advanced still image shooting 49 Choosing a focus operation - When the shutter button is pressed and held halfway down . The camera operates in the dark place - When shooting... • There is no lock sound when the focus is adjusted. • When recording with continued focus. • The focus is not adjusted after AF lock is completed ...The camera adjusts the focus before the shutter button is recommended. Monitoring AF This shortens the time needed for focusing. The factory setting is Monitoring AF. • Battery consumption...
...locked when you compose images with B/v/V. Advanced still image shooting 49 Choosing a focus operation - When the shutter button is pressed and held halfway down . The camera operates in the dark place - When shooting... • There is no lock sound when the focus is adjusted. • When recording with continued focus. • The focus is not adjusted after AF lock is completed ...The camera adjusts the focus before the shutter button is recommended. Monitoring AF This shortens the time needed for focusing. The factory setting is Monitoring AF. • Battery consumption...
Operating Instructions
Page 98
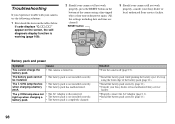
... are cleared.) RESET button 3 Should your camera still not work properly, consult your Sony dealer or local authorized Sony service facility. p Install the battery pack correctly (page 11). - 98 Cause • The camera is not installed correctly. • The battery pack has malfunctioned. Battery pack and power Symptom You cannot charge the battery pack. The /CHG lamp flashes when...
... are cleared.) RESET button 3 Should your camera still not work properly, consult your Sony dealer or local authorized Sony service facility. p Install the battery pack correctly (page 11). - 98 Cause • The camera is not installed correctly. • The battery pack has malfunctioned. Battery pack and power Symptom You cannot charge the battery pack. The /CHG lamp flashes when...

Operating Instructions
Page 99
... a new one . • If you do not operate the camera for a long time in the remaining battery time. - p Charge the battery pack (page 11). p Replace it with a new one . The battery pack runs down the battery (page 15). • The battery pack is discharged. p Fully charge the battery pack (page 12). • You are shooting/viewing images...
... a new one . • If you do not operate the camera for a long time in the remaining battery time. - p Charge the battery pack (page 11). p Replace it with a new one . The battery pack runs down the battery (page 15). • The battery pack is discharged. p Fully charge the battery pack (page 12). • You are shooting/viewing images...

Operating Instructions
Page 104
...battery level is low. • You are not using the "ImageMixer Ver. 1.5 for Sony" application software, click on a computer. p If you are using the supplied USB cable. • The USB cable is not connected firmly. • The camera was connected to a computer with the USB cable. • The CD...USB cables except for your computer. p Finalize the disc (page 85). • Vibration caused an error during recording. p Install PTP Manager (page 91). p Connect the camera directly to your computer. • You are using the "ImageMixer Ver. 1.5 for your computer. You cannot ...
...battery level is low. • You are not using the "ImageMixer Ver. 1.5 for Sony" application software, click on a computer. p If you are using the supplied USB cable. • The USB cable is not connected firmly. • The camera was connected to a computer with the USB cable. • The CD...USB cables except for your computer. p Finalize the disc (page 85). • Vibration caused an error during recording. p Install PTP Manager (page 91). p Connect the camera directly to your computer. • You are using the "ImageMixer Ver. 1.5 for your computer. You cannot ...
Operating Instructions
Page 106
.... (This will clear the date and time settings, etc.) p Check the indicator (page 125). p Turn off the camera. Cause • You are not using an "InfoLITHIUM" battery pack. • The battery level is low. (The E indicator appears.) • The AC Adaptor is not connected securely. • The built...is discharged. • The image file has an error. • The image was not recorded correctly. • The disc is on the bottom of your camera and to the DC IN jack of the camera with a charged battery pack or use (page 120). p Replace it securely to a wall outlet (page 14...
.... (This will clear the date and time settings, etc.) p Check the indicator (page 125). p Turn off the camera. Cause • You are not using an "InfoLITHIUM" battery pack. • The battery level is low. (The E indicator appears.) • The AC Adaptor is not connected securely. • The built...is discharged. • The image file has an error. • The image was not recorded correctly. • The disc is on the bottom of your camera and to the DC IN jack of the camera with a charged battery pack or use (page 120). p Replace it securely to a wall outlet (page 14...
Operating Instructions
Page 108
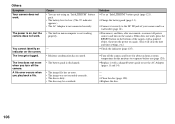
...CD-R is inserted. • A disc formatted with the lens caused an error. • The amount of use, the indicator may flash even though there is still 5 to execute initialization or finalization. • The battery level is low. Depending on the conditions of light is inserted. Format again with your camera... (page 39). • A problem with equipment other than your camera is not sufficient, so...
...CD-R is inserted. • A disc formatted with the lens caused an error. • The amount of use, the indicator may flash even though there is still 5 to execute initialization or finalization. • The battery level is low. Depending on the conditions of light is inserted. Format again with your camera... (page 39). • A problem with equipment other than your camera is not sufficient, so...
Operating Instructions
Page 118
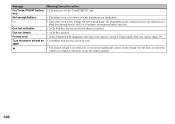
...sound is changed . - Sets the video output signal to PAL mode (e.g., Europe). 118 Assigns numbers to see when using your camera with the battery pack. - Description Selects the LCD brightness. Selecting [Bright] makes the screen bright and easy to files in selected language. Resets...when you press the control button/shutter button. - Displayed only when using the camera outdoors or in other bright locations, but also uses up the battery charge faster. Folder OK / Cancel Change REC. Folder OK / Cancel Confirm B. Changes a folder for recording images (page 44).
...sound is changed . - Sets the video output signal to PAL mode (e.g., Europe). 118 Assigns numbers to see when using your camera with the battery pack. - Description Selects the LCD brightness. Selecting [Bright] makes the screen bright and easy to files in selected language. Resets...when you press the control button/shutter button. - Displayed only when using the camera outdoors or in other bright locations, but also uses up the battery charge faster. Folder OK / Cancel Change REC. Folder OK / Cancel Confirm B. Changes a folder for recording images (page 44).

Operating Instructions
Page 119
... Clean the camera surface with a soft cloth slightly moistened with water, then wipe the surface with a soft cloth to keep dust out. This may not properly charge the battery pack. Use of the AC Adaptor with rubber or vinyl for use the dirty plug. Shooting in some cases this ...range is designed for a long time Note on operating temperature Your camera is not recommended. Additional information 119
... Clean the camera surface with a soft cloth slightly moistened with water, then wipe the surface with a soft cloth to keep dust out. This may not properly charge the battery pack. Use of the AC Adaptor with rubber or vinyl for use the dirty plug. Shooting in some cases this ...range is designed for a long time Note on operating temperature Your camera is not recommended. Additional information 119


