Operating Instructions
Page 10
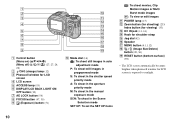
...) F DISPLAY/LCD BACK LIGHT ON/ OFF button (30) G AE LOCK button (54) H FOCUS button (47, 50) I (Exposure) button (51) 0 qa qs qd qf qg qh qj qk ql J Mode dial (16) : To shoot still images in auto adjustment mode P: To shoot still images in programmed mode S: To shoot in ...view or edit images K POWER lamp (15) L Zoom button (for shooting) (25)/ Index button (for viewing) (33) M DC IN jack (11, 14) N Hook for shoulder strap O Jog dial (42) P Speaker Q MENU button (41, 112) R (Image Size/Delete) button (20, 36) S RESET button (bottom surface) (98) • The LCD screen automatically...
...) F DISPLAY/LCD BACK LIGHT ON/ OFF button (30) G AE LOCK button (54) H FOCUS button (47, 50) I (Exposure) button (51) 0 qa qs qd qf qg qh qj qk ql J Mode dial (16) : To shoot still images in auto adjustment mode P: To shoot still images in programmed mode S: To shoot in ...view or edit images K POWER lamp (15) L Zoom button (for shooting) (25)/ Index button (for viewing) (33) M DC IN jack (11, 14) N Hook for shoulder strap O Jog dial (42) P Speaker Q MENU button (41, 112) R (Image Size/Delete) button (20, 36) S RESET button (bottom surface) (98) • The LCD screen automatically...
Operating Instructions
Page 16
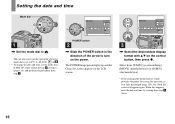
... discharged (page 120), the Clock Set screen will appear again. The POWER lamp (green) lights up and the Clock Set screen appears on the control button, then press z. Clock Set Y/M/D M/D/Y D/M/Y 2003 / OK 1/ 1 12 : 00 OK AM Cancel 3 , Select the desired date display format with v/V ... Set the mode dial to . • You can also carry out this happens, reset the date and time, by starting from [Y/M/D] (year/month/day), [M/D/Y] (month/day/year) or [D/M/Y] (day/month/year). • If the rechargeable button battery, which provides the power for saving the time data, is set to P, S, ...
... discharged (page 120), the Clock Set screen will appear again. The POWER lamp (green) lights up and the Clock Set screen appears on the control button, then press z. Clock Set Y/M/D M/D/Y D/M/Y 2003 / OK 1/ 1 12 : 00 OK AM Cancel 3 , Select the desired date display format with v/V ... Set the mode dial to . • You can also carry out this happens, reset the date and time, by starting from [Y/M/D] (year/month/day), [M/D/Y] (month/day/year) or [D/M/Y] (day/month/year). • If the rechargeable button battery, which provides the power for saving the time data, is set to P, S, ...
Operating Instructions
Page 98
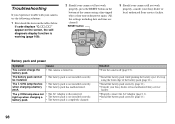
...8226; The battery pack is working (page 109). 2 Should your camera still not work properly, press the RESET button on the bottom of the camera using the front edge of the battery pack (page 11). p Consult your camera, try the following solutions. 1 First check the items on the screen...pack is turned on the power again. (All the settings including date and time are cleared.) RESET button 3 Should your camera still not work properly, consult your Sony dealer or local authorized Sony service facility. p Install the battery pack correctly (page 11). Battery pack and power Symptom You ...
...8226; The battery pack is working (page 109). 2 Should your camera still not work properly, press the RESET button on the bottom of the camera using the front edge of the battery pack (page 11). p Consult your camera, try the following solutions. 1 First check the items on the screen...pack is turned on the power again. (All the settings including date and time are cleared.) RESET button 3 Should your camera still not work properly, consult your Sony dealer or local authorized Sony service facility. p Install the battery pack correctly (page 11). Battery pack and power Symptom You ...
Operating Instructions
Page 106
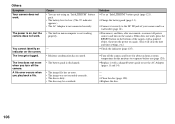
p Charge the battery pack (page 11). p Turn off the camera. p Clean the disc (page 120). Others Symptom Your camera does not work , press the RESET button on the bottom of your camera and to evaporate before use the AC Adaptor (pages 11 and 14). - - The lens gets fogged. A file error occurs when...pack is discharged. • The image file has an error. • The image was not recorded correctly. • The disc is on the camera. p Replace it securely to the DC IN jack of the camera with a charged battery pack or use (page 120). p Replace the disc. 106 The lens does...
p Charge the battery pack (page 11). p Turn off the camera. p Clean the disc (page 120). Others Symptom Your camera does not work , press the RESET button on the bottom of your camera and to evaporate before use the AC Adaptor (pages 11 and 14). - - The lens gets fogged. A file error occurs when...pack is discharged. • The image file has an error. • The image was not recorded correctly. • The disc is on the camera. p Replace it securely to the DC IN jack of the camera with a charged battery pack or use (page 120). p Replace the disc. 106 The lens does...
Operating Instructions
Page 109
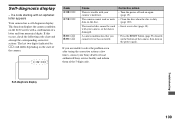
... after trying the corrective actions a few times, contact your Sony dealer or local authorized Sony service facility and inform them of the camera. If you cannot reverse has occurred. Self-diagnosis display Troubleshooting 109 The last two digits (indicated by ss) will differ depending on the disc. ... code starting with your camera, or the data is damaged. C:32:ss Code C:32: ss C:13: ss E:61: ss E:91: ss Cause There is dirty (page 120). • Insert a new disc (page 18). • Press the RESET button (page 98) located on the bottom of a letter and four numerical digits.
... after trying the corrective actions a few times, contact your Sony dealer or local authorized Sony service facility and inform them of the camera. If you cannot reverse has occurred. Self-diagnosis display Troubleshooting 109 The last two digits (indicated by ss) will differ depending on the disc. ... code starting with your camera, or the data is damaged. C:32:ss Code C:32: ss C:13: ss E:61: ss E:91: ss Cause There is dirty (page 120). • Insert a new disc (page 18). • Press the RESET button (page 98) located on the bottom of a letter and four numerical digits.
Operating Instructions
Page 118
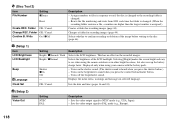
... Creates a folder for recording images (page 44). Turns on the recorded images. Folder OK / Cancel Confirm B. Resets the file numbering and starts from 0001 each time the folder is heard when you press the control button/shutter button. - Changes a folder for recording images (page 44). .../ xNormal Shutter xOn Off - Description Selects the LCD brightness. Displayed only when using the camera outdoors or in selected language. Turns on the beep/shutter sound when you press the shutter button.) - Turns off the beep/shutter sound. Sets the video output signal to NTSC mode ...
... Creates a folder for recording images (page 44). Turns on the recorded images. Folder OK / Cancel Confirm B. Resets the file numbering and starts from 0001 each time the folder is heard when you press the control button/shutter button. - Changes a folder for recording images (page 44). .../ xNormal Shutter xOn Off - Description Selects the LCD brightness. Displayed only when using the camera outdoors or in selected language. Turns on the beep/shutter sound when you press the shutter button.) - Turns off the beep/shutter sound. Sets the video output signal to NTSC mode ...
Operating Instructions
Page 130
... 44 creating a new folder 44 playback folder 69 Recording folder 44 Formatting a CD-RW 39 G GIF 59, 90 H Histogram 52 Hologram AF 29 Hot shoe 117 I Image copying images to your computer ........ 94, 97 file names 90 image ... Power AC Adaptor 14 battery pack 11 on/off 15 Precautions 119 Print (DPOF) mark 77 Protect 75 Q Quick Review 24 R Red-eye reduction 28 RESET button 98 Resize 77 Rotate 72 S Saturation 113 Scene Selection Beach mode 65 Landscape mode 64 Portrait mode 64 Snow mode 64 Twilight mode 64 Twilight...
... 44 creating a new folder 44 playback folder 69 Recording folder 44 Formatting a CD-RW 39 G GIF 59, 90 H Histogram 52 Hologram AF 29 Hot shoe 117 I Image copying images to your computer ........ 94, 97 file names 90 image ... Power AC Adaptor 14 battery pack 11 on/off 15 Precautions 119 Print (DPOF) mark 77 Protect 75 Q Quick Review 24 R Red-eye reduction 28 RESET button 98 Resize 77 Rotate 72 S Saturation 113 Scene Selection Beach mode 65 Landscape mode 64 Portrait mode 64 Snow mode 64 Twilight mode 64 Twilight...


