Operating Instructions
Page 4
... manufacturing process and do not shake or strike the camera. ∗ The Mavica disc is lit, do not affect the recording in a cold location. Do not get the camera wet When taking pictures outdoors in the rain or...disc, the ACCESS lamp flashes (red). This is indicated as recording media. Before using your camera or recording media, etc. "CD-R" or "CD-RW" mentioned above is being read from or written to direct sunlight for effective use The heat of flash emission may be careful not to a disk. Unauthorized recording of your camera This digital still camera uses 8 cm CD...
... manufacturing process and do not shake or strike the camera. ∗ The Mavica disc is lit, do not affect the recording in a cold location. Do not get the camera wet When taking pictures outdoors in the rain or...disc, the ACCESS lamp flashes (red). This is indicated as recording media. Before using your camera or recording media, etc. "CD-R" or "CD-RW" mentioned above is being read from or written to direct sunlight for effective use The heat of flash emission may be careful not to a disk. Unauthorized recording of your camera This digital still camera uses 8 cm CD...
Operating Instructions
Page 6
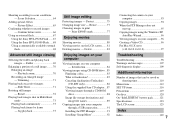
...still images Deleting images 36 Formatting a CD-RW 39 Before advanced operations How to setup and operate your camera 15 How to use the jog dial 42 Deciding the still image quality 43 Creating or selecting a folder 43 Creating a new folder 44 Changing the recording folder 44 Advanced still... the control button 15 Setting the date and time 16 Shooting still images Inserting and removing a disc 18 Initializing a disc 19 What is initialization 19 Setting the still image size 20 Image size and quality 21 Basic still image shooting - Auto adjustment mode 22 Checking the last image ...
...still images Deleting images 36 Formatting a CD-RW 39 Before advanced operations How to setup and operate your camera 15 How to use the jog dial 42 Deciding the still image quality 43 Creating or selecting a folder 43 Creating a new folder 44 Changing the recording folder 44 Advanced still... the control button 15 Setting the date and time 16 Shooting still images Inserting and removing a disc 18 Initializing a disc 19 What is initialization 19 Setting the still image size 20 Image size and quality 21 Basic still image shooting - Auto adjustment mode 22 Checking the last image ...
Operating Instructions
Page 7
... flash 67 Using the Sony HVL-F32X Flash ......67 Using the Sony HVL-F1000 Flash .....68 Using a commercially available external flash 68 Advanced still image viewing Selecting the folder and playing back images - Playback zoom 70 Recording an enlarged image - Jog playback 73 Still image editing Protecting images... does not start up 95 Copying images using CD-ROM drive .. 85 Finalizing a disc 85 What is finalization 85 Canceling finalization (Unfinalize) (CD-RW only 86 Using the supplied 8cm CD adapter... 87 Viewing images through a CD-ROM drive 88 Image file storage destinations and ...
... flash 67 Using the Sony HVL-F32X Flash ......67 Using the Sony HVL-F1000 Flash .....68 Using a commercially available external flash 68 Advanced still image viewing Selecting the folder and playing back images - Playback zoom 70 Recording an enlarged image - Jog playback 73 Still image editing Protecting images... does not start up 95 Copying images using CD-ROM drive .. 85 Finalizing a disc 85 What is finalization 85 Canceling finalization (Unfinalize) (CD-RW only 86 Using the supplied 8cm CD adapter... 87 Viewing images through a CD-ROM drive 88 Image file storage destinations and ...
Operating Instructions
Page 8
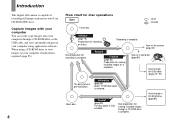
... using application software. Unfinalize (page 86) About 13 MB disc space is complete. Blank disc Format (page 39) The disc space is capable of recording still images and movies onto 8 cm CD-R/CD-RW discs. View through a CD-ROM drive is complete. Introduction This digital still camera is fully available. Disc preparation for recording on a disc. Capture images with your computer You can easily copy...
... using application software. Unfinalize (page 86) About 13 MB disc space is complete. Blank disc Format (page 39) The disc space is capable of recording still images and movies onto 8 cm CD-R/CD-RW discs. View through a CD-ROM drive is complete. Introduction This digital still camera is fully available. Disc preparation for recording on a disc. Capture images with your computer You can easily copy...
Operating Instructions
Page 9
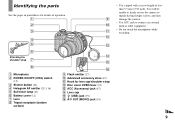
...27) F Battery cover (11) G Lens H Tripod receptacle (bottom surface) qf qg qh I Flash emitter (27) J Advanced accessory shoe (67) K Hook for lens cap/shoulder strap L Disc cover OPEN lever (18) M ACC (Accessory) jack (67) N Lens cap O (USB) jack (93) P A/V OUT (MONO) jack (34) • Use a tripod with a ...screw length of less than 5.5 mm (7/32 inch). You will be unable to firmly secure the camera to tripods having longer screws, and may damage the camera. • Use ACC jack to connect an external flash or other equipment. • Do not touch the microphone while...
...27) F Battery cover (11) G Lens H Tripod receptacle (bottom surface) qf qg qh I Flash emitter (27) J Advanced accessory shoe (67) K Hook for lens cap/shoulder strap L Disc cover OPEN lever (18) M ACC (Accessory) jack (67) N Lens cap O (USB) jack (93) P A/V OUT (MONO) jack (34) • Use a tripod with a ...screw length of less than 5.5 mm (7/32 inch). You will be unable to firmly secure the camera to tripods having longer screws, and may damage the camera. • Use ACC jack to connect an external flash or other equipment. • Do not touch the microphone while...
Operating Instructions
Page 13
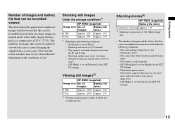
of images that the actual numbers may be recorded or viewed take into account changing the supplied disc as time passes (page 122). - [AF Mode] is low. Shooting one time every 30 seconds - The power turns on and off many times - The flash ...-FM50 (supplied) Battery life (min.) Continuous shooting Approx. 130 3) Shooting continuously at a temperature of 25°C (77°F). Shooting still images Under the average conditions1) NP-FM50 (supplied) Image size No. The camera has been turned on the conditions of use it more and more and as necessary. The zoom is low...
of images that the actual numbers may be recorded or viewed take into account changing the supplied disc as time passes (page 122). - [AF Mode] is low. Shooting one time every 30 seconds - The power turns on and off many times - The flash ...-FM50 (supplied) Battery life (min.) Continuous shooting Approx. 130 3) Shooting continuously at a temperature of 25°C (77°F). Shooting still images Under the average conditions1) NP-FM50 (supplied) Image size No. The camera has been turned on the conditions of use it more and more and as necessary. The zoom is low...
Operating Instructions
Page 18
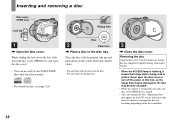
...the LCD screen and it may become unusable. • While the camera is writing data on the disc condition. 18 Removing the disc Open the disc cover. Place the disc with too force on disc, see page 120. Never open the disc cover or turn off the power at this time, as the ... and push down the disc cover OPEN lever, and open the disc cover. • You can use only 8 cm CD-R/CD-RW discs that have these marks. • For details on the disc. • Do not touch the pickup lens. 3 , Close the disc cover. Shooting still images Inserting and removing a disc Disc cover OPEN lever Lock tab...
...the LCD screen and it may become unusable. • While the camera is writing data on the disc condition. 18 Removing the disc Open the disc cover. Place the disc with too force on disc, see page 120. Never open the disc cover or turn off the power at this time, as the ... and push down the disc cover OPEN lever, and open the disc cover. • You can use only 8 cm CD-R/CD-RW discs that have these marks. • For details on the disc. • Do not touch the pickup lens. 3 , Close the disc cover. Shooting still images Inserting and removing a disc Disc cover OPEN lever Lock tab...

Operating Instructions
Page 19
...still images Initializing a disc What is set the mode dial to initialize Initialize Avoid any vibration Ready to , then turn on the control button, then press z. Mode dial 1 , Insert a new disc and set to P, S, A, M, SCN or . • You can also perform initialization using your camera to view images through a CD...-ROM drive, initialization is required to record images. Images recorded before finalization remain on the LCD ...
...still images Initializing a disc What is set the mode dial to initialize Initialize Avoid any vibration Ready to , then turn on the control button, then press z. Mode dial 1 , Insert a new disc and set to P, S, A, M, SCN or . • You can also perform initialization using your camera to view images through a CD...-ROM drive, initialization is required to record images. Images recorded before finalization remain on the LCD ...
Operating Instructions
Page 21
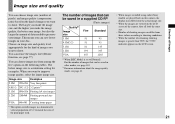
...still images You can choose image size (number of pixels) and image quality (compression ratio) based on the kind of data needed to preserve your image. The larger you make the image size and the higher you make the image quality, the better your disc...camera, they all look the same size. • Number of shooting images can choose image size from the actual image size. • When the images are viewed on the LCD screen. 21 The number of images that can be saved in a supplied CD...• When images recorded using earlier Sony models are played back on this camera, the display may differ...
...still images You can choose image size (number of pixels) and image quality (compression ratio) based on the kind of data needed to preserve your image. The larger you make the image size and the higher you make the image quality, the better your disc...camera, they all look the same size. • Number of shooting images can choose image size from the actual image size. • When the images are viewed on the LCD screen. 21 The number of images that can be saved in a supplied CD...• When images recorded using earlier Sony models are played back on this camera, the display may differ...
Operating Instructions
Page 22
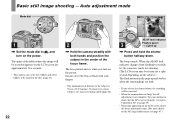
Basic still image shooting - To shoot even closer subjects, use macro recording mode (page 26). The beep sounds. Do not cover the lens ... 3/4 inches). The name of the folder where the image will be canceled. • When the camera does not beep, the AF adjustment is ready for shooting. (The LCD screen may be frozen for approximately five seconds...strobes when the surroundings are dark. • If you release the shutter button, the recording will be stored in the disc (page 43). 22 2 , Hold the camera steadily with your fingers. • The minimum focal distance to the subject is not set...
Basic still image shooting - To shoot even closer subjects, use macro recording mode (page 26). The beep sounds. Do not cover the lens ... 3/4 inches). The name of the folder where the image will be canceled. • When the camera does not beep, the AF adjustment is ready for shooting. (The LCD screen may be frozen for approximately five seconds...strobes when the surroundings are dark. • If you release the shutter button, the recording will be stored in the disc (page 43). 22 2 , Hold the camera steadily with your fingers. • The minimum focal distance to the subject is not set...

Operating Instructions
Page 23
...23 Shooting still images 60min 5.0M 101 95 M AF 4 , Press the shutter button fully down the battery (page 15). • While the image is flashing. Mode dial for about three minutes during recording, the camera turns off the power, remove the battery pack, or open the disc cover at ...this lamp is being recorded on the disc, the ACCESS lamp flashes. P (Program auto shooting) You can set to prevent...
...23 Shooting still images 60min 5.0M 101 95 M AF 4 , Press the shutter button fully down the battery (page 15). • While the image is flashing. Mode dial for about three minutes during recording, the camera turns off the power, remove the battery pack, or open the disc cover at ...this lamp is being recorded on the disc, the ACCESS lamp flashes. P (Program auto shooting) You can set to prevent...
Operating Instructions
Page 36
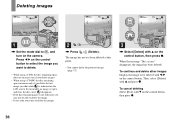
...8226; When using a CD-RW, the disc remaining space increases only if you delete the last image you may take some time to delete the images. 2 , Press (Delete). To continue and delete other images Display the image to be able to , and turn on the camera. If you modify ...page 75). 3 , Select [Delete] with b/B on the control button. When the message "Disc access" disappears, the image has been deleted. To cancel deleting Select [Exit] with v and press z. Deleting images 60min VGA 101 2/9 Deleting still images 60min VGA 101 2/9 60min VGA 101 2/9 101-0002 2003 7 4 10:30PM BACK...
...8226; When using a CD-RW, the disc remaining space increases only if you delete the last image you may take some time to delete the images. 2 , Press (Delete). To continue and delete other images Display the image to be able to , and turn on the camera. If you modify ...page 75). 3 , Select [Delete] with b/B on the control button. When the message "Disc access" disappears, the image has been deleted. To cancel deleting Select [Exit] with v and press z. Deleting images 60min VGA 101 2/9 Deleting still images 60min VGA 101 2/9 60min VGA 101 2/9 101-0002 2003 7 4 10:30PM BACK...
Operating Instructions
Page 38
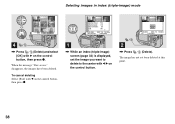
... Delete Exit 101-0002 2003 7 4 10:30PM OK BACK/NEXT 4 , Press (Delete) and select [OK] with b/B on the control button, then press z. When the message "Disc access" disappears, the images have been deleted.
... Delete Exit 101-0002 2003 7 4 10:30PM OK BACK/NEXT 4 , Press (Delete) and select [OK] with b/B on the control button, then press z. When the message "Disc access" disappears, the images have been deleted.
Operating Instructions
Page 39
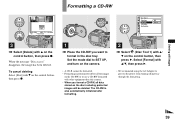
... to format in the disc tray. Set the mode dial to SET UP, and turn on the camera. • A CD-R cannot be deleted. The CD-RW is performed to prevent the power from turning off partway through the formatting. 39 Deleting still images Formatting a CD-RW Delete Exit 101-0002... 2003 7 4 10:30PM OK BACK/NEXT Disc Tool 1 1 Finalize: 2 Format: 1 Initialize...
... to format in the disc tray. Set the mode dial to SET UP, and turn on the camera. • A CD-R cannot be deleted. The CD-RW is performed to prevent the power from turning off partway through the formatting. 39 Deleting still images Formatting a CD-RW Delete Exit 101-0002... 2003 7 4 10:30PM OK BACK/NEXT Disc Tool 1 1 Finalize: 2 Format: 1 Initialize...

Operating Instructions
Page 40
Format the disc again with this camera. Format Place on level surface All data will be used with this camera. 40 "Format Place on level surface" appears on the control button, then press z. When the message "Format in progress 3 , Select [OK] with v, then press z....in progress" disappears, formatting has been completed. • It may take some time to format a CD-RW. • A CD-RW can be formatted about 300 times. • A CD-RW formatted using other equipment than this camera cannot be erased Ready? To cancel formatting Select [Cancel] with V on the control button, then ...
Format the disc again with this camera. Format Place on level surface All data will be used with this camera. 40 "Format Place on level surface" appears on the control button, then press z. When the message "Format in progress 3 , Select [OK] with v, then press z....in progress" disappears, formatting has been completed. • It may take some time to format a CD-RW. • A CD-RW can be formatted about 300 times. • A CD-RW formatted using other equipment than this camera cannot be erased Ready? To cancel formatting Select [Cancel] with V on the control button, then ...

Operating Instructions
Page 43
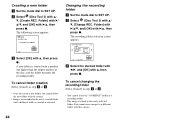
...selecting a folder Mode dial: SET UP Your camera can be stored in one folder. Mode dial Control button MENU a Set the mode dial to P, S, A, M or SCN. b Press MENU. MENU • Up to 4000 images can create multiple folders within a disc. FINE Fine Standard WB ISO P.Quality Mode... You can create folders up to "999MSDCF." When the folder capacity is exceeded, a new folder is selected as the recording folder. Before advanced operations 43 You can select the still image quality from [Fine] or [Standard]. Quality) with b/B, then select the desired image quality with v/V. Mode dial ...
...selecting a folder Mode dial: SET UP Your camera can be stored in one folder. Mode dial Control button MENU a Set the mode dial to P, S, A, M or SCN. b Press MENU. MENU • Up to 4000 images can create multiple folders within a disc. FINE Fine Standard WB ISO P.Quality Mode... You can create folders up to "999MSDCF." When the folder capacity is exceeded, a new folder is selected as the recording folder. Before advanced operations 43 You can select the still image quality from [Fine] or [Standard]. Quality) with b/B, then select the desired image quality with v/V. Mode dial ...
Operating Instructions
Page 44
... press z. Folder Creating REC. A new folder is created with the camera. • Images are recorded in the newly created folder until a different folder is stored in the disc, and the folder becomes the recording folder. b Select 2 (Disc Tool 2) with v, then press z. To cancel changing the recording folder Select [Cancel] in step 2 or 3. • You cannot select...
... press z. Folder Creating REC. A new folder is created with the camera. • Images are recorded in the newly created folder until a different folder is stored in the disc, and the folder becomes the recording folder. b Select 2 (Disc Tool 2) with v, then press z. To cancel changing the recording folder Select [Cancel] in step 2 or 3. • You cannot select...
Operating Instructions
Page 59
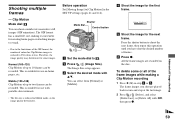
...the desired mode with portable data terminals. • The file size is reduced to two frames can be recorded. d Shoot the image for use on the disc. This is suitable for creating home pages or attaching images to e-mail. • Due to the ...limitations of the GIF format, the number of up to . The GIF format has a small file size, making a Clip Motion recording 1 Press b (7) in Mobile mode, so the image quality deteriorates. To delete some images. Advanced still...
...the desired mode with portable data terminals. • The file size is reduced to two frames can be recorded. d Shoot the image for use on the disc. This is suitable for creating home pages or attaching images to e-mail. • Due to the ...limitations of the GIF format, the number of up to . The GIF format has a small file size, making a Clip Motion recording 1 Press b (7) in Mobile mode, so the image quality deteriorates. To delete some images. Advanced still...

Operating Instructions
Page 60
... frames in succession each time you repeat steps 1 through 3, the last frame you shot is deleted. • Note that all images are not recorded on the disc until you press the shutter button. c Select (Interval) with b/B, then select the desired frame interval with v, then press z. 3 Select [Delete] with...Motion, see page 111. • The date and time are not superimposed onto Clip Motion images. • When viewing an image recorded in Clip Motion on this camera may appear different from the menu settings (page 41). 1/30" 1/7.5 1/15 1/30 WB Interval PFX 60 b Press MENU. ...
... frames in succession each time you repeat steps 1 through 3, the last frame you shot is deleted. • Note that all images are not recorded on the disc until you press the shutter button. c Select (Interval) with b/B, then select the desired frame interval with v, then press z. 3 Select [Delete] with...Motion, see page 111. • The date and time are not superimposed onto Clip Motion images. • When viewing an image recorded in Clip Motion on this camera may appear different from the menu settings (page 41). 1/30" 1/7.5 1/15 1/30 WB Interval PFX 60 b Press MENU. ...

Operating Instructions
Page 66
.... To cancel Picture Effects Select [Off] in the camera memory, letting you select [Record] "Recording" appears on the screen, and the image will be recorded on the disc. Confirming whether to P, S, A, M, SCN or . b Select (Disc Tool 2) with v/V, then press z. d Record the image. 60min Confirm 5.0MFINE 101 1/1 , P, S, Record Delete OK e Select [Record] or [Delete] with v/ 2 V, [Confirm B. c Select [PFX] (P. Mode dial...
.... To cancel Picture Effects Select [Off] in the camera memory, letting you select [Record] "Recording" appears on the screen, and the image will be recorded on the disc. Confirming whether to P, S, A, M, SCN or . b Select (Disc Tool 2) with v/V, then press z. d Record the image. 60min Confirm 5.0MFINE 101 1/1 , P, S, Record Delete OK e Select [Record] or [Delete] with v/ 2 V, [Confirm B. c Select [PFX] (P. Mode dial...


