Operating Instructions
Page 1
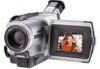
Model No. DCR-TRV Model No. DCR-TRV830 TM SERIES DCR-TRV730/TRV828/TRV830 ©2001 Sony Corporation Serial No. AC- 3-066-521-12 (1) Digital Video Camera Recorder Operating Instructions Before operating the unit, please read this product. Record the serial number in the space provided below. Refer to these numbers whenever you call upon your Sony dealer regarding this manual thoroughly, and retain it for future reference. Serial No. Owner's Record The model and serial numbers are located on the bottom.
Model No. DCR-TRV Model No. DCR-TRV830 TM SERIES DCR-TRV730/TRV828/TRV830 ©2001 Sony Corporation Serial No. AC- 3-066-521-12 (1) Digital Video Camera Recorder Operating Instructions Before operating the unit, please read this product. Record the serial number in the space provided below. Refer to these numbers whenever you call upon your Sony dealer regarding this manual thoroughly, and retain it for future reference. Serial No. Owner's Record The model and serial numbers are located on the bottom.
Operating Instructions
Page 5
... function 37 Using special effects - Memory Photo playback 117 Viewing a moving pictures on "Memory Stick" to a wall outlet 16 Step 2 Setting the date and time 17 Step 3 Inserting a cassette 18 Recording - END SEARCH/ EDITSEARCH/Rec Review 26 Playback - Digital effect 40 Using the PROGRAM AE function 43 Adjusting the exposure manually 45 Focusing manually 46 Superimposing a title 47 Making your own titles 49 Inserting a scene 51 Advanced Playback Operations Playing back a tape with picture effects ..... 52 Playing back a tape with analog video...
... function 37 Using special effects - Memory Photo playback 117 Viewing a moving pictures on "Memory Stick" to a wall outlet 16 Step 2 Setting the date and time 17 Step 3 Inserting a cassette 18 Recording - END SEARCH/ EDITSEARCH/Rec Review 26 Playback - Digital effect 40 Using the PROGRAM AE function 43 Adjusting the exposure manually 45 Focusing manually 46 Superimposing a title 47 Making your own titles 49 Inserting a scene 51 Advanced Playback Operations Playing back a tape with picture effects ..... 52 Playing back a tape with analog video...
Operating Instructions
Page 7
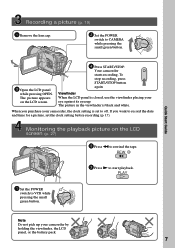
... the playback picture on the LCD screen. 4 Press START/STOP. PLAY OFCFR(CHG) 1 Set the POWER switch to rewind the tape. V POWER CAM M Note Do not pick up your eye against its eyecup. To stop recording, press START/STOP button again. REW 3 Press N to CAMERA while pressing the small green button. E ERMAORY E ERMAORY Quick Start Guide Recording a picture (p. 19) 1 Remove the lens cap. 2 Set the POWER switch to start playback. Your camcorder starts recording. Viewfinder When the LCD panel is closed, use...
... the playback picture on the LCD screen. 4 Press START/STOP. PLAY OFCFR(CHG) 1 Set the POWER switch to rewind the tape. V POWER CAM M Note Do not pick up your eye against its eyecup. To stop recording, press START/STOP button again. REW 3 Press N to CAMERA while pressing the small green button. E ERMAORY E ERMAORY Quick Start Guide Recording a picture (p. 19) 1 Remove the lens cap. 2 Set the POWER switch to start playback. Your camcorder starts recording. Viewfinder When the LCD panel is closed, use...
Operating Instructions
Page 8
... capital letters. As you read through this manual and operating your camcorder, check the model number by looking at the bottom of difference DCRLCD screen TRV730 6.2 cm (2.5 type) TRV828 8.8 cm (3.5 type) TRV830 8.8 cm (3.5 type) Before using your camcorder With your camcorder plays back tapes recorded in the Digital8 system. Also, your digital camcorder, you need an NTSC system-based TV. Copyright precautions Television programs, films, video tapes, and other materials may be copyrighted...
... capital letters. As you read through this manual and operating your camcorder, check the model number by looking at the bottom of difference DCRLCD screen TRV730 6.2 cm (2.5 type) TRV828 8.8 cm (3.5 type) TRV830 8.8 cm (3.5 type) Before using your camcorder With your camcorder plays back tapes recorded in the Digital8 system. Also, your digital camcorder, you need an NTSC system-based TV. Copyright precautions Television programs, films, video tapes, and other materials may be copyrighted...
Operating Instructions
Page 20
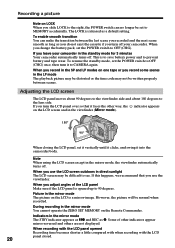
... as you do not eject the cassette if you turn the LCD panel over so that you use the LCD screen outdoors in the mirror mode, the viewfinder automatically turns off . Picture in the mirror mode You cannot operate the ZERO SET MEMORY on the Remote Commander. Some of the LCD panel Make sure if the LCD panel is released as z. The LOCK is opened Recording time becomes shorter a little...
... as you do not eject the cassette if you turn the LCD panel over so that you use the LCD screen outdoors in the mirror mode, the viewfinder automatically turns off . Picture in the mirror mode You cannot operate the ZERO SET MEMORY on the Remote Commander. Some of the LCD panel Make sure if the LCD panel is released as z. The LOCK is opened Recording time becomes shorter a little...
Operating Instructions
Page 22
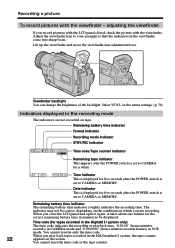
... recording. Adjust the viewfinder lens to CAMERA or MEMORY. JUL 4 2001 12:05:56 AM Time indicator This is displayed for five seconds after the POWER switch is set to be correct, depending on the conditions in VCR mode. When you are not recorded on the screen. Select VF B.L. When you record pictures with the LCD panel closed, check the picture with the viewfinder - Recording a picture To record pictures with the viewfinder. Remaining battery time...
... recording. Adjust the viewfinder lens to CAMERA or MEMORY. JUL 4 2001 12:05:56 AM Time indicator This is displayed for five seconds after the POWER switch is set to be correct, depending on the conditions in VCR mode. When you are not recorded on the screen. Select VF B.L. When you record pictures with the LCD panel closed, check the picture with the viewfinder - Recording a picture To record pictures with the viewfinder. Remaining battery time...

Operating Instructions
Page 31
... playback control buttons in the menu settings (p. 78). Then, set the TV/VCR selector on the VCR to LINE. If your TV or VCR has an S video jack Connect using the A/V connecting cable supplied with your camcorder to the LINE IN input on the VCR by using an S video cable (optional) to obtain high-quality pictures. To turn off the screen indicators, press DISPLAY on your camcorder and the TV or the VCR. Basics : Signal flow S VIDEO AUDIO / VIDEO Red White...
... playback control buttons in the menu settings (p. 78). Then, set the TV/VCR selector on the VCR to LINE. If your TV or VCR has an S video jack Connect using the A/V connecting cable supplied with your camcorder to the LINE IN input on the VCR by using an S video cable (optional) to obtain high-quality pictures. To turn off the screen indicators, press DISPLAY on your camcorder and the TV or the VCR. Basics : Signal flow S VIDEO AUDIO / VIDEO Red White...
Operating Instructions
Page 32
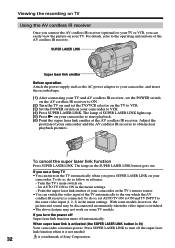
... VCR. (3) Set the POWER switch on your camcorder. Viewing the recording on TV Using the AV cordless IR receiver Once you connect the AV cordless IR receiver (optional) to your TV or VCR, you can easily view the picture on . - For details, refer to the operating instructions of SUPER LASER LINK lights up. (5) Press N on and set AUTO TV ON to ON and TV INPUT to the same video input...
... VCR. (3) Set the POWER switch on your camcorder. Viewing the recording on TV Using the AV cordless IR receiver Once you connect the AV cordless IR receiver (optional) to your TV or VCR, you can easily view the picture on . - For details, refer to the operating instructions of SUPER LASER LINK lights up. (5) Press N on and set AUTO TV ON to ON and TV INPUT to the same video input...
Operating Instructions
Page 33
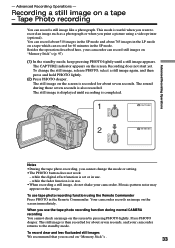
... the Remote Commander. Besides the operation described here, your camcorder returns to record an image such as a photograph or when you use tape photo recording function using a video printer (optional). Recording does not start yet. while the fader function is recorded for about seven seconds. The still image is completed. 1 CAPTURE PHOTO 2 PHOTO Notes •During the tape photo recording, you record on the screen by pressing PHOTO lightly. The still image on "Memory Stick"s (p. 97). (1) In the standby mode...
... the Remote Commander. Besides the operation described here, your camcorder returns to record an image such as a photograph or when you use tape photo recording function using a video printer (optional). Recording does not start yet. while the fader function is recorded for about seven seconds. The still image is completed. 1 CAPTURE PHOTO 2 PHOTO Notes •During the tape photo recording, you record on the screen by pressing PHOTO lightly. The still image on "Memory Stick"s (p. 97). (1) In the standby mode...
Operating Instructions
Page 63
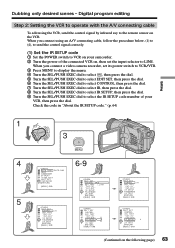
... i . When you connect using the VCR, send the control signal by infrared ray to LINE. When you connect a video camera recorder, set the input selector to the remote sensor on the VCR. I N " " CUT-OUT " I R SETUP P AUS EMODE I R TEST RETURN [ MENU ] : END OTHERS ED I T SET CONTROL ADJ TEST " CUT- I N " " CUT-OUT " I R SETUP 4 P AUS EMODE I R TEST RETURN [ MENU ] : END (Continued on , then set its power switch to VCR/VTR. 3 Press MENU to display the menu. 4 Turn the SEL...
... i . When you connect using the VCR, send the control signal by infrared ray to LINE. When you connect a video camera recorder, set the input selector to the remote sensor on the VCR. I N " " CUT-OUT " I R SETUP P AUS EMODE I R TEST RETURN [ MENU ] : END OTHERS ED I T SET CONTROL ADJ TEST " CUT- I N " " CUT-OUT " I R SETUP 4 P AUS EMODE I R TEST RETURN [ MENU ] : END (Continued on , then set its power switch to VCR/VTR. 3 Press MENU to display the menu. 4 Turn the SEL...
Operating Instructions
Page 67
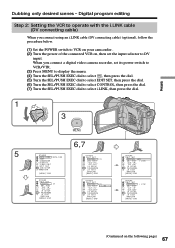
... operate with the i.LINK cable (DV connecting cable) When you connect a digital video camera recorder, set the input selector to select i.LINK, then press the dial. 1 5 OFCFR(CHG) V POWER CAM M 3 E ERMAORY MENU OTHERS DATA CODE DATE / CAM BEEP COMMA ND E R D I SPLAY V I DEO ED I T ED I T SET I ND I CATOR RETURN [ MENU ] : END OTHERS ED I T SET CONTROL I R TEST RETURN [ MENU ] : END i . When you connect using an i.LINK cable (DV connecting cable) (optional), follow the procedure below. (1) Set the POWER switch to VCR on your camcorder . (2) Turn the power...
... operate with the i.LINK cable (DV connecting cable) When you connect a digital video camera recorder, set the input selector to select i.LINK, then press the dial. 1 5 OFCFR(CHG) V POWER CAM M 3 E ERMAORY MENU OTHERS DATA CODE DATE / CAM BEEP COMMA ND E R D I SPLAY V I DEO ED I T ED I T SET I ND I CATOR RETURN [ MENU ] : END OTHERS ED I T SET CONTROL I R TEST RETURN [ MENU ] : END i . When you connect using an i.LINK cable (DV connecting cable) (optional), follow the procedure below. (1) Set the POWER switch to VCR on your camcorder . (2) Turn the power...
Operating Instructions
Page 70
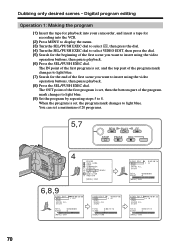
... to insert using the video operation buttons, then pause playback. (6) Press the SEL/PUSH EXEC dial. The OUT point of the first program is set , the program mark changes to 8. You can set , then the bottom part of 20 programs. 5,7 REW PLAY FF STOP PAUSE REC 4 OTHERS DATA CODE BEEP COMMA ND E R D I SPLAY V I DEO ED I T READY ED I T SET I ND I CATOR RETURN [ MENU ] : END 6,8,9 V I DEO ED I T MARK UNDO ERASE AL...
... to insert using the video operation buttons, then pause playback. (6) Press the SEL/PUSH EXEC dial. The OUT point of the first program is set , the program mark changes to 8. You can set , then the bottom part of 20 programs. 5,7 REW PLAY FF STOP PAUSE REC 4 OTHERS DATA CODE BEEP COMMA ND E R D I SPLAY V I DEO ED I T READY ED I T SET I ND I CATOR RETURN [ MENU ] : END 6,8,9 V I DEO ED I T MARK UNDO ERASE AL...
Operating Instructions
Page 72
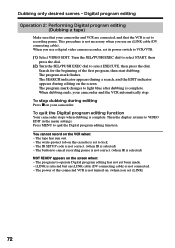
... function Your camcorder stops when dubbing is selected) - Press MENU to VIDEO EDIT in the menu settings. The write-protect tab on your camcorder. To stop . The IR SETUP code is not correct. (when IR is complete. The button to recording pause. i.LINK is selected but an i.LINK cable (DV connecting cable) is complete. Digital program editing Operation 2: Performing Digital program editing (Dubbing a tape) Make sure that your camcorder and the VCR automatically stop...
... function Your camcorder stops when dubbing is selected) - Press MENU to VIDEO EDIT in the menu settings. The write-protect tab on your camcorder. To stop . The IR SETUP code is not correct. (when IR is complete. The button to recording pause. i.LINK is selected but an i.LINK cable (DV connecting cable) is complete. Digital program editing Operation 2: Performing Digital program editing (Dubbing a tape) Make sure that your camcorder and the VCR automatically stop...
Operating Instructions
Page 85
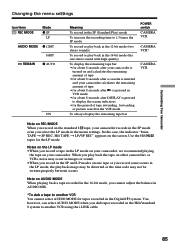
... you play back in the 16-bit mode (the one tape or you record some scenes in the LP mode, the playback image may be distorted or the time code may occur in images or sound. •When you cannot adjust the balance in AUDIO MIX. *To dub a tape to another VCR using the i.LINK cable. 85 You, however, can select AUDIO MODE when you select the LP mode in the menu settings...
... you play back in the 16-bit mode (the one tape or you record some scenes in the LP mode, the playback image may be distorted or the time code may occur in images or sound. •When you cannot adjust the balance in AUDIO MIX. *To dub a tape to another VCR using the i.LINK cable. 85 You, however, can select AUDIO MODE when you select the LP mode in the menu settings...
Operating Instructions
Page 102
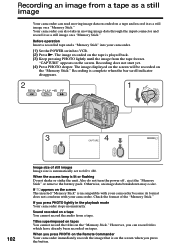
... operation Insert a recorded tape and a "Memory Stick" into your camcorder. OFCFR(CHG) 2 REW PLAY FF 1 V POWER E ERMAORY CAM M 3 CAPTURE 4 PHOTO PHOTO 102 Image size of the "Memory Stick." However, you press PHOTO on the Remote Commander Your camcorder immediately records the image that is complete when the bar scroll indicator disappears. The image recorded on the tape is automatically set to VCR. (2) Press N. "CAPTURE" appears on a tape You cannot record the audio from a tape. The image displayed on the screen will be recorded on the "Memory Stick." Recording...
... operation Insert a recorded tape and a "Memory Stick" into your camcorder. OFCFR(CHG) 2 REW PLAY FF 1 V POWER E ERMAORY CAM M 3 CAPTURE 4 PHOTO PHOTO 102 Image size of the "Memory Stick." However, you press PHOTO on the Remote Commander Your camcorder immediately records the image that is complete when the bar scroll indicator disappears. The image recorded on the tape is automatically set to VCR. (2) Press N. "CAPTURE" appears on a tape You cannot record the audio from a tape. The image displayed on the screen will be recorded on the "Memory Stick." Recording...
Operating Instructions
Page 123
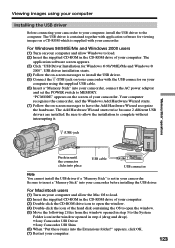
... set the POWER switch to the computer. Be sure to insert a "Memory Stick" into your camcorder. For Windows 98/98SE/Me and Windows 2000 users (1) Turn on your computer using your computer Installing the USB driver Before connecting your camcorder to your computer. (3) Double-click the CD-ROM drive icon to open the window. (4) Double-click the icon of the hard disk containing the OS to open the window. (5) Move the following 2 files from the window opened...
... set the POWER switch to the computer. Be sure to insert a "Memory Stick" into your camcorder. For Windows 98/98SE/Me and Windows 2000 users (1) Turn on your computer using your computer Installing the USB driver Before connecting your camcorder to your computer. (3) Double-click the CD-ROM drive icon to open the window. (4) Double-click the icon of the hard disk containing the OS to open the window. (5) Move the following 2 files from the window opened...
Operating Instructions
Page 125
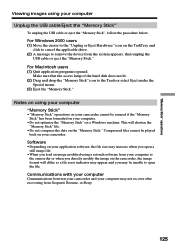
... files cannot be played back on the TaskTray and click to cancel the applicable drive. (2) A message to remove the device from the system appears, then unplug the USB cable or eject the "Memory Stick." Make sure that the access lamp of the hard disk does not lit. (2) Drag and drop the "Memory Stick" icon to the "Unplug or Eject Hardware" icon on your camcorder. This will differ so a file error...
... files cannot be played back on the TaskTray and click to cancel the applicable drive. (2) A message to remove the device from the system appears, then unplug the USB cable or eject the "Memory Stick." Make sure that the access lamp of the hard disk does not lit. (2) Drag and drop the "Memory Stick" icon to the "Unplug or Eject Hardware" icon on your camcorder. This will differ so a file error...
Operating Instructions
Page 146
... Using any other DCR-TRV730/TRV828/TRV830). is automatically switched to play back standard 8 tape on other VCRs (including other video camera recorder, you cannnot record on this camcorder. t / : During switching from Digital8 to Hi8 /standard 8 / t : During switching from the DV IN/OUT jack. During playback of recording time becomes 60 minutes in the Hi8 /standard 8 system, digital signals are output as the image signals from Hi8 /standard 8 to record such software...
... Using any other DCR-TRV730/TRV828/TRV830). is automatically switched to play back standard 8 tape on other VCRs (including other video camera recorder, you cannnot record on this camcorder. t / : During switching from Digital8 to Hi8 /standard 8 / t : During switching from the DV IN/OUT jack. During playback of recording time becomes 60 minutes in the Hi8 /standard 8 system, digital signals are output as the image signals from Hi8 /standard 8 to record such software...
Operating Instructions
Page 157
...; (kilohms)) Output impedance with infrared lighting. Additional Information 157 Hi8 video cassette) Approx. 5 min. Hi8 cassette, and shoulder strap Supplied accessories See page 10. Hi8 video cassette) SP mode: 1 hour LP mode: 1 hour and 30 minuites Fastforward/rewind time (using 120 min. Viewfinder Electric Viewfinder, Monochrome Image device 4.5 mm (1/4 type CCD) (Charge Coupled Device) Approx. 1 070 000 pixels (Memory mode: 1 000 000 pixels) (Camera mode: 690 000 pixels) Lens Combined power zoom lens Filter diameter...
...; (kilohms)) Output impedance with infrared lighting. Additional Information 157 Hi8 video cassette) Approx. 5 min. Hi8 cassette, and shoulder strap Supplied accessories See page 10. Hi8 video cassette) SP mode: 1 hour LP mode: 1 hour and 30 minuites Fastforward/rewind time (using 120 min. Viewfinder Electric Viewfinder, Monochrome Image device 4.5 mm (1/4 type CCD) (Charge Coupled Device) Approx. 1 070 000 pixels (Memory mode: 1 000 000 pixels) (Camera mode: 690 000 pixels) Lens Combined power zoom lens Filter diameter...
Operating Instructions
Page 167
... sound 81 Manual focus 46 Memory chroma key 110 Memory luminance key ....... 110 MEMORY MIX 110 Memory overlap 110 Memory PB ZOOM 129 Memory photo recording ...... 97 "Memory Stick 88 Menu settings 78 Mirror mode 20 Moisture condensation ........ 152 Monaural 31 MONOTONE 37 MPEG 88 MPEG movie recording ....... 104 NIGHTSHOT 23 NTSC system 151 O, P, Q OLD MOVIE 40 Operation indicators 166 OVERLAP 37 Photo save 115 Photo scan 58 Photo search 57 Picture effect 39, 52 Picture search 29 Playback pause...
... sound 81 Manual focus 46 Memory chroma key 110 Memory luminance key ....... 110 MEMORY MIX 110 Memory overlap 110 Memory PB ZOOM 129 Memory photo recording ...... 97 "Memory Stick 88 Menu settings 78 Mirror mode 20 Moisture condensation ........ 152 Monaural 31 MONOTONE 37 MPEG 88 MPEG movie recording ....... 104 NIGHTSHOT 23 NTSC system 151 O, P, Q OLD MOVIE 40 Operation indicators 166 OVERLAP 37 Photo save 115 Photo scan 58 Photo search 57 Picture effect 39, 52 Picture search 29 Playback pause...


