Operating Instructions
Page 2
... be producing home video that may be of sufficient magnitude to constitute a risk of Conformity Trade Name: SONY Model No.: DCR-TRV730, DCRTRV828, DCR-TRV830 Responsible Party: Sony Electronics lnc. Regulatory Information Declaration of electric shock to the following two conditions: (1) This device may not cause harmful interference, and (2) this Sony Digital Handycam camcorder. With your nearest Sony Service Center...
... be producing home video that may be of sufficient magnitude to constitute a risk of Conformity Trade Name: SONY Model No.: DCR-TRV730, DCRTRV828, DCR-TRV830 Responsible Party: Sony Electronics lnc. Regulatory Information Declaration of electric shock to the following two conditions: (1) This device may not cause harmful interference, and (2) this Sony Digital Handycam camcorder. With your nearest Sony Service Center...
Operating Instructions
Page 5
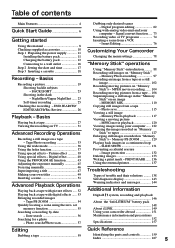
... Warning indicators and messages 144 Additional Information Digital8 system, recording and playback 146 About the "InfoLITHIUM" battery pack 148 About i.LINK 149 Using your camcorder abroad 151 Maintenance information and precautions 152 Specifications 157 Editing...3 Inserting a cassette 18 Recording - Digital program editing 62 Using with digital effects ...... 53 Enlarging recorded images - SLIDE SHOW 131 Preventing accidental erasure - Photo search/Photo scan 57 Dubbing only desired scenes - Signal convert function ..... 73 Recording video or TV programs 74 Inserting...
... Warning indicators and messages 144 Additional Information Digital8 system, recording and playback 146 About the "InfoLITHIUM" battery pack 148 About i.LINK 149 Using your camcorder abroad 151 Maintenance information and precautions 152 Specifications 157 Editing...3 Inserting a cassette 18 Recording - Digital program editing 62 Using with digital effects ...... 53 Enlarging recorded images - SLIDE SHOW 131 Preventing accidental erasure - Photo search/Photo scan 57 Dubbing only desired scenes - Signal convert function ..... 73 Recording video or TV programs 74 Inserting...

Operating Instructions
Page 6
Connecting the power cord (p. 16) Use the battery pack when using your camcorder. Open the DC IN jack cover. Connect the plug with the window facing out. After the cassette compartment goes down completely, close the lid until ... deeply into the cassette compartment with its v mark facing up. AC power adaptor (supplied) Inserting a cassette (p. 18) 1 Slide OPEN/EJECT in the direction of your camcorder outdoors (p. 11). Quick Start Guide This chapter introduces you to insert. 3 Close the cassette compartment by pressing the mark on the cassette compartment. Push the...
Connecting the power cord (p. 16) Use the battery pack when using your camcorder. Open the DC IN jack cover. Connect the plug with the window facing out. After the cassette compartment goes down completely, close the lid until ... deeply into the cassette compartment with its v mark facing up. AC power adaptor (supplied) Inserting a cassette (p. 18) 1 Slide OPEN/EJECT in the direction of your camcorder outdoors (p. 11). Quick Start Guide This chapter introduces you to insert. 3 Close the cassette compartment by pressing the mark on the cassette compartment. Push the...
Operating Instructions
Page 7
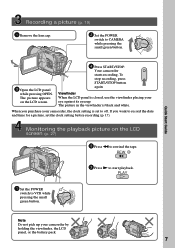
... Monitoring the playback picture on the LCD screen. 4 Press START/STOP. To stop recording, press START/STOP button again. Viewfinder When the LCD panel is closed, use the viewfinder placing your camcorder by holding the viewfinder, the LCD panel, or the battery pack. 7 If you...up your eye against its eyecup. PLAY OFCFR(CHG) 1 Set the POWER switch to CAMERA while pressing the small green button. Your camcorder starts recording. The picture in the viewfinder is set the clock setting before recording (p. 17). The picture appears on the LCD screen (p. 27) 2 Press m to...
... Monitoring the playback picture on the LCD screen. 4 Press START/STOP. To stop recording, press START/STOP button again. Viewfinder When the LCD panel is closed, use the viewfinder placing your camcorder by holding the viewfinder, the LCD panel, or the battery pack. 7 If you...up your eye against its eyecup. PLAY OFCFR(CHG) 1 Set the POWER switch to CAMERA while pressing the small green button. Your camcorder starts recording. The picture in the viewfinder is set the clock setting before recording (p. 17). The picture appears on the LCD screen (p. 27) 2 Press m to...
Operating Instructions
Page 8
...be contrary to 58 for illustration purposes. The DCR-TRV830 is indicated in "Advanced Playback Operations" on a TV, you can use the functions in the illustrations. Also, your digital camcorder, you can hear a beep sound to ...CAMERA. You, however, cannot use Hi8 /Digital8 video cassettes. Otherwise, the model name is the model used for playback in the table below. Unauthorized recording of difference DCRLCD screen TRV730 6.2 cm (2.5 type) TRV828 8.8 cm (3.5 type) TRV830 8.8 cm (3.5 type) Before using your camcorder With your camcorder plays back tapes recorded...
...be contrary to 58 for illustration purposes. The DCR-TRV830 is indicated in "Advanced Playback Operations" on a TV, you can use the functions in the illustrations. Also, your digital camcorder, you can hear a beep sound to ...CAMERA. You, however, cannot use Hi8 /Digital8 video cassettes. Otherwise, the model name is the model used for playback in the table below. Unauthorized recording of difference DCRLCD screen TRV730 6.2 cm (2.5 type) TRV828 8.8 cm (3.5 type) TRV830 8.8 cm (3.5 type) Before using your camcorder With your camcorder plays back tapes recorded...
Operating Instructions
Page 9
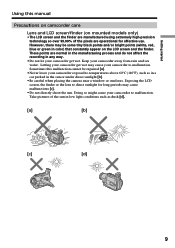
... Lens and LCD screen/finder (on the LCD screen and the finder. Keep your camcorder to malfunction. Letting your camcorder get wet may cause your camcorder get wet. Exposing the LCD screen, the finder or the lens to direct sunlight for effective use. Getting started Using this ...•The LCD screen and the finder are normal in the manufacturing process and do not affect the recording in the sun or under direct sunlight [b]. •Be careful when placing the camera near a window or outdoors. These points are manufactured using extremely high-precision technology so over 99.99...
... Lens and LCD screen/finder (on the LCD screen and the finder. Keep your camcorder to malfunction. Letting your camcorder get wet may cause your camcorder get wet. Exposing the LCD screen, the finder or the lens to direct sunlight for effective use. Getting started Using this ...•The LCD screen and the finder are normal in the manufacturing process and do not affect the recording in the sun or under direct sunlight [b]. •Be careful when placing the camera near a window or outdoors. These points are manufactured using extremely high-precision technology so over 99.99...
Operating Instructions
Page 10
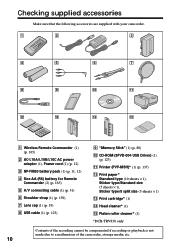
Checking supplied accessories Make sure that the following accessories are supplied with your camcorder. 1 2 3 4 5 6 7 8 9 0 qa qs qd qf qg 1 Wireless Remote Commander (1) (p. 165) 2 AC-L10A/L10B/L10C AC power adaptor (1), Power cord (1) (p. 12) 3 NP-FM50 battery.../Standard size (5 sheets × 1), Sticker type/9 split size (5 sheets × 1) qd Print cartridge* (1) qf Head cleaner* (1) qg Platen roller cleaner* (1) *DCR-TRV830 only Contents of the recording cannot be compensated if recording or playback is not made due to a malfunction of the camcorder, storage media, etc. 10
Checking supplied accessories Make sure that the following accessories are supplied with your camcorder. 1 2 3 4 5 6 7 8 9 0 qa qs qd qf qg 1 Wireless Remote Commander (1) (p. 165) 2 AC-L10A/L10B/L10C AC power adaptor (1), Power cord (1) (p. 12) 3 NP-FM50 battery.../Standard size (5 sheets × 1), Sticker type/9 split size (5 sheets × 1) qd Print cartridge* (1) qf Head cleaner* (1) qg Platen roller cleaner* (1) *DCR-TRV830 only Contents of the recording cannot be compensated if recording or playback is not made due to a malfunction of the camcorder, storage media, etc. 10
Operating Instructions
Page 11
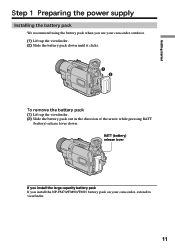
BATT (battery) release lever If you install the large capacity battery pack If you use your camcorder, extend its viewfinder. 11 Getting started Step 1 Preparing the power supply Installing the battery pack We recommend using the battery pack when you install the NP-FM70/FM90/FM91 battery pack on your camcorder outdoors. (1) Lift up the viewfinder. (2) Slide the battery pack down until it clicks. 1 2 To remove the battery pack (1) Lift up the viewfinder. (2) Slide the battery pack out in the direction of the arrow while pressing BATT (battery) release lever down.
BATT (battery) release lever If you install the large capacity battery pack If you use your camcorder, extend its viewfinder. 11 Getting started Step 1 Preparing the power supply Installing the battery pack We recommend using the battery pack when you install the NP-FM70/FM90/FM91 battery pack on your camcorder outdoors. (1) Lift up the viewfinder. (2) Slide the battery pack down until it clicks. 1 2 To remove the battery pack (1) Lift up the viewfinder. (2) Slide the battery pack out in the direction of the arrow while pressing BATT (battery) release lever down.
Operating Instructions
Page 12
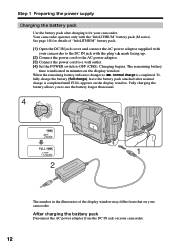
... adaptor. (3) Connect the power cord to a wall outlet. (4) Set the POWER switch to OFF (CHG). Charging begins. See page 148 for your camcorder to use the battery longer than usual. 4 V POWER 1 2 The number in minutes on the display window. When the remaining battery indicator changes to...indicated in the illustration of "InfoLITHIUM" battery pack. (1) Open the DC IN jack cover and connect the AC power adaptor supplied with your camcorder. OFCFR(CHG) E ERMAORY CAM M Step 1 Preparing the power supply Charging the battery pack Use the battery pack after normal charge is ...
... adaptor. (3) Connect the power cord to a wall outlet. (4) Set the POWER switch to OFF (CHG). Charging begins. See page 148 for your camcorder to use the battery longer than usual. 4 V POWER 1 2 The number in minutes on the display window. When the remaining battery indicator changes to...indicated in the illustration of "InfoLITHIUM" battery pack. (1) Open the DC IN jack cover and connect the AC power adaptor supplied with your camcorder. OFCFR(CHG) E ERMAORY CAM M Step 1 Preparing the power supply Charging the battery pack Use the battery pack after normal charge is ...
Operating Instructions
Page 13
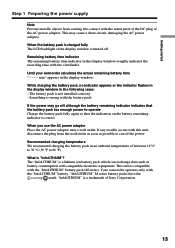
...recording time with the metal parts of the DC plug of between 10 °C to 30 °C (50 °F to operate Charge the battery pack fully again so that the battery pack has enough power to 86 °F). Your camcorder... operates only with compatible electronic equipment. Until your camcorder calculates the actual remaining battery time "- - - - If the power may cause a short-circuit,...the viewfinder. When the battery pack is charged fully The LCD backlight of Sony Corporation.
...recording time with the metal parts of the DC plug of between 10 °C to 30 °C (50 °F to operate Charge the battery pack fully again so that the battery pack has enough power to 86 °F). Your camcorder... operates only with compatible electronic equipment. Until your camcorder calculates the actual remaining battery time "- - - - If the power may cause a short-circuit,...the viewfinder. When the battery pack is charged fully The LCD backlight of Sony Corporation.
Operating Instructions
Page 14
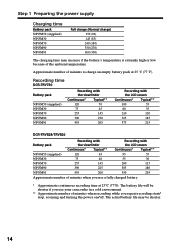
...low because of minutes when recording while you use a fully charged battery * Approximate continuous recording time at 25 ˚C (77 ˚F) Recording time DCR-TRV730 Battery pack NP-FM50 (supplied) NP-FM30 NP-FM70 NP-FM90 NP-FM91 Recording with the viewfinder Continuous* ...Recording with the viewfinder Recording with the LCD screen Continuous* Typical** Continuous* Typical** NP-FM50 (supplied) 120 65 95 55 NP-FM30 75 40 55 30 NP-FM70 255 145 200 115 NP-FM90 390 225 305 180 NP-FM91 455 260 350 205 Approximate number of minutes when you use your camcorder...
...low because of minutes when recording while you use a fully charged battery * Approximate continuous recording time at 25 ˚C (77 ˚F) Recording time DCR-TRV730 Battery pack NP-FM50 (supplied) NP-FM30 NP-FM70 NP-FM90 NP-FM91 Recording with the viewfinder Continuous* ...Recording with the viewfinder Recording with the LCD screen Continuous* Typical** Continuous* Typical** NP-FM50 (supplied) 120 65 95 55 NP-FM30 75 40 55 30 NP-FM70 255 145 200 115 NP-FM90 390 225 305 180 NP-FM91 455 260 350 205 Approximate number of minutes when you use your camcorder...
Operating Instructions
Page 15
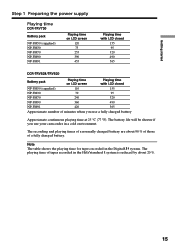
... 20 %. 15 Note The table shows the playing time for tapes recorded in a cold environment. The battery life will be shorter if you use your camcorder in the Digital8 system. Getting started Step 1 Preparing the power supply Playing time DCR-TRV730 Battery pack NP-FM50 (supplied) NP-FM30 NP-FM70 NP-FM90... NP-FM91 Playing time on LCD screen 120 75 255 390 455 Playing time with LCD closed 155 95 320 490 565 DCR-TRV828...
... 20 %. 15 Note The table shows the playing time for tapes recorded in a cold environment. The battery life will be shorter if you use your camcorder in the Digital8 system. Getting started Step 1 Preparing the power supply Playing time DCR-TRV730 Battery pack NP-FM50 (supplied) NP-FM30 NP-FM70 NP-FM90... NP-FM91 Playing time on LCD screen 120 75 255 390 455 Playing time with LCD closed 155 95 320 490 565 DCR-TRV828...
Operating Instructions
Page 16
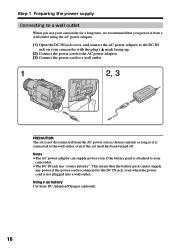
... outlet using the AC power adaptor. (1) Open the DC IN jack cover, and connect the AC power adaptor to the DC IN jack on your camcorder with the plug's v mark facing up. (2) Connect the power cord to the AC power adaptor. (3) Connect the power cord to a wall outlet. 1 2, 3 PRECAUTION ...The set itself has been turned off. Using a car battery Use Sony DC Adaptor/Charger (optional). 16 Step 1 Preparing the power supply Connecting to a wall outlet When you power it from the AC power source (house current...
... outlet using the AC power adaptor. (1) Open the DC IN jack cover, and connect the AC power adaptor to the DC IN jack on your camcorder with the plug's v mark facing up. (2) Connect the power cord to the AC power adaptor. (3) Connect the power cord to a wall outlet. 1 2, 3 PRECAUTION ...The set itself has been turned off. Using a car battery Use Sony DC Adaptor/Charger (optional). 16 Step 1 Preparing the power supply Connecting to a wall outlet When you power it from the AC power source (house current...

Operating Instructions
Page 17
If you do not set the year, then the month, the day, the hour and then the minute. (1) Set the POWER switch to CAMERA or MEMORY, and then press MENU to display the menu settings. (2) Turn the SEL/PUSH EXEC dial to select , then press the dial. (3) Turn the ... I NPUT LTR S I ZE L ANGUAGE DEMO MODE RETURN JUL 4 2001 5:30:00 PM [ MENU ] : END If you do not use your camcorder for noon. 17 First, set the date and time is recorded on a 12-hour cycle. •12:00 AM stands for midnight. •12:00 PM stands for the first time...
If you do not set the year, then the month, the day, the hour and then the minute. (1) Set the POWER switch to CAMERA or MEMORY, and then press MENU to display the menu settings. (2) Turn the SEL/PUSH EXEC dial to select , then press the dial. (3) Turn the ... I NPUT LTR S I ZE L ANGUAGE DEMO MODE RETURN JUL 4 2001 5:30:00 PM [ MENU ] : END If you do not use your camcorder for noon. 17 First, set the date and time is recorded on a 12-hour cycle. •12:00 AM stands for midnight. •12:00 PM stands for the first time...
Operating Instructions
Page 18
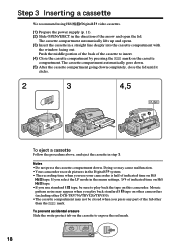
... accidental erasure Slide the write-protect tab on Hi8 tape. Doing so may cause malfunction. •Your camcorder records pictures in the Digital8 system. • The recording time when you use standard 8 tape, be closed when you press any part of the arrow and ...compartment by pressing the mark on other camcorders (including other than the mark. Step 3 Inserting a cassette We recommend using Hi8 /Digital8 video cassettes. (1) Prepare the power supply (p. 11). (2) Slide OPEN/EJECT in the direction of the lid other DCR-TRV730/TRV828/TRV830). •The cassette compartment ...
... accidental erasure Slide the write-protect tab on Hi8 tape. Doing so may cause malfunction. •Your camcorder records pictures in the Digital8 system. • The recording time when you use standard 8 tape, be closed when you press any part of the arrow and ...compartment by pressing the mark on other camcorders (including other than the mark. Step 3 Inserting a cassette We recommend using Hi8 /Digital8 video cassettes. (1) Prepare the power supply (p. 11). (2) Slide OPEN/EJECT in the direction of the lid other DCR-TRV730/TRV828/TRV830). •The cassette compartment ...
Operating Instructions
Page 19
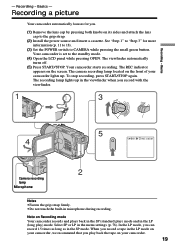
... the viewfinder. 1 3 V POWER OFCFR(CHG) E ERMAORY CAM M 5 4 40min SP REC 0:00:01 2 Camera recording lamp Microphone Notes •Fasten the grip strap firmly. •Do not touch the built-in the menu settings (p. 78). The recording lamp lights up . Recording a picture Your camcorder automatically focuses for more information (p. 11 to 18). (3) Set the POWER switch...
... the viewfinder. 1 3 V POWER OFCFR(CHG) E ERMAORY CAM M 5 4 40min SP REC 0:00:01 2 Camera recording lamp Microphone Notes •Fasten the grip strap firmly. •Do not touch the built-in the menu settings (p. 78). The recording lamp lights up . Recording a picture Your camcorder automatically focuses for more information (p. 11 to 18). (3) Set the POWER switch...
Operating Instructions
Page 20
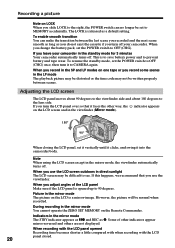
... it vertically until it clicks, and swing it to CAMERA again. Indicators in the LP mode The playback picture may be distorted or the time code may be normal when recorded. When recording with the LCD 20 panel closed. During recording in the mirror mode You cannot operate the ZERO SET... over so that you adjust angles of other way, the indicator appears on the LCD is released as z. When you record in the standby mode for 3 minutes Your camcorder automatically turns off . If this happens, we recommend that it faces the other indicators appear mirror-reversed and others are ...
... it vertically until it clicks, and swing it to CAMERA again. Indicators in the LP mode The playback picture may be distorted or the time code may be normal when recorded. When recording with the LCD 20 panel closed. During recording in the mirror mode You cannot operate the ZERO SET... over so that you adjust angles of other way, the indicator appears on the LCD is released as z. When you record in the standby mode for 3 minutes Your camcorder automatically turns off . If this happens, we recommend that it faces the other indicators appear mirror-reversed and others are ...

Operating Instructions
Page 23
...Super NightShot The NightShot function enables you use the backlight function. For example, you can satisfactorily record the environment of nocturnal animals for observation when you to shoot a subject in CAMERA or MEMORY mode, slide NIGHTSHOT to OFF. NIGHTSHOT OFF ON SUPER NIGHTSHOT NightShot Light emitter ...the screen. BACK LIGHT When you press EXPOSURE when shooting backlit subjects The backlight function will be canceled. The . Recording - Recording a picture Shooting backlit subjects - To cancel, press BACK LIGHT again. While your camcorder is in a dark place.
...Super NightShot The NightShot function enables you use the backlight function. For example, you can satisfactorily record the environment of nocturnal animals for observation when you to shoot a subject in CAMERA or MEMORY mode, slide NIGHTSHOT to OFF. NIGHTSHOT OFF ON SUPER NIGHTSHOT NightShot Light emitter ...the screen. BACK LIGHT When you press EXPOSURE when shooting backlit subjects The backlight function will be canceled. The . Recording - Recording a picture Shooting backlit subjects - To cancel, press BACK LIGHT again. While your camcorder is in a dark place.
Operating Instructions
Page 24
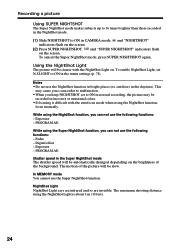
...). Exposure - and "NIGHTSHOT" indicators flash on the brightness of the picture will be recorded in CAMERA mode. To enable NightShot Light, set to ON in normal recording, the picture may cause your camcorder to malfunction. •When you can not use the following functions: - Fader -...in the daytime). Notes •Do not use the Super NightShot function. Digital effect - The motion of the background. To cancel the Super NightShot mode, press SUPER NIGHTSHOT again. Exposure - Recording a picture Using SUPER NIGHTSHOT The Super NightShot mode makes subjects up to...
...). Exposure - and "NIGHTSHOT" indicators flash on the brightness of the picture will be recorded in CAMERA mode. To enable NightShot Light, set to ON in normal recording, the picture may cause your camcorder to malfunction. •When you can not use the following functions: - Fader -...in the daytime). Notes •Do not use the Super NightShot function. Digital effect - The motion of the background. To cancel the Super NightShot mode, press SUPER NIGHTSHOT again. Exposure - Recording a picture Using SUPER NIGHTSHOT The Super NightShot mode makes subjects up to...
Operating Instructions
Page 26
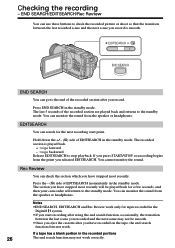
...go backward Release EDITSEARCH to stop playback. If a tape has a blank portion in the recorded portions 26 The end search function may not be played back for a few seconds, and then your camcorder will return to the end of EDITSEARCH momentarily in the standby mode. EDITSEARCH END SEARCH END ...SEARCH You can monitor the sound from the point you record. EDITSEARCH You can check the section which you have stopped most...
...go backward Release EDITSEARCH to stop playback. If a tape has a blank portion in the recorded portions 26 The end search function may not be played back for a few seconds, and then your camcorder will return to the end of EDITSEARCH momentarily in the standby mode. EDITSEARCH END SEARCH END ...SEARCH You can monitor the sound from the point you record. EDITSEARCH You can check the section which you have stopped most...


