Operating Instructions
Page 2
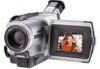
...sound quality. With your nearest Sony Service Center or Factory Service Center. You will soon be producing home video that you may call: Sony Customer Information Center 1-800-222SONY... of Conformity Trade Name: SONY Model No.: DCR-TRV730, DCRTRV828, DCR-TRV830 Responsible Party: Sony Electronics lnc. For the Sony Service Center nearest you call 416-499-SONY (Canada only) Caution: Do... two conditions: (1) This device may not cause harmful interference, and (2) this Sony Digital Handycam camcorder. Regulatory Information Declaration of the FCC Rules. Welcome! Note: In some areas ...
...sound quality. With your nearest Sony Service Center or Factory Service Center. You will soon be producing home video that you may call: Sony Customer Information Center 1-800-222SONY... of Conformity Trade Name: SONY Model No.: DCR-TRV730, DCRTRV828, DCR-TRV830 Responsible Party: Sony Electronics lnc. For the Sony Service Center nearest you call 416-499-SONY (Canada only) Caution: Do... two conditions: (1) This device may not cause harmful interference, and (2) this Sony Digital Handycam camcorder. Regulatory Information Declaration of the FCC Rules. Welcome! Note: In some areas ...
Operating Instructions
Page 5
... with analog video unit and your computer - Insert Editing 76 Customizing Your Camcorder Changing the menu settings 78 "Memory Stick" operations Using "Memory Stick"-introduction .......... 88 Recording still images on "Memory Stick"s - Memory PB ZOOM 129 Playing back images in the dark - NightShot/Super NightShot ...... 23 Self-timer recording 25 Checking the recording - Digital program editing...
... with analog video unit and your computer - Insert Editing 76 Customizing Your Camcorder Changing the menu settings 78 "Memory Stick" operations Using "Memory Stick"-introduction .......... 88 Recording still images on "Memory Stick"s - Memory PB ZOOM 129 Playing back images in the dark - NightShot/Super NightShot ...... 23 Self-timer recording 25 Checking the recording - Digital program editing...
Operating Instructions
Page 8
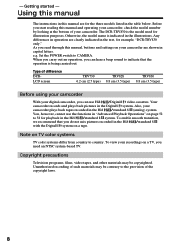
... operating your camcorder, check the model number by looking at the bottom of difference DCRLCD screen TRV730 6.2 cm (2.5 type) TRV828 8.8 cm (3.5 type) TRV830 8.8 cm (3.5 type) Before using your camcorder With your recordings on a TV, you do not mix pictures recorded in the ...use Hi8 /Digital8 video cassettes. Unauthorized recording of the copyright laws. 8 Copyright precautions Television programs, films, video tapes, and other materials may be copyrighted. The DCR-TRV830 is the model used for example, "DCR-TRV830 only." To view your digital camcorder, you read through ...
... operating your camcorder, check the model number by looking at the bottom of difference DCRLCD screen TRV730 6.2 cm (2.5 type) TRV828 8.8 cm (3.5 type) TRV830 8.8 cm (3.5 type) Before using your camcorder With your recordings on a TV, you do not mix pictures recorded in the ...use Hi8 /Digital8 video cassettes. Unauthorized recording of the copyright laws. 8 Copyright precautions Television programs, films, video tapes, and other materials may be copyrighted. The DCR-TRV830 is the model used for example, "DCR-TRV830 only." To view your digital camcorder, you read through ...
Operating Instructions
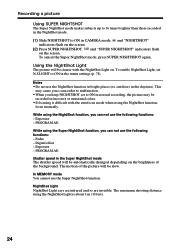
Page 24
and "NIGHTSHOT" indicators flash on the screen. To enable NightShot Light, set to ON in normal recording, the picture may cause your camcorder to malfunction. •When you keep NIGHTSHOT set N.S.LIGHT to ON in bright places (ex. This may be automatically changed depending ..., you can not use the following functions: - Digital effect - The motion of the background. Using the NightShot Light The picture will be recorded in the menu settings (p. 78). In MEMORY mode You cannot use the NightShot function in CAMERA mode. outdoors in the Super NightShot mode The shutter...
and "NIGHTSHOT" indicators flash on the screen. To enable NightShot Light, set to ON in normal recording, the picture may cause your camcorder to malfunction. •When you keep NIGHTSHOT set N.S.LIGHT to ON in bright places (ex. This may be automatically changed depending ..., you can not use the following functions: - Digital effect - The motion of the background. Using the NightShot Light The picture will be recorded in the menu settings (p. 78). In MEMORY mode You cannot use the NightShot function in CAMERA mode. outdoors in the Super NightShot mode The shutter...
Operating Instructions
Page 33
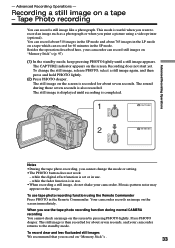
... minutes in use tape photo recording function using a video printer (optional). To change the mode or setting. •The PHOTO button does not work: - Your camcorder records an image on the screen. Tape Photo recording You can record about 510 images in the Remote Commander. Advanced Recording Operations - The sound during normal CAMERA recording You cannot check an image...
... minutes in use tape photo recording function using a video printer (optional). To change the mode or setting. •The PHOTO button does not work: - Your camcorder records an image on the screen. Tape Photo recording You can record about 510 images in the Remote Commander. Advanced Recording Operations - The sound during normal CAMERA recording You cannot check an image...
Operating Instructions
Page 38
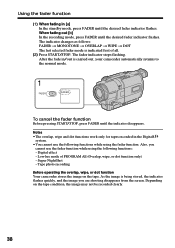
...Digital effect - The fader indicator stops flashing. After the fade in/out is being stored, the indicator flashes quickly, and the image you cannot use the following functions: - Low lux mode of all. (2) Press START/STOP. Tape photo recording Before operating the overlap, wipe, or dot function Your camcorder... stores the image on the tape condition, the image may not be recorded clearly. 38 Notes •The overlap, wipe and dot functions ...
...Digital effect - The fader indicator stops flashing. After the fade in/out is being stored, the indicator flashes quickly, and the image you cannot use the following functions: - Low lux mode of all. (2) Press START/STOP. Tape photo recording Before operating the overlap, wipe, or dot function Your camcorder... stores the image on the tape condition, the image may not be recorded clearly. 38 Notes •The overlap, wipe and dot functions ...

Operating Instructions
Page 40
... image with a moving image. Still image Moving image STILL Still image LUMI. LUMI. (LUMINANCEKEY) You can record the image so that it is left. OLD MOVIE You can record a still image so that an incidental image like a trail is superimposed on a moving image. STILL You...(FLASH MOTION) You can slow down the shutter speed. Using special effects - Your camcorder automatically sets the wide mode to ON, picture effect to recorded image using the various digital functions. Digital effect You can add special effects to SEPIA, and the appropriate shutter speed. The slow...
... image with a moving image. Still image Moving image STILL Still image LUMI. LUMI. (LUMINANCEKEY) You can record the image so that it is left. OLD MOVIE You can record a still image so that an incidental image like a trail is superimposed on a moving image. STILL You...(FLASH MOTION) You can slow down the shutter speed. Using special effects - Your camcorder automatically sets the wide mode to ON, picture effect to recorded image using the various digital functions. Digital effect You can add special effects to SEPIA, and the appropriate shutter speed. The slow...
Operating Instructions
Page 44
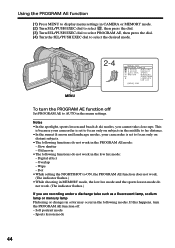
.... - Slow shutter - Notes •In the spotlight, sports lesson and beach & ski modes, you are recording under a discharge tube such as a fluorescent lamp, sodium lamp or mercury lamp Flickering or changes in color may .... (The indicator flashes.) If you cannot take close-ups. Digital effect - Using the PROGRAM AE function (1) Press MENU to display menu settings in CAMERA or MEMORY mode. (2) Turn SEL/PUSH EXEC dial to select...functions do not work in the low lux mode: - This is because your camcorder is set to focus only on subjects in the middle to far distance. •In the...
.... - Slow shutter - Notes •In the spotlight, sports lesson and beach & ski modes, you are recording under a discharge tube such as a fluorescent lamp, sodium lamp or mercury lamp Flickering or changes in color may .... (The indicator flashes.) If you cannot take close-ups. Digital effect - Using the PROGRAM AE function (1) Press MENU to display menu settings in CAMERA or MEMORY mode. (2) Turn SEL/PUSH EXEC dial to select...functions do not work in the low lux mode: - This is because your camcorder is set to focus only on subjects in the middle to far distance. •In the...
Operating Instructions
Page 53
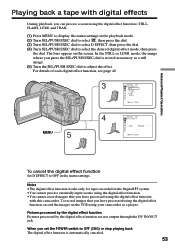
...jack. In the STILL or LUMI. For details of each digital effect function, see page 40. 3 MANUA L SET D EFFECT OFF ST I L [ MENU ] : END MENU 5 4 MANUA L SET D EFFECT L UMI . To record images that you have processed using your camcorder as a still image. (5) Turn the SEL/PUSH EXEC ...dial to OFF (CHG) or stop playing back The digital effect function is stored in the menu settings. When you set the POWER...
...jack. In the STILL or LUMI. For details of each digital effect function, see page 40. 3 MANUA L SET D EFFECT OFF ST I L [ MENU ] : END MENU 5 4 MANUA L SET D EFFECT L UMI . To record images that you have processed using your camcorder as a still image. (5) Turn the SEL/PUSH EXEC ...dial to OFF (CHG) or stop playing back The digital effect function is stored in the menu settings. When you set the POWER...

Operating Instructions
Page 60
...is connected, the right channel audio is output. With digital-to-digital connection, video and audio signals are transmitted in digital form for more information. (3) Set the POWER switch to VCR. (4) Play back the recorded tape on your camcorder. (5) Start recording on the VCR or the TV. With this connection..., you do not need to the S video jacks of both your camcorder and the VCR....
...is connected, the right channel audio is output. With digital-to-digital connection, video and audio signals are transmitted in digital form for more information. (3) Set the POWER switch to VCR. (4) Play back the recorded tape on your camcorder. (5) Start recording on the VCR or the TV. With this connection..., you do not need to the S video jacks of both your camcorder and the VCR....
Operating Instructions
Page 62
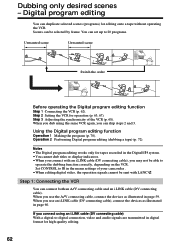
... you connect with LANC . Step 2 Setting the VCR for high-quality editing. 62 You can duplicate selected scenes (programs) for tapes recorded in the Digital8 system. •You cannot dub titles or display indicators. •When you use an i.LINK cable (DV connecting cable...63, 67). Scenes can be able to IR in the menu settings of the VCR (p. 68). Step 3 Adjusting the synchronicity of your camcorder . •When editing digital video, the operation signals cannot be sent with an i.LINK cable (DV connecting cable), you use the A/V connecting cable, connect the devices as...
... you connect with LANC . Step 2 Setting the VCR for high-quality editing. 62 You can duplicate selected scenes (programs) for tapes recorded in the Digital8 system. •You cannot dub titles or display indicators. •When you use an i.LINK cable (DV connecting cable...63, 67). Scenes can be able to IR in the menu settings of the VCR (p. 68). Step 3 Adjusting the synchronicity of your camcorder . •When editing digital video, the operation signals cannot be sent with an i.LINK cable (DV connecting cable), you use the A/V connecting cable, connect the devices as...
Operating Instructions
Page 63
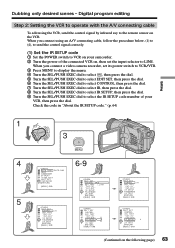
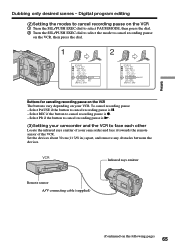
... " CUT-OUT " I R SETUP P AUS EMODE I T SET CONTROL ADJ TEST " CUT- Dubbing only desired scenes - Digital program editing Step 2: Setting the VCR to operate with the A/V connecting cable To edit using an A/V connecting cable, follow the ... (1) Set the IR SETUP code 1 Set the POWER switch to VCR on your camcorder. 2 Turn the power of the connected VCR on, then set its power switch ... dial to select the IR SETUP code number of your VCR, then press the dial. When you connect a video camera recorder, set the input selector to the remote sensor on the following page) 63 I N " " CUT-OUT ...
... " CUT-OUT " I R SETUP P AUS EMODE I T SET CONTROL ADJ TEST " CUT- Dubbing only desired scenes - Digital program editing Step 2: Setting the VCR to operate with the A/V connecting cable To edit using an A/V connecting cable, follow the ... (1) Set the IR SETUP code 1 Set the POWER switch to VCR on your camcorder. 2 Turn the power of the connected VCR on, then set its power switch ... dial to select the IR SETUP code number of your VCR, then press the dial. When you connect a video camera recorder, set the input selector to the remote sensor on the following page) 63 I N " " CUT-OUT ...
Operating Instructions
Page 64
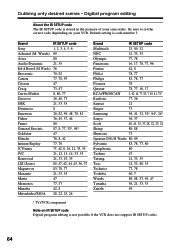
Brand IR SETUP code Sony 1, 2, 3, 4, 5, 6 Admiral (M. Wards) 89 Aiwa 80 Audio Dynamic 21, 35 Bell & Howell (M. Be sure to set the correct code depending on IR SETUP code Digital program editing is stored in the memory of your VCR. Digital program editing About the IR SETUP code The IR SETUP code ... 77, 78 Toshiba 40, 7 Wards 89, 88, 37, 95, 47 Yamaha 36, 21, 33, 35 Zenith 95 * TV/VCR component Note on your camcorder. Default setting is code number 3. Wards) 36 Brocsonic 70, 82 Canon 77, 78, 97 Citizen 47 Craig 73, 47 Curtis Mathis 8, 80, 77 Daewoo ...
Brand IR SETUP code Sony 1, 2, 3, 4, 5, 6 Admiral (M. Wards) 89 Aiwa 80 Audio Dynamic 21, 35 Bell & Howell (M. Be sure to set the correct code depending on IR SETUP code Digital program editing is stored in the memory of your VCR. Digital program editing About the IR SETUP code The IR SETUP code ... 77, 78 Toshiba 40, 7 Wards 89, 88, 37, 95, 47 Yamaha 36, 21, 33, 35 Zenith 95 * TV/VCR component Note on your camcorder. Default setting is code number 3. Wards) 36 Brocsonic 70, 82 Canon 77, 78, 97 Citizen 47 Craig 73, 47 Curtis Mathis 8, 80, 77 Daewoo ...
Operating Instructions
Page 65
Digital program editing (2) Setting the modes to cancel recording pause on the VCR, then press the dial. 1 2 OTHERS ED I T SET CONTROL ADJ TEST " CUT- To cancel recording pause: - Select PB if the button to cancel recording pause is N. (3) Setting your camcorder and the VCR to cancel recording ... sensor A/V connecting cable (supplied) (Continued on your camcorder and face it towards the remote sensor of your VCR. I N " " CUT-OUT " I R SETUP P AUS EMODE P AUS E I R TEST RETURN [ MENU ] : END Buttons for canceling recording pause on the VCR The buttons vary depending on the...
Digital program editing (2) Setting the modes to cancel recording pause on the VCR, then press the dial. 1 2 OTHERS ED I T SET CONTROL ADJ TEST " CUT- To cancel recording pause: - Select PB if the button to cancel recording pause is N. (3) Setting your camcorder and the VCR to cancel recording ... sensor A/V connecting cable (supplied) (Continued on your camcorder and face it towards the remote sensor of your VCR. I N " " CUT-OUT " I R SETUP P AUS EMODE P AUS E I R TEST RETURN [ MENU ] : END Buttons for canceling recording pause on the VCR The buttons vary depending on the...
Operating Instructions
Page 66
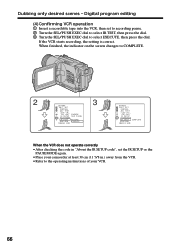
... CUT- I N " " CUT-OUT " I R SETUP P AUS EMODE I T SET CONTROL ADJ TEST " CUT- Digital program editing (4) Confirming VCR operation 1 Insert a recordable tape into the VCR, then set the IR SETUP or the PAUSEMODE again. •Place your camcorder at least 30 cm (11 7/8 in.) away from the VCR. •Refer to the... operating instructions of your VCR. 66 If the VCR starts recording, the setting is correct. When finished, the indicator on the screen...
... CUT- I N " " CUT-OUT " I R SETUP P AUS EMODE I T SET CONTROL ADJ TEST " CUT- Digital program editing (4) Confirming VCR operation 1 Insert a recordable tape into the VCR, then set the IR SETUP or the PAUSEMODE again. •Place your camcorder at least 30 cm (11 7/8 in.) away from the VCR. •Refer to the... operating instructions of your VCR. 66 If the VCR starts recording, the setting is correct. When finished, the indicator on the screen...
Operating Instructions
Page 67
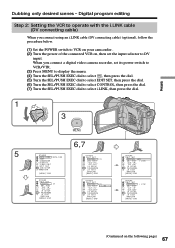
... Step 2: Setting the VCR to operate with the i.LINK cable (DV connecting cable) When you connect a digital video camera recorder, set the input selector to VCR on your camcorder . (2) Turn the power of the connected VCR on the following page) 67 When you connect using an i.LINK cable (DV connecting cable) (optional), follow the ...
... Step 2: Setting the VCR to operate with the i.LINK cable (DV connecting cable) When you connect a digital video camera recorder, set the input selector to VCR on your camcorder . (2) Turn the power of the connected VCR on the following page) 67 When you connect using an i.LINK cable (DV connecting cable) (optional), follow the ...
Operating Instructions
Page 68
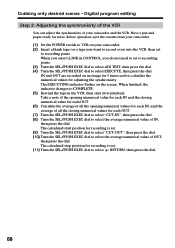
... start slow playback. Digital program editing Step 3: Adjusting the synchronicity of the VCR You can adjust the synchronicity of IN, then press the dial. IN and OUT are recorded on an image for 5 times each to recording pause. Before operation, eject the cassette from your camcorder and the VCR. Have... stop position for each IN, and the average of all the closing numerical values for recording is set . (11) Turn the SEL/PUSH EXEC dial to select the average numerical value of your camcorder. (1) Set the POWER swtich to VCR on the screen. Dubbing only desired scenes -...
... start slow playback. Digital program editing Step 3: Adjusting the synchronicity of the VCR You can adjust the synchronicity of IN, then press the dial. IN and OUT are recorded on an image for 5 times each to recording pause. Before operation, eject the cassette from your camcorder and the VCR. Have... stop position for each IN, and the average of all the closing numerical values for recording is set . (11) Turn the SEL/PUSH EXEC dial to select the average numerical value of your camcorder. (1) Set the POWER swtich to VCR on the screen. Dubbing only desired scenes -...
Operating Instructions
Page 70
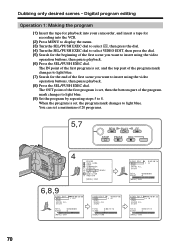
Digital program editing Operation 1: Making the program (1) Insert the tape for playback into your camcorder, and insert a tape for recording into the VCR. (2) Press MENU to display the menu. (3) Turn the SEL/PUSH EXEC dial to select , then press the dial. (4) Turn the SEL/PUSH EXEC dial to select VIDEO ... first program is set a maximum of the program mark changes to light blue. (9) Set the program by repeating steps 5 to insert using the video operation buttons, then pause playback. (6) Press the SEL/PUSH EXEC dial. Dubbing only desired scenes - You can set , then the bottom part...
Digital program editing Operation 1: Making the program (1) Insert the tape for playback into your camcorder, and insert a tape for recording into the VCR. (2) Press MENU to display the menu. (3) Turn the SEL/PUSH EXEC dial to select , then press the dial. (4) Turn the SEL/PUSH EXEC dial to select VIDEO ... first program is set a maximum of the program mark changes to light blue. (9) Set the program by repeating steps 5 to insert using the video operation buttons, then pause playback. (6) Press the SEL/PUSH EXEC dial. Dubbing only desired scenes - You can set , then the bottom part...
Operating Instructions
Page 72
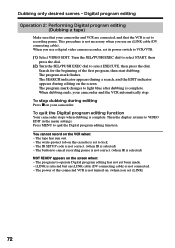
... selected) - When dubbing ends, your camcorder and VCR are connected, and that your camcorder and the VCR automatically stop dubbing during editing on the cassette is complete. The program mark changes to quit the Digital program editing function. The program to recording pause. When you use a digital video camera recorder, set to operate Digital program editing has not yet...
... selected) - When dubbing ends, your camcorder and VCR are connected, and that your camcorder and the VCR automatically stop dubbing during editing on the cassette is complete. The program mark changes to quit the Digital program editing function. The program to recording pause. When you use a digital video camera recorder, set to operate Digital program editing has not yet...
Operating Instructions
Page 73
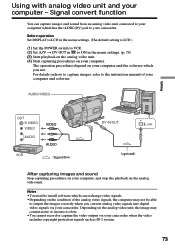
... or incorrect colors. •You cannot record or capture the video output via your computer. For details on the condition of your camcorder when the video includes copyright protection signals such as ID-2 system. 73 Notes •You need to install software which you convert analog video signals into digital video signals via your computer and software.
... or incorrect colors. •You cannot record or capture the video output via your computer. For details on the condition of your camcorder when the video includes copyright protection signals such as ID-2 system. 73 Notes •You need to install software which you convert analog video signals into digital video signals via your computer and software.


