Operating Instructions
Page 3
... 15 of FCC Rules. This equipment generates, uses, and can be used in accordance with the limits for a Class B digital device, pursuant to radio communications. Reorient or relocate the receiving antenna. - Consult the dealer or an experienced radio/TV technician ...for help. These limits are cautioned that may cause undesired operation. Operation is connected. - "Memory Stick" This Class B digital apparatus complies with Part15 of the following two conditions: (1) This device may not cause harmful interference, and (2) this device...
... 15 of FCC Rules. This equipment generates, uses, and can be used in accordance with the limits for a Class B digital device, pursuant to radio communications. Reorient or relocate the receiving antenna. - Consult the dealer or an experienced radio/TV technician ...for help. These limits are cautioned that may cause undesired operation. Operation is connected. - "Memory Stick" This Class B digital apparatus complies with Part15 of the following two conditions: (1) This device may not cause harmful interference, and (2) this device...
Operating Instructions
Page 4
... a tape (p. 27) • Recording still images or moving pictures on "Memory Stick" (p. 97, 104) • Viewing a still image or a moving picture recorded on "Memory Stick" (p. 117, 120) Capturing images on your computer • Using with analog video unit and your computer (p. 73) ... effect (p. 39) • Digital effect (p. 40) • Title (p. 47, 49) • MEMORY MIX (p. 110) Functions to give a natural appearance to your recordings • END SEARCH/EDITSEARCH/Rec Review (p. 26) • Manual focus (p. 46) Functions to use after recording • Zero set memory (p. 55) • HiFi ...
... a tape (p. 27) • Recording still images or moving pictures on "Memory Stick" (p. 97, 104) • Viewing a still image or a moving picture recorded on "Memory Stick" (p. 117, 120) Capturing images on your computer • Using with analog video unit and your computer (p. 73) ... effect (p. 39) • Digital effect (p. 40) • Title (p. 47, 49) • MEMORY MIX (p. 110) Functions to give a natural appearance to your recordings • END SEARCH/EDITSEARCH/Rec Review (p. 26) • Manual focus (p. 46) Functions to use after recording • Zero set memory (p. 55) • HiFi ...
Operating Instructions
Page 5
...a tape with picture effects ..... 52 Playing back a tape with analog video unit and your computer - Digital program editing 62 Using with digital effects ...... 53 Enlarging recorded images - Memory Photo recording 97 Recording an image from a VCR - PRINT MARK ...... 136 Using the external...the parts and controls 159 Index 167 5 Signal convert function ..... 73 Recording video or TV programs 74 Inserting a scene from a tape as a still image 102 Recording moving pictures on "Memory Stick"s - Memory Photo playback 117 Viewing a moving pictures from a tape - Date ...
...a tape with picture effects ..... 52 Playing back a tape with analog video unit and your computer - Digital program editing 62 Using with digital effects ...... 53 Enlarging recorded images - Memory Photo recording 97 Recording an image from a VCR - PRINT MARK ...... 136 Using the external...the parts and controls 159 Index 167 5 Signal convert function ..... 73 Recording video or TV programs 74 Inserting a scene from a tape as a still image 102 Recording moving pictures on "Memory Stick"s - Memory Photo playback 117 Viewing a moving pictures from a tape - Date ...
Operating Instructions
Page 10
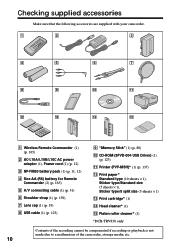
... battery for Remote Commander (2) (p. 165) 5 A/V connecting cable (1) (p. 31) 6 Shoulder strap (1) (p. 159) 7 Lens cap (1) (p. 19) 8 USB cable (1) (p. 123) 9 "Memory Stick" (1) (p. 88) 0 CD-ROM (SPVD-004 USB Driver) (1) (p. 123) qa Printer (PVP-MSH)* (1) (p. 137) qs Print paper* Standard type (10 sheets × 1), ... type/9 split size (5 sheets × 1) qd Print cartridge* (1) qf Head cleaner* (1) qg Platen roller cleaner* (1) *DCR-TRV830 only Contents of the recording cannot be compensated if recording or playback is not made due to a malfunction of the camcorder, storage media, etc. 10
... battery for Remote Commander (2) (p. 165) 5 A/V connecting cable (1) (p. 31) 6 Shoulder strap (1) (p. 159) 7 Lens cap (1) (p. 19) 8 USB cable (1) (p. 123) 9 "Memory Stick" (1) (p. 88) 0 CD-ROM (SPVD-004 USB Driver) (1) (p. 123) qa Printer (PVP-MSH)* (1) (p. 137) qs Print paper* Standard type (10 sheets × 1), ... type/9 split size (5 sheets × 1) qd Print cartridge* (1) qf Head cleaner* (1) qg Platen roller cleaner* (1) *DCR-TRV830 only Contents of the recording cannot be compensated if recording or playback is not made due to a malfunction of the camcorder, storage media, etc. 10

Operating Instructions
Page 17
... then the month, the day, the hour and then the minute. (1) Set the POWER switch to CAMERA or MEMORY, and then press MENU to display the menu settings. (2) Turn the SEL/PUSH EXEC dial to select...SEL/PUSH EXEC dial to select CLOCK SET, then press the dial. (4) Turn the SEL/PUSH EXEC dial to CAMERA or MEMORY unless you set the date and time settings. The clock starts to move. (7) Press MENU to make the ... : END If you do not use your camcorder for noon. 17 First, set the date and time is recorded on a 12-hour cycle. •12:00 AM stands for midnight. •12:00 PM stands for the...
... then the month, the day, the hour and then the minute. (1) Set the POWER switch to CAMERA or MEMORY, and then press MENU to display the menu settings. (2) Turn the SEL/PUSH EXEC dial to select...SEL/PUSH EXEC dial to select CLOCK SET, then press the dial. (4) Turn the SEL/PUSH EXEC dial to CAMERA or MEMORY unless you set the date and time settings. The clock starts to move. (7) Press MENU to make the ... : END If you do not use your camcorder for noon. 17 First, set the date and time is recorded on a 12-hour cycle. •12:00 AM stands for midnight. •12:00 PM stands for the...
Operating Instructions
Page 20
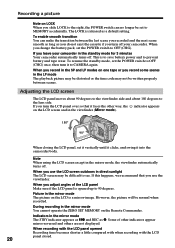
...we recommend that it faces the other indicators appear mirror-reversed and others are not displayed. During recording in the mirror mode You cannot operate the ZERO SET MEMORY on one tape or you record some scenes in the viewfinder (Mirror mode). 180° 90° When closing the LCD ...power and to prevent battery and tape wear. When you change the battery pack, set to MEMORY accidentally. To resume the standby mode, set it vertically until it clicks, and swing it to CAMERA again. When you use the viewfinder. If you leave your camcorder. Indicators in the mirror...
...we recommend that it faces the other indicators appear mirror-reversed and others are not displayed. During recording in the mirror mode You cannot operate the ZERO SET MEMORY on one tape or you record some scenes in the viewfinder (Mirror mode). 180° 90° When closing the LCD ...power and to prevent battery and tape wear. When you change the battery pack, set to MEMORY accidentally. To resume the standby mode, set it vertically until it clicks, and swing it to CAMERA again. When you use the viewfinder. If you leave your camcorder. Indicators in the mirror...
Operating Instructions
Page 21
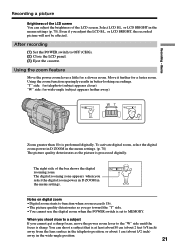
... it further for a slower zoom. W T The digital zooming zone appears when you adjust the LCD B.L. or LCD BRIGHT, the recorded picture will not be affected. After recording (1) Set the POWER switch to MEMORY. You can adjust the brightness of the LCD screen.... little for a faster zoom. When you shoot close to the "W" side until the focus is processed digitally. Basics Recording a picture Brightness of the bar shows the digital zooming zone. Select LCD B.L. Recording - "T" side: for telephoto (subject appears closer) "W" side: for wide-angle (subject appears farther ...
... it further for a slower zoom. W T The digital zooming zone appears when you adjust the LCD B.L. or LCD BRIGHT, the recorded picture will not be affected. After recording (1) Set the POWER switch to MEMORY. You can adjust the brightness of the LCD screen.... little for a faster zoom. When you shoot close to the "W" side until the focus is processed digitally. Basics Recording a picture Brightness of the bar shows the digital zooming zone. Select LCD B.L. Recording - "T" side: for telephoto (subject appears closer) "W" side: for wide-angle (subject appears farther ...
Operating Instructions
Page 22
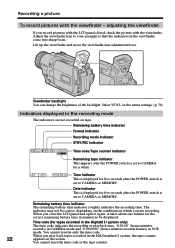
...mode. Viewfinder backlight You can change the brightness of the backlight. When you play back tapes recorded in minutes to CAMERA or MEMORY. Remaining battery time indicator Format indicator Recording mode indicator STBY/REC indicator 40min SP REC 0:00:01 Time code/Tape counter indicator Remaining...indicator This appears after the POWER switch is set to CAMERA or MEMORY. The indicator may not be displayed. adjusting the viewfinder If you are not recorded on the conditions in the recording mode The indicators are recording. Date indicator This is displayed for five seconds after...
...mode. Viewfinder backlight You can change the brightness of the backlight. When you play back tapes recorded in minutes to CAMERA or MEMORY. Remaining battery time indicator Format indicator Recording mode indicator STBY/REC indicator 40min SP REC 0:00:01 Time code/Tape counter indicator Remaining...indicator This appears after the POWER switch is set to CAMERA or MEMORY. The indicator may not be displayed. adjusting the viewfinder If you are not recorded on the conditions in the recording mode The indicators are recording. Date indicator This is displayed for five seconds after...

Operating Instructions
Page 23
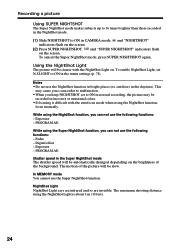
... OFF ON SUPER NIGHTSHOT NightShot Light emitter 23 Press BACK LIGHT in CAMERA or MEMORY mode, slide NIGHTSHOT to OFF. The . To cancel, press BACK LIGHT again. For example, you can satisfactorily record the environment of nocturnal animals for observation when you shoot a subject ...with the light source behind the subject or a subject with a light background, use this function. Recording a picture Shooting backlit subjects - indicator appears on the screen. Basics BACK LIGHT If you to shoot a subject in the dark - While your camcorder is in CAMERA or MEMORY mode.
... OFF ON SUPER NIGHTSHOT NightShot Light emitter 23 Press BACK LIGHT in CAMERA or MEMORY mode, slide NIGHTSHOT to OFF. The . To cancel, press BACK LIGHT again. For example, you can satisfactorily record the environment of nocturnal animals for observation when you shoot a subject ...with the light source behind the subject or a subject with a light background, use this function. Recording a picture Shooting backlit subjects - indicator appears on the screen. Basics BACK LIGHT If you to shoot a subject in the dark - While your camcorder is in CAMERA or MEMORY mode.
Operating Instructions
Page 24
...Digital effect - PROGRAM AE Shutter speed in the Super NightShot mode The shutter speed will be recorded in incorrect or unnatural colors. •If focusing is about 3 m (10 feet). 24 The maximum shooting distance using the NightShot function, you keep NIGHTSHOT set N.S.LIGHT to ON in CAMERA ...NIGHTSHOT. To enable NightShot Light, set to ON in normal recording, the picture may cause your camcorder to malfunction. •When you can not use the following functions: - This may be slow. Exposure - In MEMORY mode You cannot use the NightShot function in bright places (ex...
...Digital effect - PROGRAM AE Shutter speed in the Super NightShot mode The shutter speed will be recorded in incorrect or unnatural colors. •If focusing is about 3 m (10 feet). 24 The maximum shooting distance using the NightShot function, you keep NIGHTSHOT set N.S.LIGHT to ON in CAMERA ...NIGHTSHOT. To enable NightShot Light, set to ON in normal recording, the picture may cause your camcorder to malfunction. •When you can not use the following functions: - This may be slow. Exposure - In MEMORY mode You cannot use the NightShot function in bright places (ex...

Operating Instructions
Page 25
...START/STOP START/STOP 2-4 CAMERA SET SE L F T I MER OF F D ZOOM ON 1 6 : 9W I GHT F L A SH MODE FLASH LVL RETURN [ MENU ] : END 1,5 MENU To stop the countdown Press START/STOP. You can also record still images on "Memory Stick"s with a beep sound. To record still images using the self...-timer Press PHOTO in step 6. (p. 34) To cancel self-timer recording Set SELFTIMER to OFF in the menu settings in 10 seconds ...
...START/STOP START/STOP 2-4 CAMERA SET SE L F T I MER OF F D ZOOM ON 1 6 : 9W I GHT F L A SH MODE FLASH LVL RETURN [ MENU ] : END 1,5 MENU To stop the countdown Press START/STOP. You can also record still images on "Memory Stick"s with a beep sound. To record still images using the self...-timer Press PHOTO in step 6. (p. 34) To cancel self-timer recording Set SELFTIMER to OFF in the menu settings in 10 seconds ...
Operating Instructions
Page 33
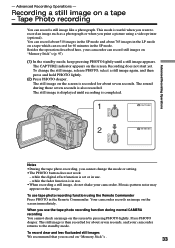
... tape - The sound during normal CAMERA recording You cannot check an image on the image. Tape Photo recording You can record still images on "Memory Stick"s . 33 Advanced Recording Operations - Recording does not start yet. To use the tape photo recording function during those seven seconds is... again, and then press and hold PHOTO lightly. (2) Press PHOTO deeper. while the digital effect function is completed. 1 CAPTURE PHOTO 2 PHOTO Notes •During the tape photo recording, you print a picture using the Remote Commander Press PHOTO in the LP mode on ...
... tape - The sound during normal CAMERA recording You cannot check an image on the image. Tape Photo recording You can record still images on "Memory Stick"s . 33 Advanced Recording Operations - Recording does not start yet. To use the tape photo recording function during those seven seconds is... again, and then press and hold PHOTO lightly. (2) Press PHOTO deeper. while the digital effect function is completed. 1 CAPTURE PHOTO 2 PHOTO Notes •During the tape photo recording, you print a picture using the Remote Commander Press PHOTO in the LP mode on ...
Operating Instructions
Page 41
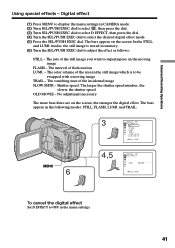
...EFFECT L UMI . IIIIIIII [ MENU ] : END To cancel the digital effect Set D EFFECT to OFF in memory. (6) Turn the SEL/PUSH EXEC dial to adjust the effect as follows: STILL - Advanced Recording Operations Using special effects - The rate of flash motion LUMI. - ...modes, the still image is to select the desired digital effect mode. (5) Press the SEL/PUSH EXEC dial. The vanishing time of the area in the still image which is stored in the menu settings. 41 The bars appear in CAMERA...
...EFFECT L UMI . IIIIIIII [ MENU ] : END To cancel the digital effect Set D EFFECT to OFF in memory. (6) Turn the SEL/PUSH EXEC dial to adjust the effect as follows: STILL - Advanced Recording Operations Using special effects - The rate of flash motion LUMI. - ...modes, the still image is to select the desired digital effect mode. (5) Press the SEL/PUSH EXEC dial. The vanishing time of the area in the still image which is stored in the menu settings. 41 The bars appear in CAMERA...
Operating Instructions
Page 44
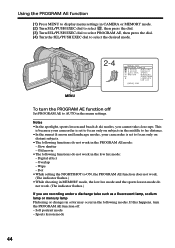
Using the PROGRAM AE function (1) Press MENU to display menu settings in CAMERA or MEMORY mode. (2) Turn SEL/PUSH EXEC dial to select , then press ...8226;The following functions do not work in MEMORY mode, the low lux mode and the sports lesson mode do not work . (The indicator flashes.) If you cannot take close-ups. Digital effect - Overlap - Soft portrait mode ... AE mode: - Wipe - Notes •In the spotlight, sports lesson and beach & ski modes, you are recording under a discharge tube such as a fluorescent lamp, sodium lamp or mercury lamp Flickering or changes in color may occur...
Using the PROGRAM AE function (1) Press MENU to display menu settings in CAMERA or MEMORY mode. (2) Turn SEL/PUSH EXEC dial to select , then press ...8226;The following functions do not work in MEMORY mode, the low lux mode and the sports lesson mode do not work . (The indicator flashes.) If you cannot take close-ups. Digital effect - Overlap - Soft portrait mode ... AE mode: - Wipe - Notes •In the spotlight, sports lesson and beach & ski modes, you are recording under a discharge tube such as a fluorescent lamp, sodium lamp or mercury lamp Flickering or changes in color may occur...
Operating Instructions
Page 45
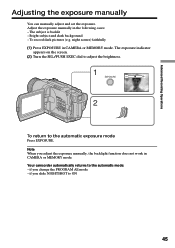
... to adjust the brightness. 1 EXPOSURE 2 To return to the automatic mode: - To record dark pictures (e.g. Adjust the exposure manually in CAMERA or MEMORY mode. Note When you adjust the exposure manually, the backlight function does not work in CAMERA or MEMORY mode. Advanced Recording Operations Adjusting the exposure manually You can manually adjust and set the...
... to adjust the brightness. 1 EXPOSURE 2 To return to the automatic mode: - To record dark pictures (e.g. Adjust the exposure manually in CAMERA or MEMORY mode. Note When you adjust the exposure manually, the backlight function does not work in CAMERA or MEMORY mode. Advanced Recording Operations Adjusting the exposure manually You can manually adjust and set the...
Operating Instructions
Page 46
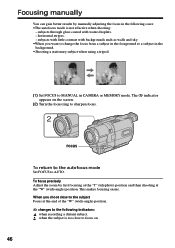
...subject Focus at the "W" (wide-angle) position. To focus precisely Adjust the zoom by manually adjusting the focus in the following indicators: when recording a distant subject. when the subject is not effective when shooting: - Focusing manually You can gain better results by first focusing at the "T"...focus on the screen. (2) Turn the focus ring to sharpen focus. 2 FOCUS To return to the autofocus mode Set FOCUS to MANUAL in CAMERA or MEMORY mode. When you want to change the focus from a subject in the foreground to a subject in the background. •Shooting a stationary ...
...subject Focus at the "W" (wide-angle) position. To focus precisely Adjust the zoom by manually adjusting the focus in the following indicators: when recording a distant subject. when the subject is not effective when shooting: - Focusing manually You can gain better results by first focusing at the "T"...focus on the screen. (2) Turn the focus ring to sharpen focus. 2 FOCUS To return to the autofocus mode Set FOCUS to MANUAL in CAMERA or MEMORY mode. When you want to change the focus from a subject in the foreground to a subject in the background. •Shooting a stationary ...
Operating Instructions
Page 49
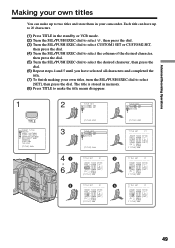
Advanced Recording Operations - HAPPY B I RTHDAY HAPPY HOL I DAYS CONGRATUL AT I T LE ] : END 49 The title is stored in your own titles, turn the SEL/PUSH EXEC dial ... characters and completed the title. (7) To finish making your camcorder. Making your own titles You can have up to two titles and store them in memory. (8) Press TITLE to make up to 20 characters. (1) Press TITLE in the standby or VCR mode. (2) Turn the SEL/PUSH EXEC dial to select , then...
Advanced Recording Operations - HAPPY B I RTHDAY HAPPY HOL I DAYS CONGRATUL AT I T LE ] : END 49 The title is stored in your own titles, turn the SEL/PUSH EXEC dial ... characters and completed the title. (7) To finish making your camcorder. Making your own titles You can have up to two titles and store them in memory. (8) Press TITLE to make up to 20 characters. (1) Press TITLE in the standby or VCR mode. (2) Turn the SEL/PUSH EXEC dial to select , then...

Operating Instructions
Page 50
Making your camcorder does not automatically turn it to CAMERA again, then proceed from step 1. Turn the SEL/PUSH EXEC dial to select [C], then press the dial to return To erase a character Select [C]. Set the ... you select [ ] The menu for selecting alphabet and Russian characters appear. If you want to enter characters in the standby mode while a cassette is in memory. Enter the new title as desired. The last character is erased. The last character is erased. If you take 3 minutes or longer to change a title...
Making your camcorder does not automatically turn it to CAMERA again, then proceed from step 1. Turn the SEL/PUSH EXEC dial to select [C], then press the dial to return To erase a character Select [C]. Set the ... you select [ ] The menu for selecting alphabet and Russian characters appear. If you want to enter characters in the standby mode while a cassette is in memory. Enter the new title as desired. The last character is erased. The last character is erased. If you take 3 minutes or longer to change a title...
Operating Instructions
Page 51
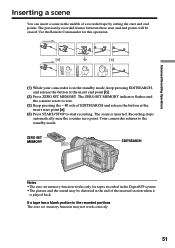
... insert end point [b]. (2) Press ZERO SET MEMORY. If a tape has a blank portion in the recorded portions The zero set memory function works only for this operation. [a] [b] (1) While your camcorder is inserted. Recording stops automatically near the counter zero point. ZERO SET MEMORY EDITSEARCH Notes •The zero set memory function may be erased. The ZERO SET...
... insert end point [b]. (2) Press ZERO SET MEMORY. If a tape has a blank portion in the recorded portions The zero set memory function works only for this operation. [a] [b] (1) While your camcorder is inserted. Recording stops automatically near the counter zero point. ZERO SET MEMORY EDITSEARCH Notes •The zero set memory function may be erased. The ZERO SET...
Operating Instructions
Page 53
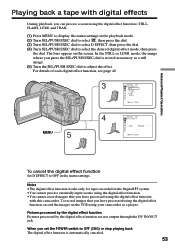
...dial to select D EFFECT, then press the dial. (4) Turn SEL/PUSH EXEC dial to OFF (CHG) or stop playing back The digital effect function is stored in memory as a player. TRA I LL F L ASH L UMI . Advanced Playback Operations Playing back a tape with this camcorder. The ...;You cannot process externally input scenes using the digital effect function. •You cannot record images that you have processed using the digital effect functions: STILL, FLASH, LUMI. When you can process a scene using the digital effect function with digital effects During playback, you set the POWER switch...
...dial to select D EFFECT, then press the dial. (4) Turn SEL/PUSH EXEC dial to OFF (CHG) or stop playing back The digital effect function is stored in memory as a player. TRA I LL F L ASH L UMI . Advanced Playback Operations Playing back a tape with this camcorder. The ...;You cannot process externally input scenes using the digital effect function. •You cannot record images that you have processed using the digital effect functions: STILL, FLASH, LUMI. When you can process a scene using the digital effect function with digital effects During playback, you set the POWER switch...


