Operating Instructions
Page 1
Model No. DCR-TRV Model No. Serial No. DCR-TRV830 TM SERIES DCR-TRV730/TRV828/TRV830 ©2001 Sony Corporation Serial No. Owner's Record The model and serial numbers are located on the bottom. 3-066-521-12 (1) Digital Video Camera Recorder Operating Instructions Before operating the unit, please read this product. Record the serial number in the space provided below. Refer to these numbers whenever you call upon your Sony dealer regarding this manual thoroughly, and retain it for future reference. AC-
Model No. DCR-TRV Model No. Serial No. DCR-TRV830 TM SERIES DCR-TRV730/TRV828/TRV830 ©2001 Sony Corporation Serial No. Owner's Record The model and serial numbers are located on the bottom. 3-066-521-12 (1) Digital Video Camera Recorder Operating Instructions Before operating the unit, please read this product. Record the serial number in the space provided below. Refer to these numbers whenever you call upon your Sony dealer regarding this manual thoroughly, and retain it for future reference. AC-
Operating Instructions
Page 7
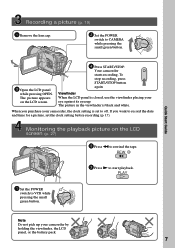
... CAM M Note Do not pick up your eye against its eyecup. The picture in the viewfinder is set the clock setting before recording (p. 17). When you want to record the date and time for a picture, set to off. If you purchase your camcorder, the clock setting is black and white.... Your camcorder starts recording. PLAY OFCFR(CHG) 1 Set the POWER switch to CAMERA while pressing the small green button. To stop recording, press START/STOP button again. V POWER OFCFR(CHG) CAM M 3 Open the LCD panel while ...
... CAM M Note Do not pick up your eye against its eyecup. The picture in the viewfinder is set the clock setting before recording (p. 17). When you want to record the date and time for a picture, set to off. If you purchase your camcorder, the clock setting is black and white.... Your camcorder starts recording. PLAY OFCFR(CHG) 1 Set the POWER switch to CAMERA while pressing the small green button. To stop recording, press START/STOP button again. V POWER OFCFR(CHG) CAM M 3 Open the LCD panel while ...
Operating Instructions
Page 8
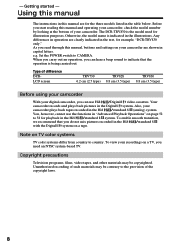
...recording of such materials may be contrary to 58 for example, "DCR...-TRV830 only." Any differences in operation are clearly indicated in the text, for playback in this manual, buttons and settings on your digital camcorder, you need an NTSC system-based TV. Your camcorder records... you do not mix pictures recorded in the table below. When...TRV730 6.2 cm (2.5 type) TRV828 8.8 cm (3.5 type) TRV830 8.8 cm (3.5 type) Before using your camcorder With your camcorder are for illustration purposes. You, however, cannot use Hi8 /Digital8 video cassettes. To view your recordings...
...recording of such materials may be contrary to 58 for example, "DCR...-TRV830 only." Any differences in operation are clearly indicated in the text, for playback in this manual, buttons and settings on your digital camcorder, you need an NTSC system-based TV. Your camcorder records... you do not mix pictures recorded in the table below. When...TRV730 6.2 cm (2.5 type) TRV828 8.8 cm (3.5 type) TRV830 8.8 cm (3.5 type) Before using your camcorder With your camcorder are for illustration purposes. You, however, cannot use Hi8 /Digital8 video cassettes. To view your recordings...
Operating Instructions
Page 9
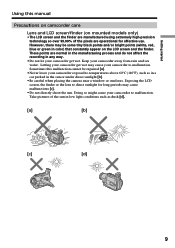
... and the finder. Take pictures of the pixels are normal in the manufacturing process and do not affect the recording in the sun or under direct sunlight [b]. •Be careful when placing the camera near a window or outdoors. Letting your camcorder get wet. Exposing the LCD screen, the finder or the lens...
... and the finder. Take pictures of the pixels are normal in the manufacturing process and do not affect the recording in the sun or under direct sunlight [b]. •Be careful when placing the camera near a window or outdoors. Letting your camcorder get wet. Exposing the LCD screen, the finder or the lens...

Operating Instructions
Page 17
First, set the year, then the month, the day, the hour and then the minute. (1) Set the POWER switch to CAMERA or MEMORY, and then press MENU to display the menu settings. (2) Turn the SEL/PUSH EXEC dial to select , then press the dial. (3) Turn the ... and pressing the dial by the time signal. "CLOCK SET" will have been discharged (p. 154). If you do not set the date and time is recorded on the tape and the "Memory Stick." The clock starts to move. (7) Press MENU to make the menu settings disappear. 1,7 2 3 MENU SETUP MENU CLOCK SET...
First, set the year, then the month, the day, the hour and then the minute. (1) Set the POWER switch to CAMERA or MEMORY, and then press MENU to display the menu settings. (2) Turn the SEL/PUSH EXEC dial to select , then press the dial. (3) Turn the ... and pressing the dial by the time signal. "CLOCK SET" will have been discharged (p. 154). If you do not set the date and time is recorded on the tape and the "Memory Stick." The clock starts to move. (7) Press MENU to make the menu settings disappear. 1,7 2 3 MENU SETUP MENU CLOCK SET...
Operating Instructions
Page 19
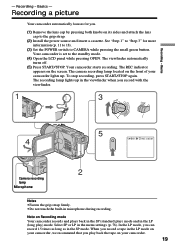
...grip strap. (2) Install the power source and insert a cassette. The viewfinder automatically turns off. (5) Press START/STOP. The camera recording lamp located on the screen. Recording - The recording lamp lights up . Select SP or LP in the LP (long play back the tape on its sides and attach the ...lens cap to CAMERA while pressing the small green button. When you record a tape in microphone during recording. Note on Recording mode Your camcorder records and plays back in the SP (standard play) mode and in the menu settings ...
...grip strap. (2) Install the power source and insert a cassette. The viewfinder automatically turns off. (5) Press START/STOP. The camera recording lamp located on the screen. Recording - The recording lamp lights up . Select SP or LP in the LP (long play back the tape on its sides and attach the ...lens cap to CAMERA while pressing the small green button. When you record a tape in microphone during recording. Note on Recording mode Your camcorder records and plays back in the SP (standard play) mode and in the menu settings ...
Operating Instructions
Page 20
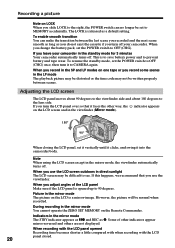
... side and about 180 degrees to the lens side. To enable smooth transition You can no longer be written properly between the last scene you recorded and the next scene smooth as long as a default setting. If you turn the LCD panel over so that you use the LCD screen ... using the LCD screen except in the standby mode for 3 minutes Your camcorder automatically turns off . If this happens, we recommend that it to CAMERA again. During recording in the mirror mode The STBY indicator appears as Xz and REC as z. When you change the battery pack, set to MEMORY accidentally. This...
... side and about 180 degrees to the lens side. To enable smooth transition You can no longer be written properly between the last scene you recorded and the next scene smooth as long as a default setting. If you turn the LCD panel over so that you use the LCD screen ... using the LCD screen except in the standby mode for 3 minutes Your camcorder automatically turns off . If this happens, we recommend that it to CAMERA again. During recording in the mirror mode The STBY indicator appears as Xz and REC as z. When you change the battery pack, set to MEMORY accidentally. This...
Operating Instructions
Page 22
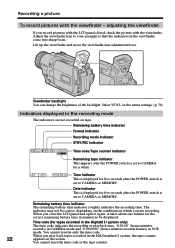
...battery time indicator The remaining battery time indicator roughly indicates the recording time. When you play back tapes recorded in minutes to CAMERA or MEMORY. adjusting the viewfinder If you are not recorded on the screen. Adjust the viewfinder lens to CAMERA or MEMORY. JUL 4 2001 12:05:56 AM Time ...the LCD panel and open it again, it takes about one minute for tapes recorded in the Digital8 system only) The time code indicates the recording or playback time, "0:00:00" (hours:minutes: seconds) in CAMERA mode and "0:00:00:00" (hours:minutes:seconds:frames) in the viewfinder ...
...battery time indicator The remaining battery time indicator roughly indicates the recording time. When you play back tapes recorded in minutes to CAMERA or MEMORY. adjusting the viewfinder If you are not recorded on the screen. Adjust the viewfinder lens to CAMERA or MEMORY. JUL 4 2001 12:05:56 AM Time ...the LCD panel and open it again, it takes about one minute for tapes recorded in the Digital8 system only) The time code indicates the recording or playback time, "0:00:00" (hours:minutes: seconds) in CAMERA mode and "0:00:00:00" (hours:minutes:seconds:frames) in the viewfinder ...

Operating Instructions
Page 23
... the light source behind the subject or a subject with a light background, use this function. For example, you can satisfactorily record the environment of nocturnal animals for observation when you press EXPOSURE when shooting backlit subjects The backlight function will be canceled. To ...ON. Basics BACK LIGHT If you use the backlight function. Press BACK LIGHT in CAMERA or MEMORY mode, slide NIGHTSHOT to OFF. The . While your camcorder is in CAMERA or MEMORY mode. Recording a picture Shooting backlit subjects - and "NIGHTSHOT" indicators flash on the screen. ...
... the light source behind the subject or a subject with a light background, use this function. For example, you can satisfactorily record the environment of nocturnal animals for observation when you press EXPOSURE when shooting backlit subjects The backlight function will be canceled. To ...ON. Basics BACK LIGHT If you use the backlight function. Press BACK LIGHT in CAMERA or MEMORY mode, slide NIGHTSHOT to OFF. The . While your camcorder is in CAMERA or MEMORY mode. Recording a picture Shooting backlit subjects - and "NIGHTSHOT" indicators flash on the screen. ...
Operating Instructions
Page 24
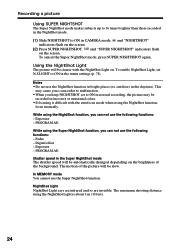
...NIGHTSHOT again. outdoors in the Super NightShot mode The shutter speed will be recorded in CAMERA mode. PROGRAM AE Shutter speed in the daytime). To enable NightShot Light, set to ON in normal recording, the picture may cause your camcorder to malfunction. •When you ... 24 Fader - Notes •Do not use the Super NightShot function. This may be slow. Digital effect - NightShot Light NightShot Light rays are infrared and so are invisible. Recording a picture Using SUPER NIGHTSHOT The Super NightShot mode makes subjects up to 16 times brighter than those...
...NIGHTSHOT again. outdoors in the Super NightShot mode The shutter speed will be recorded in CAMERA mode. PROGRAM AE Shutter speed in the daytime). To enable NightShot Light, set to ON in normal recording, the picture may cause your camcorder to malfunction. •When you ... 24 Fader - Notes •Do not use the Super NightShot function. This may be slow. Digital effect - NightShot Light NightShot Light rays are infrared and so are invisible. Recording a picture Using SUPER NIGHTSHOT The Super NightShot mode makes subjects up to 16 times brighter than those...

Operating Instructions
Page 25
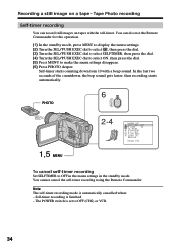
...[ MENU ] : END 1,5 MENU To stop recording, press START/STOP again. 6 START/STOP START/STOP 2-4 CAMERA SET SE L F T I MER OF F D ZOOM ON 1 6 : 9W I DE S T E ADY SHOT N . Self-timer starts counting down from 10 with the self-timer (p. 101). 25 To record still images using the self-timer Press PHOTO in...to select ON, then press the dial. (5) Press MENU to make the menu settings disappear. (6) Press START/STOP. Self-timer memory photo recording You can also use the Remote Commander for this operation. (1) Press MENU to display the menu settings in step 6. (p. 34) To cancel ...
...[ MENU ] : END 1,5 MENU To stop recording, press START/STOP again. 6 START/STOP START/STOP 2-4 CAMERA SET SE L F T I MER OF F D ZOOM ON 1 6 : 9W I DE S T E ADY SHOT N . Self-timer starts counting down from 10 with the self-timer (p. 101). 25 To record still images using the self-timer Press PHOTO in...to select ON, then press the dial. (5) Press MENU to make the menu settings disappear. (6) Press START/STOP. Self-timer memory photo recording You can also use the Remote Commander for this operation. (1) Press MENU to display the menu settings in step 6. (p. 34) To cancel ...
Operating Instructions
Page 33
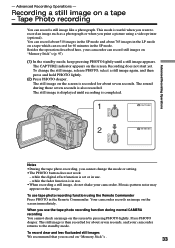
... digital effect function is displayed until a still image appears. To use . •When recording a still image, do not shake your camcorder can record about 510 images in the SP mode and about 765 images in use tape photo recording function using a video printer (optional). Press PHOTO deeper. Recording .... •The PHOTO button does not work: - The sound during normal CAMERA recording You cannot check an image on "Memory Stick"s (p. 97). (1) In the standby mode, keep pressing PHOTO lightly until recording is useful when you want to the standby mode. When you print a...
... digital effect function is displayed until a still image appears. To use . •When recording a still image, do not shake your camcorder can record about 510 images in the SP mode and about 765 images in use tape photo recording function using a video printer (optional). Press PHOTO deeper. Recording .... •The PHOTO button does not work: - The sound during normal CAMERA recording You cannot check an image on "Memory Stick"s (p. 97). (1) In the standby mode, keep pressing PHOTO lightly until recording is useful when you want to the standby mode. When you print a...
Operating Instructions
Page 34
... counting down from 10 with the self-timer. L I DE S T E ADY SHOT N . In the last two seconds of the countdown, the beep sound gets faster, then recording starts automatically. 6 PHOTO PHOTO 1,5 MENU 2-4 CAMERA SET SE L F T I MER OF F D ZOOM ON 1 6 : 9W I GHT F L A SH MODE FLASH LVL RETURN [ MENU ] : END To cancel self-timer...
... counting down from 10 with the self-timer. L I DE S T E ADY SHOT N . In the last two seconds of the countdown, the beep sound gets faster, then recording starts automatically. 6 PHOTO PHOTO 1,5 MENU 2-4 CAMERA SET SE L F T I MER OF F D ZOOM ON 1 6 : 9W I GHT F L A SH MODE FLASH LVL RETURN [ MENU ] : END To cancel self-timer...
Operating Instructions
Page 39
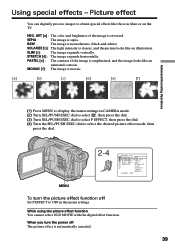
... and the image looks like those in the menu settings. While using the picture effect function You cannot select OLD MOVIE with the digital effect function. PASTEL [e] : The contrast of the image is clearer, and the picture looks like an illustration. STRETCH [d] : The... image expands horizontally. MOSAIC [f] : The image is mosaic. [a] [b] [c] [d] [e] [f] Advanced Recording Operations (1) Press MENU to display the menu settings in CAMERA mode. (2) Turn SEL/PUSH EXEC dial to select , then press the dial. (3) Turn SEL/PUSH EXEC dial to select P...
... and the image looks like those in the menu settings. While using the picture effect function You cannot select OLD MOVIE with the digital effect function. PASTEL [e] : The contrast of the image is clearer, and the picture looks like an illustration. STRETCH [d] : The... image expands horizontally. MOSAIC [f] : The image is mosaic. [a] [b] [c] [d] [e] [f] Advanced Recording Operations (1) Press MENU to display the menu settings in CAMERA mode. (2) Turn SEL/PUSH EXEC dial to select , then press the dial. (3) Turn SEL/PUSH EXEC dial to select P...
Operating Instructions
Page 41
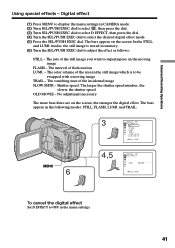
... of the still image you want to OFF in the following modes: STILL, FLASH, LUMI. IIIIIIII [ MENU ] : END To cancel the digital effect Set D EFFECT to superimpose on the moving image TRAIL - In the STILL and LUMI. The vanishing time of flash motion LUMI. - ... R O L D MOV I LL F L ASH L UMI . Advanced Recording Operations Using special effects - The bars appear in the menu settings. 41 The bars appear on the screen, the stronger the digital effect. Digital effect (1) Press MENU to display the menu settings in CAMERA mode. (2) Turn SEL/PUSH EXEC dial to select , then press...
... of the still image you want to OFF in the following modes: STILL, FLASH, LUMI. IIIIIIII [ MENU ] : END To cancel the digital effect Set D EFFECT to superimpose on the moving image TRAIL - In the STILL and LUMI. The vanishing time of flash motion LUMI. - ... R O L D MOV I LL F L ASH L UMI . Advanced Recording Operations Using special effects - The bars appear in the menu settings. 41 The bars appear on the screen, the stronger the digital effect. Digital effect (1) Press MENU to display the menu settings in CAMERA mode. (2) Turn SEL/PUSH EXEC dial to select , then press...
Operating Instructions
Page 44
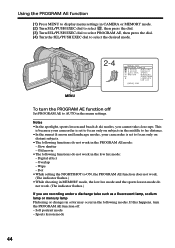
...•In the spotlight, sports lesson and beach & ski modes, you are recording under a discharge tube such as a fluorescent lamp, sodium lamp or mercury lamp...PROGRAM AE mode: - Old movie •The following functions do not work in the low lux mode: - Digital effect - Sports lesson mode 44 Soft portrait mode - Dot •While setting the NIGHTSHOT to ON, the PROGRAM...flashes.) If you cannot take close-ups. Using the PROGRAM AE function (1) Press MENU to display menu settings in CAMERA or MEMORY mode. (2) Turn SEL/PUSH EXEC dial to select , then press the dial. (3) Turn SEL/...
...•In the spotlight, sports lesson and beach & ski modes, you are recording under a discharge tube such as a fluorescent lamp, sodium lamp or mercury lamp...PROGRAM AE mode: - Old movie •The following functions do not work in the low lux mode: - Digital effect - Sports lesson mode 44 Soft portrait mode - Dot •While setting the NIGHTSHOT to ON, the PROGRAM...flashes.) If you cannot take close-ups. Using the PROGRAM AE function (1) Press MENU to display menu settings in CAMERA or MEMORY mode. (2) Turn SEL/PUSH EXEC dial to select , then press the dial. (3) Turn SEL/...
Operating Instructions
Page 45
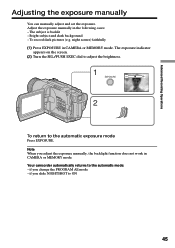
... NIGHTSHOT to the automatic exposure mode Press EXPOSURE. Bright subject and dark background - Advanced Recording Operations Adjusting the exposure manually You can manually adjust and set the exposure. Adjust the exposure manually in CAMERA or MEMORY mode. night scenes) faithfully (1) Press EXPOSURE in the following cases: - .... 1 EXPOSURE 2 To return to ON 45 if you adjust the exposure manually, the backlight function does not work in CAMERA or MEMORY mode. Note When you change the PROGRAM AE mode - Your camcorder automatically returns to the automatic mode: -
... NIGHTSHOT to the automatic exposure mode Press EXPOSURE. Bright subject and dark background - Advanced Recording Operations Adjusting the exposure manually You can manually adjust and set the exposure. Adjust the exposure manually in CAMERA or MEMORY mode. night scenes) faithfully (1) Press EXPOSURE in the following cases: - .... 1 EXPOSURE 2 To return to ON 45 if you adjust the exposure manually, the backlight function does not work in CAMERA or MEMORY mode. Note When you change the PROGRAM AE mode - Your camcorder automatically returns to the automatic mode: -
Operating Instructions
Page 46
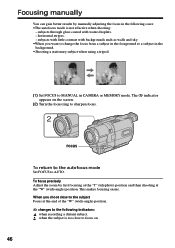
...: •The autofocus mode is too close to AUTO. To focus precisely Adjust the zoom by manually adjusting the focus in the following indicators: when recording a distant subject. Focusing manually You can gain better results by first focusing at the "T" (telephoto) position and then shooting at the end of the "W" (wide...
...: •The autofocus mode is too close to AUTO. To focus precisely Adjust the zoom by manually adjusting the focus in the following indicators: when recording a distant subject. Focusing manually You can gain better results by first focusing at the "T" (telephoto) position and then shooting at the end of the "W" (wide...

Operating Instructions
Page 50
... The power automatically goes off while you want to change a title you have entered remain stored in your camcorder does not automatically turn it to CAMERA again, then proceed from step 1. To enter a space Select [Z& ?!], then select the blank part. 50 The last character is erased. Enter the new title as...
... The power automatically goes off while you want to change a title you have entered remain stored in your camcorder does not automatically turn it to CAMERA again, then proceed from step 1. To enter a space Select [Z& ?!], then select the blank part. 50 The last character is erased. Enter the new title as...
Operating Instructions
Page 63
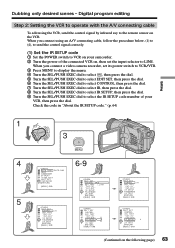
... EMODE I R TEST RETURN [ MENU ] : END OTHERS ED I T SET CONTROL ADJ TEST " CUT- When you connect a video camera recorder, set the input selector to LINE. I N " " CUT-OUT " I R SETUP 4 P AUS EMODE I R TEST RETURN [ MENU ] : END (Continued on the VCR. Digital program editing Step 2: Setting the VCR to operate with the A/V connecting cable To edit using an...
... EMODE I R TEST RETURN [ MENU ] : END OTHERS ED I T SET CONTROL ADJ TEST " CUT- When you connect a video camera recorder, set the input selector to LINE. I N " " CUT-OUT " I R SETUP 4 P AUS EMODE I R TEST RETURN [ MENU ] : END (Continued on the VCR. Digital program editing Step 2: Setting the VCR to operate with the A/V connecting cable To edit using an...


