
Operating Instructions
Page 6
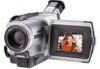
... Start Guide This chapter introduces you to insert. 3 Close the cassette compartment by pressing the mark on the cassette compartment. Connect the plug with the window facing out. Connecting the power cord (p. 16) Use the battery pack when using your camcorder. Quick Start Guide 6 After the cassette compartment goes down completely...
... Start Guide This chapter introduces you to insert. 3 Close the cassette compartment by pressing the mark on the cassette compartment. Connect the plug with the window facing out. Connecting the power cord (p. 16) Use the battery pack when using your camcorder. Quick Start Guide 6 After the cassette compartment goes down completely...
Operating Instructions
Page 9
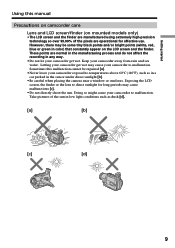
... sunlight for effective use. Letting your camcorder get wet. Take pictures of the pixels are normal in the manufacturing process and do not affect the recording in low light conditions such as in a car parked in color) that constantly appear on mounted models only) •The LCD screen and the finder... tiny black points and/or bright points (white, red, blue or green in the sun or under direct sunlight [b]. •Be careful when placing the camera near a window or outdoors.
... sunlight for effective use. Letting your camcorder get wet. Take pictures of the pixels are normal in the manufacturing process and do not affect the recording in low light conditions such as in a car parked in color) that constantly appear on mounted models only) •The LCD screen and the finder... tiny black points and/or bright points (white, red, blue or green in the sun or under direct sunlight [b]. •Be careful when placing the camera near a window or outdoors.
Operating Instructions
Page 12
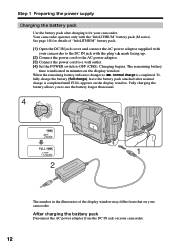
...Step 1 Preparing the power supply Charging the battery pack Use the battery pack after normal charge is completed until FULL appears on the display window. After charging the battery pack Disconnect the AC power adaptor from that on your camcorder. 12 Your camcorder operates only with your camcorder. ...To fully charge the battery (full charge), leave the battery pack attached after charging it for details of the display window may differ from the DC IN jack on the display window. Fully charging the battery allows you to use the battery longer than usual. 4 V POWER 1 2 The number ...
...Step 1 Preparing the power supply Charging the battery pack Use the battery pack after normal charge is completed until FULL appears on the display window. After charging the battery pack Disconnect the AC power adaptor from that on your camcorder. 12 Your camcorder operates only with your camcorder. ...To fully charge the battery (full charge), leave the battery pack attached after charging it for details of the display window may differ from the DC IN jack on the display window. Fully charging the battery allows you to use the battery longer than usual. 4 V POWER 1 2 The number ...
Operating Instructions
Page 13
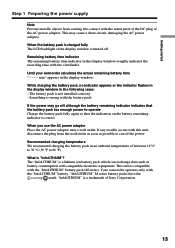
...wrong with compatible electronic equipment. Something is correct. Recommended charging temperature We recommend charging the battery pack in the display window roughly indicates the recording time with the viewfinder. min" appears in the following cases: - What is not installed correctly. - TM ... the display window. Getting started Step 1 Preparing the power supply Note Prevent metallic objects from the wall outlet as soon as battery consumption with the battery pack. Your camcorder operates only with the metal parts of the DC plug of Sony Corporation. "InfoLITHIUM"...
...wrong with compatible electronic equipment. Something is correct. Recommended charging temperature We recommend charging the battery pack in the display window roughly indicates the recording time with the viewfinder. min" appears in the following cases: - What is not installed correctly. - TM ... the display window. Getting started Step 1 Preparing the power supply Note Prevent metallic objects from the wall outlet as soon as battery consumption with the battery pack. Your camcorder operates only with the metal parts of the DC plug of Sony Corporation. "InfoLITHIUM"...
Operating Instructions
Page 18
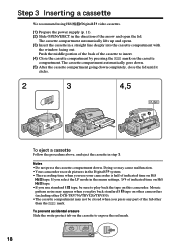
...tape. •If you press any part of indicated time on this camcorder. Step 3 Inserting a cassette We recommend using Hi8 /Digital8 video cassettes. (1) Prepare the power supply (p. 11). (2) Slide OPEN/EJECT in the direction of the cassette to insert. (4) Close the ... with the window facing out. Mosaic pattern noise may appear when you play back standard 8 tape on other camcorders (including other DCR-TRV730/TRV828/TRV830). •The cassette compartment may cause malfunction. •Your camcorder records pictures in the Digital8 system. • The recording time when ...
...tape. •If you press any part of indicated time on this camcorder. Step 3 Inserting a cassette We recommend using Hi8 /Digital8 video cassettes. (1) Prepare the power supply (p. 11). (2) Slide OPEN/EJECT in the direction of the cassette to insert. (4) Close the ... with the window facing out. Mosaic pattern noise may appear when you play back standard 8 tape on other camcorders (including other DCR-TRV730/TRV828/TRV830). •The cassette compartment may cause malfunction. •Your camcorder records pictures in the Digital8 system. • The recording time when ...
Operating Instructions
Page 43
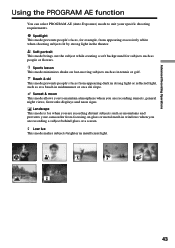
... Using the PROGRAM AE function You can select PROGRAM AE (Auto Exposure) mode to maintain atmosphere when you are recording sunsets, general night views, fireworks displays and neon signs. Sunset & moon This mode allows you to suit your camcorder from focusing on a ski...This mode brings out the subject while creating a soft background for subjects such as in windows when you are recording a subject behind glass or a screen. Spotlight This mode prevents people's faces, for when you are recording distant subjects such as at a beach in insufficient light. 43 Landscape This mode is ...
... Using the PROGRAM AE function You can select PROGRAM AE (Auto Exposure) mode to maintain atmosphere when you are recording sunsets, general night views, fireworks displays and neon signs. Sunset & moon This mode allows you to suit your camcorder from focusing on a ski...This mode brings out the subject while creating a soft background for subjects such as in windows when you are recording a subject behind glass or a screen. Spotlight This mode prevents people's faces, for when you are recording distant subjects such as at a beach in insufficient light. 43 Landscape This mode is ...
Operating Instructions
Page 87
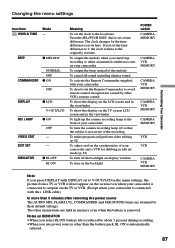
.... (Except when your camcorder is connected with DISPLAY set to V-OUT/LCD in the viewfinder To light up the camera recording lamp at the front of your camcorder To deactivate the Remote Commander to their default settings. The clock changes by about 3 ... recording To make program and perform video editing (p. 62) To adjust and set the synchronicity of your camcorder To turn the camera recording lamp off the backlight on display window To turn on the backlight POWER switch CAMERA MEMORY CAMERA VCR MEMORY CAMERA VCR MEMORY CAMERA VCR MEMORY CAMERA MEMORY VCR VCR CAMERA ...
.... (Except when your camcorder is connected with DISPLAY set to V-OUT/LCD in the viewfinder To light up the camera recording lamp at the front of your camcorder To deactivate the Remote Commander to their default settings. The clock changes by about 3 ... recording To make program and perform video editing (p. 62) To adjust and set the synchronicity of your camcorder To turn the camera recording lamp off the backlight on display window To turn on the backlight POWER switch CAMERA MEMORY CAMERA VCR MEMORY CAMERA VCR MEMORY CAMERA VCR MEMORY CAMERA MEMORY VCR VCR CAMERA ...
Operating Instructions
Page 89
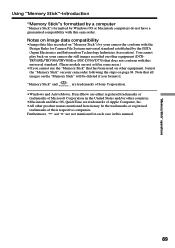
...that does not conform with the Design Rules for Camera File Systems universal standard established by the JEITA (Japan Electronics and Information Technology Industries Association). Notes on image data compatibility •Image data files recorded on "Memory Stick"s by your camcorder conform with... this universal standard. (These models are not sold in this camcorder. "Memory Stick" and are trademarks of Sony Corporation. •Windows and ActiveMovie, DirectShow are either registered...
...that does not conform with the Design Rules for Camera File Systems universal standard established by the JEITA (Japan Electronics and Information Technology Industries Association). Notes on image data compatibility •Image data files recorded on "Memory Stick"s by your camcorder conform with... this universal standard. (These models are not sold in this camcorder. "Memory Stick" and are trademarks of Sony Corporation. •Windows and ActiveMovie, DirectShow are either registered...
Operating Instructions
Page 122
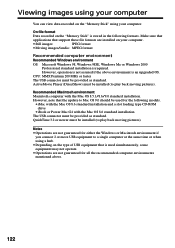
... • Still images: JPEG format • Moving images/audio: MPEG format Recommended computer environment Recommended Windows environment OS: Microsoft Windows 98, Windows 98SE, Windows Me or Windows 2000 Professional standard installation is stored in the following models. •iMac with the Mac OS 8.6 ...installation. However, note that support these file formats are installed on the "Memory Stick" is required. On file format Data recorded on your computer. QuickTime 3.2 or newer must be used simultaneously, some equipment may not operate. • Operations are ...
... • Still images: JPEG format • Moving images/audio: MPEG format Recommended computer environment Recommended Windows environment OS: Microsoft Windows 98, Windows 98SE, Windows Me or Windows 2000 Professional standard installation is stored in the following models. •iMac with the Mac OS 8.6 ...installation. However, note that support these file formats are installed on the "Memory Stick" is required. On file format Data recorded on your computer. QuickTime 3.2 or newer must be used simultaneously, some equipment may not operate. • Operations are ...
Operating Instructions
Page 123
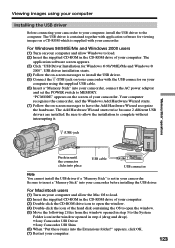
... the CD-ROM drive of the hard disk containing the OS to open the window. (5) Move the following 2 files from the window opened in step 4 (drag and drop). •Sony Camcorder USB Driver •Sony Camcorder USB Shim (6) When "Put these items into place USB cable USB connector... Note You cannot install the USB driver if a "Memory Stick" is supplied with application software for Windows ® 98/98SE/Me and Windows ® 2000". For Macintosh...
... the CD-ROM drive of the hard disk containing the OS to open the window. (5) Move the following 2 files from the window opened in step 4 (drag and drop). •Sony Camcorder USB Driver •Sony Camcorder USB Shim (6) When "Put these items into place USB cable USB connector... Note You cannot install the USB driver if a "Memory Stick" is supplied with application software for Windows ® 98/98SE/Me and Windows ® 2000". For Macintosh...
Operating Instructions
Page 124
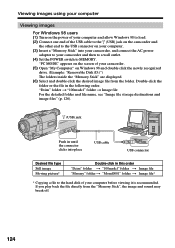
... users (1) Turn on the power of your computer and allow Windows 98 to load. (2) Connect one end of your camcorder and then to a wall outlet. (4) Set the POWER switch to your computer before viewing it is ... a file to the hard disk of the USB cable to the (USB) jack on the camcorder and the other end to the USB connector on Windows 98 and double click the newly recognized drive. (Example: "Removable Disk (D:)") The folders inside the "Memory Stick" are displayed. (6) Select and double-click the desired...
... users (1) Turn on the power of your computer and allow Windows 98 to load. (2) Connect one end of your camcorder and then to a wall outlet. (4) Set the POWER switch to your computer before viewing it is ... a file to the hard disk of the USB cable to the (USB) jack on the camcorder and the other end to the USB connector on Windows 98 and double click the newly recognized drive. (Example: "Removable Disk (D:)") The folders inside the "Memory Stick" are displayed. (6) Select and double-click the desired...
Operating Instructions
Page 125
... Compressed files cannot be played back on the camcorder, the image format will shorten the "Memory Stick" life. •Do not compress the data on a Windows machine. Make sure that the access lamp of the hard disk does not lit. (2) Drag and drop the "Memory Stick" icon to the camcorder or... your computer Unplug the USB cable/Eject the "Memory Stick" To unplug the USB cable or eject the "Memory Stick", follow the procedure below. For Windows 2000 users (1) Move the cursor to the "Unplug or Eject Hardware" icon on the TaskTray and click to cancel the applicable drive. (2) A message to ...
... Compressed files cannot be played back on the camcorder, the image format will shorten the "Memory Stick" life. •Do not compress the data on a Windows machine. Make sure that the access lamp of the hard disk does not lit. (2) Drag and drop the "Memory Stick" icon to the camcorder or... your computer Unplug the USB cable/Eject the "Memory Stick" To unplug the USB cable or eject the "Memory Stick", follow the procedure below. For Windows 2000 users (1) Move the cursor to the "Unplug or Eject Hardware" icon on the TaskTray and click to cancel the applicable drive. (2) A message to ...
Operating Instructions
Page 126
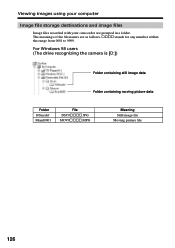
Viewing images using your computer Image file storage destinations and image files Image files recorded with your camcorder are as follows. For Windows 98 users (The drive recognizing the camera is [D:]) Folder containing still image data Folder containing moving picture data Folder 100msdcf Moml0001 File DSC0ssss.JPG MOV0ssss.MPG Meaning Still image file Moving picture file 126 ssss stands for any number within the range from 0001 to 9999. The meanings of the file names are grouped in a folder.
Viewing images using your computer Image file storage destinations and image files Image files recorded with your camcorder are as follows. For Windows 98 users (The drive recognizing the camera is [D:]) Folder containing still image data Folder containing moving picture data Folder 100msdcf Moml0001 File DSC0ssss.JPG MOV0ssss.MPG Meaning Still image file Moving picture file 126 ssss stands for any number within the range from 0001 to 9999. The meanings of the file names are grouped in a folder.
Operating Instructions
Page 138
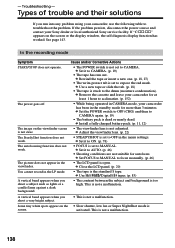
...contrast between the subject and background is not a malfunction. 138 This is too high. You cannot record in the viewfinder. c Remove the cassette and leave your camcorder for at least 1 hour to ...to the drum (moisture condensation). Some tiny white spots appear on the screen or the display window, the self-diagnosis display function has worked. If "C:ss:ss" appears on the screen.... on the viewfinder screen is stuck to CAMERA. (p. 19) • The tape has run into any problem using your Sony dealer or local authorized Sony service facility. The autofocusing function does not...
...contrast between the subject and background is not a malfunction. 138 This is too high. You cannot record in the viewfinder. c Remove the cassette and leave your camcorder for at least 1 hour to ...to the drum (moisture condensation). Some tiny white spots appear on the screen or the display window, the self-diagnosis display function has worked. If "C:ss:ss" appears on the screen.... on the viewfinder screen is stuck to CAMERA. (p. 19) • The tape has run into any problem using your Sony dealer or local authorized Sony service facility. The autofocusing function does not...
Operating Instructions
Page 142
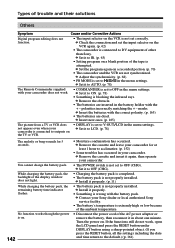
... trouble and their solutions Others Symptom Cause and/or Corrective Actions Digital program editing does not function. • The input selector on a recorded portion. (p. 70) • The camcorder and the VCR ...battery, then reconnect it again, then operate your camcorder. c Contact your Sony dealer or local authorized Sony service facility. • The battery's temperature is not set to OFF... or low because of the ambient temperature. • Disconnect the power cord of the display window does not light. No function works though the power is not properly installed. c Install it...
... trouble and their solutions Others Symptom Cause and/or Corrective Actions Digital program editing does not function. • The input selector on a recorded portion. (p. 70) • The camcorder and the VCR ...battery, then reconnect it again, then operate your camcorder. c Contact your Sony dealer or local authorized Sony service facility. • The battery's temperature is not set to OFF... or low because of the ambient temperature. • Disconnect the power cord of the display window does not light. No function works though the power is not properly installed. c Install it...
Operating Instructions
Page 143
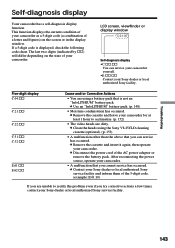
... acclimatize. (p. 152) • The video heads are unable to rectify the problem even if you cannot service has occurred. Troubleshooting 143 The last two digits (indicated by ss) will differ depending on the screen or in the display window. c Remove the cassette and insert it... again, then operate your camcorder. After reconnecting the power source, operate your Sony dealer or local authorized Sony facility. c Contact your camcorder as a 5-digit code (a combination of a letter and figures)...
... acclimatize. (p. 152) • The video heads are unable to rectify the problem even if you cannot service has occurred. Troubleshooting 143 The last two digits (indicated by ss) will differ depending on the screen or in the display window. c Remove the cassette and insert it... again, then operate your camcorder. After reconnecting the power source, operate your Sony dealer or local authorized Sony facility. c Contact your camcorder as a 5-digit code (a combination of a letter and figures)...

Operating Instructions
Page 144
... readable with the cassette compartment open (p. 152). Fast flashing: • The "Memory Stick" is recorded in the Hi8/standard 8 system (p. 109). See the page in the display window, check the following. Warning indicator as a moving picture. Warning indicator as to eject the cassette* ...Slow flashing: •The write-protect tab on the screen or in parentheses "( )" for about five to record on "Memory Stick" as to...
... readable with the cassette compartment open (p. 152). Fast flashing: • The "Memory Stick" is recorded in the Hi8/standard 8 system (p. 109). See the page in the display window, check the following. Warning indicator as a moving picture. Warning indicator as to eject the cassette* ...Slow flashing: •The write-protect tab on the screen or in parentheses "( )" for about five to record on "Memory Stick" as to...
Operating Instructions
Page 148
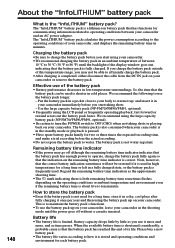
...switch to OFF (CHG) when not taking shots. - The battery pack is shorter in the shooting mode until the backlight of the display window goes out, indicating that the battery pack has reached the end of the battery pack • Battery performance decreases in minutes. This is ...InfoLITHIUM" battery pack 148 What is paused. • Have spare battery packs handy for two or three times the expected recording time, and make a trial recording before the actual recording. •Do not expose the battery pack to water. The battery pack is also consumed when your camcorder and an...
...switch to OFF (CHG) when not taking shots. - The battery pack is shorter in the shooting mode until the backlight of the display window goes out, indicating that the battery pack has reached the end of the battery pack • Battery performance decreases in minutes. This is ...InfoLITHIUM" battery pack 148 What is paused. • Have spare battery packs handy for two or three times the expected recording time, and make a trial recording before the actual recording. •Do not expose the battery pack to water. The battery pack is also consumed when your camcorder and an...
Operating Instructions
Page 160
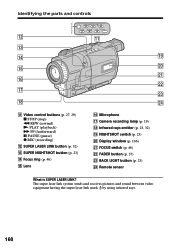
... qa Video control buttons (p. 27, 29) x STOP (stop) m REW (rewind) N PLAY (playback) M FF (fastforward) X PAUSE (pause) z REC (recording) qs SUPER LASER LINK button (p. 32) qd SUPER NIGHTSHOT button (p. 23) qf Focus ring (p. 46) qg Lens qh Microphone qj Camera recording lamp (p. 19) qk Infrared rays emitter (p. 23, 32) ql NIGHTSHOT switch (p. 23) w; Display window (p. 166...
... qa Video control buttons (p. 27, 29) x STOP (stop) m REW (rewind) N PLAY (playback) M FF (fastforward) X PAUSE (pause) z REC (recording) qs SUPER LASER LINK button (p. 32) qd SUPER NIGHTSHOT button (p. 23) qf Focus ring (p. 46) qg Lens qh Microphone qj Camera recording lamp (p. 19) qk Infrared rays emitter (p. 23, 32) ql NIGHTSHOT switch (p. 23) w; Display window (p. 166...
Operating Instructions
Page 166
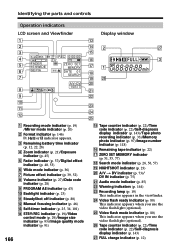
...window 1 qd 2 qf 2 wj 3 qg 4 40min SP REC 0:00:00 W T qh 3 5 FADER 16:9WIDE ZERO SET MEMORY qj 1 6 SEPIA 7 DATE 01 SEARCH qk ql wh A/V DV w; 16B I T 8 wa 9 ws 0 wd qa wf qs wg 1 Recording... mode indicator (p. 19) /Mirror mode indicator (p. 20) 2 Format indicator (p. 146) , or indicator appears. 3 Remaining battery time indicator (p. 12, 22, 28) 4 Zoom indicator (p. 21)/Exposure indicator (p. 45) 5 Fader indicator (p. 37)/Digital...indicator (p. 12) wg Video flash mode indicator (p. 80) This indicator appears when you use the video flash light (optional)....
...window 1 qd 2 qf 2 wj 3 qg 4 40min SP REC 0:00:00 W T qh 3 5 FADER 16:9WIDE ZERO SET MEMORY qj 1 6 SEPIA 7 DATE 01 SEARCH qk ql wh A/V DV w; 16B I T 8 wa 9 ws 0 wd qa wf qs wg 1 Recording... mode indicator (p. 19) /Mirror mode indicator (p. 20) 2 Format indicator (p. 146) , or indicator appears. 3 Remaining battery time indicator (p. 12, 22, 28) 4 Zoom indicator (p. 21)/Exposure indicator (p. 45) 5 Fader indicator (p. 37)/Digital...indicator (p. 12) wg Video flash mode indicator (p. 80) This indicator appears when you use the video flash light (optional)....


