Operating Instructions
Page 5
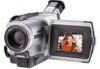
...Recording Operations Recording a still image on "Memory Stick" - Digital effect 40 Using the PROGRAM AE function 43 Adjusting the exposure manually 45 Focusing manually 46 Superimposing a title 47 Making your own titles 49 Inserting a scene 51 Advanced Playback Operations Playing back a tape with picture effects ..... 52 Playing back a tape with analog video... this manual 8 Checking supplied accessories 10 Step 1 Preparing the power supply 11 Installing the battery pack 11 Charging the battery pack 12 Connecting to tapes 127 Enlarging still images recorded on "Memory Stick"s ...
...Recording Operations Recording a still image on "Memory Stick" - Digital effect 40 Using the PROGRAM AE function 43 Adjusting the exposure manually 45 Focusing manually 46 Superimposing a title 47 Making your own titles 49 Inserting a scene 51 Advanced Playback Operations Playing back a tape with picture effects ..... 52 Playing back a tape with analog video... this manual 8 Checking supplied accessories 10 Step 1 Preparing the power supply 11 Installing the battery pack 11 Charging the battery pack 12 Connecting to tapes 127 Enlarging still images recorded on "Memory Stick"s ...

Operating Instructions
Page 6
...more information. Open the DC IN jack cover. After the cassette compartment goes down completely, close the lid until it clicks. AC power adaptor (supplied) Inserting a cassette (p. 18) 1 Slide OPEN/EJECT in the direction of your camcorder outdoors (p. 11). Quick Start Guide 6 Connecting the... power cord (p. 16) Use the battery pack when using your camcorder. See the page in a straight line deeply into the cassette ...
...more information. Open the DC IN jack cover. After the cassette compartment goes down completely, close the lid until it clicks. AC power adaptor (supplied) Inserting a cassette (p. 18) 1 Slide OPEN/EJECT in the direction of your camcorder outdoors (p. 11). Quick Start Guide 6 Connecting the... power cord (p. 16) Use the battery pack when using your camcorder. See the page in a straight line deeply into the cassette ...
Operating Instructions
Page 10
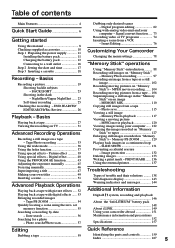
... Make sure that the following accessories are supplied with your camcorder. 1 2 3 4 5 6 7 8 9 0 qa qs qd qf qg 1 Wireless Remote Commander (1) (p. 165) 2 AC-L10A/L10B/L10C AC power adaptor (1), Power cord (1) (p. 12) 3 NP-FM50 battery pack (1) (p. 11, 12) 4 Size AA (R6) battery for Remote Commander (2) (p. 165) 5 A/V... size (5 sheets × 1) qd Print cartridge* (1) qf Head cleaner* (1) qg Platen roller cleaner* (1) *DCR-TRV830 only Contents of the recording cannot be compensated if recording or playback is not made due to a malfunction of the camcorder, storage media, etc. 10
... Make sure that the following accessories are supplied with your camcorder. 1 2 3 4 5 6 7 8 9 0 qa qs qd qf qg 1 Wireless Remote Commander (1) (p. 165) 2 AC-L10A/L10B/L10C AC power adaptor (1), Power cord (1) (p. 12) 3 NP-FM50 battery pack (1) (p. 11, 12) 4 Size AA (R6) battery for Remote Commander (2) (p. 165) 5 A/V... size (5 sheets × 1) qd Print cartridge* (1) qf Head cleaner* (1) qg Platen roller cleaner* (1) *DCR-TRV830 only Contents of the recording cannot be compensated if recording or playback is not made due to a malfunction of the camcorder, storage media, etc. 10
Operating Instructions
Page 11
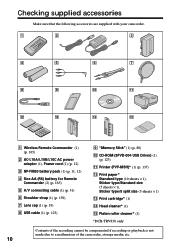
Getting started Step 1 Preparing the power supply Installing the battery pack We recommend using the battery pack when you install the NP-FM70/FM90/FM91 battery pack on your camcorder outdoors. (1) Lift up the viewfinder. (2) Slide the battery pack down until it clicks. 1 2 To remove the battery pack (1) Lift up the viewfinder. (2) Slide the battery pack out in the direction of the arrow while pressing BATT (battery) release lever down. BATT (battery) release lever If you install the large capacity battery pack If you use your camcorder, extend its viewfinder. 11
Getting started Step 1 Preparing the power supply Installing the battery pack We recommend using the battery pack when you install the NP-FM70/FM90/FM91 battery pack on your camcorder outdoors. (1) Lift up the viewfinder. (2) Slide the battery pack down until it clicks. 1 2 To remove the battery pack (1) Lift up the viewfinder. (2) Slide the battery pack out in the direction of the arrow while pressing BATT (battery) release lever down. BATT (battery) release lever If you install the large capacity battery pack If you use your camcorder, extend its viewfinder. 11
Operating Instructions
Page 12
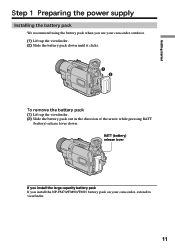
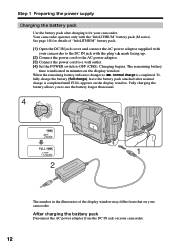
...u, normal charge is indicated in the illustration of "InfoLITHIUM" battery pack. (1) Open the DC IN jack cover and connect the AC power adaptor supplied with your camcorder. See page 148 for your camcorder. 12 To fully charge the battery (full charge), leave the battery pack attached ... display window. After charging the battery pack Disconnect the AC power adaptor from that on the display window. Fully charging the battery allows you to OFF (CHG). OFCFR(CHG) E ERMAORY CAM M Step 1 Preparing the power supply Charging the battery pack Use the battery pack after normal charge...
...u, normal charge is indicated in the illustration of "InfoLITHIUM" battery pack. (1) Open the DC IN jack cover and connect the AC power adaptor supplied with your camcorder. See page 148 for your camcorder. 12 To fully charge the battery (full charge), leave the battery pack attached ... display window. After charging the battery pack Disconnect the AC power adaptor from that on the display window. Fully charging the battery allows you to OFF (CHG). OFCFR(CHG) E ERMAORY CAM M Step 1 Preparing the power supply Charging the battery pack Use the battery pack after normal charge...
Operating Instructions
Page 13
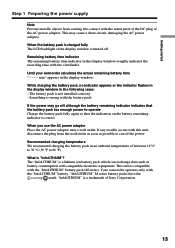
...ambient temperature of Sony Corporation. Until your camcorder calculates the actual remaining battery time "- - - - Something is compatible with the battery pack. This unit is wrong with the "InfoLITHIUM" battery pack (M series). TM SERIES 13 Getting started Step 1 Preparing the power supply Note Prevent ... The LCD backlight of the AC power adaptor. If the power may cause a short-circuit, damaging the AC power adaptor. Recommended charging temperature We recommend charging the battery pack in the display window roughly indicates the recording time with the metal parts of ...
...ambient temperature of Sony Corporation. Until your camcorder calculates the actual remaining battery time "- - - - Something is compatible with the battery pack. This unit is wrong with the "InfoLITHIUM" battery pack (M series). TM SERIES 13 Getting started Step 1 Preparing the power supply Note Prevent ... The LCD backlight of the AC power adaptor. If the power may cause a short-circuit, damaging the AC power adaptor. Recommended charging temperature We recommend charging the battery pack in the display window roughly indicates the recording time with the metal parts of ...
Operating Instructions
Page 14
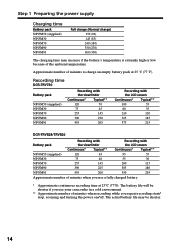
... be shorter. 14 Approximate number of minutes to charge an empty battery pack at 25 ˚C (77 ˚F) Recording time DCR-TRV730 Battery pack NP-FM50 (supplied) NP-FM30 NP-FM70 NP-FM90 NP-FM91 Recording with the viewfinder Continuous* Typical** 120 70 75 45 255 145 390 230 455 265...temperature. Step 1 Preparing the power supply Charging time Battery pack NP-FM50 (supplied) NP-FM30 NP-FM70 NP-FM90 NP-FM91 Full charge (Normal charge) 150 (90) 145 (85) 240 (180) 330 (270) 360 (300) The charging time may be shorter if you repeat recording start/ stop, zooming and ...
... be shorter. 14 Approximate number of minutes to charge an empty battery pack at 25 ˚C (77 ˚F) Recording time DCR-TRV730 Battery pack NP-FM50 (supplied) NP-FM30 NP-FM70 NP-FM90 NP-FM91 Recording with the viewfinder Continuous* Typical** 120 70 75 45 255 145 390 230 455 265...temperature. Step 1 Preparing the power supply Charging time Battery pack NP-FM50 (supplied) NP-FM30 NP-FM70 NP-FM90 NP-FM91 Full charge (Normal charge) 150 (90) 145 (85) 240 (180) 330 (270) 360 (300) The charging time may be shorter if you repeat recording start/ stop, zooming and ...
Operating Instructions
Page 15
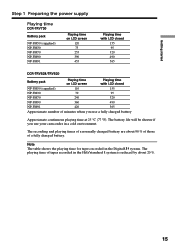
... a cold environment. Note The table shows the playing time for tapes recorded in the Digital8 system. The recording and playing times of a normally charged battery are about 20 %. 15 Getting started Step 1 Preparing the power supply Playing time DCR-TRV730 Battery pack NP-FM50 (supplied) NP-FM30 NP-FM70 NP-FM90 NP-FM91 Playing time on LCD...
... a cold environment. Note The table shows the playing time for tapes recorded in the Digital8 system. The recording and playing times of a normally charged battery are about 20 %. 15 Getting started Step 1 Preparing the power supply Playing time DCR-TRV730 Battery pack NP-FM50 (supplied) NP-FM30 NP-FM70 NP-FM90 NP-FM91 Playing time on LCD...
Operating Instructions
Page 16
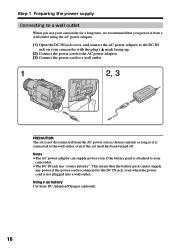
Using a car battery Use Sony DC Adaptor/Charger (optional). 16 Step 1 Preparing the power supply Connecting to a wall outlet When you use your camcorder. • The DC IN jack has "source priority". Notes • The AC power adaptor can supply power even if the battery pack is connected to the wall outlet, even if the set is...
Using a car battery Use Sony DC Adaptor/Charger (optional). 16 Step 1 Preparing the power supply Connecting to a wall outlet When you use your camcorder. • The DC IN jack has "source priority". Notes • The AC power adaptor can supply power even if the battery pack is connected to the wall outlet, even if the set is...
Operating Instructions
Page 18
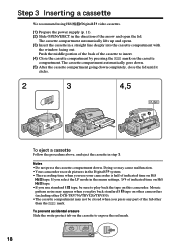
... Hi8 /Digital8 video cassettes. (1) Prepare the power supply (p. 11). (2) Slide OPEN/EJECT in the menu settings, 3/4 of indicated time on Hi8 tape. •If you use standard 8 tape, be closed when you press any part of the lid other DCR-TRV730/TRV828/TRV830). •The cassette compartment may cause malfunction. •Your camcorder records pictures in...
... Hi8 /Digital8 video cassettes. (1) Prepare the power supply (p. 11). (2) Slide OPEN/EJECT in the menu settings, 3/4 of indicated time on Hi8 tape. •If you use standard 8 tape, be closed when you press any part of the lid other DCR-TRV730/TRV828/TRV830). •The cassette compartment may cause malfunction. •Your camcorder records pictures in...
Operating Instructions
Page 27
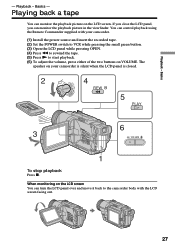
...volume, press either of the two buttons on the LCD screen You can control playback using the Remote Commander supplied with your camcorder is silent when the LCD panel is closed. 2 V 4 OFCFR(CHG) POWER REW E ERMAORY CAM M 5 PLAY 6 3 VOLUME 1 To stop playback Press x. Playback - Basics ...- If you close the LCD panel, you can monitor the playback picture on your camcorder. (1) Install the power source and insert the recorded tape. (2) Set the POWER switch to VCR while pressing the small green button. (3) Open the LCD panel while pressing OPEN. (4) Press m to rewind...
...volume, press either of the two buttons on the LCD screen You can control playback using the Remote Commander supplied with your camcorder is silent when the LCD panel is closed. 2 V 4 OFCFR(CHG) POWER REW E ERMAORY CAM M 5 PLAY 6 3 VOLUME 1 To stop playback Press x. Playback - Basics ...- If you close the LCD panel, you can monitor the playback picture on your camcorder. (1) Install the power source and insert the recorded tape. (2) Set the POWER switch to VCR while pressing the small green button. (3) Open the LCD panel while pressing OPEN. (4) Press m to rewind...

Operating Instructions
Page 31
...the TV screen. Connect an S video cable (optional) to the S video jacks on TV Set DISPLAY to V-OUT/LCD in the same way as when you power your camcorder from a wall outlet using the A/V connecting cable supplied with your camcorder to watch the ...recording on TV Connect your camcorder to your TV with the A/V connecting cable supplied with your camcorder. You can operate the playback control buttons in the menu settings (p. 78). Then, set the TV/VCR selector on the VCR by using the AC power adaptor (p. 16). Basics : Signal flow S VIDEO AUDIO / VIDEO Red White Yellow IN S VIDEO VIDEO...
...the TV screen. Connect an S video cable (optional) to the S video jacks on TV Set DISPLAY to V-OUT/LCD in the same way as when you power your camcorder from a wall outlet using the A/V connecting cable supplied with your camcorder to watch the ...recording on TV Connect your camcorder to your TV with the A/V connecting cable supplied with your camcorder. You can operate the playback control buttons in the menu settings (p. 78). Then, set the TV/VCR selector on the VCR by using the AC power adaptor (p. 16). Basics : Signal flow S VIDEO AUDIO / VIDEO Red White Yellow IN S VIDEO VIDEO...
Operating Instructions
Page 32
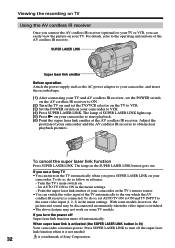
... at the TV's remote sensor. • You can switch the video input of the AV cordless IR receiver. Turn the TV's main switch on your TV. To do as the AC power adaptor to your camcorder, and insert the recorded tape. (1) After connecting your TV and AV cordless IR receiver,...trademark of your camcorder. SUPER LASER LINK Super laser link emitter Before operation Attach the power supply such as follow in the menu settings. - The lamp on your camcorder to turn on the TV automatically when you use a Sony TV • You can turn off automatically. Press SUPER LASER LINK to VCR. ...
... at the TV's remote sensor. • You can switch the video input of the AV cordless IR receiver. Turn the TV's main switch on your TV. To do as the AC power adaptor to your camcorder, and insert the recorded tape. (1) After connecting your TV and AV cordless IR receiver,...trademark of your camcorder. SUPER LASER LINK Super laser link emitter Before operation Attach the power supply such as follow in the menu settings. - The lamp on your camcorder to turn on the TV automatically when you use a Sony TV • You can turn off automatically. Press SUPER LASER LINK to VCR. ...

Operating Instructions
Page 59
...instructions of your camcorder - S VIDEO AUDIO / VIDEO IN S VIDEO VIDEO AUDIO : Signal flow When you want to the VCR using your camcorder. (2) Set the input selector on the Remote Commander - Connect your camcorder to record over) into the VCR, and insert the recorded tape into your camcorder as ... of your VCR for more information. (3) Set the POWER switch to VCR. (4) Play back the recorded tape on your camcorder. (5) Start recording on the VCR connected to your camcorder using the A/V connecting cable supplied with your camcorder and the VCR. DISPLAY on VCRs ...
...instructions of your camcorder - S VIDEO AUDIO / VIDEO IN S VIDEO VIDEO AUDIO : Signal flow When you want to the VCR using your camcorder. (2) Set the input selector on the Remote Commander - Connect your camcorder to record over) into the VCR, and insert the recorded tape into your camcorder as ... of your VCR for more information. (3) Set the POWER switch to VCR. (4) Play back the recorded tape on your camcorder. (5) Start recording on the VCR connected to your camcorder using the A/V connecting cable supplied with your camcorder and the VCR. DISPLAY on VCRs ...
Operating Instructions
Page 84
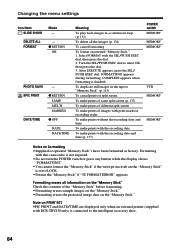
...To make prints with the recording date To make prints with the SEL/PUSH EXEC dial, then press the dial. 2. Changing the menu settings Icon/item SLIDE SHOW Mode - Formatting with DCR-TRV830 only) is not required. •Do not turn the POWER switch or press any ... Stick" before formatting. •Formatting erases sample images on the "Memory Stick." •Formatting erases the protected image data on formatting •Supplied or optional "Memory Stick"s have been formatted at factory. DELETE ALL FORMAT - Formatting erases all the images (p. 134) To cancel formatting To...
...To make prints with the recording date To make prints with the SEL/PUSH EXEC dial, then press the dial. 2. Changing the menu settings Icon/item SLIDE SHOW Mode - Formatting with DCR-TRV830 only) is not required. •Do not turn the POWER switch or press any ... Stick" before formatting. •Formatting erases sample images on the "Memory Stick." •Formatting erases the protected image data on formatting •Supplied or optional "Memory Stick"s have been formatted at factory. DELETE ALL FORMAT - Formatting erases all the images (p. 134) To cancel formatting To...
Operating Instructions
Page 87
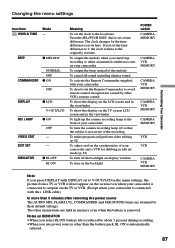
... life is reduced by about 3 percent during recording. •When you use power sources other menu items are returned to outputs on the backlight POWER switch CAMERA MEMORY CAMERA VCR MEMORY CAMERA VCR MEMORY CAMERA VCR MEMORY CAMERA MEMORY VCR VCR CAMERA VCR MEMORY Note If you press DISPLAY with ...video editing (p. 62) To adjust and set the synchronicity of the melody To cancel all sound including shutter sound To activate the Remote Commander supplied with the i. LINK cable) In more than the battery pack, BL ON is removed. To output the melody when you start/stop recording...
... life is reduced by about 3 percent during recording. •When you use power sources other menu items are returned to outputs on the backlight POWER switch CAMERA MEMORY CAMERA VCR MEMORY CAMERA VCR MEMORY CAMERA VCR MEMORY CAMERA MEMORY VCR VCR CAMERA VCR MEMORY Note If you press DISPLAY with ...video editing (p. 62) To adjust and set the synchronicity of the melody To cancel all sound including shutter sound To activate the Remote Commander supplied with the i. LINK cable) In more than the battery pack, BL ON is removed. To output the melody when you start/stop recording...
Operating Instructions
Page 88
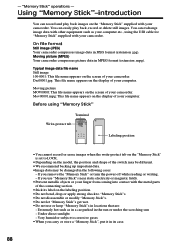
... carry or store a "Memory Stick", put it in the following cases: - You can record and play back, record or delete still images. On file format Still image (JPEG) Your camcorder compresses image data ... your computer etc., using "Memory Stick" Terminal Write-protect tab Labeling position •You cannot record or erase images when the write-protect tab on the "Memory Stick" is set to LOCK....to corrosive gases •When you remove the "Memory Stick" or turn the power off while reading or writing. - Under direct sunlight - Using "Memory Stick"-introduction You can easily ...
... carry or store a "Memory Stick", put it in the following cases: - You can record and play back, record or delete still images. On file format Still image (JPEG) Your camcorder compresses image data ... your computer etc., using "Memory Stick" Terminal Write-protect tab Labeling position •You cannot record or erase images when the write-protect tab on the "Memory Stick" is set to LOCK....to corrosive gases •When you remove the "Memory Stick" or turn the power off while reading or writing. - Under direct sunlight - Using "Memory Stick"-introduction You can easily ...
Operating Instructions
Page 112
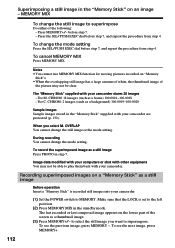
... not be clear. To see the previous image, press MEMORY -. Press MEMORY+/- For M. Image data modified with your camcorder. (1) Set the POWER switch to the left position. (2) Press MEMORY MIX in the "Memory Stick" on "Memory Stick"s. •When the overlapping still image has ... image in the standby mode. To change the still image to superimpose. The "Memory Stick" supplied with your camcorder. OVERLAP You cannot change the mode setting. Make sure that the LOCK is recorded still images into your camcorder stores 20 images - To see the next image, press MEMORY+. ...
... not be clear. To see the previous image, press MEMORY -. Press MEMORY+/- For M. Image data modified with your camcorder. (1) Set the POWER switch to the left position. (2) Press MEMORY MIX in the "Memory Stick" on "Memory Stick"s. •When the overlapping still image has ... image in the standby mode. To change the still image to superimpose. The "Memory Stick" supplied with your camcorder. OVERLAP You cannot change the mode setting. Make sure that the LOCK is recorded still images into your camcorder stores 20 images - To see the next image, press MEMORY+. ...
Operating Instructions
Page 118
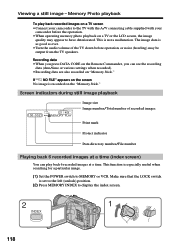
...TV speakers. This is not a malfunction. Recording data •When you press DATA CODE on the Remote Commander, you can play back recorded images on a TV screen •Connect your camcorder to the TV with the A/V connecting cable supplied with your camcorder before operation, or noise (...howling) may appear to display the index screen. 2 INDEX 11 V POWER OFCFR(CHG) E ERMAORY CAM M 118...
...TV speakers. This is not a malfunction. Recording data •When you press DATA CODE on the Remote Commander, you can play back recorded images on a TV screen •Connect your camcorder to the TV with the A/V connecting cable supplied with your camcorder before operation, or noise (...howling) may appear to display the index screen. 2 INDEX 11 V POWER OFCFR(CHG) E ERMAORY CAM M 118...
Operating Instructions
Page 162
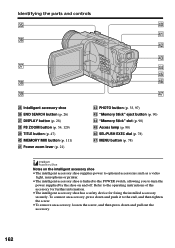
... accessory for further information. •The intelligent accessory shoe has a safety device for fixing the installed accessory securely. MEMORY MIX button (p. 111) ra Power zoom lever (p. 21) rs PHOTO button (p. 33, 97) rd "Memory Stick" eject button (p. 90) rf "Memory Stick" slot (p. 90)... (p. 78) Notes on the intelligent accessory shoe •The intelligent accessory shoe supplies power to optional accessories such as a video light, microphone or printer. •The intelligent accessory shoe is linked to the POWER switch, allowing you to turn the power supplied by the shoe on and off.
... accessory for further information. •The intelligent accessory shoe has a safety device for fixing the installed accessory securely. MEMORY MIX button (p. 111) ra Power zoom lever (p. 21) rs PHOTO button (p. 33, 97) rd "Memory Stick" eject button (p. 90) rf "Memory Stick" slot (p. 90)... (p. 78) Notes on the intelligent accessory shoe •The intelligent accessory shoe supplies power to optional accessories such as a video light, microphone or printer. •The intelligent accessory shoe is linked to the POWER switch, allowing you to turn the power supplied by the shoe on and off.


