How to shoot a great birthday video.
Page 1
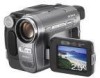
... along the lines to create your camera carrying case. Many camcorders have charged batteries and an extra memory card or blank media ready to learn more about Handycam® cameras visit sony.com/handycam © 2009 Sony Electronics Inc. Always have a low light sensor that brings out...You no longer have face and smile detection features. Be Prepared. Some camcorders have to take digital still images while you take place. Instructions: This PDF is prohibited. Use Available Light. Many camcorders let you are trademarks of the existing light as possible. by Nigel ...
... along the lines to create your camera carrying case. Many camcorders have charged batteries and an extra memory card or blank media ready to learn more about Handycam® cameras visit sony.com/handycam © 2009 Sony Electronics Inc. Always have a low light sensor that brings out...You no longer have face and smile detection features. Be Prepared. Some camcorders have to take digital still images while you take place. Instructions: This PDF is prohibited. Use Available Light. Many camcorders let you are trademarks of the existing light as possible. by Nigel ...

Camera Operations Guide
Page 1
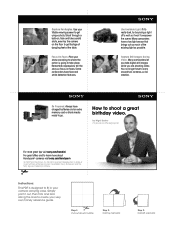
Camera Operations Guide [US] 2-515-268-12(1) Camera Operations Guide Read this first Digital Video Camera Recorder DCR-TRV380/TRV480 TM SERIES © 2005 Sony Corporation
Camera Operations Guide [US] 2-515-268-12(1) Camera Operations Guide Read this first Digital Video Camera Recorder DCR-TRV380/TRV480 TM SERIES © 2005 Sony Corporation
Camera Operations Guide
Page 3
... Conformity Trade Name: SONY Model No.: DCR-TRV480 Responsible Party: Sony Electronics Inc. ACSerial No. This equipment generates, uses, and can record on standard 8 mm and Hi8 , Digital8 video cassettes in color....org). Telephone Number: 858-942-2230 This device complies with the limits for a digital device pursuant to a malfunction of the manufacturing process and do not affect the recording ...Refer to the following measures: - Model No. These limits are normal results of the camcorder, storage media, etc. • TV color systems differ depending on the LCD screen and...
... Conformity Trade Name: SONY Model No.: DCR-TRV480 Responsible Party: Sony Electronics Inc. ACSerial No. This equipment generates, uses, and can record on standard 8 mm and Hi8 , Digital8 video cassettes in color....org). Telephone Number: 858-942-2230 This device complies with the limits for a digital device pursuant to a malfunction of the manufacturing process and do not affect the recording ...Refer to the following measures: - Model No. These limits are normal results of the camcorder, storage media, etc. • TV color systems differ depending on the LCD screen and...
Camera Operations Guide
Page 4
...name of your hand on the back side of the LCD panel to support it. Before you start reading this may cause a malfunction of your camcorder. Then, touch the buttons displayed on the LCD frame accidentally when you open or close the LCD panel, or when you see. • ...malfunctions. If you are for all models. Change the screen language before using the touch panel, place your camcorder. • The on-screen displays in each local language are captured using a digital still camera, and thus may be sure to insert the connector plug in the wrong direction, the terminal may...
...name of your hand on the back side of the LCD panel to support it. Before you start reading this may cause a malfunction of your camcorder. Then, touch the buttons displayed on the LCD frame accidentally when you open or close the LCD panel, or when you see. • ...malfunctions. If you are for all models. Change the screen language before using the touch panel, place your camcorder. • The on-screen displays in each local language are captured using a digital still camera, and thus may be sure to insert the connector plug in the wrong direction, the terminal may...
Camera Operations Guide
Page 6
... effects 42 Fading in various modes from a "Memory Stick 53 Playing back with added effects - FADER 42 Using special effects - Easy Handycam 54 Making full use of a scene - Adjusting the exposure 37 Adjusting the exposure for backlit subjects 37 Fixing the exposure for an off... Recording in various modes 50 Viewing recordings with ease - Date search 60 6 Digital effect 44 Overlaying still images on movies on a "Memory Stick 52 Playing back in and out of Easy Handycam operation 55 Various playback functions 56 Magnifying pictures - Tape playback zoom/Memory playback...
... effects 42 Fading in various modes from a "Memory Stick 53 Playing back with added effects - FADER 42 Using special effects - Easy Handycam 54 Making full use of a scene - Adjusting the exposure 37 Adjusting the exposure for backlit subjects 37 Fixing the exposure for an off... Recording in various modes 50 Viewing recordings with ease - Date search 60 6 Digital effect 44 Overlaying still images on movies on a "Memory Stick 52 Playing back in and out of Easy Handycam operation 55 Various playback functions 56 Magnifying pictures - Tape playback zoom/Memory playback...
Camera Operations Guide
Page 7
... Image protection/ Print mark 102 Printing recorded images (PictBridge compliant printer 104 Using with specific information - Digital convert function 116 ,continued 7 APPLI.) menu - Advanced operations Using the Menu Selecting menu items 62 Using...REC MODE/MULTI-SOUND/AUDIO MIX/USB-CAMERA, etc 79 Using the (TIME/LANGU.) menu - Digital program editing 94 Deleting recorded pictures 101 Marking recorded images with your computer Features 106 Installing the software...Memory Stick" to the computer via your camcorder - PROGRAM AE/16:9 WIDE, etc 64 Using the (MEMORY SET) menu -
... Image protection/ Print mark 102 Printing recorded images (PictBridge compliant printer 104 Using with specific information - Digital convert function 116 ,continued 7 APPLI.) menu - Advanced operations Using the Menu Selecting menu items 62 Using...REC MODE/MULTI-SOUND/AUDIO MIX/USB-CAMERA, etc 79 Using the (TIME/LANGU.) menu - Digital program editing 94 Deleting recorded pictures 101 Marking recorded images with your computer Features 106 Installing the software...Memory Stick" to the computer via your camcorder - PROGRAM AE/16:9 WIDE, etc 64 Using the (MEMORY SET) menu -
Camera Operations Guide
Page 29
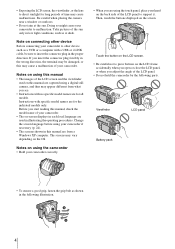
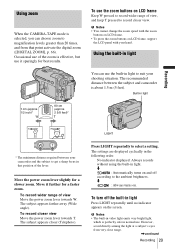
... effective, but use the zoom buttons on LCD frame, support the LCD panel with your camcorder and the subject to get a sharp focus in that point activate the digital zoom ([DIGITAL ZOOM], p. 66). m : Always turns on and off the built-in light. To use it further for a faster zoom. To record wider range...
... effective, but use the zoom buttons on LCD frame, support the LCD panel with your camcorder and the subject to get a sharp focus in that point activate the digital zoom ([DIGITAL ZOOM], p. 66). m : Always turns on and off the built-in light. To use it further for a faster zoom. To record wider range...
Camera Operations Guide
Page 40
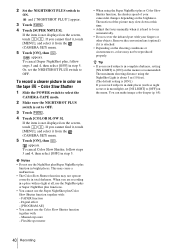
...8226; Depending on the screen, touch / . To cancel Color Slow Shutter, follow steps 3 and 4, then select [OFF] in a place with your camcorder changes depending on the menu. b Notes • Do not use the NightShot plus/Super NightShot plus function in step 5. To cancel Super NightShot plus, follow... Adjust the focus manually when it from the (CAMERA SET) menu. 5 Touch [ON], then . Or, set to [OFF] on the brightness. Digital effect - [PROGRAM AE] • You cannot use the Super NightShot plus or Color Slow Shutter function, the shutter speed of the picture may not be...
...8226; Depending on the screen, touch / . To cancel Color Slow Shutter, follow steps 3 and 4, then select [OFF] in a place with your camcorder changes depending on the menu. b Notes • Do not use the NightShot plus/Super NightShot plus function in step 5. To cancel Super NightShot plus, follow... Adjust the focus manually when it from the (CAMERA SET) menu. 5 Touch [ON], then . Or, set to [OFF] on the brightness. Digital effect - [PROGRAM AE] • You cannot use the Super NightShot plus or Color Slow Shutter function, the shutter speed of the picture may not be...
Camera Operations Guide
Page 43
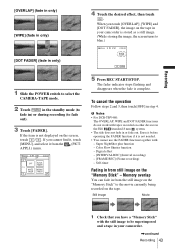
... effect, then touch . Erase it before operating the FADER function if it from still image on the screen, touch / . Super NightShot plus function - Digital effect - [INTERVAL REC] (Interval recording) - [FRAME REC] (Frame recording) - Still image Movie 1 Check that you touch [OVERLAP], [WIPE] ...or during recording (to be superimposed and a tape in your camcorder is stored as a still image. (While storing the image, the screen turns to the movie currently being recorded on the tape. b Notes • For DCR-TRV480: The OVERLAP, WIPE and DOT FADER functions do not work with...
... effect, then touch . Erase it before operating the FADER function if it from still image on the screen, touch / . Super NightShot plus function - Digital effect - [INTERVAL REC] (Interval recording) - [FRAME REC] (Frame recording) - Still image Movie 1 Check that you touch [OVERLAP], [WIPE] ...or during recording (to be superimposed and a tape in your camcorder is stored as a still image. (While storing the image, the screen turns to the movie currently being recorded on the tape. b Notes • For DCR-TRV480: The OVERLAP, WIPE and DOT FADER functions do not work with...
Camera Operations Guide
Page 44
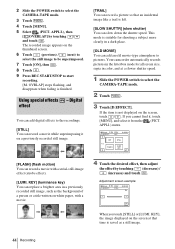
...[MENU], and select it on the screen at a slower shutter speed. 1 Slide the POWER switch to pictures. APPLI.) menu. 60min D. Your camcorder automatically records pictures in the letterbox mode for shooting a subject more clearly in color, and at that an incidental image like a trail is saved .... [STILL] You can record a movie with a movie. 4 Touch the desired effect, then adjust the effect by touching / and touch . Digital effect You can add digital effects to select the CAMERA-TAPE mode. 3 Touch . 4 Touch [MENU]. 5 Select (PICT. If the item is finished.
...[MENU], and select it on the screen at a slower shutter speed. 1 Slide the POWER switch to pictures. APPLI.) menu. 60min D. Your camcorder automatically records pictures in the letterbox mode for shooting a subject more clearly in color, and at that an incidental image like a trail is saved .... [STILL] You can record a movie with a movie. 4 Touch the desired effect, then adjust the effect by touching / and touch . Digital effect You can add digital effects to select the CAMERA-TAPE mode. 3 Touch . 4 Touch [MENU]. 5 Select (PICT. If the item is finished.

Camera Operations Guide
Page 45
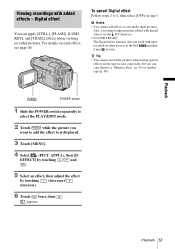
...adjust the focus automatically when you want to superimpose on a tape - b Notes • You cannot use Digital effect together with the subject against a blue background. For details, refer to steady the camcorder. 5 Touch . Overlaying still images on movies on a movie. MEMORY MIX You can have recorded on ...the blue area of the movie will be used as an image which you are currently recording on a "Memory Stick" beforehand. To cancel Digital effect Follow steps 2 and 3, then select [OFF] in the still image which is 1/4). Adjust the focus manually using a tripod to the...
...adjust the focus automatically when you want to superimpose on a tape - b Notes • You cannot use Digital effect together with the subject against a blue background. For details, refer to steady the camcorder. 5 Touch . Overlaying still images on movies on a movie. MEMORY MIX You can have recorded on ...the blue area of the movie will be used as an image which you are currently recording on a "Memory Stick" beforehand. To cancel Digital effect Follow steps 2 and 3, then select [OFF] in the still image which is 1/4). Adjust the focus manually using a tripod to the...
Camera Operations Guide
Page 51
Digital effect You can copy them to a "Memory Stick" (p. 92) or another tape (p. 90). POWER switch 1 Slide the POWER switch repeatedly to 4, then select [OFF] in your camcorder, but you can apply [STILL], [FLASH], [LUMI. Playback Viewing recordings with tapes recorded on other ... steps 2 to select the PLAY/EDIT mode. 2 Touch while the picture you cannot output pictures edited with digital effects via the DV Interface. • For DCR-TRV480: The Digital effect function does not work with added effects - Playback 51 b Notes • You cannot add effects to...
Digital effect You can copy them to a "Memory Stick" (p. 92) or another tape (p. 90). POWER switch 1 Slide the POWER switch repeatedly to 4, then select [OFF] in your camcorder, but you can apply [STILL], [FLASH], [LUMI. Playback Viewing recordings with tapes recorded on other ... steps 2 to select the PLAY/EDIT mode. 2 Touch while the picture you cannot output pictures edited with digital effects via the DV Interface. • For DCR-TRV480: The Digital effect function does not work with added effects - Playback 51 b Notes • You cannot add effects to...
Camera Operations Guide
Page 66
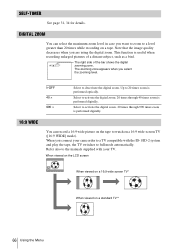
...a 16:9 wide picture on a tape. Refer also to activate the digital zoom. 20 times through 990 times zoom is performed optically. When you are using the digital zoom. Note that the image quality decreases when you connect your camcorder to a TV compatible with your TV. Select to the manuals supplied with... the ID-1/ID-2 system and play the tape, the TV switches to watch on a standard TV** 66 Using the Menu The right side of a distant subject, such as a bird. Select to activate the digital zoom....
...a 16:9 wide picture on a tape. Refer also to activate the digital zoom. 20 times through 990 times zoom is performed optically. When you are using the digital zoom. Note that the image quality decreases when you connect your camcorder to a TV compatible with your TV. Select to the manuals supplied with... the ID-1/ID-2 system and play the tape, the TV switches to watch on a standard TV** 66 Using the Menu The right side of a distant subject, such as a bird. Select to activate the digital zoom....

Camera Operations Guide
Page 82
...digital device and an analog device to your camcorder and convert the signal transmitted from the connected devices to the appropriate signal on the tape, and play back a tape that was recorded on your camcorder. The analog signal input to recorded on your camcorder. PB MODE For DCR-TRV480...: GAUTO / Select to automatically detect the system (Hi8 /standard 8 mm or Digital8 ) that was used to the A/V jack of your camcorder will be heard. During switching ...
...digital device and an analog device to your camcorder and convert the signal transmitted from the connected devices to the appropriate signal on the tape, and play back a tape that was recorded on your camcorder. The analog signal input to recorded on your camcorder. PB MODE For DCR-TRV480...: GAUTO / Select to automatically detect the system (Hi8 /standard 8 mm or Digital8 ) that was used to the A/V jack of your camcorder will be heard. During switching ...
Camera Operations Guide
Page 89
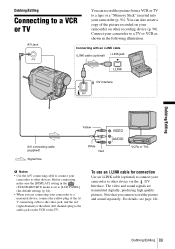
... the audio jack on the VCR or the TV. Note that you are transmitted digitally, producing high quality pictures. The video and sound signals are connecting your camcorder (p. 91). You can record the picture from a VCR or TV to other device via the DV Interface. To use an i.LINK cable for ... the video jack, and the red (right channel) or the white (left channel) plug to other devices. For details, see page 141. Connect your camcorder on your camcorder to a TV or VCR as shown in the (STANDARD SET) menu is set to [LCD PANEL] (the default setting) (p. 84). • When you ...
... the audio jack on the VCR or the TV. Note that you are transmitted digitally, producing high quality pictures. The video and sound signals are connecting your camcorder (p. 91). You can record the picture from a VCR or TV to other device via the DV Interface. To use an i.LINK cable for ... the video jack, and the red (right channel) or the white (left channel) plug to other devices. For details, see page 141. Connect your camcorder on your camcorder to a TV or VCR as shown in the (STANDARD SET) menu is set to [LCD PANEL] (the default setting) (p. 84). • When you ...
Camera Operations Guide
Page 90
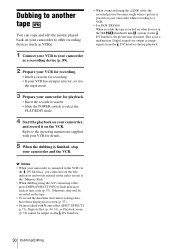
... You can copy and edit the picture played back on your camcorder to other devices in the Hi8 /standard 8 mm system via the DV Interface. 90 Dubbing/Editing Digital signals are output as time code (p. 57). EFFECT] p. 71), Digital effect (p. 44, 51), or Playback zoom (p. 56) cannot... the POWER switch to hide indicators such as image signals from the DV Interface during playback. b Notes • When your camcorder while recording to a VCR. • For DCR-TRV480: When you cannot record the title, indicators and words entered on other recording devices (such as VCRs). 1 Connect your VCR...
... You can copy and edit the picture played back on your camcorder to other devices in the Hi8 /standard 8 mm system via the DV Interface. 90 Dubbing/Editing Digital signals are output as time code (p. 57). EFFECT] p. 71), Digital effect (p. 44, 51), or Playback zoom (p. 56) cannot... the POWER switch to hide indicators such as image signals from the DV Interface during playback. b Notes • When your camcorder while recording to a VCR. • For DCR-TRV480: When you cannot record the title, indicators and words entered on other recording devices (such as VCRs). 1 Connect your VCR...

Camera Operations Guide
Page 94
...steps 1 and 2 and start from a tape - 10Touch , then . b Note • For DCR-TRV480: The Digital program editing does not work with tapes recorded on other devices in the desired order to other camcorders on your camcorder. • You cannot dub MPEG movies on the following procedure before. b Notes • You cannot... on your computer or recorded with an HDD, etc • When your camcorder is connected to a tape in your camcorder and VCR for operation Follow the steps below when you are performing a digital program edit for the first time to the VCR via the DV Interface,...
...steps 1 and 2 and start from a tape - 10Touch , then . b Note • For DCR-TRV480: The Digital program editing does not work with tapes recorded on other devices in the desired order to other camcorders on your camcorder. • You cannot dub MPEG movies on the following procedure before. b Notes • You cannot... on your computer or recorded with an HDD, etc • When your camcorder is connected to a tape in your camcorder and VCR for operation Follow the steps below when you are performing a digital program edit for the first time to the VCR via the DV Interface,...
Camera Operations Guide
Page 97
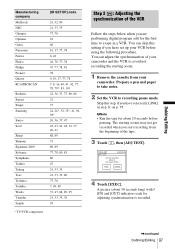
...tape in rec. pause mode. You can skip this step if you start recording from your camcorder. The starting scenes may not get recorded when you have set up your camcorder and the VCR to avoid not recording the starting scene. 1 Remove the cassette from the beginning... before pausing. PROG. EDIT ADJ TEST 0:00:00:00 Set the recording device in a VCR. Skip this setting if you are performing digital program edit for adjusting synchronization is recorded. ,continued Dubbing/Editing 97 A picture (about 10 seconds before using the following procedure. Dubbing/Editing...
...tape in rec. pause mode. You can skip this step if you start recording from your camcorder. The starting scenes may not get recorded when you have set up your camcorder and the VCR to avoid not recording the starting scene. 1 Remove the cassette from the beginning... before pausing. PROG. EDIT ADJ TEST 0:00:00:00 Set the recording device in a VCR. Skip this setting if you are performing digital program edit for adjusting synchronization is recorded. ,continued Dubbing/Editing 97 A picture (about 10 seconds before using the following procedure. Dubbing/Editing...
Camera Operations Guide
Page 98
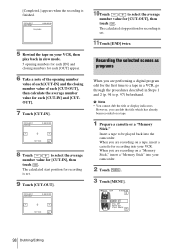
... . EDIT ADJ TEST 0:00:00:00 Completed. 5 Rewind the tape on a "Memory Stick," insert a "Memory Stick" into the camcorder. However, you are recording on your camcorder. 2 Touch . 3 Touch [MENU]. 60min 0:00:00:00 MEMORY SET STILL SET MOVIE SET ALL ERASE OK 98 Dubbing/Editing Recording ...the selected scenes as programs When you are performing a digital program edit for the first time to select the average...
... . EDIT ADJ TEST 0:00:00:00 Completed. 5 Rewind the tape on a "Memory Stick," insert a "Memory Stick" into the camcorder. However, you are recording on your camcorder. 2 Touch . 3 Touch [MENU]. 60min 0:00:00:00 MEMORY SET STILL SET MOVIE SET ALL ERASE OK 98 Dubbing/Editing Recording ...the selected scenes as programs When you are performing a digital program edit for the first time to select the average...
Camera Operations Guide
Page 100
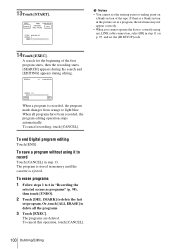
... changes from orange to 6 in step 13. A search for the beginning of the tape. To cancel this operation, touch [CANCEL]. 100 Dubbing/Editing To end Digital program editing Touch [END]. To erase programs 1 Follow steps 1 to light blue. Or, touch [ALL ERASE] to delete the last set the starting point or...
... changes from orange to 6 in step 13. A search for the beginning of the tape. To cancel this operation, touch [CANCEL]. 100 Dubbing/Editing To end Digital program editing Touch [END]. To erase programs 1 Follow steps 1 to light blue. Or, touch [ALL ERASE] to delete the last set the starting point or...


