Camera Operations Guide
Page 3
... are operational for a digital device pursuant to comply with the limits for effective use Note on a cassette tape You can radiate radio frequency energy and, if not installed and used with the instructions, may be provided, even if recording or playback is encouraged to try to correct the interference by turning the equipment off and on the LCD panel, viewfinder, and lens • The LCD screen...
... are operational for a digital device pursuant to comply with the limits for effective use Note on a cassette tape You can radiate radio frequency energy and, if not installed and used with the instructions, may be provided, even if recording or playback is encouraged to try to correct the interference by turning the equipment off and on the LCD panel, viewfinder, and lens • The LCD screen...
Camera Operations Guide
Page 4
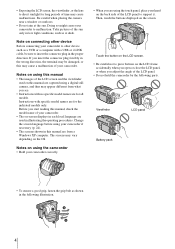
... reading this manual, check the model name of your camcorder. • The on connecting other device Before connecting your camcorder to support it. Change the screen language before using this manual • The images of the LCD panel. • Do not hold the camcorder by the following illustration. 4 Be careful when placing the camera near a window or outdoors. • Do not aim at dusk. Then, touch the buttons displayed on the...
... reading this manual, check the model name of your camcorder. • The on connecting other device Before connecting your camcorder to support it. Change the screen language before using this manual • The images of the LCD panel. • Do not hold the camcorder by the following illustration. 4 Be careful when placing the camera near a window or outdoors. • Do not aim at dusk. Then, touch the buttons displayed on the...

Camera Operations Guide
Page 17
... possible recording time using the viewfinder. ,continued Getting started After charging the battery The CHG (charge) lamp turns off . 1 Set the POWER switch to (CHG) OFF. To check the remaining battery - 6 Slide the POWER switch up and charging starts. BATTERY INFO BATTERY CHARGE LEVEL 0% 50% 100% REC TIME AVAILABLE LCD SCREEN: 72 min VIEWFINDER: 95 min A Battery charge level: Displays approximate remaining amount of power left in the direction of the battery pack. To remove the battery pack BATT(battery) release button POWER switch OPEN POWER switch You can check...
... possible recording time using the viewfinder. ,continued Getting started After charging the battery The CHG (charge) lamp turns off . 1 Set the POWER switch to (CHG) OFF. To check the remaining battery - 6 Slide the POWER switch up and charging starts. BATTERY INFO BATTERY CHARGE LEVEL 0% 50% 100% REC TIME AVAILABLE LCD SCREEN: 72 min VIEWFINDER: 95 min A Battery charge level: Displays approximate remaining amount of power left in the direction of the battery pack. To remove the battery pack BATT(battery) release button POWER switch OPEN POWER switch You can check...

Camera Operations Guide
Page 18
... the playing time for tapes recorded in the Digital8 system. The battery pack is reduced by about 20%. For DCR-TRV480: The playing time of tapes recorded on Approximate number of minutes available when you use your camcorder, even if its power cord is disconnected from the wall outlet. • The recording and playback time will be shorter when you use a fully charged battery pack at 25°C (77°F). Battery pack Continuous Typical* recording recording time time...
... the playing time for tapes recorded in the Digital8 system. The battery pack is reduced by about 20%. For DCR-TRV480: The playing time of tapes recorded on Approximate number of minutes available when you use your camcorder, even if its power cord is disconnected from the wall outlet. • The recording and playback time will be shorter when you use a fully charged battery pack at 25°C (77°F). Battery pack Continuous Typical* recording recording time time...

Camera Operations Guide
Page 26
... CAMERA-TAPE lamp lights up . Slide the POWER switch while pressing the green button. 4 Press REC START/STOP. To delete the movie, touch after playback is set to (CHG) OFF. 26 Recording p. 24). When you are recording on the LCD screen and the Camera recording lamp lights up , and your camcorder is finished, then [YES]. To record on the screen. To record on a tape or a "Memory Stick." OPEN REC START/STOP POWER switch z Tip • Performing Easy Handycam operation, even first time users can record movies on a "Memory Stick...
... CAMERA-TAPE lamp lights up . Slide the POWER switch while pressing the green button. 4 Press REC START/STOP. To delete the movie, touch after playback is set to (CHG) OFF. 26 Recording p. 24). When you are recording on the LCD screen and the Camera recording lamp lights up , and your camcorder is finished, then [YES]. To record on the screen. To record on a tape or a "Memory Stick." OPEN REC START/STOP POWER switch z Tip • Performing Easy Handycam operation, even first time users can record movies on a "Memory Stick...
Camera Operations Guide
Page 29
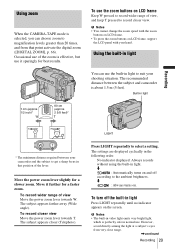
... the zoom buttons on LCD frame. • To press the zoom buttons on the screen. The settings are displayed cyclically in light. To turn off the built-in light You can choose zoom to magnification levels greater than 20 times, and from very close range. ,continued Recording 29 m : Always turns on. To record closer view Move the power zoom lever towards W. To record wider range of the lever. Using zoom When the CAMERA-TAPE mode is...
... the zoom buttons on LCD frame. • To press the zoom buttons on the screen. The settings are displayed cyclically in light. To turn off the built-in light You can choose zoom to magnification levels greater than 20 times, and from very close range. ,continued Recording 29 m : Always turns on. To record closer view Move the power zoom lever towards W. To record wider range of the lever. Using zoom When the CAMERA-TAPE mode is...
Camera Operations Guide
Page 57
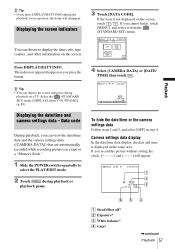
... view the date/time data and the camera settings data ([CAMERA DATA]) that are automatically recorded while recording pictures on a TV. If you cannot find it, touch [MENU], and select it from the (STANDARD SET) menu. 60min DATA CODE: 0:00:00:00 OFF OFF DATE/ TIME CAMERA DATA Press DISPLAY/BATT INFO. Select the (STANDARD SET) menu, [DISPLAY], then [V-OUT/PANEL] (p. 84). Displaying the screen indicators You can display the screen indicators during playback on a tape or a "Memory Stick." 1 Slide the POWER switch repeatedly to display...
... view the date/time data and the camera settings data ([CAMERA DATA]) that are automatically recorded while recording pictures on a TV. If you cannot find it, touch [MENU], and select it from the (STANDARD SET) menu. 60min DATA CODE: 0:00:00:00 OFF OFF DATE/ TIME CAMERA DATA Press DISPLAY/BATT INFO. Select the (STANDARD SET) menu, [DISPLAY], then [V-OUT/PANEL] (p. 84). Displaying the screen indicators You can display the screen indicators during playback on a tape or a "Memory Stick." 1 Slide the POWER switch repeatedly to display...
Camera Operations Guide
Page 68
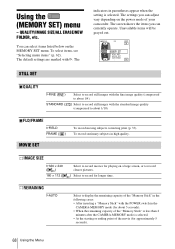
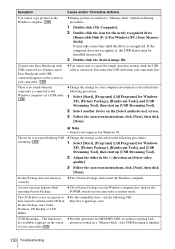
...). QUALITY/IMAGE SIZE/ALL ERASE/NEW FOLDER, etc. MOVIE SET IMAGE SIZE G320 × 240 () 160 × 112 ( Select to record for playing on the MEMORY SET menu. The indicators in high quality. The screen shows the items you can select items listed below on a large screen, or to record clearer pictures. ) Select to record movies for longer time. You can adjust vary depending on the power mode of the "Memory Stick" in the...
...). QUALITY/IMAGE SIZE/ALL ERASE/NEW FOLDER, etc. MOVIE SET IMAGE SIZE G320 × 240 () 160 × 112 ( Select to record for playing on the MEMORY SET menu. The indicators in high quality. The screen shows the items you can select items listed below on a large screen, or to record clearer pictures. ) Select to record movies for longer time. You can adjust vary depending on the power mode of the "Memory Stick" in the...
Camera Operations Guide
Page 79
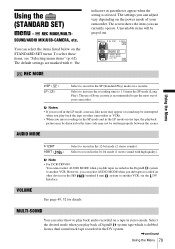
...:00 STANDARD SET REC MODE AUD I O MODE LCD SET OK Using the Menu GSP ( SP ) LP ( LP ) Select to another VCR, via the DV Interface. The use of Sony cassette is selected. SOUND/AUDIO MIX/USB-CAMERA, etc. The default settings are marked with high quality). b Note • For DCR-TRV480: You cannot select AUDIO MODE when you dub tapes recorded in the LP mode on one tape, the playback picture may be distorted or the time code may...
...:00 STANDARD SET REC MODE AUD I O MODE LCD SET OK Using the Menu GSP ( SP ) LP ( LP ) Select to another VCR, via the DV Interface. The use of Sony cassette is selected. SOUND/AUDIO MIX/USB-CAMERA, etc. The default settings are marked with high quality). b Note • For DCR-TRV480: You cannot select AUDIO MODE when you dub tapes recorded in the LP mode on one tape, the playback picture may be distorted or the time code may...
Camera Operations Guide
Page 90
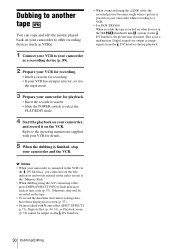
... recorded on the tape. • To record the date/time and camera settings data, have them displayed on screen (p. 57). • Pictures edited with your VCR for playback. • Insert the recorded cassette. • Slide the POWER switch to select the PLAY/EDIT mode. 4 Start the playback on your camcorder, and record it to the input mode. 3 Prepare your camcorder for details. 5 When the dubbing is finished, stop your camcorder and the VCR. • When connected using the i.LINK cable, the recorded picture...
... recorded on the tape. • To record the date/time and camera settings data, have them displayed on screen (p. 57). • Pictures edited with your VCR for playback. • Insert the recorded cassette. • Slide the POWER switch to select the PLAY/EDIT mode. 4 Start the playback on your camcorder, and record it to the input mode. 3 Prepare your camcorder for details. 5 When the dubbing is finished, stop your camcorder and the VCR. • When connected using the i.LINK cable, the recorded picture...
Camera Operations Guide
Page 104
... the instructions shown on the model. Printing 1 Select the image to a digital video camera or digital still camera, regardless of model manufacturer. You can easily print still images recorded on the camcorder without using a computer by connecting a printer directly to be displayed. Refer to a printer using the supplied USB cable. The location of the USB jack of your camcorder to the operating instructions supplied with your camcorder, set the paper in the menu settings is not set to...
... the instructions shown on the model. Printing 1 Select the image to a digital video camera or digital still camera, regardless of model manufacturer. You can easily print still images recorded on the camcorder without using a computer by connecting a printer directly to be displayed. Refer to a printer using the supplied USB cable. The location of the USB jack of your camcorder to the operating instructions supplied with your camcorder, set the paper in the menu settings is not set to...

Camera Operations Guide
Page 107
...) (to connect via an i.LINK cable), disc drive (You need a CD-R drive to have DirectX installed.) Windows Media Player 7.0 or later Macromedia Flash Player 6.0 or later • Sound system: 16 bit stereo sound card and stereo speakers • Memory: 64 MB or more (depending on the size of the image files edited) • Display: 4 MB VRAM video card, Minimum 800 × 600 dots, High color (16 bit color, 65 000 colors), DirectDraw display driver capability...
...) (to connect via an i.LINK cable), disc drive (You need a CD-R drive to have DirectX installed.) Windows Media Player 7.0 or later Macromedia Flash Player 6.0 or later • Sound system: 16 bit stereo sound card and stereo speakers • Memory: 64 MB or more (depending on the size of the image files edited) • Display: 4 MB VRAM video card, Minimum 800 × 600 dots, High color (16 bit color, 65 000 colors), DirectDraw display driver capability...
Camera Operations Guide
Page 122
... Corrective Actions Cannot play back. cPress LIGHT repeatedly to [AUTO] in the (STANDARD SET) menu for the tape recorded in the (STANDARD SET) menu. (p. 79) cTurn up the volume. (p. 49) cOn the (STANDARD SET) menu, adjust [AUDIO MIX] from the [ST2] (sub sound) side until the sound is being played. • The data code on the tape is heard appropriately. (p. 81) cMake sure the red and white plugs of the A/V connecting cable are not clear...
... Corrective Actions Cannot play back. cPress LIGHT repeatedly to [AUTO] in the (STANDARD SET) menu for the tape recorded in the (STANDARD SET) menu. (p. 79) cTurn up the volume. (p. 49) cOn the (STANDARD SET) menu, adjust [AUDIO MIX] from the [ST2] (sub sound) side until the sound is being played. • The data code on the tape is heard appropriately. (p. 81) cMake sure the red and white plugs of the A/V connecting cable are not clear...
Camera Operations Guide
Page 127
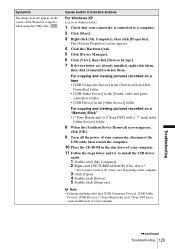
... the [Other devices] folder 5 When the [Confirm Device Removal] screen appears, click [OK]. 6 Turn off the power of your camcorder, disconnect the USB cable, then restart the computer. 7 Place the CD-ROM in the [Universal Serial Bus Controller] folder For copying and viewing pictures recorded on a "Memory Stick" • [? Sony DSC] with a "?" Sony Handycam] and [? Sony DSC] may vary depending on the computer. 3 Click [Open]. 4 Double-click [Driver]. 5 Double-click [Setup.exe]. Troubleshooting ,continued Troubleshooting 127 Cause...
... the [Other devices] folder 5 When the [Confirm Device Removal] screen appears, click [OK]. 6 Turn off the power of your camcorder, disconnect the USB cable, then restart the computer. 7 Place the CD-ROM in the [Universal Serial Bus Controller] folder For copying and viewing pictures recorded on a "Memory Stick" • [? Sony DSC] with a "?" Sony Handycam] and [? Sony DSC] may vary depending on the computer. 3 Click [Open]. 4 Double-click [Driver]. 5 Double-click [Setup.exe]. Troubleshooting ,continued Troubleshooting 127 Cause...
Camera Operations Guide
Page 128
... your camcorder is connected to delete them , then click [Uninstall] to a computer. 2 Right-click [My Computer], then click [Properties]. Sony Handycam] or [? Sony Handycam] and [? Cause and/or Corrective Actions For Windows 2000 Log on the computer. 3 Click [Open]. 4 Double-click [Driver]. 5 Double-click [Setup.exe]. For copying and viewing pictures recorded on a tape • [USB Composite Device] in the [Universal Serial Bus Controller] folder • [USB Audio Device] in the [Sound, video and game controllers...
... your camcorder is connected to delete them , then click [Uninstall] to a computer. 2 Right-click [My Computer], then click [Properties]. Sony Handycam] or [? Sony Handycam] and [? Cause and/or Corrective Actions For Windows 2000 Log on the computer. 3 Click [Open]. 4 Double-click [Driver]. 5 Double-click [Setup.exe]. For copying and viewing pictures recorded on a tape • [USB Composite Device] in the [Universal Serial Bus Controller] folder • [USB Audio Device] in the [Sound, video and game controllers...
Camera Operations Guide
Page 129
... click [Uninstall] to delete them. Sony Handycam] and [? For copying and viewing pictures recorded on a tape • [USB Composite Device] in the [Universal Serial Bus Controller] folder • [USB Audio Device] in the [Sound, video and game controllers] folder • [USB Device] in the disc drive of the Windows computer when using the USB cable. mark in the [Other devices] folder 8 When the [Confirm Device Removal] screen appears, click [OK]. 9 Turn off the power of your camcorder, disconnect the USB cable, then restart the computer...
... click [Uninstall] to delete them. Sony Handycam] and [? For copying and viewing pictures recorded on a tape • [USB Composite Device] in the [Universal Serial Bus Controller] folder • [USB Audio Device] in the [Sound, video and game controllers] folder • [USB Device] in the disc drive of the Windows computer when using the USB cable. mark in the [Other devices] folder 8 When the [Confirm Device Removal] screen appears, click [OK]. 9 Turn off the power of your camcorder, disconnect the USB cable, then restart the computer...
Camera Operations Guide
Page 130
... audio device] screen. 3 Follow the on-screen instructions, click [Next], then click [Done]. cClose Picture Package on your Windows computer first, then set the POWER switch on your computer environment as described in Picture Package Auto Video, Producer, CD Backup or VCD Maker. cDisplay pictures recorded on Windows 98. Disconnect the USB cable from your camcorder. 130 Troubleshooting Picture Package does not function correctly. of your camcorder. It may be written on a "Memory Stick" after USB...
... audio device] screen. 3 Follow the on-screen instructions, click [Next], then click [Done]. cClose Picture Package on your Windows computer first, then set the POWER switch on your computer environment as described in Picture Package Auto Video, Producer, CD Backup or VCD Maker. cDisplay pictures recorded on Windows 98. Disconnect the USB cable from your camcorder. 130 Troubleshooting Picture Package does not function correctly. of your camcorder. It may be written on a "Memory Stick" after USB...
Camera Operations Guide
Page 138
... you eject the "Memory Stick," turn the power off on the "Memory Stick" (while the access lamp is lit or flashing). - MOV00001: This file name appears on the screen of your camcorder. • Data read/write speed may be recorded or played on a computer: A "Memory Stick" formatted by the Windows OS or using Macintosh computers does not have guaranteed compatibility with the terminal. The file extension is ".JPG." • Movie format: Your camcorder compresses and records picture data in...
... you eject the "Memory Stick," turn the power off on the "Memory Stick" (while the access lamp is lit or flashing). - MOV00001: This file name appears on the screen of your camcorder. • Data read/write speed may be recorded or played on a computer: A "Memory Stick" formatted by the Windows OS or using Macintosh computers does not have guaranteed compatibility with the terminal. The file extension is ".JPG." • Movie format: Your camcorder compresses and records picture data in...

Camera Operations Guide
Page 154
... 20, 84 BLACK FADER 42 Built-in light 29 BURN DVD 76 BURN VCD 76 Button-type battery Remote Commander........ 151 C CALIBRATION 144 Camera Chroma key (CAMTM CHROMA 45 Camera settings data display 57 Cassette 22, 137 CD-ROM 106 Charging the battery Battery pack 16 Pre-installed rechargeable battery 145 Clock set (CLOCK SET)...... 21, 85 Color Slow Shutter (COLOR SLW S)........40 Customizing Personal Menu 86 D Data code (DATA CODE) .....57, 83 Date search 60 Date/time 57 Delete Deleting pictures .......101 DEMO MODE 75 Digital convert function (A/VcDV...
... 20, 84 BLACK FADER 42 Built-in light 29 BURN DVD 76 BURN VCD 76 Button-type battery Remote Commander........ 151 C CALIBRATION 144 Camera Chroma key (CAMTM CHROMA 45 Camera settings data display 57 Cassette 22, 137 CD-ROM 106 Charging the battery Battery pack 16 Pre-installed rechargeable battery 145 Clock set (CLOCK SET)...... 21, 85 Color Slow Shutter (COLOR SLW S)........40 Customizing Personal Menu 86 D Data code (DATA CODE) .....57, 83 Date search 60 Date/time 57 Delete Deleting pictures .......101 DEMO MODE 75 Digital convert function (A/VcDV...
Camera Operations Guide
Page 155
... (PROG. LCD brightness (LCD BRIGHT) ..........20 LCD COLOR 81 LCD screen 4 LCD SET 81 LP (Long Play) See Recording mode (REC MODE) Luminance key (LUMI. KEY 44 M Macintosh 108, 111 Main sound See MULTI-SOUND Manual focus 41 Memory Chroma key (MTCAM CHROMA 45 Memory Luminance key (MTCAM LUMI.) ....45 MEMORY MIX 45 Memory Overlap (OVERLAP 43 Memory photo 32, 52 "Memory Stick" General information .........138 Inserting 23 Number of pictures......33 Menu CAMERA SET............64 EDIT/PLAY 76 MEMORY SET...........68 MENU ROTATE...
... (PROG. LCD brightness (LCD BRIGHT) ..........20 LCD COLOR 81 LCD screen 4 LCD SET 81 LP (Long Play) See Recording mode (REC MODE) Luminance key (LUMI. KEY 44 M Macintosh 108, 111 Main sound See MULTI-SOUND Manual focus 41 Memory Chroma key (MTCAM CHROMA 45 Memory Luminance key (MTCAM LUMI.) ....45 MEMORY MIX 45 Memory Overlap (OVERLAP 43 Memory photo 32, 52 "Memory Stick" General information .........138 Inserting 23 Number of pictures......33 Menu CAMERA SET............64 EDIT/PLAY 76 MEMORY SET...........68 MENU ROTATE...


