

Operating Instructions
Page 2
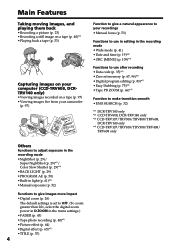
... direct sunlight. 2 Caution: Do not handle damaged or leaking Lithium-Ion batteries. For more information regarding recycling of this Sony Digital Handycam camcorder/Handycam VisionTM . You will soon be producing home video that may be of sufficient magnitude to constitute a risk of electric...car parked in the U.S.A. Never expose the battery pack to use. Congratulations on your used rechargeable batteries to persons. With your Digital Handycam/Handycam VisionTM, you . You can capture life's precious moments with advanced features, but at the same time it is intended...
... direct sunlight. 2 Caution: Do not handle damaged or leaking Lithium-Ion batteries. For more information regarding recycling of this Sony Digital Handycam camcorder/Handycam VisionTM . You will soon be producing home video that may be of sufficient magnitude to constitute a risk of electric...car parked in the U.S.A. Never expose the battery pack to use. Congratulations on your used rechargeable batteries to persons. With your Digital Handycam/Handycam VisionTM, you . You can capture life's precious moments with advanced features, but at the same time it is intended...
Operating Instructions
Page 4
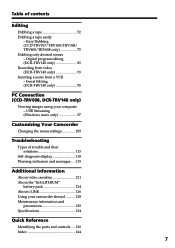
... your computer (CCD-TRV608, DCRTRV140 only) •Viewing images recorded on a tape (p. 97) •Viewing images live from your camcorder (p. 97) Function to give a natural appearance to your recordings •Manual focus (p. 53) Functions to use in editing in the...memory (p. 67, 96)*1) • Digital program editing (p. 83)*1) • Easy Dubbing (p. 75)*4) • Tape PB ZOOM (p. 66)*1) Function to make transition smooth •END SEARCH (p. 32) *1) DCR-TRV140 only *2) CCD-TRV608, DCR-TRV140 only *3) CCD-TRV107/TRV308/TRV408/TRV608, DCR-TRV140 only *4) CCD-TRV107/TRV108/TRV308/TRV408/...
... your computer (CCD-TRV608, DCRTRV140 only) •Viewing images recorded on a tape (p. 97) •Viewing images live from your camcorder (p. 97) Function to give a natural appearance to your recordings •Manual focus (p. 53) Functions to use in editing in the...memory (p. 67, 96)*1) • Digital program editing (p. 83)*1) • Easy Dubbing (p. 75)*4) • Tape PB ZOOM (p. 66)*1) Function to make transition smooth •END SEARCH (p. 32) *1) DCR-TRV140 only *2) CCD-TRV608, DCR-TRV140 only *3) CCD-TRV107/TRV308/TRV408/TRV608, DCR-TRV140 only *4) CCD-TRV107/TRV108/TRV308/TRV408/...
Operating Instructions
Page 7
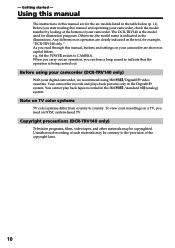
... (CCD-TRV107/TRV108/TRV308/ TRV408/TRV608 only 75 Dubbing only desired scenes - Digital program editing (DCR-TRV140 only 83 Recording from video (DCR-TRV140 only 93 Inserting a scene from a VCR - Insert Editing (DCR-TRV140 only 95 PC Connection (CCD-TRV608, DCR-TRV140 only) Viewing images using your camcorder abroad .......... 128 Maintenance information and precautions 129 Specifications 134 Quick Reference Identifying...
... (CCD-TRV107/TRV108/TRV308/ TRV408/TRV608 only 75 Dubbing only desired scenes - Digital program editing (DCR-TRV140 only 83 Recording from video (DCR-TRV140 only 93 Inserting a scene from a VCR - Insert Editing (DCR-TRV140 only 95 PC Connection (CCD-TRV608, DCR-TRV140 only) Viewing images using your camcorder abroad .......... 128 Maintenance information and precautions 129 Specifications 134 Quick Reference Identifying...
Operating Instructions
Page 10
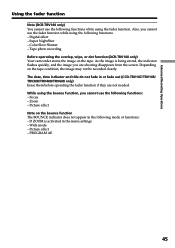
... TV. Before using your camcorder (DCR-TRV140 only) With your camcorder are clearly indicated in the table below (p. 11). You cannot play back tapes recorded in the Digital8 system. - Any differences in operation are shown in capital letters. Set the POWER switch to country. Note on your digital camcorder, we recommend using Hi8 /Digital8 video cassettes. When you...
... TV. Before using your camcorder (DCR-TRV140 only) With your camcorder are clearly indicated in the table below (p. 11). You cannot play back tapes recorded in the Digital8 system. - Any differences in operation are shown in capital letters. Set the POWER switch to country. Note on your digital camcorder, we recommend using Hi8 /Digital8 video cassettes. When you...

Operating Instructions
Page 26
... right side of the bar shows the digital W T zooming zone. The digital zooming zone appears when you select the digital zoom power in D ZOOM in light accidentally. After using your camcorder (CCD-TRV107/TRV308/TRV408/TRV608, DCR-TRV140 only) Remove the battery pack from your camcorder to OFF (CHG). (2) Close the LCD panel. (3) Eject the cassette. (4) Attach the...
... right side of the bar shows the digital W T zooming zone. The digital zooming zone appears when you select the digital zoom power in D ZOOM in light accidentally. After using your camcorder (CCD-TRV107/TRV308/TRV408/TRV608, DCR-TRV140 only) Remove the battery pack from your camcorder to OFF (CHG). (2) Close the LCD panel. (3) Eject the cassette. (4) Attach the...

Operating Instructions
Page 30
...the Super NightShot (DCR-TRV140 only) The Super NightShot mode makes subjects up to 16 times brighter than those recorded in the NightShot mode. (1) Slide NIGHTSHOT to ON in the daytime). and "SUPER NIGHTSHOT" indicators flash on the screen. This may cause your camcorder to ON in incorrect... or unnatural colors. •If focusing is about 3 m (10 feet). 30 Fader - and " COLOR SLOW SHUTTER" indicators flash on the screen. Digital effect - Using the NightShot Light The picture will be ...
...the Super NightShot (DCR-TRV140 only) The Super NightShot mode makes subjects up to 16 times brighter than those recorded in the NightShot mode. (1) Slide NIGHTSHOT to ON in the daytime). and "SUPER NIGHTSHOT" indicators flash on the screen. This may cause your camcorder to ON in incorrect... or unnatural colors. •If focusing is about 3 m (10 feet). 30 Fader - and " COLOR SLOW SHUTTER" indicators flash on the screen. Digital effect - Using the NightShot Light The picture will be ...

Operating Instructions
Page 40
... is then recorded for 60 minutes in use. •When recording a still image, do not shake your camcorder returns to the standby mode. Recording a still image on the image. DCR-TRV140 only You can record for about seven seconds. You can record about 510 images in the SP mode and... image on the screen is set or in the LP mode on the screen until a still image appears. while the digital effect function is recorded for about 7 seconds, and your camcorder. - To use . - The still image is completed. Recording does not start yet. When you cannot change the still...
... is then recorded for 60 minutes in use. •When recording a still image, do not shake your camcorder returns to the standby mode. Recording a still image on the image. DCR-TRV140 only You can record for about seven seconds. You can record about 510 images in the SP mode and... image on the screen is set or in the LP mode on the screen until a still image appears. while the digital effect function is recorded for about 7 seconds, and your camcorder. - To use . - The still image is completed. Recording does not start yet. When you cannot change the still...
Operating Instructions
Page 45
... only) Erase them before operating the fader function if they are shooting disappears from the screen. Wide mode - Digital effect - Tape photo recording Before operating the overlap, wipe, or dot function (DCR-TRV140 only) Your camcorder stores the image on the tape condition, the image may not be recorded clearly. Zoom - Picture effect - ...following functions while using the following mode or functions: - Also, you are not needed. PROGRAM AE 45 Advanced Recording Operations Using the fader function Note (DCR-TRV140 only) You cannot use the following functions: -
... only) Erase them before operating the fader function if they are shooting disappears from the screen. Wide mode - Digital effect - Tape photo recording Before operating the overlap, wipe, or dot function (DCR-TRV140 only) Your camcorder stores the image on the tape condition, the image may not be recorded clearly. Zoom - Picture effect - ...following functions while using the following mode or functions: - Also, you are not needed. PROGRAM AE 45 Advanced Recording Operations Using the fader function Note (DCR-TRV140 only) You cannot use the following functions: -
Operating Instructions
Page 46
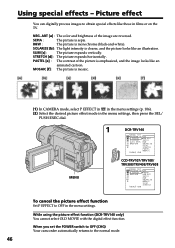
...DCR-TRV140 MANUA L SET PROGRAM AE OFF P EFFECT NEG. AR T SEP I A B&W SOL AR I Z E MOS A I C SL I C [ MENU ] : END CCD-TRV107/TRV108/ TRV308/TRV408/TRV608 MANUA L SET PROGRAM AE OFF P EFFECT PASTE L RETURN NEG. When you set the POWER switch to OFF (CHG) Your camcorder... picture expands vertically. PASTEL [e] : The contrast of the image are reversed. While using the picture effect function (DCR-TRV140 only) You cannot select OLD MOVIE with the digital effect function. B&W : The picture is emphasized, and the image looks like an animated cartoon. AR T D ...
...DCR-TRV140 MANUA L SET PROGRAM AE OFF P EFFECT NEG. AR T SEP I A B&W SOL AR I Z E MOS A I C SL I C [ MENU ] : END CCD-TRV107/TRV108/ TRV308/TRV408/TRV608 MANUA L SET PROGRAM AE OFF P EFFECT PASTE L RETURN NEG. When you set the POWER switch to OFF (CHG) Your camcorder... picture expands vertically. PASTEL [e] : The contrast of the image are reversed. While using the picture effect function (DCR-TRV140 only) You cannot select OLD MOVIE with the digital effect function. B&W : The picture is emphasized, and the image looks like an animated cartoon. AR T D ...
Operating Instructions
Page 47
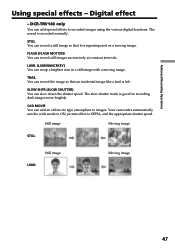
DCR-TRV140 only You can slow down the shutter speed. SLOW SHTR (SLOW SHUTTER) You can add special effects to recorded images using the various digital functions. Still image Moving image STILL Still image LUMI. LUMI. (LUMINANCEKEY) You can record a still image so that an incidental... image like a trail is superimposed on a moving image. The slow shutter mode is recorded normally. Your camcorder automatically sets the ...
DCR-TRV140 only You can slow down the shutter speed. SLOW SHTR (SLOW SHUTTER) You can add special effects to recorded images using the various digital functions. Still image Moving image STILL Still image LUMI. LUMI. (LUMINANCEKEY) You can record a still image so that an incidental... image like a trail is superimposed on a moving image. The slow shutter mode is recorded normally. Your camcorder automatically sets the ...
Operating Instructions
Page 65
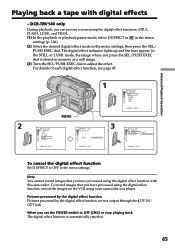
...record images that you can process a scene using the digital effect function with digital effects - DCR-TRV140 only During playback, you have processed using the digital effect function, record the images on the VCR using your camcorder as a still image. (3) Turn the SEL/PUSH EXEC... dial to adjust the effect. The digital effect indicator lights up and the bars appear. TRA ...
...record images that you can process a scene using the digital effect function with digital effects - DCR-TRV140 only During playback, you have processed using the digital effect function, record the images on the VCR using your camcorder as a still image. (3) Turn the SEL/PUSH EXEC... dial to adjust the effect. The digital effect indicator lights up and the bars appear. TRA ...

Operating Instructions
Page 74
... dubbing a tape Press x on both your camcorder. (2) Set the input selector on other video equipment, the picture may jitter. 74 Dubbing a tape Using the i.LINK cable (DV connecting cable) (DCR-TRV140 only) Simply connect the i.LINK cable (DV connecting cable) (optional) to DV IN/OUT and to -digital connection, video and audio signals are...
... dubbing a tape Press x on both your camcorder. (2) Set the input selector on other video equipment, the picture may jitter. 74 Dubbing a tape Using the i.LINK cable (DV connecting cable) (DCR-TRV140 only) Simply connect the i.LINK cable (DV connecting cable) (optional) to DV IN/OUT and to -digital connection, video and audio signals are...
Operating Instructions
Page 84
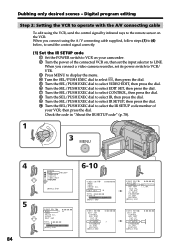
... the IR SETUP code number of the connected VCR on the VCR. I N" "CUT-OUT" I R SETUP PAUSEMODE I T SET CONTROL ADJ TEST "CUT- Digital program editing Step 2: Setting the VCR to operate with the A/V connecting cable To edit using the A/V connecting cable supplied, follow steps (1) to (4) below, to... send the control signal correctly. (1) Set the IR SETUP code 1 Set the POWER switch to VCR on your camcorder. 2 Turn the power of your VCR, then press the dial. L I NK V I DEO ED I T ED I R TEST RETURN [ MENU ] : END 0:00:00:00 IR i . I N" "...
... the IR SETUP code number of the connected VCR on the VCR. I N" "CUT-OUT" I R SETUP PAUSEMODE I T SET CONTROL ADJ TEST "CUT- Digital program editing Step 2: Setting the VCR to operate with the A/V connecting cable To edit using the A/V connecting cable supplied, follow steps (1) to (4) below, to... send the control signal correctly. (1) Set the IR SETUP code 1 Set the POWER switch to VCR on your camcorder. 2 Turn the power of your VCR, then press the dial. L I NK V I DEO ED I T ED I R TEST RETURN [ MENU ] : END 0:00:00:00 IR i . I N" "...
Operating Instructions
Page 85
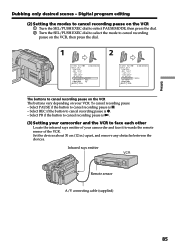
... your VCR. To cancel recording pause: - Set the devices about 30 cm (12 in.) apart, and remove any obstacles between the devices. Digital program editing (2) Setting the modes to cancel recording pause on the VCR 1 Turn the SEL/PUSH EXEC dial to select PAUSEMODE, then press the... to cancel recording pause is z. - Infrared rays emitter Remote sensor A/V connecting cable (supplied) 85 Select PAUSE if the button to cancel recording pause on your camcorder and the VCR to cancel recording pause is X. - I N " " CUT-OUT " I R SETUP P AUS EMODE I R TEST RETURN [ MENU ] : END 0:00:00:...
... your VCR. To cancel recording pause: - Set the devices about 30 cm (12 in.) apart, and remove any obstacles between the devices. Digital program editing (2) Setting the modes to cancel recording pause on the VCR 1 Turn the SEL/PUSH EXEC dial to select PAUSEMODE, then press the... to cancel recording pause is z. - Infrared rays emitter Remote sensor A/V connecting cable (supplied) 85 Select PAUSE if the button to cancel recording pause on your camcorder and the VCR to cancel recording pause is X. - I N " " CUT-OUT " I R SETUP P AUS EMODE I R TEST RETURN [ MENU ] : END 0:00:00:...
Operating Instructions
Page 86
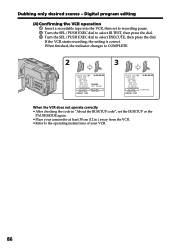
...operate correctly •After checking the code in .) away from the VCR. •Refer to COMPLETE. 2 3 V I DEO ED I T ED I T SET CONTROL ADJ TEST "CUT- Digital program editing (4) Confirming the VCR operation 1 Insert a recordable tape into the VCR, then set the IR SETUP or the PAUSEMODE again. •Place your... camcorder at least 30 cm (12 in "About the IR SETUP code", set to recording pause. 2 Turn the SEL/PUSH EXEC dial to select IR TEST...
...operate correctly •After checking the code in .) away from the VCR. •Refer to COMPLETE. 2 3 V I DEO ED I T ED I T SET CONTROL ADJ TEST "CUT- Digital program editing (4) Confirming the VCR operation 1 Insert a recordable tape into the VCR, then set the IR SETUP or the PAUSEMODE again. •Place your... camcorder at least 30 cm (12 in "About the IR SETUP code", set to recording pause. 2 Turn the SEL/PUSH EXEC dial to select IR TEST...
Operating Instructions
Page 87
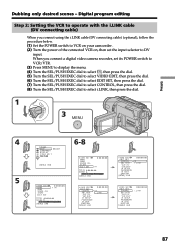
... N" "CUT-OUT" I R SETUP PAUSEMODE I R TEST RETURN [ MENU ] : END 0:00:00:00 IR i . Digital program editing Step 2: Setting the VCR to operate with the i.LINK cable (DV connecting cable) When you connect a digital video camera recorder, set the input selector to select i.LINK, then press the dial. 1 POWER RA... When you connect using the i.LINK cable (DV connecting cable) (optional), follow the procedure below. (1) Set the POWER switch to VCR on your camcorder . (2) Turn the power of the connected VCR on, then set its POWER switch to VCR/VTR. (3) Press MENU to display the menu. (4)...
... N" "CUT-OUT" I R SETUP PAUSEMODE I R TEST RETURN [ MENU ] : END 0:00:00:00 IR i . Digital program editing Step 2: Setting the VCR to operate with the i.LINK cable (DV connecting cable) When you connect a digital video camera recorder, set the input selector to select i.LINK, then press the dial. 1 POWER RA... When you connect using the i.LINK cable (DV connecting cable) (optional), follow the procedure below. (1) Set the POWER switch to VCR on your camcorder . (2) Turn the power of the connected VCR on, then set its POWER switch to VCR/VTR. (3) Press MENU to display the menu. (4)...

Operating Instructions
Page 88
Dubbing only desired scenes - The calculated start slow playback. Before operation, eject the cassette from your camcorder. (1) Set the POWER switch to VCR on your camcorder and the VCR. When you select i.LINK in the VCR, then start position for each OUT. (11) Turn the SEL/PUSH EXEC dial... the SEL/PUSH EXEC dial to select the average numerical value of IN, then press the dial. Digital program editing Step 3: Adjusting the synchronization of the VCR You can adjust the synchronization of your camcorder. (2) Insert a blank tape (or a tape you do not need to set to select EXECUTE, ...
Dubbing only desired scenes - The calculated start slow playback. Before operation, eject the cassette from your camcorder. (1) Set the POWER switch to VCR on your camcorder and the VCR. When you select i.LINK in the VCR, then start position for each OUT. (11) Turn the SEL/PUSH EXEC dial... the SEL/PUSH EXEC dial to select the average numerical value of IN, then press the dial. Digital program editing Step 3: Adjusting the synchronization of the VCR You can adjust the synchronization of your camcorder. (2) Insert a blank tape (or a tape you do not need to set to select EXECUTE, ...

Operating Instructions
Page 89
... I T ED I N " . Be sure to allow about 50 seconds. •If you connect using the i.LINK cable (DV connecting cable) With a digital-to operate the dubbing function correctly, depending on the VCR. Digital program editing 11 7,8 V I DEO ED I T 0:00:00:00 ED I T SET CONTROL AD J T E S T COMP L E T E " CUT- " CUT-OUT...:00 0 V I DEO ED I T ED I T SET CONTROL ADJ TEST " CUT- Set CONTROL to IR in the menu settings of your camcorder . •When you complete step 3, the image to adjust the synchronization is recorded for about 10 seconds of the tape may not be able to...
... I T ED I N " . Be sure to allow about 50 seconds. •If you connect using the i.LINK cable (DV connecting cable) With a digital-to operate the dubbing function correctly, depending on the VCR. Digital program editing 11 7,8 V I DEO ED I T 0:00:00:00 ED I T SET CONTROL AD J T E S T COMP L E T E " CUT- " CUT-OUT...:00 0 V I DEO ED I T ED I T SET CONTROL ADJ TEST " CUT- Set CONTROL to IR in the menu settings of your camcorder . •When you complete step 3, the image to adjust the synchronization is recorded for about 10 seconds of the tape may not be able to...
Operating Instructions
Page 90
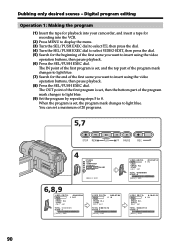
Digital program editing Operation 1: Making the program (1) Insert the tape for playback into your camcorder, and insert a tape for recording into the VCR. (2) Press MENU to display the menu. (3) Turn the SEL/PUSH EXEC dial to select , then press the ...
Digital program editing Operation 1: Making the program (1) Insert the tape for playback into your camcorder, and insert a tape for recording into the VCR. (2) Press MENU to display the menu. (3) Turn the SEL/PUSH EXEC dial to select , then press the ...

Operating Instructions
Page 91
... Select RETURN in the menu settings. (2) Turn the SEL/PUSH EXEC dial to recording pause. The program is stored in step 3. Operation 2: Performing Digital program editing (Dubbing a tape) Make sure that the VCR is complete. The last set program mark flashes. (2) Turn the SEL/PUSH EXEC dial to...). If there is canceled. Search for the beginning of the tape. The program marks are cleared and the settings are connected, and that your camcorder and VCR stop automatically. 91 All the program marks flash. (3) Turn the SEL/PUSH EXEC dial to select UNDO, then press the dial. ...
... Select RETURN in the menu settings. (2) Turn the SEL/PUSH EXEC dial to recording pause. The program is stored in step 3. Operation 2: Performing Digital program editing (Dubbing a tape) Make sure that the VCR is complete. The last set program mark flashes. (2) Turn the SEL/PUSH EXEC dial to...). If there is canceled. Search for the beginning of the tape. The program marks are cleared and the settings are connected, and that your camcorder and VCR stop automatically. 91 All the program marks flash. (3) Turn the SEL/PUSH EXEC dial to select UNDO, then press the dial. ...


