
Operating Instructions
Page 7
.../TRV308/ TRV408/TRV608 only 75 Dubbing only desired scenes - USB Streaming (Windows users only 97 Customizing Your Camcorder Changing the menu settings 105 Troubleshooting Types of contents Editing Dubbing a tape 72 Dubbing a tape easily - Digital program editing (DCR-TRV140 only 83 Recording from video (DCR-TRV140 only 93 Inserting a scene from a VCR - Table of trouble and...
.../TRV308/ TRV408/TRV608 only 75 Dubbing only desired scenes - USB Streaming (Windows users only 97 Customizing Your Camcorder Changing the menu settings 105 Troubleshooting Types of contents Editing Dubbing a tape 72 Dubbing a tape easily - Digital program editing (DCR-TRV140 only 83 Recording from video (DCR-TRV140 only 93 Inserting a scene from a VCR - Table of trouble and...
Operating Instructions
Page 8
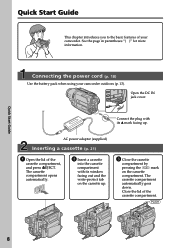
Connecting the power cord (p. 18) Use the battery pack when using your camcorder. Quick Start Guide 8 Connect the plug with its v mark facing up . 3 Close the cassette compartment by pressing the mark on the cassette compartment. The cassette ... of the cassette compartment. See the page in parentheses "( )" for more information. Quick Start Guide This chapter introduces you to the basic features of your camcorder outdoors (p. 13). EJECT 2 Insert a cassette into the cassette compartment with its window facing out and the write-protect tab on the cassette up .
Connecting the power cord (p. 18) Use the battery pack when using your camcorder. Quick Start Guide 8 Connect the plug with its v mark facing up . 3 Close the cassette compartment by pressing the mark on the cassette compartment. The cassette ... of the cassette compartment. See the page in parentheses "( )" for more information. Quick Start Guide This chapter introduces you to the basic features of your camcorder outdoors (p. 13). EJECT 2 Insert a cassette into the cassette compartment with its window facing out and the write-protect tab on the cassette up .

Operating Instructions
Page 12
... in the manufacturing process and do not affect the recording in any way. •Do not let your camcorder get wet may cause malfunctions [c]. •Do not directly shoot the sun. Exposing the LCD screen, the finder or the lens to malfunction. Using this malfunction cannot be some tiny black points and... sun in low light conditions such as in a car parked in the sun or under direct sunlight [b]. •Be careful when placing the camera near a window or outdoors. These points are operational for long periods may cause your camcorder to direct sunlight for effective use.
... in the manufacturing process and do not affect the recording in any way. •Do not let your camcorder get wet may cause malfunctions [c]. •Do not directly shoot the sun. Exposing the LCD screen, the finder or the lens to malfunction. Using this malfunction cannot be some tiny black points and... sun in low light conditions such as in a car parked in the sun or under direct sunlight [b]. •Be careful when placing the camera near a window or outdoors. These points are operational for long periods may cause your camcorder to direct sunlight for effective use.
Operating Instructions
Page 14
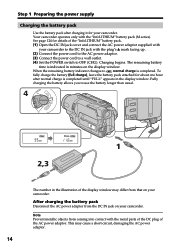
...usual. The remaining battery time is indicated in the illustration of the display window may cause a short-circuit, damaging the AC power adaptor. 14 CR 4 V POWER OFF(CHG) CAME RA FULL 1 2,3 The number in minutes on your camcorder to the DC IN jack with the "InfoLITHIUM" battery pack (M series...). After charging the battery pack Disconnect the AC power adaptor from the DC IN jack on the display window. This may differ from coming into contact with the metal...
...usual. The remaining battery time is indicated in the illustration of the display window may cause a short-circuit, damaging the AC power adaptor. 14 CR 4 V POWER OFF(CHG) CAME RA FULL 1 2,3 The number in minutes on your camcorder to the DC IN jack with the "InfoLITHIUM" battery pack (M series...). After charging the battery pack Disconnect the AC power adaptor from the DC IN jack on the display window. This may differ from coming into contact with the metal...
Operating Instructions
Page 15
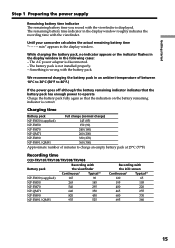
... you record with the viewfinder is disconnected. - Until your camcorder calculates the actual remaining battery time "- - - - While charging the battery pack, no indicator appears or the indicator flashes in the display window in the display window. The AC power adapter is displayed. We recommend charging the... battery pack in the display window roughly indicates the recording time with the viewfinder. The battery pack is wrong with the LCD screen Continuous* Typical** 120 65 195 105 400 220 465 255 600 330 695...
... you record with the viewfinder is disconnected. - Until your camcorder calculates the actual remaining battery time "- - - - While charging the battery pack, no indicator appears or the indicator flashes in the display window in the display window. The AC power adapter is displayed. We recommend charging the... battery pack in the display window roughly indicates the recording time with the viewfinder. The battery pack is wrong with the LCD screen Continuous* Typical** 120 65 195 105 400 220 465 255 600 330 695...

Operating Instructions
Page 21
... its window facing out and the write-protect tab on the cassette up your camcorder is the 3/4 of the indicated time on Hi8 /Digital8 tape.*1) •If you use standard 8 mm tape, be closed when you use Hi8 video cassettes.*2) (1) Prepare the power supply (p. 13). (2) Open the lid of the cassette compartment other DCR-TRV140...
... its window facing out and the write-protect tab on the cassette up your camcorder is the 3/4 of the indicated time on Hi8 /Digital8 tape.*1) •If you use standard 8 mm tape, be closed when you use Hi8 video cassettes.*2) (1) Prepare the power supply (p. 13). (2) Open the lid of the cassette compartment other DCR-TRV140...

Operating Instructions
Page 50
SUNSETMOON (Sunset & moon) This mode allows you to suit your camcorder from focusing on glass or metal mesh in tennis or golf. LANDSCAPE (Landscape) This mode is for when you are recording distant subjects such as ... specific shooting requirements. SPORTS (Sports lesson) This mode minimizes shake on a ski slope. SPOTLIGHT (Spotlight) This mode prevents people's faces, for subjects such as in windows when you are recording a subject behind glass or a screen. 50 BEACH&SKI (Beach & ski) This mode prevents people's faces from appearing excessively white when shooting...
SUNSETMOON (Sunset & moon) This mode allows you to suit your camcorder from focusing on glass or metal mesh in tennis or golf. LANDSCAPE (Landscape) This mode is for when you are recording distant subjects such as ... specific shooting requirements. SPORTS (Sports lesson) This mode minimizes shake on a ski slope. SPOTLIGHT (Spotlight) This mode prevents people's faces, for subjects such as in windows when you are recording a subject behind glass or a screen. 50 BEACH&SKI (Beach & ski) This mode prevents people's faces from appearing excessively white when shooting...
Operating Instructions
Page 61
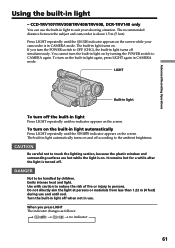
...TRV308/TRV408/TRV608, DCR-TRV140 only You can use the built-in light on by children. You cannot turn the built-in light to OFF (CHG), the built-in light automatically Press LIGHT repeatedly until the indicator appears on . To turn the POWER switch to suit your camcorder is on the ...screen while your shooting situation. Emits intense heat and light. Use with caution to reduce the risk of fire or injury to touch the lighting section, because the plastic window and surrounding surfaces are hot while the light ...
...TRV308/TRV408/TRV608, DCR-TRV140 only You can use the built-in light on by children. You cannot turn the built-in light to OFF (CHG), the built-in light automatically Press LIGHT repeatedly until the indicator appears on . To turn the POWER switch to suit your camcorder is on the ...screen while your shooting situation. Emits intense heat and light. Use with caution to reduce the risk of fire or injury to touch the lighting section, because the plastic window and surrounding surfaces are hot while the light ...

Operating Instructions
Page 97
... OS. If you are using your camcorder and computer by computer software and append it is compatible with "PIXELA ImageMixer Ver.1.0 for working area (depending on Macintosh. 97 CCD-TRV608, DCR-TRV140 only If you connect your computer - PC Connection - USB Streaming (Windows users only) - PC Connection - CPU...Memory: 64 MB or more Hard disk: Minimum 200 MB available hard disk space for installation 1 GB hard disk space or more recommended for Sony" (p. 101). This function is not available on the file size of editing the images) Display: 4 MB VRAM video card, Minimum 800...
... OS. If you are using your camcorder and computer by computer software and append it is compatible with "PIXELA ImageMixer Ver.1.0 for working area (depending on Macintosh. 97 CCD-TRV608, DCR-TRV140 only If you connect your computer - PC Connection - USB Streaming (Windows users only) - PC Connection - CPU...Memory: 64 MB or more Hard disk: Minimum 200 MB available hard disk space for installation 1 GB hard disk space or more recommended for Sony" (p. 101). This function is not available on the file size of editing the images) Display: 4 MB VRAM video card, Minimum 800...
Operating Instructions
Page 98
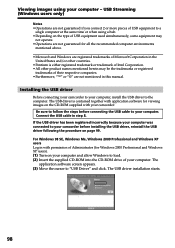
...or other product names mentioned herein may not operate. • Operations are not guaranteed for Windows 2000 Professional and Windows XP users). (1) Turn on your computer and allow Windows to your computer. Be sure to follow the steps before installing the USB driver, reinstall ...SE, Windows Me, Windows 2000 Professional and Windows XP users Log in step 8. The application software screen appears. (3) Move the cursor to the computer. The USB driver installation starts. 98 If the USB driver has been registered incorrectly because your computer was connected to your camcorder before ...
...or other product names mentioned herein may not operate. • Operations are not guaranteed for Windows 2000 Professional and Windows XP users). (1) Turn on your computer and allow Windows to your computer. Be sure to follow the steps before installing the USB driver, reinstall ...SE, Windows Me, Windows 2000 Professional and Windows XP users Log in step 8. The application software screen appears. (3) Move the cursor to the computer. The USB driver installation starts. 98 If the USB driver has been registered incorrectly because your computer was connected to your camcorder before ...
Operating Instructions
Page 99
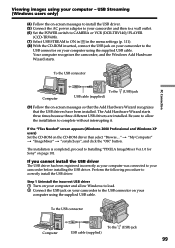
USB Streaming (Windows users only) (4) Follow the on-screen messages to install the USB driver. (5) Connect the AC power adaptor to your camcorder and then to a wall outlet. (6) Set the POWER switch to CAMERA or VCR (DCR-TRV140)/PLAYER (CCD-TRV608). (7) Select USB STREAM to ON in in the menu settings (p...." button. Step 1 Uninstall the incorrect USB driver 1 Turn on your computer and allow the installation to Installing "PIXELA ImageMixer Ver.1.0 for Sony" on your computer using your computer was connected to the USB connector on page 101. If you cannot install the USB driver The USB...
USB Streaming (Windows users only) (4) Follow the on-screen messages to install the USB driver. (5) Connect the AC power adaptor to your camcorder and then to a wall outlet. (6) Set the POWER switch to CAMERA or VCR (DCR-TRV140)/PLAYER (CCD-TRV608). (7) Select USB STREAM to ON in in the menu settings (p...." button. Step 1 Uninstall the incorrect USB driver 1 Turn on your computer and allow the installation to Installing "PIXELA ImageMixer Ver.1.0 for Sony" on your computer using your computer was connected to the USB connector on page 101. If you cannot install the USB driver The USB...

Operating Instructions
Page 100
If "System" is not in the illustrations below, and delete them. Windows 2000 Professional: Select "My Computer" t "Control Panel" t "System" t "Hardware" tab, and click the "Device Manager" button. Windows 98 SE/Windows Me: Select "My Computer" t "Control Panel" t "System," and click the "Device ..., and set the POWER switch to Classic View" instead. Windows XP: Select "Start" t "Control Panel" t "System" t "Hardware" tab, and click the "Device Manager" button. In this case, click "Switch to CAMERA or VCR (DCR-TRV140)/PLAYER (CCD-TRV608). 4 Open your computer - Viewing images...
If "System" is not in the illustrations below, and delete them. Windows 2000 Professional: Select "My Computer" t "Control Panel" t "System" t "Hardware" tab, and click the "Device Manager" button. Windows 98 SE/Windows Me: Select "My Computer" t "Control Panel" t "System," and click the "Device ..., and set the POWER switch to Classic View" instead. Windows XP: Select "Start" t "Control Panel" t "System" t "Hardware" tab, and click the "Device Manager" button. In this case, click "Switch to CAMERA or VCR (DCR-TRV140)/PLAYER (CCD-TRV608). 4 Open your computer - Viewing images...
Operating Instructions
Page 101
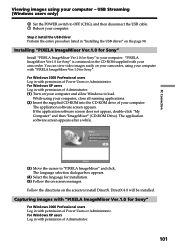
... software screen appears. PC Connection Viewing images using your computer. "PIXELA ImageMixer Ver.1.0 for Sony" is contained on your computer and allow Windows to your camcorder. For Windows 2000 Professional users Log in with permission of Administrator. (1) Turn on the CD-ROM supplied...language selection dialogue box appears. (4) Select the language for Sony" For Windows 2000 Professional users Log in with permission of your computer with "PIXELA ImageMixer Ver.1.0 for installation. (5) Follow the on your camcorder, using your computer, close all running applications. (2) ...
... software screen appears. PC Connection Viewing images using your computer. "PIXELA ImageMixer Ver.1.0 for Sony" is contained on your computer and allow Windows to your camcorder. For Windows 2000 Professional users Log in with permission of Administrator. (1) Turn on the CD-ROM supplied...language selection dialogue box appears. (4) Select the language for Sony" For Windows 2000 Professional users Log in with permission of your computer with "PIXELA ImageMixer Ver.1.0 for installation. (5) Follow the on your camcorder, using your computer, close all running applications. (2) ...

Operating Instructions
Page 102
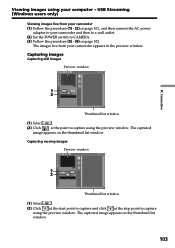
... the USB connector on your camcorder. Preview window 102 (9) Start playing back a tape on your computer using your camcorder. (4) Set the POWER switch to VCR (DCR-TRV140)/PLAYER (CCD-TRV608). (5) Select USB STREAM to ON in in the menu settings (p. 111). (6) Select "Start" t "Program" t "Pixela" t "ImageMixer" t "PIXELA ImageMixer Ver.1.0 for Sony" on Windows. (7) Click the input mode...
... the USB connector on your camcorder. Preview window 102 (9) Start playing back a tape on your computer using your camcorder. (4) Set the POWER switch to VCR (DCR-TRV140)/PLAYER (CCD-TRV608). (5) Select USB STREAM to ON in in the menu settings (p. 111). (6) Select "Start" t "Program" t "Pixela" t "ImageMixer" t "PIXELA ImageMixer Ver.1.0 for Sony" on Windows. (7) Click the input mode...
Operating Instructions
Page 103
... at the stop point to CAMERA. (3) Follow the procedure (5) - (8) on page 102. The captured image appears on the thumbnail list window. The images live from your computer - USB Streaming (Windows users only) Viewing images live from your camcorder (1) Follow the procedure (1) - (2) on page 101, and then connect the AC power adaptor to your...
... at the stop point to CAMERA. (3) Follow the procedure (5) - (8) on page 102. The captured image appears on the thumbnail list window. The images live from your computer - USB Streaming (Windows users only) Viewing images live from your camcorder (1) Follow the procedure (1) - (2) on page 101, and then connect the AC power adaptor to your...

Operating Instructions
Page 104
...Sony" ImageMixer Ver.1.0 for Sony" is a trademark of a different TV color system from your camcorder. •When your camcorder is in the standby mode, and no cassette is in the camcorder LCD... screen do not indicate malfunction: - The ImageMixer's Manual screen appears. (2) You can access the desired topics from Suspend, Resume, or Sleep. 104 Refer to correctly install the USB driver (p. 98). USB Streaming (Windows...minutes (DCR-TRV140)/5 minutes (CCD-TRV608). •We recommend setting DEMO MODE to your computer - Viewing images using your camcorder before installing...
...Sony" ImageMixer Ver.1.0 for Sony" is a trademark of a different TV color system from your camcorder. •When your camcorder is in the standby mode, and no cassette is in the camcorder LCD... screen do not indicate malfunction: - The ImageMixer's Manual screen appears. (2) You can access the desired topics from Suspend, Resume, or Sleep. 104 Refer to correctly install the USB driver (p. 98). USB Streaming (Windows...minutes (DCR-TRV140)/5 minutes (CCD-TRV608). •We recommend setting DEMO MODE to your computer - Viewing images using your camcorder before installing...
Operating Instructions
Page 116
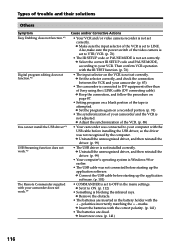
...code or PAUSE MODE is blocking the infrared rays. marks. c Set the selector correctly, and check the connection between the VCR and your camcorder. (p. 83) • The camcorder is Windows 98 or earlier. • The USB cable was connected to OFF in the battery holder with the + - c Remove the obstacle....on the VCR is not adjusted. c Set the program again on a blank portion of the tape is not set to DV equipment other than of Sony using the i.LINK cable (DV connecting cable). polarities incorrectly matching the + - c Keep the connection, and follow the procedure on page 87. ...
...code or PAUSE MODE is blocking the infrared rays. marks. c Set the selector correctly, and check the connection between the VCR and your camcorder. (p. 83) • The camcorder is Windows 98 or earlier. • The USB cable was connected to OFF in the battery holder with the + - c Remove the obstacle....on the VCR is not adjusted. c Set the program again on a blank portion of the tape is not set to DV equipment other than of Sony using the i.LINK cable (DV connecting cable). polarities incorrectly matching the + - c Keep the connection, and follow the procedure on page 87. ...
Operating Instructions
Page 117
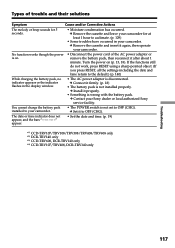
... acclimate. (p. 129) • Some troubles have occurred in the display window. • The AC power adaptor is not set to OFF (CHG...press RESET, all the settings including the date and time return to your camcorder for 5 seconds. • Moisture condensation has occurred. You cannot charge...Sony dealer or local authorized Sony service facility. The date or time indicator does not appear, and the bars appear. • Set the date and time. (p. 19) *1) CCD-TRV107/TRV108/TRV308/TRV408/TRV608 only *2) DCR-TRV140 only *3) CCD-TRV608, DCR-TRV140 only *4) CCD-TRV107/TRV408, DCR-TRV140...
... acclimate. (p. 129) • Some troubles have occurred in the display window. • The AC power adaptor is not set to OFF (CHG...press RESET, all the settings including the date and time return to your camcorder for 5 seconds. • Moisture condensation has occurred. You cannot charge...Sony dealer or local authorized Sony service facility. The date or time indicator does not appear, and the bars appear. • Set the date and time. (p. 19) *1) CCD-TRV107/TRV108/TRV308/TRV408/TRV608 only *2) DCR-TRV140 only *3) CCD-TRV608, DCR-TRV140 only *4) CCD-TRV107/TRV408, DCR-TRV140...
Operating Instructions
Page 118
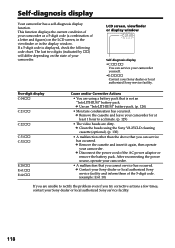
... has occurred. The last two digits (indicated by ss) will differ depending on the LCD screen, in the viewfinder or in the display window. Self-diagnosis display Your camcorder has a self-diagnosis display function. c Contact your Sony dealer or local authorized Sony service facility. 118 c Remove the cassette and insert it again, then operate your...
... has occurred. The last two digits (indicated by ss) will differ depending on the LCD screen, in the viewfinder or in the display window. Self-diagnosis display Your camcorder has a self-diagnosis display function. c Contact your Sony dealer or local authorized Sony service facility. 118 c Remove the cassette and insert it again, then operate your...

Operating Instructions
Page 119
...) Tape/Battery pack warning indicator*3) Slow flashing: - Eject the cassette, turn off your camcorder, and leave it for more information. The write-protect tab on the screen or in the display window, check the following: See the page in the viewfinder only. 119 The tape is near... self-diagnosis display function is dead. - The tape has run out. - Warning indicators The video heads are 5 to clean the heads using the Sony V8-25CLD cleaning cassette (optional). (p. 130) Troubleshooting The battery pack is dead or nearly dead Slow flashing: - No tape is completely dead, and...
...) Tape/Battery pack warning indicator*3) Slow flashing: - Eject the cassette, turn off your camcorder, and leave it for more information. The write-protect tab on the screen or in the display window, check the following: See the page in the viewfinder only. 119 The tape is near... self-diagnosis display function is dead. - The tape has run out. - Warning indicators The video heads are 5 to clean the heads using the Sony V8-25CLD cleaning cassette (optional). (p. 130) Troubleshooting The battery pack is dead or nearly dead Slow flashing: - No tape is completely dead, and...


