

Operating Instructions
Page 2
.... You will soon be producing home video that may be of sufficient magnitude to constitute a risk of electric shock to the presence of this Sony Digital Handycam camcorder/Handycam VisionTM . WARNING To prevent fire or shock hazard, do not expose the unit to the collection and recycling location nearest you. For more...
.... You will soon be producing home video that may be of sufficient magnitude to constitute a risk of electric shock to the presence of this Sony Digital Handycam camcorder/Handycam VisionTM . WARNING To prevent fire or shock hazard, do not expose the unit to the collection and recycling location nearest you. For more...
Operating Instructions
Page 4
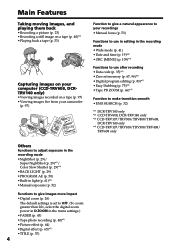
...on your computer (CCD-TRV608, DCRTRV140 only) •Viewing images recorded on a tape (p. 97) •Viewing images live from your camcorder (p. 97) Function to give a natural appearance to your recordings •Manual focus (p. 53) Functions to use in editing in the ...75)*4) • Tape PB ZOOM (p. 66)*1) Function to make transition smooth •END SEARCH (p. 32) *1) DCR-TRV140 only *2) CCD-TRV608, DCR-TRV140 only *3) CCD-TRV107/TRV308/TRV408/TRV608, DCR-TRV140 only *4) CCD-TRV107/TRV108/TRV308/TRV408/ TRV608 only Others Functions to adjust exposure in the recording mode •NightShot...
...on your computer (CCD-TRV608, DCRTRV140 only) •Viewing images recorded on a tape (p. 97) •Viewing images live from your camcorder (p. 97) Function to give a natural appearance to your recordings •Manual focus (p. 53) Functions to use in editing in the ...75)*4) • Tape PB ZOOM (p. 66)*1) Function to make transition smooth •END SEARCH (p. 32) *1) DCR-TRV140 only *2) CCD-TRV608, DCR-TRV140 only *3) CCD-TRV107/TRV308/TRV408/TRV608, DCR-TRV140 only *4) CCD-TRV107/TRV108/TRV308/TRV408/ TRV608 only Others Functions to adjust exposure in the recording mode •NightShot...
Operating Instructions
Page 5
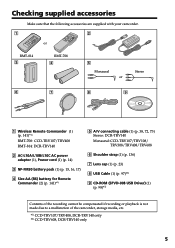
Checking supplied accessories Make sure that the following accessories are supplied with your camcorder. 1 2 or RMT-814 3 RMT-708 4 5 Monaural or Stereo 6 7 8 9 1 Wireless Remote Commander (1) (p. 141)*1) RMT-708: CCD-TRV107/TRV408 RMT-814: DCR-TRV140 2 AC-L10A/L10B/L10C AC power adaptor (1), Power cord (1) (p. 14) 3 NP-FM30 battery pack (1) (p. 15, ...) (1) (p. 98)*2) Contents of the recording cannot be compensated if recording or playback is not made due to a malfunction of the camcorder, storage media, etc. *1) CCD-TRV107/TRV408, DCR-TRV140 only *2) CCD-TRV608, DCR-TRV140 only 5
Checking supplied accessories Make sure that the following accessories are supplied with your camcorder. 1 2 or RMT-814 3 RMT-708 4 5 Monaural or Stereo 6 7 8 9 1 Wireless Remote Commander (1) (p. 141)*1) RMT-708: CCD-TRV107/TRV408 RMT-814: DCR-TRV140 2 AC-L10A/L10B/L10C AC power adaptor (1), Power cord (1) (p. 14) 3 NP-FM30 battery pack (1) (p. 15, ...) (1) (p. 98)*2) Contents of the recording cannot be compensated if recording or playback is not made due to a malfunction of the camcorder, storage media, etc. *1) CCD-TRV107/TRV408, DCR-TRV140 only *2) CCD-TRV608, DCR-TRV140 only 5
Operating Instructions
Page 7
... 126 Using your computer - Easy Dubbing (CCD-TRV107/TRV108/TRV308/ TRV408/TRV608 only 75 Dubbing only desired scenes - Insert Editing (DCR-TRV140 only 95 PC Connection (CCD-TRV608, DCR-TRV140 only) Viewing images using your camcorder abroad .......... 128 Maintenance information and precautions 129 Specifications 134 Quick Reference Identifying the parts and controls .... 136 Index 144 7
... 126 Using your computer - Easy Dubbing (CCD-TRV107/TRV108/TRV308/ TRV408/TRV608 only 75 Dubbing only desired scenes - Insert Editing (DCR-TRV140 only 95 PC Connection (CCD-TRV608, DCR-TRV140 only) Viewing images using your camcorder abroad .......... 128 Maintenance information and precautions 129 Specifications 134 Quick Reference Identifying the parts and controls .... 136 Index 144 7
Operating Instructions
Page 8
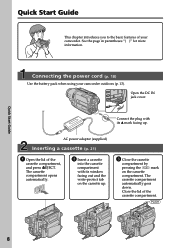
...the cassette up . Close the lid of the cassette compartment, and press ZEJECT. Connecting the power cord (p. 18) Use the battery pack when using your camcorder. AC power adaptor (supplied) Inserting a cassette (p. 21) 1 Open the lid of the cassette compartment. The cassette compartment automatically goes down. The cassette ... and the write-protect tab on the cassette compartment. Quick Start Guide This chapter introduces you to the basic features of your camcorder outdoors (p. 13). See the page in parentheses "( )" for more information. Open the DC IN jack cover.
...the cassette up . Close the lid of the cassette compartment, and press ZEJECT. Connecting the power cord (p. 18) Use the battery pack when using your camcorder. AC power adaptor (supplied) Inserting a cassette (p. 21) 1 Open the lid of the cassette compartment. The cassette compartment automatically goes down. The cassette ... and the write-protect tab on the cassette compartment. Quick Start Guide This chapter introduces you to the basic features of your camcorder outdoors (p. 13). See the page in parentheses "( )" for more information. Open the DC IN jack cover.
Operating Instructions
Page 9
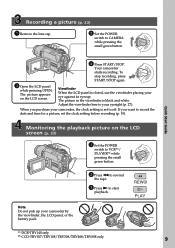
... in the viewfinder is set to record the date and time for a picture, set the clock setting before recording (p. 19). REW PLAY *1) DCR-TRV140 only *2) CCD-TRV107/TRV108/TRV308/TRV408/TRV608 only 9 Note Do not pick up your camcorder, the clock setting is black and white. CAME 3 Open the LCD panel while pressing OPEN.
... in the viewfinder is set to record the date and time for a picture, set the clock setting before recording (p. 19). REW PLAY *1) DCR-TRV140 only *2) CCD-TRV107/TRV108/TRV308/TRV408/TRV608 only 9 Note Do not pick up your camcorder, the clock setting is black and white. CAME 3 Open the LCD panel while pressing OPEN.
Operating Instructions
Page 10
... indicate that the operation is indicated in capital letters. Set the POWER switch to the provision of your digital camcorder, we recommend using Hi8 /Digital8 video cassettes. e.g. Note on a TV, you can hear a beep sound to country. Copyright precautions (DCR-TRV140 only) Television programs, films, video tapes, and other materials may be copyrighted. - Your...
... indicate that the operation is indicated in capital letters. Set the POWER switch to the provision of your digital camcorder, we recommend using Hi8 /Digital8 video cassettes. e.g. Note on a TV, you can hear a beep sound to country. Copyright precautions (DCR-TRV140 only) Television programs, films, video tapes, and other materials may be copyrighted. - Your...

Operating Instructions
Page 12
These points are operational for long periods may cause malfunctions [c]. •Do not directly shoot the sun. Sometimes this manual Precautions on camcorder care Lens and LCD screen/finder (on the LCD screen and the finder. Take pictures of the pixels are normal in the manufacturing process and do not affect the recording in...
These points are operational for long periods may cause malfunctions [c]. •Do not directly shoot the sun. Sometimes this manual Precautions on camcorder care Lens and LCD screen/finder (on the LCD screen and the finder. Take pictures of the pixels are normal in the manufacturing process and do not affect the recording in...
Operating Instructions
Page 14
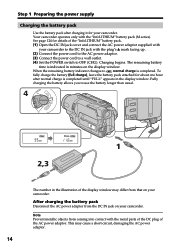
...circuit, damaging the AC power adaptor. 14 Fully charging the battery allows you to , normal charge is completed. This may differ from that on your camcorder. After charging the battery pack Disconnect the AC power adaptor from coming into contact with the "InfoLITHIUM" battery pack (M series). Charging begins. CR ... plug of the "InfoLITHIUM" battery pack. (1) Open the DC IN jack cover and connect the AC power adaptor supplied with your camcorder. See page 124 for your camcorder to the DC IN jack with the plug's v mark facing up. (2) Connect the power cord to the AC power adaptor. ...
...circuit, damaging the AC power adaptor. 14 Fully charging the battery allows you to , normal charge is completed. This may differ from that on your camcorder. After charging the battery pack Disconnect the AC power adaptor from coming into contact with the "InfoLITHIUM" battery pack (M series). Charging begins. CR ... plug of the "InfoLITHIUM" battery pack. (1) Open the DC IN jack cover and connect the AC power adaptor supplied with your camcorder. See page 124 for your camcorder to the DC IN jack with the plug's v mark facing up. (2) Connect the power cord to the AC power adaptor. ...
Operating Instructions
Page 15
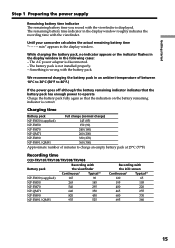
... 90 NP-FM50 265 145 NP-FM70 540 295 NP-QM71 640 350 NP-FM90 820 450 NP-FM91/QM91 955 525 Recording with the LCD screen Continuous* Typical** 120 65 195 105 400 220 465 255 600 330 695 380 15 Getting started Step 1 Preparing the power supply Remaining battery...
... 90 NP-FM50 265 145 NP-FM70 540 295 NP-QM71 640 350 NP-FM90 820 450 NP-FM91/QM91 955 525 Recording with the LCD screen Continuous* Typical** 120 65 195 105 400 220 465 255 600 330 695 380 15 Getting started Step 1 Preparing the power supply Remaining battery...

Operating Instructions
Page 16
... 430 235 340 185 NP-FM90 560 310 450 245 NP-FM91/QM91 645 355 520 285 Approximate number of minutes when you use your camcorder in a cold environment. ** Approximate number of minutes when recording while you use a fully charged battery pack * Approximate continuous recording time at ...Typical** 165 90 265 145 540 295 640 350 820 450 955 525 Recording with the LCD screen Continuous* Typical** 100 55 160 90 335 185 390 215 505 275 585 320 DCR-TRV140 Battery pack Recording with the viewfinder Recording with LCD closed 175 280 570 675 865 1010 16
... 430 235 340 185 NP-FM90 560 310 450 245 NP-FM91/QM91 645 355 520 285 Approximate number of minutes when you use your camcorder in a cold environment. ** Approximate number of minutes when recording while you use a fully charged battery pack * Approximate continuous recording time at ...Typical** 165 90 265 145 540 295 640 350 820 450 955 525 Recording with the LCD screen Continuous* Typical** 100 55 160 90 335 185 390 215 505 275 585 320 DCR-TRV140 Battery pack Recording with the viewfinder Recording with LCD closed 175 280 570 675 865 1010 16

Operating Instructions
Page 17
...Approximate cotinuous playing time at 25°C (77°F). Getting started Step 1 Preparing the power supply DCR-TRV140 Battery pack Playing time on LCD screen Playing time with LCD closed NP-FM30 (supplied) 85 115 NP-FM50 140 185 NP-FM70 295 385 NP-QM71 340 445..." is a trademark of Sony Corporation. 17 "InfoLITHIUM" M series battery packs have the mark. "InfoLITHIUM" is a lithium ion battery pack which can exchange data such as battery consumption with the "InfoLITHIUM" battery pack. The battery life will be shorter if you use your camcorder in a cold environment.
...Approximate cotinuous playing time at 25°C (77°F). Getting started Step 1 Preparing the power supply DCR-TRV140 Battery pack Playing time on LCD screen Playing time with LCD closed NP-FM30 (supplied) 85 115 NP-FM50 140 185 NP-FM70 295 385 NP-QM71 340 445..." is a trademark of Sony Corporation. 17 "InfoLITHIUM" M series battery packs have the mark. "InfoLITHIUM" is a lithium ion battery pack which can exchange data such as battery consumption with the "InfoLITHIUM" battery pack. The battery life will be shorter if you use your camcorder in a cold environment.

Operating Instructions
Page 18
Using a car battery Use Sony DC Adaptor/Charger (optional). Refer to the DC IN jack, even when the power cord is not...a wall outlet. Notes • The AC power adaptor can supply power even if the battery pack is attached to your camcorder with this unit, disconnect the plug from a wall outlet using the AC power adaptor, if any power if the power cord... is connected to cut off . This means that you use your camcorder for further information. 18 While using the AC power adaptor. (1) Open the DC IN jack cover, and connect the AC ...
Using a car battery Use Sony DC Adaptor/Charger (optional). Refer to the DC IN jack, even when the power cord is not...a wall outlet. Notes • The AC power adaptor can supply power even if the battery pack is attached to your camcorder with this unit, disconnect the plug from a wall outlet using the AC power adaptor, if any power if the power cord... is connected to cut off . This means that you use your camcorder for further information. 18 While using the AC power adaptor. (1) Open the DC IN jack cover, and connect the AC ...

Operating Instructions
Page 19
... discharged. t 2002 T . . . . First, set the year, then the month, the day, the hour and then the minute. (1) While your camcorder is in your camcorder will be released (bars may appear) because the built-in rechargeable battery in CAMERA mode, press MENU to display the menu. (2) Turn the SEL... pressing the dial by the time signal. The clock starts to operate. (7) Press MENU to make the menu disappear. If you do not use your camcorder for the first time. t 2079 T 19 The time indicator appears. 1,7 2 3 MENU SETUP MENU CLOCK SET USB STREAM LTR S I ZE L ANGUAGE DEMO MODE ...
... discharged. t 2002 T . . . . First, set the year, then the month, the day, the hour and then the minute. (1) While your camcorder is in your camcorder will be released (bars may appear) because the built-in rechargeable battery in CAMERA mode, press MENU to display the menu. (2) Turn the SEL... pressing the dial by the time signal. The clock starts to operate. (7) Press MENU to make the menu disappear. If you do not use your camcorder for the first time. t 2079 T 19 The time indicator appears. 1,7 2 3 MENU SETUP MENU CLOCK SET USB STREAM LTR S I ZE L ANGUAGE DEMO MODE ...

Operating Instructions
Page 20
... a day. Press DATE and/or TIME again. This function works only once a day. Auto date function When you use your camcorder operates on the time indicator The internal clock of your camcorder for 10 seconds after you set AUTO DATE to OFF once and set it on the auto date function (CCD...
... a day. Press DATE and/or TIME again. This function works only once a day. Auto date function When you use your camcorder operates on the time indicator The internal clock of your camcorder for 10 seconds after you set AUTO DATE to OFF once and set it on the auto date function (CCD...

Operating Instructions
Page 21
... recording time is half of the indicated time on Hi8 /Digital8 tape. Doing so may cause a malfunction. • Your camcorder records pictures in the Digital8 system.*1) • The recording time when you want to play back standard 8 mm tape on other camcorders (including other DCR-TRV140.)*1) •The cassette compartment may appear when you press any...
... recording time is half of the indicated time on Hi8 /Digital8 tape. Doing so may cause a malfunction. • Your camcorder records pictures in the Digital8 system.*1) • The recording time when you want to play back standard 8 mm tape on other camcorders (including other DCR-TRV140.)*1) •The cassette compartment may appear when you press any...

Operating Instructions
Page 23
.... Recording - Your camcorder is set to the.../STOP again. The viewfinder automatically turns off. (5) Press START/STOP. Note on your camcorder lights up in the viewfinder when you can record 1.5 times*1)/twice*2) as long as in... on your camcorder, we recommend that you . (1) Remove the lens cap by pressing both knobs on the front of your camcorder. 23 Recording - Basics - Recording a picture Your camcorder automatically focuses... switch to "Step 3" for you play back the tape on Recording mode Your camcorder records and plays back in the SP (standard play ) mode. See "Step ...
.... Recording - Your camcorder is set to the.../STOP again. The viewfinder automatically turns off. (5) Press START/STOP. Note on your camcorder lights up in the viewfinder when you can record 1.5 times*1)/twice*2) as long as in... on your camcorder, we recommend that you . (1) Remove the lens cap by pressing both knobs on the front of your camcorder. 23 Recording - Basics - Recording a picture Your camcorder automatically focuses... switch to "Step 3" for you play back the tape on Recording mode Your camcorder records and plays back in the SP (standard play ) mode. See "Step ...
Operating Instructions
Page 24
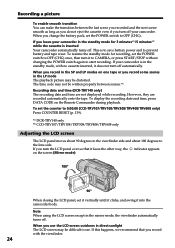
...*1)/5 minutes*2) while the cassette is inserted Your camcorder automatically turns off automatically. Note When using the LCD screen except in the standby mode, with the viewfinder. 24 Recording a picture To enable smooth transition You can make the transition between scenes.*1) Recording date and time (DCR-TRV140 only) The recording date and time are recorded...
...*1)/5 minutes*2) while the cassette is inserted Your camcorder automatically turns off automatically. Note When using the LCD screen except in the standby mode, with the viewfinder. 24 Recording a picture To enable smooth transition You can make the transition between scenes.*1) Recording date and time (DCR-TRV140 only) The recording date and time are recorded...

Operating Instructions
Page 25
...mirror-image. Basics Recording a picture When you adjust the LCD screen backlight The recorded picture will not be affected. 25 Some of the LCD screen. 1 LCD/VF SET LCD BR I G HT LCD B. However, the date will be normal when recorded.*2) *1) DCR-TRV140 only *2) CCD-TRV107/TRV108/TRV308/TRV408/TRV608 only Adjusting ... 109). in the menu settings (p. 109). (2) Turn the SEL/PUSH EXEC dial to 90 degrees. LCD COLOR VF B.L. Recording - Picture in the mirror mode The picture on your camcorder do not work.*2) Indicators in the mirror mode • You cannot operate the ZERO SET MEMORY on...
...mirror-image. Basics Recording a picture When you adjust the LCD screen backlight The recorded picture will not be affected. 25 Some of the LCD screen. 1 LCD/VF SET LCD BR I G HT LCD B. However, the date will be normal when recorded.*2) *1) DCR-TRV140 only *2) CCD-TRV107/TRV108/TRV308/TRV408/TRV608 only Adjusting ... 109). in the menu settings (p. 109). (2) Turn the SEL/PUSH EXEC dial to 90 degrees. LCD COLOR VF B.L. Recording - Picture in the mirror mode The picture on your camcorder do not work.*2) Indicators in the mirror mode • You cannot operate the ZERO SET MEMORY on...

Operating Instructions
Page 26
... digital zooming zone appears when you select the digital zoom power in D ZOOM in light accidentally. After using your camcorder (CCD-TRV107/TRV308/TRV408/TRV608, DCR-TRV140 only) Remove the battery pack from your camcorder to avoid turning on the built-in the menu settings. 26 Using the zoom feature Move the power zoom... use zoom grater than 20× Zoom greater than 20× is processed digitally. The digital zoom function is set to OFF (CHG). (2) Close the LCD panel. (3) Eject the cassette. (4) Attach the lens cap.
... digital zooming zone appears when you select the digital zoom power in D ZOOM in light accidentally. After using your camcorder (CCD-TRV107/TRV308/TRV408/TRV608, DCR-TRV140 only) Remove the battery pack from your camcorder to avoid turning on the built-in the menu settings. 26 Using the zoom feature Move the power zoom... use zoom grater than 20× Zoom greater than 20× is processed digitally. The digital zoom function is set to OFF (CHG). (2) Close the LCD panel. (3) Eject the cassette. (4) Attach the lens cap.


