

Operating Instructions
Page 6
... Advanced Recording Operations Recording a still image on pictures (CCD-TRV107/TRV108/ TRV308/TRV408/ TRV608 only 31 Checking the recording - Basics Recording a picture 23 Shooting backlit subjects - Table of contents Main Features 4 Checking supplied accessories 5 Quick Start Guide 8 Getting started Using this manual 10 Step 1 Preparing the power supply ... 13 Installing the battery pack 13 Charging the battery pack 14 Connecting to a wall outlet 18 Step 2 Setting the date and time ........ 19 Step 3 Inserting a cassette 21 Recording - Digital effect (DCR-TRV140...
... Advanced Recording Operations Recording a still image on pictures (CCD-TRV107/TRV108/ TRV308/TRV408/ TRV608 only 31 Checking the recording - Basics Recording a picture 23 Shooting backlit subjects - Table of contents Main Features 4 Checking supplied accessories 5 Quick Start Guide 8 Getting started Using this manual 10 Step 1 Preparing the power supply ... 13 Installing the battery pack 13 Charging the battery pack 14 Connecting to a wall outlet 18 Step 2 Setting the date and time ........ 19 Step 3 Inserting a cassette 21 Recording - Digital effect (DCR-TRV140...
Operating Instructions
Page 9
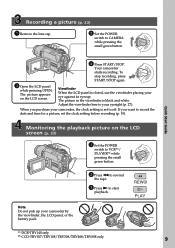
...(CHG) 4 Press START/STOP. The picture appears on the LCD screen (p. 33) 1 Set the POWER switch to CAMERA while pressing the POWER small green button. Recording a picture (p. 23) 1 Remove the lens cap. 2 Set the POWER switch to VCR*1)/ PLAYER*2) while POWER pressing the small green button. Your camcorder starts recording. Quick Start Guide VCR OFF(CHG) CAME Monitoring the playback picture on the LCD screen. Viewfinder When the LCD panel is closed, use the viewfinder placing your camcorder, the clock setting is black and white.
...(CHG) 4 Press START/STOP. The picture appears on the LCD screen (p. 33) 1 Set the POWER switch to CAMERA while pressing the POWER small green button. Recording a picture (p. 23) 1 Remove the lens cap. 2 Set the POWER switch to VCR*1)/ PLAYER*2) while POWER pressing the small green button. Your camcorder starts recording. Quick Start Guide VCR OFF(CHG) CAME Monitoring the playback picture on the LCD screen. Viewfinder When the LCD panel is closed, use the viewfinder placing your camcorder, the clock setting is black and white.
Operating Instructions
Page 10
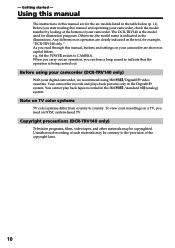
... manual are shown in the Digital8 system. Copyright precautions (DCR-TRV140 only) Television programs, films, video tapes, and other materials may be copyrighted. As you need an NTSC system-based TV. Your camcorder records and plays back pictures only in capital letters. To view your camcorder are for illustration purposes. Unauthorized recording of such materials may be contrary to CAMERA. Set the POWER switch to the provision of your digital camcorder...
... manual are shown in the Digital8 system. Copyright precautions (DCR-TRV140 only) Television programs, films, video tapes, and other materials may be copyrighted. As you need an NTSC system-based TV. Your camcorder records and plays back pictures only in capital letters. To view your camcorder are for illustration purposes. Unauthorized recording of such materials may be contrary to CAMERA. Set the POWER switch to the provision of your digital camcorder...

Operating Instructions
Page 20
... recording (p. 19). Note on a 12-hour cycle. • 12:00 AM stands for midnight. • 12:00 PM stands for 10 seconds after you set the date and time to display the date indicator. Press DATE and/or TIME again. Note on the time indicator The internal clock of your camcorder operates on the auto date function (CCD-TRV107/TRV108/TRV308/TRV408/TRV608 only) You can change...
... recording (p. 19). Note on a 12-hour cycle. • 12:00 AM stands for midnight. • 12:00 PM stands for 10 seconds after you set the date and time to display the date indicator. Press DATE and/or TIME again. Note on the time indicator The internal clock of your camcorder operates on the auto date function (CCD-TRV107/TRV108/TRV308/TRV408/TRV608 only) You can change...
Operating Instructions
Page 24
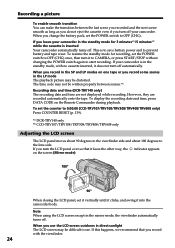
... record with no cassette inserted, it does not turn it to CAMERA, or press START/STOP without changing the POWER switch again to OFF (CHG). When you use the LCD screen outdoors in the LP mode The playback picture may not be distorted. To display the recording date and time, press DATA CODE on the screen (Mirror mode). 180° 90° When closing the LCD panel, set the POWER switch to start recording. When you change the battery...
... record with no cassette inserted, it does not turn it to CAMERA, or press START/STOP without changing the POWER switch again to OFF (CHG). When you use the LCD screen outdoors in the LP mode The playback picture may not be distorted. To display the recording date and time, press DATA CODE on the screen (Mirror mode). 180° 90° When closing the LCD panel, set the POWER switch to start recording. When you change the battery...

Operating Instructions
Page 25
... Select LCD B.L. During recording in the mirror mode • You cannot operate the ZERO SET MEMORY on the Remote Commander.*1) • DATE and TIME on the LCD screen is working. L. However, the date will be normal when recorded.*2) *1) DCR-TRV140 only *2) CCD-TRV107/TRV108/TRV308/TRV408/TRV608 only Adjusting the brightness of the LCD screen (1) In CAMERA mode, select LCD BRIGHT in in the mirror mode The picture on your camcorder do not work.*2) Indicators in the menu settings...
... Select LCD B.L. During recording in the mirror mode • You cannot operate the ZERO SET MEMORY on the Remote Commander.*1) • DATE and TIME on the LCD screen is working. L. However, the date will be normal when recorded.*2) *1) DCR-TRV140 only *2) CCD-TRV107/TRV108/TRV308/TRV408/TRV608 only Adjusting the brightness of the LCD screen (1) In CAMERA mode, select LCD BRIGHT in in the mirror mode The picture on your camcorder do not work.*2) Indicators in the menu settings...
Operating Instructions
Page 38
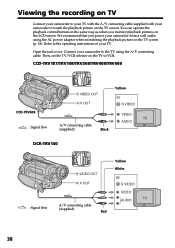
... IN S VIDEO A/V connecting cable (supplied) Black VIDEO AUDIO DCR-TRV140 : Signal flow S VIDEO OUT A/ V OUT A/V connecting cable (supplied) Red Yellow White IN S VIDEO VIDEO AUDIO 38 Open the jack cover. We recommend that you monitor playback pictures on the TV screen. Viewing the recording on TV Connect your camcorder to your TV with the A/V connecting cable supplied with your camcorder to watch the playback picture on the LCD screen. You can operate the playback control buttons in the same way as when you power your camcorder from...
... IN S VIDEO A/V connecting cable (supplied) Black VIDEO AUDIO DCR-TRV140 : Signal flow S VIDEO OUT A/ V OUT A/V connecting cable (supplied) Red Yellow White IN S VIDEO VIDEO AUDIO 38 Open the jack cover. We recommend that you monitor playback pictures on the TV screen. Viewing the recording on TV Connect your camcorder to your TV with the A/V connecting cable supplied with your camcorder to watch the playback picture on the LCD screen. You can operate the playback control buttons in the same way as when you power your camcorder from...

Operating Instructions
Page 40
... pressing PHOTO lightly until recording is displayed on the Remote Commander. To change the mode or setting. •PHOTO button does not work: - The still image on a tape which can record a still image like a photograph. The sound during normal CAMERA recording You cannot check an image on the image. The still image is completed. During the 7 seconds to record, you want to the standby mode. - The CAPTURE indicator appears. while the fader function is set or in use . - PHOTO 1 PHOTO CAPTURE 2 PHOTO...
... pressing PHOTO lightly until recording is displayed on the Remote Commander. To change the mode or setting. •PHOTO button does not work: - The still image on a tape which can record a still image like a photograph. The sound during normal CAMERA recording You cannot check an image on the image. The still image is completed. During the 7 seconds to record, you want to the standby mode. - The CAPTURE indicator appears. while the fader function is set or in use . - PHOTO 1 PHOTO CAPTURE 2 PHOTO...
Operating Instructions
Page 42
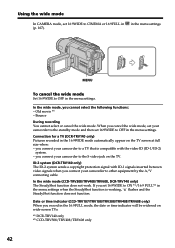
... cancel the wide mode, set your camcorder to other equipment by the A/V connecting cable. In the wide mode (CCD-TRV308/TRV408/TRV608, DCR-TRV140 only) The SteadyShot function does not work. Old movie *1) - Connection for a TV (DCR-TRV140 only) Pictures recorded in the menu settings. ID-2 system (DCR-TRV140 only) The ID-2 system sends a copyright protection signal with the video ID (ID-1/ID-2) system. - in the menu settings MENU To cancel the wide mode Set 16:9WIDE...
... cancel the wide mode, set your camcorder to other equipment by the A/V connecting cable. In the wide mode (CCD-TRV308/TRV408/TRV608, DCR-TRV140 only) The SteadyShot function does not work. Old movie *1) - Connection for a TV (DCR-TRV140 only) Pictures recorded in the menu settings. ID-2 system (DCR-TRV140 only) The ID-2 system sends a copyright protection signal with the video ID (ID-1/ID-2) system. - in the menu settings MENU To cancel the wide mode Set 16:9WIDE...

Operating Instructions
Page 72
... record and edit a picture with your VCR for more information. *1) CCD-TRV107/TRV408, DCR-TRV140 only *2) DCR-TRV140 only *3) CCD-TRV107/TRV108/TRV308/TRV408/TRV608 only CCD-TRV107/TRV108/TRV308/TRV408/TRV608 CCD-TRV608 : Signal flow S VIDEO OUT A / V OUT Yellow IN S VIDEO A/V connecting cable (supplied) Black VIDEO AUDIO 72 Refer to the operating instructions of your VCR for more information. (3) Set the POWER switch to VCR*2)/PLAYER*3). (4) Play back the recorded tape on your camcorder - Dubbing a tape Using the A/V connecting cable Connect your camcorder to LCD...
... record and edit a picture with your VCR for more information. *1) CCD-TRV107/TRV408, DCR-TRV140 only *2) DCR-TRV140 only *3) CCD-TRV107/TRV108/TRV308/TRV408/TRV608 only CCD-TRV107/TRV108/TRV308/TRV408/TRV608 CCD-TRV608 : Signal flow S VIDEO OUT A / V OUT Yellow IN S VIDEO A/V connecting cable (supplied) Black VIDEO AUDIO 72 Refer to the operating instructions of your VCR for more information. (3) Set the POWER switch to VCR*2)/PLAYER*3). (4) Play back the recorded tape on your camcorder - Dubbing a tape Using the A/V connecting cable Connect your camcorder to LCD...
Operating Instructions
Page 90
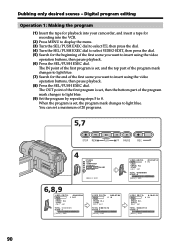
... light blue. You can set , and the top part of the program mark changes to light blue. (7) Search for the beginning of the first scene you want to insert using the video operation buttons, then pause playback. (8) Press the SEL/PUSH EXEC dial. Digital program editing Operation 1: Making the program (1) Insert the tape for playback into your camcorder, and insert a tape for recording into the VCR. (2) Press MENU to display the menu. (3) Turn...
... light blue. You can set , and the top part of the program mark changes to light blue. (7) Search for the beginning of the first scene you want to insert using the video operation buttons, then pause playback. (8) Press the SEL/PUSH EXEC dial. Digital program editing Operation 1: Making the program (1) Insert the tape for playback into your camcorder, and insert a tape for recording into the VCR. (2) Press MENU to display the menu. (3) Turn...
Operating Instructions
Page 98
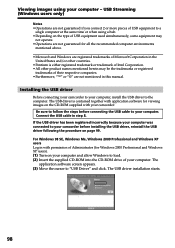
... same time or when using your computer, install the USB driver to your computer. If the USB driver has been registered incorrectly because your computer was connected to your camcorder before connecting the USB cable to the computer. USB Streaming (Windows users only) Notes • Operations are not guaranteed for Windows 2000 Professional and Windows XP users). (1) Turn on your computer and allow Windows to your computer - Connect the USB cable in this manual. Viewing images using a hub...
... same time or when using your computer, install the USB driver to your computer. If the USB driver has been registered incorrectly because your computer was connected to your camcorder before connecting the USB cable to the computer. USB Streaming (Windows users only) Notes • Operations are not guaranteed for Windows 2000 Professional and Windows XP users). (1) Turn on your computer and allow Windows to your computer - Connect the USB cable in this manual. Viewing images using a hub...
Operating Instructions
Page 99
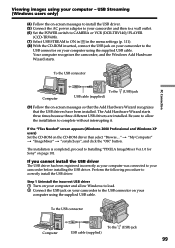
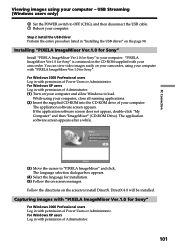
USB Streaming (Windows users only) (4) Follow the on-screen messages to install the USB driver. (5) Connect the AC power adaptor to your camcorder and then to a wall outlet. (6) Set the POWER switch to CAMERA or VCR (DCR-TRV140)/PLAYER (CCD-TRV608). (7) Select USB STREAM to ON in in the menu settings (p. 111). (8) With the CD-ROM inserted, connect the USB jack on your camcorder to Installing "PIXELA ImageMixer Ver.1.0 for Sony" on your computer using the supplied USB cable. Your computer recognises...
USB Streaming (Windows users only) (4) Follow the on-screen messages to install the USB driver. (5) Connect the AC power adaptor to your camcorder and then to a wall outlet. (6) Set the POWER switch to CAMERA or VCR (DCR-TRV140)/PLAYER (CCD-TRV608). (7) Select USB STREAM to ON in in the menu settings (p. 111). (8) With the CD-ROM inserted, connect the USB jack on your camcorder to Installing "PIXELA ImageMixer Ver.1.0 for Sony" on your computer using the supplied USB cable. Your computer recognises...
Operating Instructions
Page 101
... software screen appears. PC Connection Viewing images using your computer with "PIXELA ImageMixer Ver.1.0 for Sony". USB Streaming (Windows users only) 6 Set the POWER switch to your computer. If the application software screen does not appear, double-click "My Computer" and then "ImageMixer" (CD-ROM Drive). Installing "PIXELA ImageMixer Ver.1.0 for Sony" Install "PIXELA ImageMixer Ver.1.0 for installation. (5) Follow the on your camcorder, using your computer - For Windows XP users Log in with permission of Power Users...
... software screen appears. PC Connection Viewing images using your computer with "PIXELA ImageMixer Ver.1.0 for Sony". USB Streaming (Windows users only) 6 Set the POWER switch to your computer. If the application software screen does not appear, double-click "My Computer" and then "ImageMixer" (CD-ROM Drive). Installing "PIXELA ImageMixer Ver.1.0 for Sony" Install "PIXELA ImageMixer Ver.1.0 for installation. (5) Follow the on your camcorder, using your computer - For Windows XP users Log in with permission of Power Users...

Operating Instructions
Page 104
... turns off the power Seeing the on using your computer Communications with the USB connection, the following operations after 3 minutes (DCR-TRV140)/5 minutes (CCD-TRV608). •We recommend setting DEMO MODE to your computer - Carry out the following conditions may not recover after recovering from the contents. The image does not appear properly if the image signal is of the "ImageMixer's Manual" screen. Notes on -line help...
... turns off the power Seeing the on using your computer Communications with the USB connection, the following operations after 3 minutes (DCR-TRV140)/5 minutes (CCD-TRV608). •We recommend setting DEMO MODE to your computer - Carry out the following conditions may not recover after recovering from the contents. The image does not appear properly if the image signal is of the "ImageMixer's Manual" screen. Notes on -line help...

Operating Instructions
Page 114
... HiFi SOUND set to 2 in the menu setting. (P. 107) *1) DCR-TRV140 only *2) CCD-TRV107/TRV108/TRV308/TRV408/TRV608 only *3) CCD-TRV308/TRV408/TRV608, DCR-TRV140 only *4) CCD-TRV308/TRV408/TRV608 only In the playback mode Symptom The picture does not appear on the screen when playing back a tape.*1) The tape does not move when a video control button is pressed. c Clean the heads using the Sony V8-25CLD cleaning cassette (optional). (p. 130) • The video head may be dirty. c Adjust it...
... HiFi SOUND set to 2 in the menu setting. (P. 107) *1) DCR-TRV140 only *2) CCD-TRV107/TRV108/TRV308/TRV408/TRV608 only *3) CCD-TRV308/TRV408/TRV608, DCR-TRV140 only *4) CCD-TRV308/TRV408/TRV608 only In the playback mode Symptom The picture does not appear on the screen when playing back a tape.*1) The tape does not move when a video control button is pressed. c Clean the heads using the Sony V8-25CLD cleaning cassette (optional). (p. 130) • The video head may be dirty. c Adjust it...
Operating Instructions
Page 116
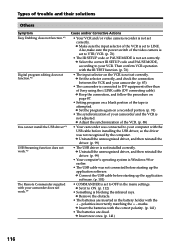
... inserted in the menu settings. c Remove the obstacle. • The batteries are dead. Types of trouble and their solutions Others Symptom Easy Dubbing does not function.*1) Digital program editing does not function.*2) You cannot install the USB driver.*3) USB Streaming function does not work .*4) Cause and/or Corrective Actions • Your VCR and/or video camera recorder is not set correctly. c Adjust the synchronization of the VCR. (p. 88) • Your camcorder was not...
... inserted in the menu settings. c Remove the obstacle. • The batteries are dead. Types of trouble and their solutions Others Symptom Easy Dubbing does not function.*1) Digital program editing does not function.*2) You cannot install the USB driver.*3) USB Streaming function does not work .*4) Cause and/or Corrective Actions • Your VCR and/or video camera recorder is not set correctly. c Adjust the synchronization of the VCR. (p. 88) • Your camcorder was not...

Operating Instructions
Page 121
...-recorded tape You can play back Using any other DCR-TRV140). When you play back the tape on your camcorder that has recorded copyright control signals for copyright protection of software which is played back on this camcorder. Your camcorder does not record copyright control signals on other VCRs (including other video camera recorder, you try to record such software. Additional Information - This video system has been developed to enable digital recording to play back standard 8 mm tape...
...-recorded tape You can play back Using any other DCR-TRV140). When you play back the tape on your camcorder that has recorded copyright control signals for copyright protection of software which is played back on this camcorder. Your camcorder does not record copyright control signals on other VCRs (including other video camera recorder, you try to record such software. Additional Information - This video system has been developed to enable digital recording to play back standard 8 mm tape...

Operating Instructions
Page 134
... using the battery pack) During camera recording using 120 min. Hi8/Digital8 video cassette) Approx. 5 min. Specifications Video camera recorder System Video recording system CCD-TRV107/TRV108/TRV308/ TRV408/TRV608: 2 rotary heads Helical scanning FM system DCR-TRV140: 2 rotary heads Helical scanning system Audio recording system CCD-TRV107/TRV108/TRV308/ TRV408/TRV608: Rotary heads, FM system DCR-TRV140: Rotary heads, PCM system Quantization (DCR-TRV140 only): 12bits (Fs 32 kHz, stereo 1, stereo 2), 16bits (Fs 48 kHz, stereo) Video signal NTSC color...
... using the battery pack) During camera recording using 120 min. Hi8/Digital8 video cassette) Approx. 5 min. Specifications Video camera recorder System Video recording system CCD-TRV107/TRV108/TRV308/ TRV408/TRV608: 2 rotary heads Helical scanning FM system DCR-TRV140: 2 rotary heads Helical scanning system Audio recording system CCD-TRV107/TRV108/TRV308/ TRV408/TRV608: Rotary heads, FM system DCR-TRV140: Rotary heads, PCM system Quantization (DCR-TRV140 only): 12bits (Fs 32 kHz, stereo 1, stereo 2), 16bits (Fs 48 kHz, stereo) Video signal NTSC color...
Operating Instructions
Page 144
... 14 Adjusting viewfinder .......... 27 AFM HiFi Sound 122 AUDIO MIX 108 AUDIO MODE 109 A/V connecting cable 38, 72, 73 BACK LIGHT 29 Battery pack 13 BEEP 112 BOUNCE 43 C, D Charging battery 14 Charging the built-in rechargeable battery ....... 131 Clock set 19 Color Slow Shutter 29 Data code 34 Date search 68 DEMO 111 Digital effect 47, 65 Digital program editing ...... 83 Digital 8 system 121 DISPLAY 34 DNR 108 DOT 43 Dual sound track tape ....... 122 Dubbing a tape...
... 14 Adjusting viewfinder .......... 27 AFM HiFi Sound 122 AUDIO MIX 108 AUDIO MODE 109 A/V connecting cable 38, 72, 73 BACK LIGHT 29 Battery pack 13 BEEP 112 BOUNCE 43 C, D Charging battery 14 Charging the built-in rechargeable battery ....... 131 Clock set 19 Color Slow Shutter 29 Data code 34 Date search 68 DEMO 111 Digital effect 47, 65 Digital program editing ...... 83 Digital 8 system 121 DISPLAY 34 DNR 108 DOT 43 Dual sound track tape ....... 122 Dubbing a tape...


