AR-M550 | AR-M620 | AR-M700 Operation Manual
Page 9
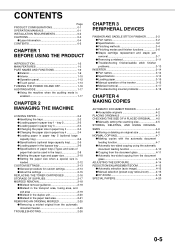
CONTENTS Page PRODUCT CONFIGURATIONS 0-1 OPERATION MANUALS 0-1 INSTALLATION REQUIREMENTS 0-2 CAUTIONS 0-3 G Laser Information 0-4 CONTENTS 0-5 CHAPTER 1 BEFORE USING THE PRODUCT INTRODUCTION 1-2 MAIN FEATURES 1-3 PART NAMES AND FUNCTIONS 1-9 G Exterior 1-9 G Interior 1-10 G Operation ... when the auditing mode is loaded 2-12 CUSTOM SETTINGS 2-13 G General procedure for custom settings 2-13 G About the settings 2-15 REPLACING THE TONER CARTRIDGES 2-16 STORAGE OF SUPPLIES 2-17 MISFEED REMOVAL 2-18 G Misfeed removal guidance 2-18 G Misfeed in the transport area, fusing area, and ...
CONTENTS Page PRODUCT CONFIGURATIONS 0-1 OPERATION MANUALS 0-1 INSTALLATION REQUIREMENTS 0-2 CAUTIONS 0-3 G Laser Information 0-4 CONTENTS 0-5 CHAPTER 1 BEFORE USING THE PRODUCT INTRODUCTION 1-2 MAIN FEATURES 1-3 PART NAMES AND FUNCTIONS 1-9 G Exterior 1-9 G Interior 1-10 G Operation ... when the auditing mode is loaded 2-12 CUSTOM SETTINGS 2-13 G General procedure for custom settings 2-13 G About the settings 2-15 REPLACING THE TONER CARTRIDGES 2-16 STORAGE OF SUPPLIES 2-17 MISFEED REMOVAL 2-18 G Misfeed removal guidance 2-18 G Misfeed in the transport area, fusing area, and ...
AR-M550 | AR-M620 | AR-M700 Operation Manual
Page 19
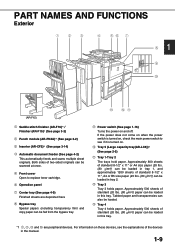
...devices, see if it is turned on and off. PART NAMES AND FUNCTIONS Exterior 1 (AR-F15) 1 Saddle stitch finisher (AR-F16)*1 / Finisher (AR-F15)*1 (See page 3-2) 2 Punch module (AR-PN4A)*1 (See page 3-2) 3 Inserter (AR-CF2)*1 (See page 3-14) 4 Automatic document feeder (See page 4-2) This automatically feeds ...be fed from the bypass tray. 9 Power switch (See page 1-16) Turns the power on , check the main power switch to replace toner cartridge. 6 Operation panel 7 Center tray (See page 4-9) Finished sheets are peripheral devices. Approximately 500 sheets of two-sided originals can be...
...devices, see if it is turned on and off. PART NAMES AND FUNCTIONS Exterior 1 (AR-F15) 1 Saddle stitch finisher (AR-F16)*1 / Finisher (AR-F15)*1 (See page 3-2) 2 Punch module (AR-PN4A)*1 (See page 3-2) 3 Inserter (AR-CF2)*1 (See page 3-14) 4 Automatic document feeder (See page 4-2) This automatically feeds ...be fed from the bypass tray. 9 Power switch (See page 1-16) Turns the power on , check the main power switch to replace toner cartridge. 6 Operation panel 7 Center tray (See page 4-9) Finished sheets are peripheral devices. Approximately 500 sheets of two-sided originals can be...
AR-M550 | AR-M620 | AR-M700 Operation Manual
Page 20
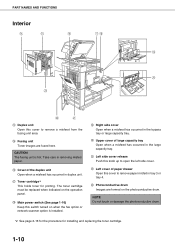
...AND FUNCTIONS Interior 14 Duplex unit Open this cover to remove paper misfed in tray 3 or tray 4. 23 Photoconductive drum Images are fused here. The toner cartridge must be replaced when indicated on the operation panel. 18 Main power switch (See page 1-16) Keep this cover to remove a misfeed from the... fusing unit area. 15 Fusing unit Toner images are formed on when the fax option or network scanner option is hot. NOTE Do not touch or damage the photoconductive drum. *2 See page...
...AND FUNCTIONS Interior 14 Duplex unit Open this cover to remove paper misfed in tray 3 or tray 4. 23 Photoconductive drum Images are fused here. The toner cartridge must be replaced when indicated on the operation panel. 18 Main power switch (See page 1-16) Keep this cover to remove a misfeed from the... fusing unit area. 15 Fusing unit Toner images are formed on when the fax option or network scanner option is hot. NOTE Do not touch or damage the photoconductive drum. *2 See page...

AR-M550 | AR-M620 | AR-M700 Operation Manual
Page 29
It also contains information about supplies. CHAPTER 2 MANAGING THE MACHINE This chapter explains how to load paper, replace the toner cartridge, and remove paper misfeeds. tray 2 2-2 G Loading paper in paper tray 3 2-3 G Changing the paper size in paper tray 3 2-3 G Changing the ... size when a special size is loaded 2-12 CUSTOM SETTINGS 2-13 G General procedure for custom settings 2-13 G About the settings 2-15 REPLACING THE TONER CARTRIDGES 2-16 STORAGE OF SUPPLIES 2-17 MISFEED REMOVAL 2-18 G Misfeed removal guidance 2-18 G Misfeed in the transport area, fusing area, and exit ...
It also contains information about supplies. CHAPTER 2 MANAGING THE MACHINE This chapter explains how to load paper, replace the toner cartridge, and remove paper misfeeds. tray 2 2-2 G Loading paper in paper tray 3 2-3 G Changing the paper size in paper tray 3 2-3 G Changing the ... size when a special size is loaded 2-12 CUSTOM SETTINGS 2-13 G General procedure for custom settings 2-13 G About the settings 2-15 REPLACING THE TONER CARTRIDGES 2-16 STORAGE OF SUPPLIES 2-17 MISFEED REMOVAL 2-18 G Misfeed removal guidance 2-18 G Misfeed in the transport area, fusing area, and exit ...
AR-M550 | AR-M620 | AR-M700 Operation Manual
Page 37
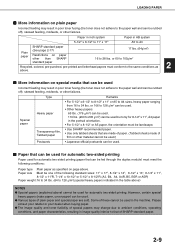
... heavy papers indicated in the table above) NOTES G Special papers (explained above . Some of SHARP standard paper. 2-9 LOADING PAPER I More information on plain paper Incorrect feeding may result in poor toner fusing (the toner does not adhere to the paper well and can be used in the machine. I Paper that... of these cannot be rubbed off ), skewed feeding, misfeeds, or other than SHARP 17 lbs. (64g/m2) 16 to 205 g/m2...
... heavy papers indicated in the table above) NOTES G Special papers (explained above . Some of SHARP standard paper. 2-9 LOADING PAPER I More information on plain paper Incorrect feeding may result in poor toner fusing (the toner does not adhere to the paper well and can be used in the machine. I Paper that... of these cannot be rubbed off ), skewed feeding, misfeeds, or other than SHARP 17 lbs. (64g/m2) 16 to 205 g/m2...
AR-M550 | AR-M620 | AR-M700 Operation Manual
Page 44
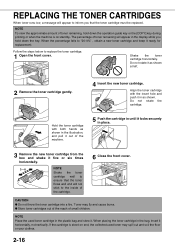
...To view the approximate amount of the cartridge. 6 Close the front cover. Hold the toner cartridge with the insert hole and push it . Shake the toner cartridge horizontally. The percentage of toner remaining will appear in as shown in the bag, insert it five or six times ...horizontally. Do not rotate the cartridge. When placing the toner cartridge in the illustration, and pull it out of small children. Align the toner cartridge with both hands as shown. REPLACING THE TONER CARTRIDGES When toner runs low, a message will appear to inform you hold down...
...To view the approximate amount of the cartridge. 6 Close the front cover. Hold the toner cartridge with the insert hole and push it . Shake the toner cartridge horizontally. The percentage of toner remaining will appear in as shown in the bag, insert it five or six times ...horizontally. Do not rotate the cartridge. When placing the toner cartridge in the illustration, and pull it out of small children. Align the toner cartridge with both hands as shown. REPLACING THE TONER CARTRIDGES When toner runs low, a message will appear to inform you hold down...
AR-M550 | AR-M620 | AR-M700 Operation Manual
Page 45
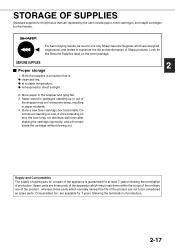
... in the wrapper and lying flat. 3. STORAGE OF SUPPLIES Standard supplies for this product that is guaranteed for 7 years following the termination of Sharp products. GENUINE SUPPLIES 2 I Proper storage 1. Spare parts are available for at a stable temperature, G not exposed to direct sunlight. 2. ... : G clean and dry, G at least 7 years following the termination of the product - Look for the finisher. Store a new toner cartridge box horizontally. Consumables too, are those parts which normally exceed the life of the product are not to be sure to maximize the...
... in the wrapper and lying flat. 3. STORAGE OF SUPPLIES Standard supplies for this product that is guaranteed for 7 years following the termination of Sharp products. GENUINE SUPPLIES 2 I Proper storage 1. Spare parts are available for at a stable temperature, G not exposed to direct sunlight. 2. ... : G clean and dry, G at least 7 years following the termination of the product - Look for the finisher. Store a new toner cartridge box horizontally. Consumables too, are those parts which normally exceed the life of the product are not to be sure to maximize the...
AR-M550 | AR-M620 | AR-M700 Operation Manual
Page 54
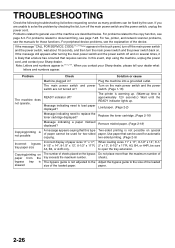
... power switch and the power switch, wait about 10 seconds, and then turn the main power switch and the power switch back on. Replace the toner cartridge. (Page 2-16) Message indicating a paper misfeed displayed? When loading sizes 11" x 17", 8-1/2" x 14", 8-1/ 2" x 13", 8-1/2" x 11"R, A3, B4, or A4R, be sure...the main power switch and the power switch, unplug the power cord. When you are not turned on? If you contact your Sharp dealer, please tell your Sharp dealer. For problems related to the copy function, see the manuals for those functions. The main power switch and power Turn ...
... power switch and the power switch, wait about 10 seconds, and then turn the main power switch and the power switch back on. Replace the toner cartridge. (Page 2-16) Message indicating a paper misfeed displayed? When loading sizes 11" x 17", 8-1/2" x 14", 8-1/ 2" x 13", 8-1/2" x 11"R, A3, B4, or A4R, be sure...the main power switch and the power switch, unplug the power cord. When you are not turned on? If you contact your Sharp dealer, please tell your Sharp dealer. For problems related to the copy function, see the manuals for those functions. The main power switch and power Turn ...

AR-M550 | AR-M620 | AR-M700 Operation Manual
Page 126
... IMAGE] key in the special modes screen (3rd screen). The [MIRROR IMAGE] ECIAL MODES MIRROR IMAGE B/W REVERSE key will appear in the copy to reduce toner consumption. If the document glass is being used, see pages 4-11 through 413. B/W reverse Black and white are reversed in the upper left of... toner) can be highlighted to indicate that the function is turned on, and the mirror image icon ( ) will be printed with black/white reverse to create a...
... IMAGE] key in the special modes screen (3rd screen). The [MIRROR IMAGE] ECIAL MODES MIRROR IMAGE B/W REVERSE key will appear in the copy to reduce toner consumption. If the document glass is being used, see pages 4-11 through 413. B/W reverse Black and white are reversed in the upper left of... toner) can be highlighted to indicate that the function is turned on, and the mirror image icon ( ) will be printed with black/white reverse to create a...
AR-M550 | AR-M620 | AR-M700 Operation Manual
Page 168
...size 2-10 to 2-12 Setting the paper type 2-10 to 2-11 Sharing 7-3 Sort 1-3, 3-4, 4-9 [SORT] key 3-6 Special modes (Copier operation 5-2 Special modes (Document filing function 7-12 Special paper 2-8 to 2-9 Special papers 4-20 Specifications 8-2 to 8-3 -Finisher/saddle stitch ... 2-8 to 2-9, 2-17, 3-15, 4-20, 5-11, 5-26 Tandem copy 1-5, 5-2, 5-9 Text 4-14 Text/photo 4-14 The machine does not operate 2-26, 6-3 Toner cartridge 1-10, 2-16 Top cover 3-2 Total count 2-15 Total number of originals 4-2 Touch panel 1-12, 1-13, 7-4, 7-5 Transparency film......... 2-4, 2-8, 2-9, 2-17, ...
...size 2-10 to 2-12 Setting the paper type 2-10 to 2-11 Sharing 7-3 Sort 1-3, 3-4, 4-9 [SORT] key 3-6 Special modes (Copier operation 5-2 Special modes (Document filing function 7-12 Special paper 2-8 to 2-9 Special papers 4-20 Specifications 8-2 to 8-3 -Finisher/saddle stitch ... 2-8 to 2-9, 2-17, 3-15, 4-20, 5-11, 5-26 Tandem copy 1-5, 5-2, 5-9 Text 4-14 Text/photo 4-14 The machine does not operate 2-26, 6-3 Toner cartridge 1-10, 2-16 Top cover 3-2 Total count 2-15 Total number of originals 4-2 Touch panel 1-12, 1-13, 7-4, 7-5 Transparency film......... 2-4, 2-8, 2-9, 2-17, ...

Installation Manual
Page 2
...Floor strength 5 Direct rays of the specified frequency ±2%. Bringing space For installation of the specified voltage ±10%. If not, toner concentration control is outside the specified range, use ) conditions Before installing the machine, check that the door size is also available. If... the temperature and humidity exceeds the specified range, the machine may be installed horizontally. [1] AR-M550/M620/M700 UNPACKING AND INSTALLATION 1. If power waveform is deformed, a trouble may also cause safety problems. Therefore, be within...
...Floor strength 5 Direct rays of the specified frequency ±2%. Bringing space For installation of the specified voltage ±10%. If not, toner concentration control is outside the specified range, use ) conditions Before installing the machine, check that the door size is also available. If... the temperature and humidity exceeds the specified range, the machine may be installed horizontally. [1] AR-M550/M620/M700 UNPACKING AND INSTALLATION 1. If power waveform is deformed, a trouble may also cause safety problems. Therefore, be within...
Installation Manual
Page 7
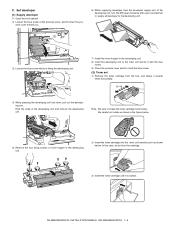
... developing unit. 2) Insert the toner cartridge into the main unit insertion port as shown below. AR-M550/M620/M700 INSTALLATION MANUAL (AR-M550/M620/M700) 1 - 6 In this case, do not turn the MG gear clockwise with the blue screw. (2) Toner set 1) Remove the toner cartridge from the developer supply port... fixing screws of the process cover, and tilt down the pro- Hold the strap of the developing unit, turn the cartridge. 3) Insert the toner cartridge until it with a plus screwdriver to supply all developer to the developing unit. 1 2 3) Loosen the blue screw which is locked. ...
... developing unit. 2) Insert the toner cartridge into the main unit insertion port as shown below. AR-M550/M620/M700 INSTALLATION MANUAL (AR-M550/M620/M700) 1 - 6 In this case, do not turn the MG gear clockwise with the blue screw. (2) Toner set 1) Remove the toner cartridge from the developer supply port... fixing screws of the process cover, and tilt down the pro- Hold the strap of the developing unit, turn the cartridge. 3) Insert the toner cartridge until it with a plus screwdriver to supply all developer to the developing unit. 1 2 3) Loosen the blue screw which is locked. ...

Installation Manual
Page 8
... paper guide to the original position. 3) Supply paper to the tray 2 similarly. Toner supply operation to increase the toner concentration level by 0.5% after normal completion of paper set (stored) as the reference toner density control value. 2 Note: The 70-sheet machine (AR-M700N/U) performs resetting after completion of fusing is within 2 min, the machine...
... paper guide to the original position. 3) Supply paper to the tray 2 similarly. Toner supply operation to increase the toner concentration level by 0.5% after normal completion of paper set (stored) as the reference toner density control value. 2 Note: The 70-sheet machine (AR-M700N/U) performs resetting after completion of fusing is within 2 min, the machine...
Installation Manual
Page 13
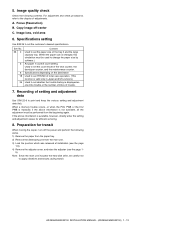
A. Preparation for efficient servicing. 8. AR-M550/M620/M700 INSTALLATION MANUAL (AR-M550/M620/M700) 1 - 12 Focus (Resolution) B. For adjustment and check procedures, refer to apply vibrations and shocks during transit. Note: Since the main ...paper size by software.) A3 paper 1 count/2 count setting Used to set the count mode of toner save operation. (This function is available, however, directly enter the setting and adjustment values for transit When moving the copier, turn off -center C. Image quality check Check the following works. 1) Remove the paper from...
A. Preparation for efficient servicing. 8. AR-M550/M620/M700 INSTALLATION MANUAL (AR-M550/M620/M700) 1 - 12 Focus (Resolution) B. For adjustment and check procedures, refer to apply vibrations and shocks during transit. Note: Since the main ...paper size by software.) A3 paper 1 count/2 count setting Used to set the count mode of toner save operation. (This function is available, however, directly enter the setting and adjustment values for transit When moving the copier, turn off -center C. Image quality check Check the following works. 1) Remove the paper from...


